


16
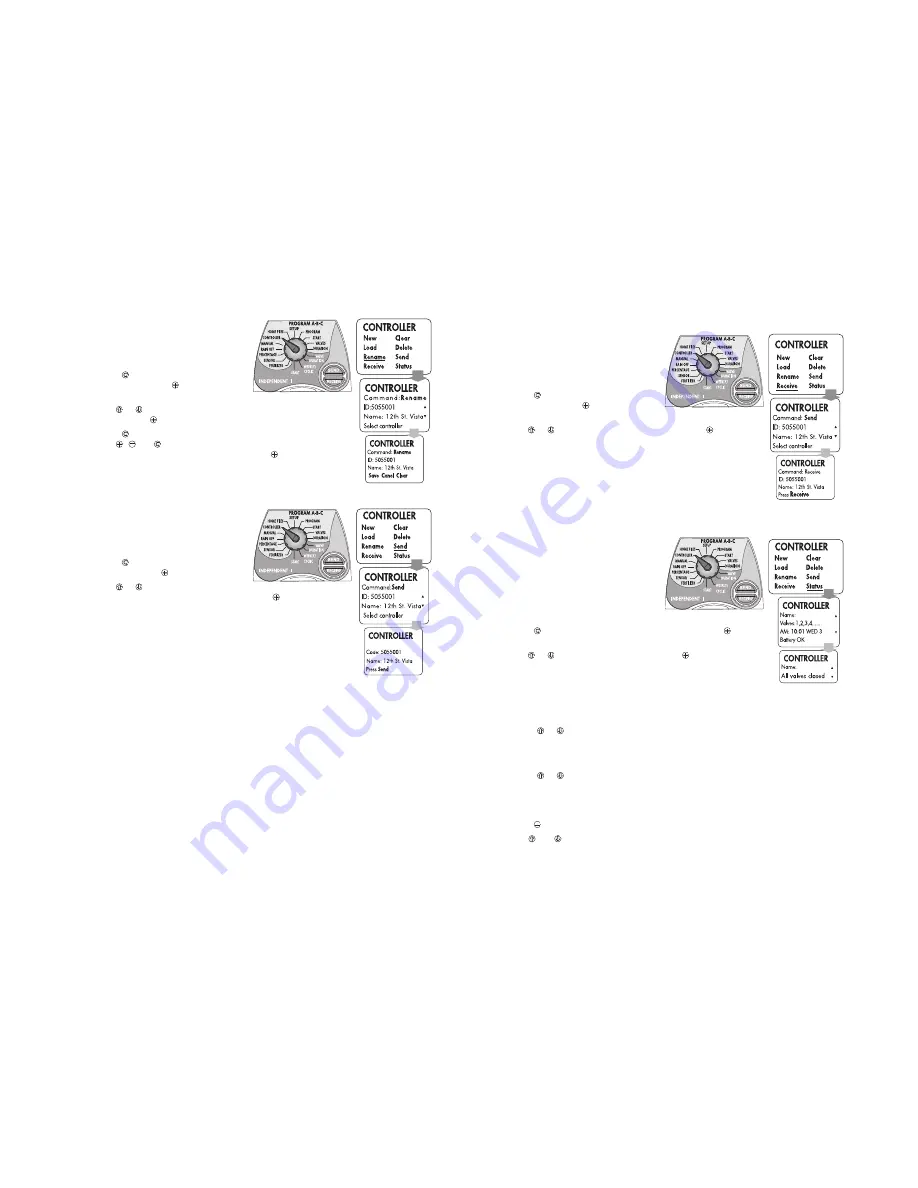
12.6 RENAME CONTROLLER
Used to change the name of a controller.
Turn the selector to CONTROLLER
position
Press
until the cursor appears below the
word Rename. Press
, the screen changes.
The command: Rename
Use
or
to select the ID and name of the controller you wish to
change. Press
, the screen changes. Select a controller.
Press
. The cursor appears below the first letter of the controller's name.
Use
,
and
to give a new name to the controller. Once you enter the
new name, move the cursor below Save and press
. The name change
has been performed.
12.7 SEND PROGRAM FROM REMOTE TO THE CONTROLLER
Used to send the program from the remote to
the controller.
Turn the selector to CONTROLLER
position
Press
until the cursor appears below the
word Send. Press
, the screen changes.
Use
or
to select the controller to which
you wish to send the program (ID and name). Press
, the screen changes.
The controller's ID and name are displayed. Press on SEND and wait for the
confirmation that the loading succeeded.
NOTE the progress of the command input by the transmission bar at
the bottom of the screen. If the communication fails, improve your
position in relation to the controller and repeat the command
The program received by the controller is also saved in the remote's
memory (up to 50 controllers).
17
12.8 RECEIVE PROGRAM FROM CONTROLLER
Used to read the existing program from the
controller in the field, in order to review or
make changes.
Turn the selector to CONTROLLER
position
Press
until the cursor appears below the
word Receive. Press
, the screen changes.
The command is Receive.
Use
or
to select the controller's ID and name. Press
, the screen
changes. Press on RECEIVE and wait for the confirmation that the reading
succeeded.
NOTE the progress of the command input by the progress of the
transmission bar at the bottom of the screen. If the communication
fails, improve your position in relation to the controller and repeat the
command. Maintain the correct distance from the controller.
You can now read the program that resides in the controller on the screen of the Remote.
12.9 STATUS CHECK OF CONTROLLER IN FIELD
Used to check the status of the controller in
the field from the remote. You can receive the
following data: number of valves in the
controller, current day and time, battery
condition, open valve, Rain Off activated and
Sensor status.
Turn the selector to CONTROLLER
position
Press
until the cursor appears below the word Status. Press
, the
screen changes.
Use
or
to select the desired controller. Press
, the screen changes.
Verify that this is the controller you wish to check. Press RECEIVE and wait
until you receive data from the controller.
The first screen displays:
a. Controller model – number of valves
b. Updated time and day
c. Condition of the battery
Use
or
to move to another screen
The second screen displays:
a. Open program or valve
b. Remaining time for open valves
Use
or
to move to another screen
The third screen displays:
a. Status of sensor – wet or dry
b. If the Rain Off is activated
Press
to return to the main screen.
Use
and
to move among screens.