Dexter Laundry 450ETC1-18030.1 Скачать руководство пользователя страница 87

FR

ES

PT

IT

EL

PL

UA

RO

EN

87

5. 

PRZED URUCHOMIENIEM UR

ZĄDZENI

A


Urz

ą

dzenie powinno by

ć

 ustawione na równej, stabilnej powierzchni tzn. musi 

być

 pewnie przyk

cone do 

stołu

 roboczego, do dostarczonej ramy lub w podobny sposób. Przed ustawieniem maszyny nale

ży


wybr


stabil

 powierzchni

ę,

 woln

ą

 od przeszkód (poza mate

riała

mi przeznaczonymi do ci

ęci

a) i odpowiednio 

oświet

lon

ą


Przed 

włąc

zeniem urz

ą

dzenia nale

ży

 zamontowa

ć

 wszystkie 

osł

ony i urz

ą

dzenia zabezpieczaj

ąc

e. 


Tarcza tn

ąca

 musi 

ynnie si

ę

 obraca

ć


Przed po

dłą

czeniem urz

ą

dzenia do zasilania sprawd

zić,

 czy napi

ęcie

 podane na tabliczce znamionowej jest 

takie samo jak napi

ęci

e w sieci elektrycznej


Podczas pracy zawsze sta

ć z

 przodu maszyny (blisko uchwytu transportowego).

6.

MONTA

Ż

OSTRZE

Ż

ENIE! 

Przed monta

ż

em, regulacj

ą

 i wymian

ą

 pi

ł

y tarczowej 

nale

ż

y wyci

ągnąć

 wtyczk

ę

 z gniazdka sieciowego.

MONTA

Ż

 TARCZY TN

Ą

CEJ

Podni

eść

przyk

ła

dnic

ę

 piono

 45° o ok. 45° i wyj

ąć

 j

ą.

Poluzo

wać


ś

ruby krzy

ż

akowe 

ś

rubok

tem krzy

ż

akowym (nie ma w zestawie) i 

zdjąć

 doln

ą

 os

ł

on

ę


ochron

 Przymocowa

ć

klucz prosty do nak

rętk

i sze

ścio

k

ąt

nej. 

U

żyć

 klucza 

towego do zablokowania wa

ł

u silnika.

Poluzo

wać

 nak

t

 sz

eśc

iok

ą

tn

ą

 kluczem prostym w kierunku przeciwnym do ruchu wskazówek zegara.

Zdj

ąć 

nakr

ęt

k

ę

 sz

eści

o

t

 i ko

łn

ierz zewn

ęt

rzny.

Z

o

żyć

 now

ą

 tarcz

ę

 t

c

ą

 na ko

łni

erzu wewn

ęt

rznym pami

ę

t

ając

 aby strz

ałki

 na tarczy t

cej skierowane

były

  w kierunku przeciwnym do ruchu wskazówek zegara.

Zamocowa

ć

 ko

ł

nierz zewn

ęt

rzny.

Przykr

ęcić

 nak

t

 sz

eśc

iok

ą

tn

ą

 do wa

ł

u silnika zgodnie z ruchem wskazówek zegara.

P

rzyłoż

y

ć

 klucz prosty do sz

eśc

i

oką

tnej nakr

ę

tki.

U

żyć

 klucza 

towego do zablokowania wa

ł

u silnika.

Dokr

ęcić

 sz

eśc

i

oką

tn

ą

 nakr

ę

tk

ę

 zgodnie z ruchem wskazówek zegara przy pomo

 klucza prostego.

Zamontowa

ć

 doln

ą


osł

o

 ochronn

ą

 i dokr

ęcić


ś

ruby kr

zyż

akowe.

Z

o

żyć

 przy

kła

dnic

ę

 piono

 45°.

Wa

ż

ne:

Starannie dobr

 tarcz

ę

 t

c

ą

 odpowiedni

ą

 dla obrabianego przedmiotu. Nie wolno 

uży

w


odksz

tał

conych, 

k

nię

tych lub t

ę

pych tarcz tn

ący

ch. No

sić


kawice ochronne. Akcesoria tarczy t

cej

stosowane z tym narz

ędz

iem, musz

ą

 b

 zgodny z tarc

 tn

ą

c

ą

 dostarczo

 razem z urz

ą

dzeniem pod 

wzgl

ę

dem technicznym i jako

ścio

wym. Porówna

ć

 dane techniczne z danymi zawartymi w niniejszej instrukcji 

obsł

ugi. Zwr

ócić

 szczegól

 uwag

ę

 na nominal

 pr

ęd

k

ość

 obrotow

ą

 i wymiary. 

Uży

wa

ć

wy

łą

cznie tarcz 

tnąc

ych, których najw

yżs

za dopuszczalna pr

ę

dko

ść

 obrotowa (obr/min) nie jest 

niżs

za ni

ż

 maksymalna 

pr

ę

dko

ść

 wa

ł

u (obr/min) przecinarki do 

płyte

k i ci

ę

tego materi

ału.

 Nale

ży

 równie

ż

 przestrzeg

 zalec


producenta akcesoriów. Podczas mont

ażu

 tarczy t

cej nale

ż

y upew

nić

 si

ę,


ż

e szeroko

ść


cięc

ia jest nie 

mniejsza, a grubo

ść

 tarczy tn

ą

cej nie wi

ększ

niż

 grub

ość

 metalowego wspornika.
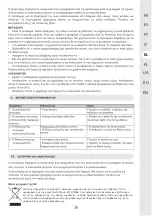
 

Uwaga:

 Zalecenie dla operatora, aby nosi

ł

 ochronniki 

uchu. 

Deklarowana wartość emisji hałasu została zmierzona zgodnie ze standardowym testem metody i mogą być

wykorzystywane do porównywania jednego narzędzia z drugim;

Deklarowana wartość emisji hałasu może również być wykorzystane we wstępnej ocenie narażenia.

Emisja hałasu podczas rzeczywistego użytkowania elektronarzędzia może różnić się od podanych wartości w

zależności od sposobu użytkowania narzędzia.

Musisz określić środki bezpieczeństwa w celu ochrony operatora, które są oparte na oszacowaniu narażenia w

rzeczywistych warunkach użytkowania (biorąc pod uwagę wszystkie elementy cyklu operacyjnego, takie jak,

gdy narzędzie jest wyłączone lub nieaktywne, oprócz czasu aktywacji) .
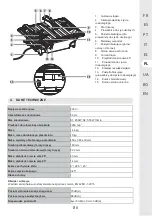
Urz

ą

dzenie przeznaczone jest do pracy w trybie S1 (praca ci

ągła

) z moc

ą

 450W oraz w trybie S2 (praca

krótkotr

wał

a) z mo

 550W. Tryb S2 oznacza, 

ż

e urz

ą

dzenie mo

że

 pracow

 nieprzerwanie przez okres

maksymalnie 10 minut przy obci

ąż

eniu nominalnym, po up

ły

wie tego czasu nal

eży wyłą

czy

ć

 urz

ą

dzenie i

pozostawi

ć

 je do 

cał

kowitego ostygni

ę

cia. Po tym okresie czasu mo

ż

na go u

ży

w

 ponownie przez

maksymalnie 10 minut.    

Содержание 450ETC1-18030.1

Страница 1: ...Legali e di Sicurezza Instructions Manual Legal Safety Instructions 2021 11 V01 EN TILE CUTTER 450ETC1 18030 1 FR ES PT IT EL PL UA RO EN FRTraductiondesinstructionsoriginalesESTraducci ndelasInstruc...

Страница 2: ......

Страница 3: ...u n i c a l a t s n i satisfacci n Si necesita alguna ayuda el personal de la tienda estar a su disposici n para guiarle o a z i l i t u o a l a t s n i e d l a u n a m o r e l a o l o m a h l e s n o...

Страница 4: ...4 4 A F C B E D G I H...

Страница 5: ...l ne peut plus tre utilis veuillez l apporter au centre de recyclage des d chets IMPORTANT LIRE ET CONSERVER POUR R F RENCE ULT RIEURE 1 UTILISATION PR VUE POUR LE COUPE CARREAUX 2 CONSIGNES DE S CURI...

Страница 6: ...le secteur avec cordon d alimentation ou votre outil lectrique fonctionnant sur batterie sans cordon d alimentation 1 S curit de la zone de travail a Conserver la zone de travail propre et bien clair...

Страница 7: ...dus aux poussi res h Rester vigilant et ne pas n gliger les principes de s curit de l outil sous pr texte que vous avez l habitude de l utiliser Une fraction de seconde d inattention peut provoquer un...

Страница 8: ...i ces coup es si la machine est en marche Risque de coupures Les pi ces coup es peuvent avoir des bords coupants Attention vous pouvez vous couper D branchez la machine si vous la laissez sans surveil...

Страница 9: ...e transport Si possible conservez l emballage jusqu la fin de la p riode de garantie Pour le d tail des l ments fournis veuillez consulter les Instructions de montage fournies ATTENTION Lisez toutes l...

Страница 10: ...ge nominale une fois cette p riode coul e vous devez teindre l appareil et le laisser refroidir compl tement Ensuite vous pourrez nouveau l utiliser pendant 10 minutes maximum 4 DONN ES TECHNIQUES Ten...

Страница 11: ...es techniques et qualitatives Comparez les informations techniques avec les donn es de ce manuel d utilisation Faites particuli rement attention la vitesse de rotation nominale et aux dimensions N uti...

Страница 12: ...ndelle plate sur le boulon avant le bouton de blocage du letage et serrer le bouton de blocage Assurez vous que la protection sup rieure peut bouger librement et qu elle ne peut pas toucher le disque...

Страница 13: ...elque mani re que ce soit Pour mettre en marche appuyez sur le 1 de l interrupteur marche arr t Avant de commencer couper attendez que la roue de coupe ait atteint sa vitesse maximale et attendez que...

Страница 14: ...l interrupteur marche arr t en position de marche Laissez le disque de coupe atteindre sa vitesse maximale et attendez que le disque de coupe soit humide avant de d placer le mat riau dans le disque d...

Страница 15: ...ts de d p ts R PARATION Les dommages doivent tre r par s uniquement par des experts quali s L quipement est fourni dans un emballage pour viter qu il ne soit endommag pendant le transport Les mati res...

Страница 16: ...orrectement limin s il ne veut plus le garder Les anciens quipements peuvent tre retourn s un point de collecte appropri qui les liminera conform ment aux r glementations nationales en mati re de recy...

Страница 17: ...FR ES PT IT EL PL UA RO EN 17 79 11 VUE D TAILL E...

Страница 18: ...4 Vis M4x8 Bouton B Rondelle large 6 Cliquet d appui Ressort de compression Non QT Description 41 42 43 44 45 46 47 48 49 50 51 52 53 54 55 56 57 58 59 60 61 62 63 64 65 66 67 68 69 70 71 72 73 74 75...

Страница 19: ...e circuit de protection et les moteurs en cas d usure 5 Votre r clamation de garantie ne peut tre trait e que si Une preuve de la date d achat peut tre fournie sous la forme d un ticket ou facture Auc...

Страница 20: ...13 GARANT A Lea el manual de usuario Lea el manual de usuario Atenci n Lleve protecci n auditiva Lleve protecci n de manos Lleve protecci n visual Lleve mascarilla Cuidado riesgo de sufrir cortes No s...

Страница 21: ...o una herida grave Conservar todas las advertencias e instrucciones para referencia ulterior El t rmino herramienta el ctrica en las advertencias hace referencia a la herramienta el ctrica conectada...

Страница 22: ...instalaciones de recogida asegurarse de que est n conectados y utilizados correctamente Utilizar dichos dispositivos puede reducir los riesgos ligados al polvo h Mant ngase alerta y no descuide los p...

Страница 23: ...n el disco mientras se est cortando S lo retire las piezas cortadas o que se hayan podido atascar cuando la m quina est desenchufada el motor apagado y la herramienta completamente parada Limpie la su...

Страница 24: ...s las piezas Inspeccione el equipo y los accesorios para asegurarse de que no han sufrido da os durante el transporte Si puede conserve el embalaje hasta que venza el periodo de garant a ATENCI N El e...

Страница 25: ...I Nivel de presi n de sonido LpA 75 dB A Nivel de potencia de sonido LwA 88 dB A Incertidumbre K KpA 3 dB A KWA 3 dB A Mientras la usa col quese siempre de pie enfrente de la m quina cerca del asa de...

Страница 26: ...grietados no deber n usarse P ngase guantes de protecci n Los accesorios del disco de corte que se usen en la m quina deber n ser compatibles con las caracter sticas t cnicas o cualitativas fijadas Co...

Страница 27: ...el soporte met lico con pernos hexagonales Ponga una arandela en el perno antes de colocar la rosca de la perilla de bloqueo y f jela bien Aseg rese de que el protector superior puede moverse libreme...

Страница 28: ...mpezar Aseg rese de que no hay defectos visibles Aseg rese de que no hay nada en la zona de trabajo que impida que ste se realice Aseg rese de que hay suficiente agua de refrigeraci n Aseg rese de que...

Страница 29: ...rte paralelo Fije la gu a de corte paralelo al ancho deseado y apriete la perilla de bloqueo hasta bloquearla Ajuste la gu a de corte a inglete al ngulo deseado usando una escala angular y apriete con...

Страница 30: ...tire Ajuste el soporte met lico para que est alineado con el disco de corte Fije el soporte met lico y compruebe que est bien alineado con el disco de corte LIMPIEZA Despu s de usarla permita siempre...

Страница 31: ...a ses de la UE No se deshaga nunca de herramientas el ctricas tir ndolas junto con sus desechos dom sticos Para cumplir con la Directiva Europea 2012 19 UE sobre residuos el ctricos y equipos electr n...

Страница 32: ...32 FR ES PT IT EL PL UA RO EN VISTA ESPLOSA ED ELENCO DEI PEZZI DI RICAMBIO 11 79...

Страница 33: ...erilla B Arandela lager 6 Presionar el trinquete Resorte de compensaci n N Cantidad Nombre de la pieza 41 42 43 44 45 46 47 48 49 50 51 52 53 54 55 56 57 58 59 60 61 62 63 64 65 66 67 68 69 70 71 72 7...

Страница 34: ...los conmutadores disyuntores y motores en caso de desgaste 5 Su petici n de garant a puede ser tratada s lo si Se puede presentar la prueba de la fecha de compra en forma de un recibo Terceros no efec...

Страница 35: ...E AS 13 GARANTIA Leia o manual do utilizador Leia o manual do utilizador Aviso Usar uma prote o auricular Usar uma prote o para as m os Usar uma prote o para os olhos Usar uma m scara protetora Cuidad...

Страница 36: ...nto de todas as instru es enumeradas abaixo pode resultar em eletrocuss o inc ndio e ou ferimentos graves Guarde todos os avisos e instru es para refer ncia futura O termo ferramenta el trica nos avis...

Страница 37: ...s m veis g Se forem fornecidos dispositivos para a conex o de equipamentos para extra o e coleta de p certifique se de que estejam conectados e sejam utilizados corretamente O uso de coletores de poei...

Страница 38: ...Certifique se de que a pe a de trabalho n o pode escorregar ou ficar presa no disco de corte enquanto est a ser cortada Retire as pe as de trabalho cortadas e bloqueadas unicamente quando a ficha esti...

Страница 39: ...de com os regulamentos de seguran a Abra a embalagem e retire o equipamento com cuidado Retire o material de embalagem e qualquer embalagem e ou suportes de transporte se houver Verifique se todos os...

Страница 40: ...ofundidade m x de corte para um corte de 90 30 mm Profundidade m x de corte para um corte de 45 14 mm Faixa de inclina o da mesa 0 22 5 45 Gama cortador de esquadria 0 45 Classe de prote o I N vel de...

Страница 41: ...acess rios do disco de corte utilizados nesta m quina devem ser compat veis com o disco de corte entregue na compra no que diz respeito s caracter sticas t cnicas e qualitativas Compare as informa es...

Страница 42: ...do atrav s da prote o de prote o superior e do suporte de metal Coloque uma anilha plana no parafuso antes do bot o de bloqueio da rosca e aperte o bot o de bloqueio Certifique se de que a guarda de p...

Страница 43: ...ho que possa dificultar o trabalho a ser executado Certifique se de que h gua de arrefecimento suficiente Certifique se de que a prote o est montada corretamente Certifique se de que ningu m al m do u...

Страница 44: ...desejada e aperte o bot o de bloqueio para prend la no lugar Ajuste a guia de esquadria para o ngulo desejado servindo se da escala angular e aperte firmemente com o bot o de bloqueio Certifique se de...

Страница 45: ...e Ajuste o suporte de metal para que fique alinhado com o disco de corte Fixe o suporte de metal e verifique novamente se est alinhado com o disco de corte LIMPEZA Deixe sempre o aparelho esfriar ap s...

Страница 46: ...dades locais Apenas para pa ses da UE Nunca elimine nenhuma ferramenta el trica com o lixo dom stico Para cumprir a Diretiva Europeia 2012 19 UE sobre res duos de equipamentos el tricos e eletr nicos...

Страница 47: ...47 FR ES PT IT EL PL UA RO EN PERSPETIVA EXPLODIDA E LISTA DE PE AS SOBRESSALENTES 11 79...

Страница 48: ...ss o 4 Parafuso M4X8 Bot o B Anilha Lager 6 Catraca de press o Mola de compress o N QDE Descri o 41 42 43 44 45 46 47 48 49 50 51 52 53 54 55 56 57 58 59 60 61 62 63 64 65 66 67 68 69 70 71 72 73 74 7...

Страница 49: ...ores no caso de desgaste 5 A sua reclama o relativamente garantia s pode ser processada se A prova da data de compra puder ser fornecida sob a forma de um recibo ou fatura Nenhuma repara o e ou substi...

Страница 50: ...A Leggere il manuale per l operatore Leggere il manuale per l operatore Avvertenza Indossare protezioni uditive Indossare protezioni per le mani Indossare protezioni per gli occhi Indossare una masche...

Страница 51: ...lle avvertenze si riferisce al vostro elettroutensile con filo o a batteria cordless 1 Sicurezza dell area di lavoro a Mantenere l area di lavoro pulita e ben illuminata Aree ingombrate o buie sono pr...

Страница 52: ...do per cui stato progettato b Non utilizzare l utensile elettrico se l interruttore non si accende e non si spegne Qualsiasi utensile elettrico che non possa essere controllato con l interruttore peri...

Страница 53: ...alimentazione deve sempre essere effettuata dal fabbricante o dalla ditta incaricata dell assistenza tecnica Tenere l acqua lontano dai componenti elettrici dell utensile e dalle persone nella zona di...

Страница 54: ...cattoli Non lasciare che i bambini giochino con sacchetti di plastica fogli di plastica e piccoli pezzi C il rischio di strozzamento e soffocamento 1 Piede di gomma 2 Scala della guida di taglio paral...

Страница 55: ...in seguito riutilizzato per un massimo di 10 minuti Nota si raccomanda all operatore di indossare una protezione per l udito 5 PRIMA DI AVVIARE IL PRODOTTO La macchina deve essere montata in modo che...

Страница 56: ...macchina devono essere compatibili con il disco fornito per quanto riguarda le loro caratteristiche tecniche e qualitative Confrontare le informazioni tecniche con i dati in questo manuale dell utente...

Страница 57: ...piatta sul bullone prima della manopola di bloccaggio della filettatura e stringere la manopola di bloccaggio Assicurarsi che la protezione superiore possa muoversi liberamente e che non possa toccare...

Страница 58: ...terruttore on off Prima di iniziare a tagliare attendere che la ruota da taglio abbia raggiunto la massima velocit e attendere che il disco si bagni Per spegnere premere il tasto 0 sull interruttore o...

Страница 59: ...teriale Tenere saldamente il materiale contro la guida di taglio mitre e far scorrere la guida mitre lungo la guida di taglio parallela Inserire il materiale nel disco da taglio Quando il taglio viene...

Страница 60: ...dui ostinati Non usare detergenti o solventi aggressivi Questi potrebbero avere un impatto negativo sui pezzi di plastica e metallo dell utensile Tenere le aperture di areazione del motore sgombre di...

Страница 61: ...e alla sua implementazione nelle legislazioni nazionali i vecchi utensili elettrici devono essere separati dagli altri rifiuti e smaltiti in modo rispettoso dell ambiente ad esempio portandoli in un...

Страница 62: ...62 FR ES PT IT EL PL UA RO EN 11 VISTA ESPLOSA ED ELENCO DEI PEZZI DI RICAMBIO 79...

Страница 63: ...4 Bullone M4X8 Manopola B Rondella larga 6 Nottolino pressa Molla di compressione N QT Descrizione 41 42 43 44 45 46 47 48 49 50 51 52 53 54 55 56 57 58 59 60 61 62 63 64 65 66 67 68 69 70 71 72 73 7...

Страница 64: ...di usura 5 Il vostro ricorso alla garanzia pu essere trattato se possibile presentare una prova d acquisto sotto forma di ricevuta Nessuna riparazione e o sostituzione sia stata effettuata da terzi L...

Страница 65: ...65 FR ES PT IT EL PL UA RO EN 1 2 3 4 5 I Y 6 O 7 I 8 9 10 O Y 11 E H 12 13 Y...

Страница 66: ...66 FR ES PT IT EL PL UA RO EN 1 2 2 1 1 2...

Страница 67: ...67 FR ES PT IT EL PL UA RO EN RCD RCD 3 off 4 H...

Страница 68: ...68 FR ES PT IT EL PL UA RO EN 5 2 2...

Страница 69: ...69 FR ES PT IT EL PL UA RO EN 9 10 11 15 1 14 2 3 4 13 12 5 6 7 8...

Страница 70: ...RO EN 4 EN 62841 1 2015 LpA 75 dB A LWA 88 dB A K KpA 3 dB A KWA 3 dB A 5 230 V 50 Hz S1 450W S2 550W 10min 2950 min 1 14 4 kg 10 kg 450 x 380 x 30mm 180 mm 22 2 mm 90 30 mm 45 14 mm 0 22 5 45 0 45 I...

Страница 71: ...FR ES PT IT EL PL UA RO EN 71 6 45 45 rpm rpm...

Страница 72: ...72 FR ES PT IT EL PL UA RO EN 45 45...

Страница 73: ...73 FR ES PT IT EL PL UA RO EN 0 45 45 45 45 45 MIN 7 OFF 1 on off 0 on off 2 cm 90 90 on off on...

Страница 74: ...74 FR ES PT IT EL PL UA RO EN 45 45 on off on 90 on off on 22 5 45 45 45 45 22 5 45 45 on off on 45...

Страница 75: ...75 FR ES PT IT EL PL UA RO EN 45 0 45 8...

Страница 76: ...76 FR ES PT IT EL PL UA RO EN 2012 19 E...

Страница 77: ...77 FR ES PT IT EL PL UA RO EN...

Страница 78: ...78 FR ES PT IT EL PL UA RO EN 11 79...

Страница 79: ...1 1 1 1 1 1 1 1 1 1 1 1 1 1 1 1 4 4 1 1 1 5 1 1 3 1 1 ST4 2X13 4 M5X12 ST4 2X9 5 o ring 5 M5X135 4 4 4 M4X8 6 41 42 43 44 45 46 47 48 49 50 51 52 53 54 55 56 57 58 59 60 61 62 63 64 65 66 67 68 69 70...

Страница 80: ...80 FR ES PT IT EL PL UA RO EN 13 Y 1 Dexter DIY Dexter 36 Dexter 2 Dexter Dexter 3 4 5 6 7 Dexter Dexter Dexter Dexter Dexter 8 Dexter...

Страница 81: ...JA Przeczyta instrukcj obs ugi Przeczyta instrukcj obs ugi Ostrze enie Nale y nosi ochraniacze na uszy Nale y stosowa ochron r k Nale y stosowa ochron oczu Nosi mask ochronn Ostro nie ryzyko skaleczen...

Страница 82: ...ra enia cia a Zachowa wszystkie ostrze enia i instrukcje do wykorzystania w przysz o ci Termin elektronarz dzie w ostrze eniach odnosi si do elektronarz dzi zasilanych energi elektryczn z sieci z prze...

Страница 83: ...dnie ubranie Nie nale y nosi lu nego ubrania ani bi uterii W osy odzie i r kawice trzyma z dala od ruchomych cz ci Lu ne ubranie bi uteria lub d ugie w osy mog zosta wci gni te przez ruchome cz ci g J...

Страница 84: ...gim lub jeden na drugim Istnieje niebezpiecze stwo zakleszczenia I odbicia Upewni si e obrabiany element nie mo e ze lizgn si lub zakleszczy w tarczy tn cej podczas ci cia Przyci te i zakleszczone ele...

Страница 85: ...jscu do wykorzystania w przysz o ci Wszelkie modyfikacje kt re mog yby prowadzi do zmiany pierwotnych charakterystyk maszyny na przyk ad pr dko ci obrotowej lub maksymalnej rednicy pi y tarczowej mog...

Страница 86: ...ibracje Warto ci emisji ha asu zosta y zmierzone zgodnie z norm EN 62841 1 2015 Napi cie znamionowe 230 V Cz stotliwo znamionowa 50 Hz Moc znamionowa S1 450W S2 550W 10min Pr dko obrotowa bez obci eni...

Страница 87: ...w 45 Wa ne Starannie dobra tarcz tn c odpowiedni dla obrabianego przedmiotu Nie wolno u ywa odkszta conych p kni tych lub t pych tarcz tn cych Nosi r kawice ochronne Akcesoria tarczy tn cej stosowane...

Страница 88: ...e Upewni si e sze ciok tna nakr tka jest do ko ca dokr cona MONTA REGULACJA METALOWEGO WSPORNIKA Podnie przyk adnic pionow 45 o oko o 45 i wyj j Poluzowa ruby krzy akowe rubokr tem krzy akowym nie ma...

Страница 89: ...o ok 45 i wyj j Zlokalizowa otw r na spodzie zbiornika na wod Mocno wcisn korek w otw r zbiornika Za o y przyk adnic pionow 45 NAPE NIANIE ZBIORNIKA NA WOD Unie przyk adnic pionow 45 o ok 45 i wyj j M...

Страница 90: ...nim zaczniecie przesuwa obrabiany element w kierunku tarczy tn cej Mocno trzyma obrabiany przedmiot przy prowadnicy ci cia uko nego i przesuwa prowadnic ci cia uko nego wzd u prowadnicy ci cia r wnole...

Страница 91: ...na ziemi lub wok maszyny cieki nale y usuwa zgodnie z lokalnymi przepisami WYMIANA TARCZY TN CEJ Odczeka a urz dzenie ostygnie Wyj korek zbiornika wody i opr ni go Monta tarczy tn cej Zapozna si z czy...

Страница 92: ...w obr bie miejsca pracy lecz do innej lokalizacji np przy pomocy pojazdu lepiej jest zdemontowa urz dzenie i transportowa je w oryginalnym opakowaniu Ze wzgl d w praktycznych tarcze tn ce musz by zaw...

Страница 93: ...93 FR ES PT IT EL PL UA RO EN...

Страница 94: ...94 FR ES PT IT EL PL UA RO EN PERSPEKTYWICZNY WIDOK EKSPLODUJ CY LISTA CZ CIZAMIENNYCH 11 79...

Страница 95: ...odk adka spr ysta 4 ruba sworze M4X8 Pokr t o B Podk adka lager 6 Zapadka dociskowa Spr yna dociskowa Nr IL Opis 41 42 43 44 45 46 47 48 49 50 51 52 53 54 55 56 57 58 59 60 61 62 63 64 65 66 67 68 69...

Страница 96: ...cia prze cznik w wy cznik w obwod w ochronnych i silnik w 5 Roszczenia do gwarancji mog by dochodzone tylko w przypadku Potwierdzenia daty zakupu paragonem Nie dokonaniu naprawy lub wymiany cz ci prze...

Страница 97: ...97 FR ES PT IT EL PL UA RO EN 1 2 3 4 5 6 7 8 9 10 11 12 13...

Страница 98: ...98 FR ES PT IT EL PL UA RO EN 1 2 2 1 1 a b c 2 a b c d...

Страница 99: ...99 FR ES PT IT EL PL UA RO EN e f 3 a b c d e f g h 4 a b c d e...

Страница 100: ...100 FR ES PT IT EL PL UA RO EN f g h 5 a 2 2...

Страница 101: ...101 FR ES PT IT EL PL UA RO EN...

Страница 102: ...102 FR ES PT IT EL PL UA RO EN 9 10 11 15 1 14 2 3 4 13 12 5 6 7 8...

Страница 103: ...FR ES PT IT EL PL UA RO EN 103 4 EN 62841 1 2015 S1 450 S2 550 S2 10 10 5 230 50 S1 450 S2 550 10 2950 1 14 4 10 450 x 380 x 30 180 22 2 90 30 45 14 0 22 5 45 0 45 I LpA 75 A LWA 88 A K KpA 3 KWA 3...

Страница 104: ...104 FR ES PT IT EL PL UA RO EN 45 45 45 6...

Страница 105: ...105 FR ES PT IT EL PL UA RO EN 45 45 45...

Страница 106: ...106 FR ES PT IT EL PL UA RO EN 0 45 45 45 45 45 45 M 45 MIN 1 0 2 90 90 7...

Страница 107: ...107 FR ES PT IT EL PL UA RO EN 45 45 45 90 22 5 45 45 45 45 22 5 45 45 45 45 0...

Страница 108: ...108 FR ES PT IT EL PL UA RO EN 45 8...

Страница 109: ...FR ES PT IT EL PL UA RO EN...

Страница 110: ...110 FR ES PT IT EL PL UA RO EN...

Страница 111: ...111 FR ES PT IT EL PL UA RO EN 11 79...

Страница 112: ...3 1 8 1 1 1 1 1 1 1 1 1 1 1 1 1 1 1 1 1 1 1 4 4 1 1 1 5 1 1 3 1 1 ST4 2X13 4 M5x12 ST4 2X9 5 A B 5 M5X135 4 4 4 M4X8 B 6 41 42 43 44 45 46 47 48 49 50 51 52 53 54 55 56 57 58 59 60 61 62 63 64 65 66...

Страница 113: ...113 FR ES PT IT EL PL UA RO EN 13 1 Dexter Dexter 24 Dexter 2 Dexter Dexter 3 4 5 6 7 Dexter Dexter Dexter Dexter 8 Dexter...

Страница 114: ...clare a de eurilor IMPORTANT CITI I I P STRA I PENTRU CONSULTARE ULTERIOARA CUPRINS 1 UTILIZAREA PRECONIZAT A DISPOZITIVULUI DE T IAT PL CI CERAMICE 2 INSTRUC IUNI DE SIGURAN 3 DESCRIERE 4 DATE TEHNIC...

Страница 115: ...ablu 1 Siguran a n zona de lucru a Zona de lucru se va p stra curat i va fi bine iluminat Zonele n dezordine i ntunecoase favorizeaz producerea accidentelor b Nu utiliza i instrumente electrice n medi...

Страница 116: ...persoanelor str ine de instrumentul electric sau de instruc iunile acestea s foloseasc dispozitivul Instrumentele electrice sunt periculoase n m inile utilizatorilor neinstrui i e ntre ine i instrumen...

Страница 117: ...lectric n conformitate cu instruc iunile ntotdeauna vor exista riscuri reziduale Urm toarele riscuri pot ap rea ca urmare a proiect rii i construc iei acestui dispozitiv electric Afectarea s n t ii ca...

Страница 118: ...118 FR ES PT IT EL PL UA RO EN 9 10 11 15 1 14 2 3 4 13 12 5 6 7 8...

Страница 119: ...tivul trebuie s fie a ezat astfel nc t s stea ntr o pozi ie ferm adic trebuie s fie n urubat n siguran pe un banc de lucru pe cadrul de baz furnizat sau pe o suprafa asem n toare nainte de a instala d...

Страница 120: ...esoriile pentru discuri de t iere care sunt utilizate pe acest dispozitiv trebuie s fie compatibile cu discul de t iere din pachetul de livrare n ceea ce prive te caracteristicile tehnice i calitative...

Страница 121: ...o aib plat pe urub nainte de butonul de blocare a filetului i str nge i butonul de blocare Asigura i v c ap r toarea superioar se poate mi ca liber i c nu poate atinge discul de t iere atunci c nd est...

Страница 122: ...se constat c este deteriorat n vreun fel Pentru a porni ap sa i 1 pe comutatorul de pornire oprire nainte de a ncepe t ierea a tepta i p n c nd discul de t iere a atins viteza maxim i a tepta i ca di...

Страница 123: ...im i a tepta i ca discul de t iere s se umezeasc nainte de a muta materialul n discul de t iere ine i materialul ferm contra ghidajului de t iere n unghi i glisa i ghidajul de t iere n unghi de a lung...

Страница 124: ...solven i puternici Ace tia ar putea afecta n mod negativ componentele din plastic i metal ale dispozitivului Cur a i depunerile de pe deschiderile de aerisire ale motorului REPARAREA Dispozitivul treb...

Страница 125: ...FR ES PT IT EL PL UA RO EN...

Страница 126: ...126 FR ES PT IT EL PL UA RO EN VEDERE DETALIAT I LISTA PIESELOR DE SCHIMB 11 79...

Страница 127: ...are 4 aib elastic 4 Bol M4X8 Buton B aib mare 6 Clichet de presare Arc de compresie Nr CANT Descriere 41 42 43 44 45 46 47 48 49 50 51 52 53 54 55 56 57 58 59 60 61 62 63 64 65 66 67 68 69 70 71 72 73...

Страница 128: ...utatoare comutatoare de circuit protejat i motoare n cazul uzurii 5 Cererea dumneavoastr de utilizare a garan iei se poate procesa numai dac Se poate face dovada datei de achizi ie prin prezentarea ch...

Страница 129: ...le If it cannot be used anymore please take it to waste recycling centre IMPORTANT READ AND KEEP FOR FUTURE REFERENCE 1 INTENDED USE FOR THE TILE CUTTER 2 SAFETY INSTRUCTIONS 3 DESCRIPTION 4 TECHNICAL...

Страница 130: ...ture reference The term power tool in the warnings refers to your mains operated corded power tool or battery operated cordless power tool 1 Work area safety a Keep work area clean and well lit Clutte...

Страница 131: ...f tools allow you to become complacent and ignore tool safety principles A careless action can cause severe injury within a fraction of a second 4 Power tool use and care a Do not force the power tool...

Страница 132: ...reomove any cut parts if the machine is switched on Risk of cuts Cut workpieces can have sharp cutting edges Careful you may cut yourself Unplug the machine if you are leaving it unattended Only use c...

Страница 133: ...see if all the items are supplied Inspect the equipment and accessories for damage in transit If possible keep the packaging until the end of the guarantee period For detail items supplied please see...

Страница 134: ...rupted period of 10 minutes at most with a nominal load after this period of time has elapsed you must switch o the appliance and allow it to cool down completely Afterwards it can be used again for a...

Страница 135: ...he data in this user manual Take particular not of the nominal rotational speed and the dimensions Only use cutting discs whose highest permissible speed rpm is not lower than the maximum shaft speed...

Страница 136: ...guard and metal b before the thread locking knob and tighten the locking knob Ensure that upper protective guard can move freely and that it cannot touch the cutting disc when in use MOUNTING THE PARA...

Страница 137: ...press the 1 on the on off switch Before you begin cutting wait until the cutting wheel has reached maximum speed and wait for the cutting disc to get wet To switch off press the 0 on the on off switc...

Страница 138: ...ng on the saw Turn the on off switch to the on position Let the cutting disc build up to full speed and wait for the cutting disc to get wet before moving the material into the cutting disc Hold the m...

Страница 139: ...rsh cleaning agents or solvents These could Keep the motor s vent openings free of deposits REPAIR The equipment is supplied in packaging to prevent it from being damaged in transit The raw materials...

Страница 140: ...the equipment is properly disposed of if he no longer wants to keep the equipment Old equipment can be returned to a suitable collection point that will dispose of the equipment in accordance with na...

Страница 141: ...141 11 EXPLODED VIEW FR ES PT IT EL PL UA RO EN 79...

Страница 142: ...ar washer 4 Grounding block 4 Spring washer 4 Bolt M4x8 Knob B Lager washer 6 Press pawl Compess spring No QTY Description 41 42 43 44 45 46 47 48 49 50 51 52 53 54 55 56 57 58 59 60 61 62 63 64 65 66...

Страница 143: ...the warranty can only be processed if Proof of the purchase date can be provided in the form of a receipt No repairs and or replacements have been carried out by third parties The tool has not been s...

Страница 144: ...144...

Страница 145: ...145...

Страница 146: ...si n Liga o da alimenta o Messo sotto tensione W czenie zasilania Punere sub tensiune Power up Nettoyage Limpieza Limpeza Pulizia Czyszczenie Cur are Cleaning Sanssolvant Sindisolvente Semsolventes Se...

Страница 147: ...147 2 FR Montage ES Montaje PT Montagem IT Montaggio EL PL Monta UA i RO Montaj EN Assembly 1 1 2 x2 x2...

Страница 148: ...148 I I H H F FR Montage ES Montaje PT Montagem IT Montaggio EL PL Monta UA i RO Montaj EN Assembly F H I 4 3 1 2 x2 x2...

Страница 149: ...149 6 G G 5 1 2 3 4 3 x2 x2 x2 x2...

Страница 150: ...150 8 7 5 x2 x2...

Страница 151: ...10 151 1 2 2 D 3 D 9...

Страница 152: ...152 12 2 1 3 B C B C 11...

Страница 153: ...153 E FR Pr paration ES Preparaci n PT Prepara o IT Preparazione EL PL Przygotowanie UA i RO Pregatire EN Preparation E 2 1 2 3 1...

Страница 154: ...154 3 4 4...

Страница 155: ...155 1 2 FR Utilisation ES Utilizaci n PT Utiliza o IT Uso EL PL U ytkowanie UA RO Utilizare EN Use 1 OR 2...

Страница 156: ...156 4 1 3 2...

Страница 157: ...nvierno PT Prepara oparaoinverno IT Rimessaggio EL PL Przechowywanie UA RO P strarepeperioadaiernii EN Winterstorage FR Entretien ES Mantenimiento PT Manuten o IT Manutenzione EL PL Konserwacja UA RO...

Страница 158: ...to pu essere reciclato Se deve essere smaltitto portalo presso un centro de reciclaggio This product is recyclable If it cannot be used anymore please take it to waste recycling centre 050000 ADEO Ser...

Отзывы: