


139
WARNING!
As a matter of principle, for all work carried out on
the machine itselt (e.g. shipping, assembly, ref itting, cleaning
and mainternance work) the plug must be disconnected from the
socket. Disconnect the machine from the mains supply.
WARNING!
Do not injure yourself with the cutting disc. Wear
protective gloves.
8. MAINTENANCE
CUTTING DISC
Replace a dull, worn cutting disc promptly with a new, sharp one. Wear protective gloves.
THE METAL BRACKET
• If the metal bracket is no longer in alignment with the cutting disc, the metal bracket must be
adjusted.
• Loosen the cross-screws with the star-head screwdriver (not supplied) but do not remove them.
• Adjust the metal bracket so that it is aligned with the cutting disc.
• Secure the metal bracket and check again that it is aligned with the cutting disc.
CLEANING
• Always allow the appliance to cool down after use.
• Remove all of the water from the reservoir.
• Clean the machine with a damp cloth and some soap. Use brushes or scrubbers to clean places that
are hard to reach and stubborn residue. Don’t use any harsh cleaning agents or solvents. These could
• Keep the motor’s vent openings free of deposits.
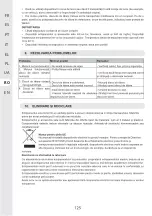
REPAIR
The equipment is supplied in packaging to prevent it from being damaged in transit. The raw materials
in this packaging can be reused or recycled.
The equipment and its accessories are made of various types of material, such as metal and plastic.
Defective components must be disposed of as special waste. Ask your dealer or your local council.
TRANSPORT
d on the working table underneath
when transoprt. Never pull or carry the macine by the switch, by moving parts, by the cord or by the
upper protective guard. Never use the safety features to carry the machine for purposes for which they
are not intended or to carry the machine.
• For best results, two people should carry the tool. The tool is heavy.
• Make sure that the upper protective guard is properly installed so that the upper part of the cutting
disc is covered.
• Remove the water reservoir plug and empty it.
• When transporting it, the tool must always be lifted by the base. It must not be pulled or pushed
above the base.
Replace of the cutting disc:
• Refer to the steps described the section “MOUNTING THE CUTTING DISC”.
• Clean all parts such as upper protective guard, the housing,
FR
ES
PT
IT
EL
PL
UA
RO
EN
Содержание 450ETC1-18030.1
Страница 2: ......
Страница 4: ...4 4 A F C B E D G I H...
Страница 17: ...FR ES PT IT EL PL UA RO EN 17 79 11 VUE D TAILL E...
Страница 32: ...32 FR ES PT IT EL PL UA RO EN VISTA ESPLOSA ED ELENCO DEI PEZZI DI RICAMBIO 11 79...
Страница 47: ...47 FR ES PT IT EL PL UA RO EN PERSPETIVA EXPLODIDA E LISTA DE PE AS SOBRESSALENTES 11 79...
Страница 62: ...62 FR ES PT IT EL PL UA RO EN 11 VISTA ESPLOSA ED ELENCO DEI PEZZI DI RICAMBIO 79...
Страница 65: ...65 FR ES PT IT EL PL UA RO EN 1 2 3 4 5 I Y 6 O 7 I 8 9 10 O Y 11 E H 12 13 Y...
Страница 66: ...66 FR ES PT IT EL PL UA RO EN 1 2 2 1 1 2...
Страница 67: ...67 FR ES PT IT EL PL UA RO EN RCD RCD 3 off 4 H...
Страница 68: ...68 FR ES PT IT EL PL UA RO EN 5 2 2...
Страница 69: ...69 FR ES PT IT EL PL UA RO EN 9 10 11 15 1 14 2 3 4 13 12 5 6 7 8...
Страница 71: ...FR ES PT IT EL PL UA RO EN 71 6 45 45 rpm rpm...
Страница 72: ...72 FR ES PT IT EL PL UA RO EN 45 45...
Страница 73: ...73 FR ES PT IT EL PL UA RO EN 0 45 45 45 45 45 MIN 7 OFF 1 on off 0 on off 2 cm 90 90 on off on...
Страница 74: ...74 FR ES PT IT EL PL UA RO EN 45 45 on off on 90 on off on 22 5 45 45 45 45 22 5 45 45 on off on 45...
Страница 75: ...75 FR ES PT IT EL PL UA RO EN 45 0 45 8...
Страница 76: ...76 FR ES PT IT EL PL UA RO EN 2012 19 E...
Страница 77: ...77 FR ES PT IT EL PL UA RO EN...
Страница 78: ...78 FR ES PT IT EL PL UA RO EN 11 79...
Страница 93: ...93 FR ES PT IT EL PL UA RO EN...
Страница 94: ...94 FR ES PT IT EL PL UA RO EN PERSPEKTYWICZNY WIDOK EKSPLODUJ CY LISTA CZ CIZAMIENNYCH 11 79...
Страница 97: ...97 FR ES PT IT EL PL UA RO EN 1 2 3 4 5 6 7 8 9 10 11 12 13...
Страница 98: ...98 FR ES PT IT EL PL UA RO EN 1 2 2 1 1 a b c 2 a b c d...
Страница 99: ...99 FR ES PT IT EL PL UA RO EN e f 3 a b c d e f g h 4 a b c d e...
Страница 100: ...100 FR ES PT IT EL PL UA RO EN f g h 5 a 2 2...
Страница 101: ...101 FR ES PT IT EL PL UA RO EN...
Страница 102: ...102 FR ES PT IT EL PL UA RO EN 9 10 11 15 1 14 2 3 4 13 12 5 6 7 8...
Страница 104: ...104 FR ES PT IT EL PL UA RO EN 45 45 45 6...
Страница 105: ...105 FR ES PT IT EL PL UA RO EN 45 45 45...
Страница 106: ...106 FR ES PT IT EL PL UA RO EN 0 45 45 45 45 45 45 M 45 MIN 1 0 2 90 90 7...
Страница 107: ...107 FR ES PT IT EL PL UA RO EN 45 45 45 90 22 5 45 45 45 45 22 5 45 45 45 45 0...
Страница 108: ...108 FR ES PT IT EL PL UA RO EN 45 8...
Страница 109: ...FR ES PT IT EL PL UA RO EN...
Страница 110: ...110 FR ES PT IT EL PL UA RO EN...
Страница 111: ...111 FR ES PT IT EL PL UA RO EN 11 79...
Страница 118: ...118 FR ES PT IT EL PL UA RO EN 9 10 11 15 1 14 2 3 4 13 12 5 6 7 8...
Страница 125: ...FR ES PT IT EL PL UA RO EN...
Страница 126: ...126 FR ES PT IT EL PL UA RO EN VEDERE DETALIAT I LISTA PIESELOR DE SCHIMB 11 79...
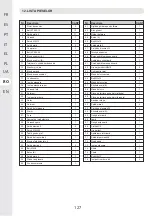
Страница 141: ...141 11 EXPLODED VIEW FR ES PT IT EL PL UA RO EN 79...
Страница 144: ...144...
Страница 145: ...145...
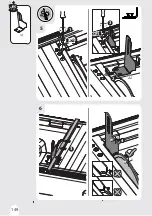
Страница 147: ...147 2 FR Montage ES Montaje PT Montagem IT Montaggio EL PL Monta UA i RO Montaj EN Assembly 1 1 2 x2 x2...
Страница 148: ...148 I I H H F FR Montage ES Montaje PT Montagem IT Montaggio EL PL Monta UA i RO Montaj EN Assembly F H I 4 3 1 2 x2 x2...
Страница 149: ...149 6 G G 5 1 2 3 4 3 x2 x2 x2 x2...
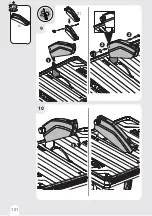
Страница 150: ...150 8 7 5 x2 x2...
Страница 151: ...10 151 1 2 2 D 3 D 9...
Страница 152: ...152 12 2 1 3 B C B C 11...
Страница 154: ...154 3 4 4...
Страница 155: ...155 1 2 FR Utilisation ES Utilizaci n PT Utiliza o IT Uso EL PL U ytkowanie UA RO Utilizare EN Use 1 OR 2...
Страница 156: ...156 4 1 3 2...