


138
WARNING!
before beginning cut.
• Adjust mitre cutting guide to 45° using angle scale and tighten securely with locking knob.
• Make sure the material is clear of the cutting disc before turning on the saw.
• Turn the on/off switch to the on position.
• Let the cutting disc get up to full speed and wait for the cutting disc to get wet before moving the
material into the cutting disc.
slide mitre cutting guide along parallel
cutting guide. Feed the material into the cutting disc.
• When the cut is made, turn the saw off. Wait for the cutting disc to come to a complete stop before
removing any part of the material.
TO MAKE A MITRE CUT
Mitre cuts are used for cutting outside and inside corners on material, decorative chair rails and base
moldings with the material at any angle to the cutting disc other than 90°. Mitre cuts tend to “creep”
during cutting. This can be controlled by holding the workpiece securely against the mitre cutting
guide.
• Using a marker or grease pencil, mark the area to be cut on material.
• Slide mitre guide onto parallel cutting guide from front.
• Set the parallel cutting guide to desired width, and tighten the locking knob to secure in place.
• Adjust mitre guide to desired angle, using angle scale, and tighten securely with locking knob.
• Make sure the material is clear of the cutting disc before turning on the saw.
• Turn the on/off switch to the on position.
• Let the cutting disc build up to full speed and wait for the cutting disc to get wet before moving the
material into the cutting disc.
• Hold the material f irmly against the mitre cutting guide and slide mitre cutting guide along parallel
cutting guide. Feed the material into the cutting disc.
• When the cut is made, turn the saw off. Wait for the cutting disc to come to a complete stop before
removing any part of the material.
TO MAKE A BEVEL CUT
Beveled 22.5° and 45° cuts can be made using the 45° vertical fence.
• Using a marker or grease pencil, mark the area to be cut on material.
• Raise up the 45° vertical fence.
• On underside of 45° vertical fence, pull down the two table legs into right angles of the plate.
second set of notches to angle 45° vertical
fence into highest 45° angle.
• Turn the on/off switch to the on position.
• Let the cutting disc get up to full speed and wait for the cutting disc to get wet before moving the
material into the cutting disc.
ed the material into the cutting disc.
• When the cut is made, turn the saw off. Wait for the cutting disc to come to a complete stop before
removing any part of the material.
TO CHANGE RESERVOIR WATER
• Unplug tile saw.
• Remove the water reservoir plug and empty into a bucket, do not allow water to splash onto ground
or around machine.
• Discard waste water in accordance with local regulations.
CHANGING CUTTING DISC
• Let the machine cool down.
• Remove the water reservoir plug and empty it.
FR
ES
PT
IT
EL
PL
UA
RO
EN
Содержание 450ETC1-18030.1
Страница 2: ......
Страница 4: ...4 4 A F C B E D G I H...
Страница 17: ...FR ES PT IT EL PL UA RO EN 17 79 11 VUE D TAILL E...
Страница 32: ...32 FR ES PT IT EL PL UA RO EN VISTA ESPLOSA ED ELENCO DEI PEZZI DI RICAMBIO 11 79...
Страница 47: ...47 FR ES PT IT EL PL UA RO EN PERSPETIVA EXPLODIDA E LISTA DE PE AS SOBRESSALENTES 11 79...
Страница 62: ...62 FR ES PT IT EL PL UA RO EN 11 VISTA ESPLOSA ED ELENCO DEI PEZZI DI RICAMBIO 79...
Страница 65: ...65 FR ES PT IT EL PL UA RO EN 1 2 3 4 5 I Y 6 O 7 I 8 9 10 O Y 11 E H 12 13 Y...
Страница 66: ...66 FR ES PT IT EL PL UA RO EN 1 2 2 1 1 2...
Страница 67: ...67 FR ES PT IT EL PL UA RO EN RCD RCD 3 off 4 H...
Страница 68: ...68 FR ES PT IT EL PL UA RO EN 5 2 2...
Страница 69: ...69 FR ES PT IT EL PL UA RO EN 9 10 11 15 1 14 2 3 4 13 12 5 6 7 8...
Страница 71: ...FR ES PT IT EL PL UA RO EN 71 6 45 45 rpm rpm...
Страница 72: ...72 FR ES PT IT EL PL UA RO EN 45 45...
Страница 73: ...73 FR ES PT IT EL PL UA RO EN 0 45 45 45 45 45 MIN 7 OFF 1 on off 0 on off 2 cm 90 90 on off on...
Страница 74: ...74 FR ES PT IT EL PL UA RO EN 45 45 on off on 90 on off on 22 5 45 45 45 45 22 5 45 45 on off on 45...
Страница 75: ...75 FR ES PT IT EL PL UA RO EN 45 0 45 8...
Страница 76: ...76 FR ES PT IT EL PL UA RO EN 2012 19 E...
Страница 77: ...77 FR ES PT IT EL PL UA RO EN...
Страница 78: ...78 FR ES PT IT EL PL UA RO EN 11 79...
Страница 93: ...93 FR ES PT IT EL PL UA RO EN...
Страница 94: ...94 FR ES PT IT EL PL UA RO EN PERSPEKTYWICZNY WIDOK EKSPLODUJ CY LISTA CZ CIZAMIENNYCH 11 79...
Страница 97: ...97 FR ES PT IT EL PL UA RO EN 1 2 3 4 5 6 7 8 9 10 11 12 13...
Страница 98: ...98 FR ES PT IT EL PL UA RO EN 1 2 2 1 1 a b c 2 a b c d...
Страница 99: ...99 FR ES PT IT EL PL UA RO EN e f 3 a b c d e f g h 4 a b c d e...
Страница 100: ...100 FR ES PT IT EL PL UA RO EN f g h 5 a 2 2...
Страница 101: ...101 FR ES PT IT EL PL UA RO EN...
Страница 102: ...102 FR ES PT IT EL PL UA RO EN 9 10 11 15 1 14 2 3 4 13 12 5 6 7 8...
Страница 104: ...104 FR ES PT IT EL PL UA RO EN 45 45 45 6...
Страница 105: ...105 FR ES PT IT EL PL UA RO EN 45 45 45...
Страница 106: ...106 FR ES PT IT EL PL UA RO EN 0 45 45 45 45 45 45 M 45 MIN 1 0 2 90 90 7...
Страница 107: ...107 FR ES PT IT EL PL UA RO EN 45 45 45 90 22 5 45 45 45 45 22 5 45 45 45 45 0...
Страница 108: ...108 FR ES PT IT EL PL UA RO EN 45 8...
Страница 109: ...FR ES PT IT EL PL UA RO EN...
Страница 110: ...110 FR ES PT IT EL PL UA RO EN...
Страница 111: ...111 FR ES PT IT EL PL UA RO EN 11 79...
Страница 118: ...118 FR ES PT IT EL PL UA RO EN 9 10 11 15 1 14 2 3 4 13 12 5 6 7 8...
Страница 125: ...FR ES PT IT EL PL UA RO EN...
Страница 126: ...126 FR ES PT IT EL PL UA RO EN VEDERE DETALIAT I LISTA PIESELOR DE SCHIMB 11 79...
Страница 141: ...141 11 EXPLODED VIEW FR ES PT IT EL PL UA RO EN 79...
Страница 144: ...144...
Страница 145: ...145...
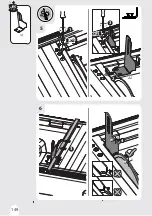
Страница 147: ...147 2 FR Montage ES Montaje PT Montagem IT Montaggio EL PL Monta UA i RO Montaj EN Assembly 1 1 2 x2 x2...
Страница 148: ...148 I I H H F FR Montage ES Montaje PT Montagem IT Montaggio EL PL Monta UA i RO Montaj EN Assembly F H I 4 3 1 2 x2 x2...
Страница 149: ...149 6 G G 5 1 2 3 4 3 x2 x2 x2 x2...
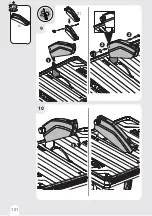
Страница 150: ...150 8 7 5 x2 x2...
Страница 151: ...10 151 1 2 2 D 3 D 9...
Страница 152: ...152 12 2 1 3 B C B C 11...
Страница 154: ...154 3 4 4...
Страница 155: ...155 1 2 FR Utilisation ES Utilizaci n PT Utiliza o IT Uso EL PL U ytkowanie UA RO Utilizare EN Use 1 OR 2...
Страница 156: ...156 4 1 3 2...