

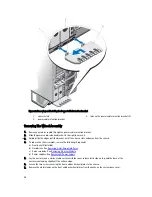


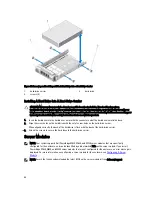


Figure 37. Removing and Installing a Server Module
1.
release button
2.
PCIe label on server module
NOTE: This label indicates that the
server module is configured specifically
for the VRTX enclosure.
3.
guide rail on server module (or server module
blank)
4.
guide rail on enclosure
5.
server module handle
NOTE: The above figure shows removal and installation of a half-height server module. The procedure for
removing and installing a full-height server module is identical to removing and installing a half-height server
module.
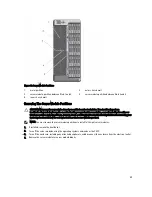
Configuring A Server Module
NOTE: Follow this procedure to install PowerEdge M520, M620, or M820 server modules that are not configured for
the VRTX enclosure.
NOTE: If you install PowerEdge M520, M620, or M820 server modules that are not configured for the VRTX
enclosure, an error message is displayed.
To configure a server module for the VRTX enclosure:
1.
Open the server module.
For more information on opening a server module, see the server module Owner's Manual at dell.com/
poweredgemanuals.
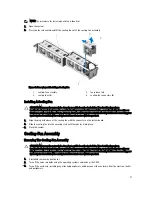
2.
Remove any mezzanine cards installed in Fabric B and Fabric C slots of the server module.
57
Содержание PowerEdge M520
Страница 1: ...Dell PowerEdge VRTX Enclosure Owner s Manual Regulatory Model E22S Regulatory Type E22S001 ...
Страница 8: ...8 ...
Страница 34: ...34 ...
Страница 66: ...Figure 45 Securing the Power Cable Without Wheel Assembly 1 power cable 2 strap 66 ...
Страница 148: ...148 ...
Страница 151: ...Figure 94 System Board Connectors Back 1 midplane planar connectors 3 151 ...
Страница 152: ...152 ...
Страница 158: ...158 ...