background image

1.


Follow the instructions in "

Preparing to Work Inside the Computer

."  


2.


Close the display, turn the computer upside down on a flat work surface, and remove the main battery and secondary battery (if present).  


3.


Remove the M3 x 5-mm screw from the center of the hard drive door.  


4.


Slide the drive door up until the drive assembly tab disengages from the door slots in the bottom case assembly.  


5.


Carefully pull the drive assembly straight out of the bottom case assembly.  


Replacing the Hard Drive  

1.


Push the drive assembly into the hard drive opening on the left side of the computer.  


2.


Align the drive assembly tabs with the bottom case assembly slots and push down until it clicks into place.  


3.


Replace the M3 x 5-mm screw in the drive door.  


Fixed Optical Drive  


Removing the Fixed Optical Drive  

1.


Follow the instructions in "

Preparing to Work Inside the Computer

."  


2.


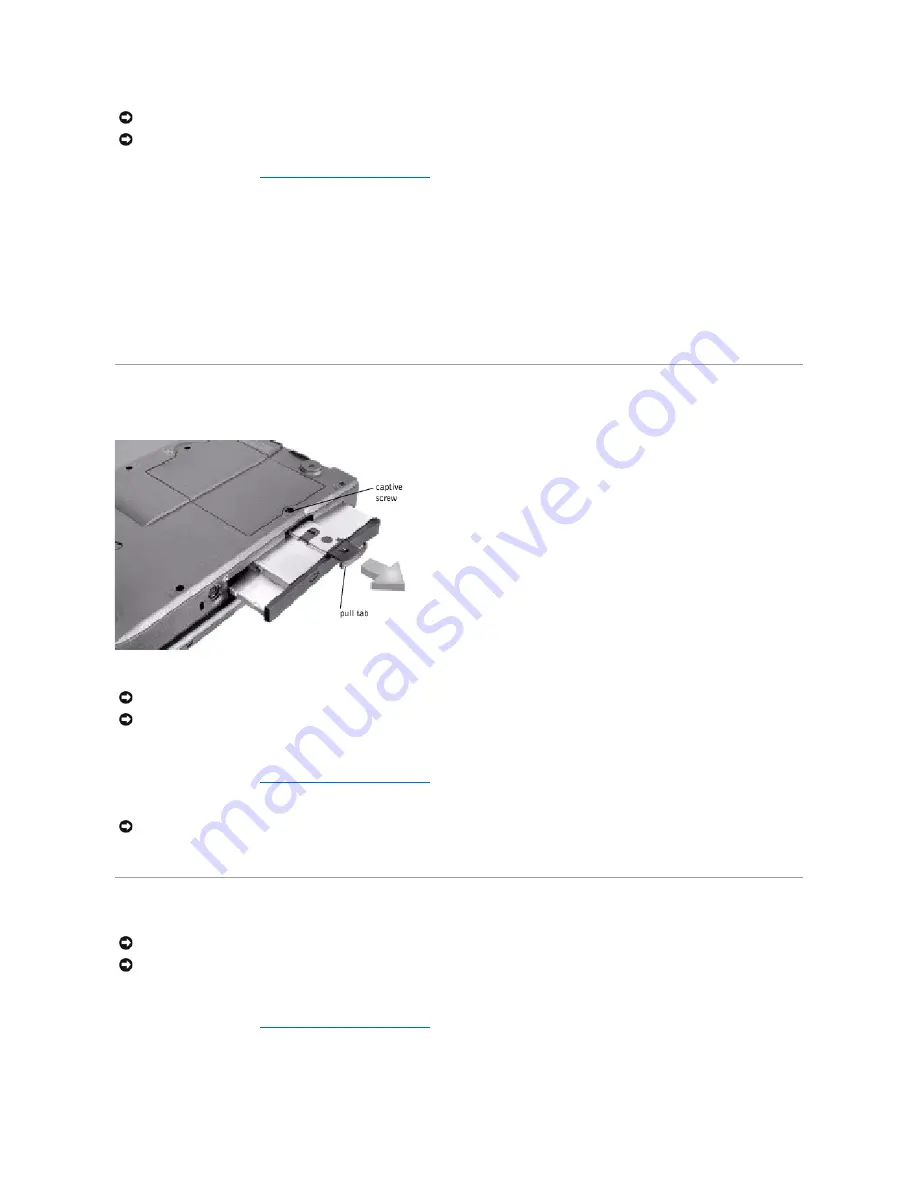
Loosen the captive screw on the bottom of the computer.  


3.


Turn the computer over, pull out the pull tab, and use the pull tab to remove the fixed optical drive.  


Media Bay Devices 

Removing Media Bay Devices  

1.


Follow the instructions in "

Preparing to Work Inside the Computer

."  


2.


Close the display, turn the computer upside down on a flat work surface, and remove the main battery.  


3.


Remove the device from the media bay.  


NOTICE: 

Make sure that the work surface is clean to prevent scratching the computer cover. 

NOTICE: 

The disk drive is very sensitive to shock. Handle the assembly by its edges (do not squeeze the top of the hard drive case), and avoid 

dropping it. 

NOTICE: 

Disconnect the computer and attached devices from electrical outlets and remove any installed batteries. 

NOTICE: 

To avoid ESD, ground yourself by using a wrist grounding strap or by periodically touching an unpainted metal surface on the computer. 

NOTICE: 

To keep the pull tab from catching on the captive screw, turn the computer over before removing the fixed optical drive. 

NOTICE: 

Disconnect the computer and any attached devices from electrical outlets, and remove any installed batteries. 

NOTICE: 

To avoid ESD, ground yourself by using a wrist grounding strap or by periodically touching an unpainted metal surface on the computer. 

Содержание Inspiron 8100

Страница 1: ...ation Microsoft and Windows are registered trademarks of Microsoft Corporation Other trademarks and trade names may be used in this document to refer to either the entities claiming the marks and names or their products Dell Computer Corporation disclaims any proprietary interest in trademarks and trade names other than its own This product incorporates copyright protection technology that is prot...

Страница 2: ...ory 5 Under Software by Operating System click your operating system to display a list of drivers a Utilities subdirectory and a Documentation subdirectory 6 Click the type of driver for example Audio or the utility you want to reinstall A link appears for the specific driver or utility used by your computer 7 Click the link to display the Languages screen 8 Click your preferred language for the d...

Страница 3: ...6 Click the Device Manager button and look beneath Other Devices If you are reinstalling a modem driver click PCI Simple Communications Controller If you are reinstalling a network adapter click Ethernet Controller 7 From the pull down menu click Action and select Properties 8 Click the Reinstall Driver button and click Next 9 Verify that Search for a suitable driver for my device Recommended is s...

Страница 4: ...lick Control Panel 2 Double click the Power Options icon 3 Click the Hibernate tab 4 Ensure that Enable hibernate support is selected and click Apply 5 Click OK to close the Control Panel Reinstalling Windows 2000 1 Insert the Operating System CD into the CD or DVD drive 2 Shut down the computer 3 Turn on the computer 4 Press any key when the Press any key to boot from CD message appears on the sc...

Страница 5: ...port 1 Click the Start button point to Settings and click Control Panel 2 Double click the Power Options icon 3 Click the Hibernate tab 4 Ensure that Enable hibernate support is selected and click Apply 5 Click OK to close the Control Panel Back to Contents Page NOTICE Make sure that you reinstall the Intel Chip Set Update Utility driver before you reinstall any other drivers ...

Страница 6: ...ctors S Video TV Out Connector Video Connector Docking Connector IEEE 1394 Connector Serial Connector Parallel Connector Pin Signal 1 DCD 2 RXDA 3 TXDA 4 DTR 5 GND 6 DSR 7 RTS 8 CTS 9 RI Shell N A Pin Signal Pin Signal 1 STB 5V 11 BUSY MTR 2 PDO INDEX 12 PE WDATA 3 PD1 TRK0 13 SLCT WGATE 4 PD2 WP 14 AFDF 5 PD3 RDATA 15 ERROR HDSEL ...

Страница 7: ...Video TV Out Connector 6 PD4 DSKCHG 16 INIT DIR 7 PD5F 17 SLCT_IN STEP 8 PD6F 18 23 GND 9 PD7F 24 NC 10 ACK DRV 25 GND Pin Signal 1 DAT_KBD 2 DAT_SM1 3 GND 4 PS2VCC 5 CLK_KBD 6 CLK_SM1 Shell N A Pin Signal 1 VCC 2 Data 3 Data 4 Ground ...

Страница 8: ...king Connector Pin Signal 1 GND 2 GND 3 DLUMA L 4 DCRMA L 5 SPDIF 6 DCMPS L 7 SPGND Pin Signal 1 RED 2 GREEN 3 BLUE 4 NC 5 GND 6 GND 7 GND 8 GND 9 CRTVCC 10 GND 11 M SEN 12 DAT_DDC2 13 HSYNC 14 VSYNC 15 CLK_DDC2 Shell N A ...

Страница 9: ...TRDY 173 SAD16 24 D_ATCTLED 74 SLCT_IN 124 SIRDY 174 SC BE1 25 D_PWRLED 75 BUSY 125 SFRAME 175 CD BE2 26 DOCK_PWR_SRC 76 PE 126 SCLKRUN 176 GND 27 DOCK_PWR_SRC 77 SLCT 127 GND 177 SAD17 28 DOCK_PWR_SRC 78 GND 128 SGNTA 178 SAD18 29 GND 79 DAT_SMB 129 SREQA 179 SAD19 30 5VDOCK 80 DCLK_SMB 130 SGNT0 180 SAD20 31 5VDOCK 81 SMB_INIT 131 SREQ0 181 SAD21 32 5VDOCK 82 GND 132 SPCIRST 182 GND 33 5VDOCK 83...

Страница 10: ...IEEE 1394 Connector Back to Contents Page 50 LOW_PWR 100 NC 150 NC 200 GND Pin Signal 1 TPB 2 TPB 3 TPA 4 TPA ...

Страница 11: ...serves power by copying system data to a reserved area on the hard drive and then completely turning off the computer When you exit hibernate mode the application programs and files that were open before you activated hibernate mode are still open Your computer enters hibernate mode if the battery charge level becomes critically low or if either the power button the power conservation key combinat...

Страница 12: ...llows you to l Set icon and standby password options l Program the following functions Activate standby mode the default when you close the display Activate hibernate mode the default for the power button Shut down Windows and turn off the computer Choose no action None To program these functions click an option from the corresponding pull down menu and then click OK Hibernate Tab The Hibernate ta...

Страница 13: ...driver l Small flat blade screwdriver l Pry stick l Small plastic scribe l Microprocessor extractor l Flash BIOS update program floppy disk or CD required only when upgrading the microprocessor replacing the reserve battery or replacing the system board Preparing to Work Inside the Computer Recommended Tools Screw Identification System Components Hard Drive Fixed Optical Drive Media Bay Devices Me...

Страница 14: ...s corresponding hole and avoid over tightening Hard Drive Door Security M3 x 5 mm 1 each Keyboard to Bottom Case Assembly M2 5 x 20 mm 4 each plus one in memory module cover and one in Mini PCI card cover Display to Base M2 5 x 6 mm 3 each 2 at back of computer 1 at flex cable strain relief Display Bezel Rubber screw covers 4 each Plastic screw covers 2 each M2 5 x 4 mm 6 each Display Panel to Dis...

Страница 15: ...ctrical outlets and remove any installed batteries NOTICE To avoid ESD ground yourself by using a wrist grounding strap or by periodically touching an unpainted metal surface on the computer NOTICE To avoid damaging the system board you must remove the main battery before you service the computer ...

Страница 16: ... pull tab to remove the fixed optical drive Media Bay Devices Removing Media Bay Devices 1 Follow the instructions in Preparing to Work Inside the Computer 2 Close the display turn the computer upside down on a flat work surface and remove the main battery 3 Remove the device from the media bay NOTICE Make sure that the work surface is clean to prevent scratching the computer cover NOTICE The disk...

Страница 17: ...e of the module until the module pops up slightly 3 Lift the memory module out of its connector NOTICE Disconnect the computer and attached devices from electrical outlets and remove any installed batteries NOTICE To avoid possible damage to the memory module from ESD ground yourself by using a wrist grounding strap or by periodically touching an unpainted metal surface on the computer NOTICE To a...

Страница 18: ...enna Removing the Mini PCI Card Assembly 1 Follow the instructions in Preparing to Work Inside the Computer 2 Remove the M2 5 x 20 mm screw and lift out the Mini PCI card cover 3 To release the Mini PCI card assembly spread the metal securing tabs until the assembly pops up slightly 4 Disconnect the assembly from the wiring harness or internal antenna 5 Lift out the assembly and disconnect any att...

Страница 19: ...adapter card contains two mini coax antenna connectors connect the mini coax cable to the outermost antenna connector as shown NOTICE If you are installing a wireless network adapter fold and tuck the unused wiring harness into the slot so that it does not interfere with the cover NOTICE Disconnect the computer and attached devices from electrical outlets and remove any installed batteries NOTICE ...

Страница 20: ...oard 5 Lift the right end of the keyboard and slide it slightly to the right to disengage the tabs at the left end 6 Pivot the keyboard and balance it upright on the left side of the computer NOTICE Be careful when handling the keyboard The keycaps are fragile easily dislodged and time consuming to replace ...

Страница 21: ...tabs at the left end of the keyboard under the edge of the bottom case assembly and fit the keyboard into place 3 Check that the keyboard is correctly installed The keys should be flush with the left and right surfaces of the palm rest 4 Reinstall the four screws in the holes labeled circle K Display and Bezel Assembly NOTICE Position the keyboard track stick flex cable so that it is not pinched w...

Страница 22: ...he Display Assembly 1 Remove the hinge cover 2 Remove the M2 5 x 6 mm screw that secures the flex cable to the strain relief and then use the pull loop to remove the flex cable from the video card NOTICE Disconnect the computer and attached devices from electrical outlets and remove any installed batteries NOTICE To avoid ESD ground yourself by using a wrist grounding strap or by periodically touc...

Страница 23: ...to Work Inside the Computer 2 Use a scribe to pry loose the four rubber screw covers located across the top of the bezel NOTICE When reconnecting the flex cable press down on both ends of the connector not in the middle Pressing the middle of the connector can damage fragile components NOTICE Disconnect the computer and attached devices from electrical outlets and remove any installed batteries NO...

Страница 24: ...in relief and then use the pull loop to remove the flex cable from the video card 3 Remove the display assembly bezel 4 Remove the M2 5 x 4 mm screw securing the plastic flex cable mounting bracket to the top cover assembly 5 Remove the six M2 x 3 mm screws three on each side from the right and left sides of the panel 6 Lift the display panel and flex cable out of the top cover assembly 7 Disconne...

Страница 25: ...etic screwdriver to reinstall the six M2 x 3 mm screws that secure the display panel in the top cover 5 Reinstall the display assembly bezel Display Latch Assembly 1 Remove the hinge cover 2 Remove the screw securing the flex cable to its strain relief and then use the pull loop to remove the flex cable from the video card HINT Use a magnetic screwdriver to reassemble the display panel in the disp...

Страница 26: ...cessor Thermal Cooling Assembly NOTICE When replacing the display assembly latch it may help to flex the cover slightly to allow more space while seating the latch NOTICE Disconnect the computer and attached devices from electrical outlets and remove any installed batteries NOTICE To avoid ESD ground yourself by using a wrist grounding strap or by periodically touching an unpainted metal surface o...

Страница 27: ... NOTICE To ensure maximum cooling for the microprocessor do not touch the heat transfer areas on the thermal cooling assembly The oils in your skin reduce the heat transfer capability of the thermal pads NOTICE Disconnect the computer and attached devices from electrical outlets and remove any installed batteries NOTICE To avoid ESD ground yourself by using a wrist grounding strap or by periodical...

Страница 28: ...ch mechanism and pivot the top of the pry stick away from the clip to close the latch NOTICE To avoid damaging the microprocessor when removing the cam lock screw hold the screwdriver so that it is perpendicular to the microprocessor NOTICE After replacing the microprocessor module update the BIOS using a flash BIOS update program floppy disk or CD that came with the replacement microprocessor NOT...

Страница 29: ...on the top of the connector to seat the card in its connector 2 Replace the three screws the screw lengths are marked on the card NOTICE Disconnect the computer and attached devices from electrical outlets and remove any installed batteries NOTICE To avoid ESD ground yourself by using a wrist grounding strap or by periodically touching an unpainted metal surface on the computer NOTICE When reconne...

Страница 30: ...ve any device installed in the media bay 4 Slide and hold the latch release on the right side and remove any battery installed in the battery bay 5 Locate the indentation under each palm rest place your thumbs on the indentation and gently push to release the palm rests 6 Remove the palm rests 7 To replace a palm rest insert it into the slots on the computer Then press along the outside edges of t...

Страница 31: ...y NOTICE Disconnect the computer and attached devices from electrical outlets and remove any installed batteries NOTICE To avoid ESD ground yourself by using a wrist grounding strap or by periodically touching an unpainted metal surface on the computer NOTICE The reserve battery provides power to the computer s RTC and NVRAM when the computer is turned off Removing the palm rest disconnects the re...

Страница 32: ...battery a Pry the reserve battery free from the metal palm rest bracket b Remove the foam pad remnants from the palm rest bracket Replacing the Reserve Battery NOTICE Disconnect the computer and attached devices from electrical outlets and remove any installed batteries NOTICE To avoid ESD ground yourself by using a wrist grounding strap or by periodically touching an unpainted metal surface on th...

Страница 33: ...ny installed Mini PCI cards 4 If migrating the memory remove all installed memory modules 5 Remove the keyboard assembly 6 Remove the hinge cover 7 Remove the display assembly 8 Remove the palm rest assembly 9 Remove the video card 10 Remove the microprocessor thermal cooling assembly 11 If migrating the microprocessor remove the microprocessor module 12 Remove the three M2 5 x 4 mm captive washer...

Страница 34: ...ly downward pressure to the tabs while squeezing them together tweezers work well to eject the latch button from the bottom of the case without loosening the upper latch assembly spring and slider If the upper latch assembly does come loose a Reinsert the spring onto the slider and reinstall both pieces in the latch housing on the inside of the case NOTICE Disconnect the computer and attached devi...

Страница 35: ...ions in Preparing to Work Inside the Computer 2 Remove the keyboard assembly 3 Remove the hinge cover 4 Remove the display assembly 5 Remove the palm rest assembly 6 Lift out the video card 7 Lift the battery charger board out of the system board connector Replacing the Battery Charger Board Align the screw holes on the battery charger board with the screw holes on the bottom case assembly and the...

Страница 36: ...n Assembly 1 Follow the instructions in Preparing to Work Inside the Computer 2 Remove the system board NOTICE Disconnect the computer and attached devices from electrical outlets and remove any installed batteries NOTICE To avoid ESD ground yourself by using a wrist grounding strap or by periodically touching an unpainted metal surface on the computer NOTICE Disconnect the computer and attached d...

Страница 37: ...cover notch side up and snap it into the connector cutout Removing the RJ 11 RJ 45 Board NOTICE When reconnecting the fan cables connect the shorter cable to the connector closest to the fan assembly Route both cables so that they will not be pinched by the thermal cooling assembly NOTICE Disconnect the computer and attached devices from electrical outlets and remove any installed batteries NOTICE...

Страница 38: ... tall plastic tab away from the board assembly to release it lift out the assembly When replacing the RJ 11 RJ 45 board assembly protect the wiring harness by routing it between the plastic posts as shown in the following figure Back to Contents Page ...

Страница 39: ... 3 displays basic device configuration settings l Page 4 displays battery charge status l Page 5 displays power management settings l Page 6 displays system security and hard drive password settings Viewing the System Setup Program Pages 1 Turn on or restart your computer 2 When the Dell logo appears press F2 immediately If you wait too long and the Windows logo appears continue to wait until you ...

Страница 40: ... Display 4 Follow the instructions shown on the screen HINT See the Tell Me How help file for information on standby mode Check the power light When the power light is lit or blinking the computer has power If the power light is blinking the computer is in standby mode press the power button to exit standby mode If the power light is off press the power button Check the battery If you are using a ...

Страница 41: ... fluorescent lights or halogen lamps to check for interference Rotate the computer to face a different direction Eliminate sunlight glare which can cause poor picture quality Restore the recommended settings Restore the original resolution and refresh rate settings For more information see the Tell Me How help file for instructions Adjust the Windows display settings 1 Click the Start button point...

Страница 42: ...ectrical outlet Ensure that the electrical outlet is working by testing it with another device such as a lamp Ensure that the printer is turned on See the documentation supplied with the printer Verify that the printer is recognized by Windows 1 Click the Start button point to Settings and then click Printers If the printer is listed right click the printer icon click Properties and then select th...

Страница 43: ...ard or keypad to the computer the numeric keypad on the integrated keyboard is disabled If you connect an external USB keyboard or keypad to the computer the numeric keypad remains enabled Disconnect the keyboard cable Shut down the computer Disconnect the keyboard cable and check the cable connector for bent or broken pins Disable the numeric keypad Press the Num Lk key to disable the numeric key...

Страница 44: ...ice the you are verifying HINT Because of different worldwide file types not all DVD titles work in all DVD drives Ensure that Windows recognizes the drive Double click the My Computer icon If the DVD drive is not listed perform a full scan with your antivirus software to check for and remove viruses Viruses can sometimes prevent Windows from recognizing the drive Test the drive with another DVD I...

Страница 45: ...l Try copying the file to a different disk or use a larger capacity disk A required DLL file was not found The program that you are trying to open is missing an essential file To remove and then reinstall the program Windows Me 1 Click the Start button point to Settings and then click Control Panel 2 Double click the Add Remove Programs icon 3 Select the program that you want to remove 4 Click Add...

Страница 46: ...d disconnect them from their power sources and then from the computer 4 Remove and reinstall the battery 5 Turn on the computer If the computer does not turn on or if you cannot identify the damaged components contact Dell for technical assistance See Contacting Dell in the Dell Solutions Guide that came with your computer for contact information Resolving Other Technical Problems Review Sending a...

Страница 47: ...Back to Contents Page ...

Страница 48: ...ts PCI 4450 4451 CardBus controller PC Card connectors two supports two Type I or Type II cards or one Type III card Cards supported 3 3 V and 5 V PC Card connector size 68 pins Data width maximum PCMCIA 16 bits CardBus 32 bits Memory Architecture SDRAM Memory module connector two user accessible SODIMM sockets Memory module capacities 64 128 and 256 MB 3 3 V SDRAM SODIMMS Standard memory 64 MB no...

Страница 49: ...o Audio controller ESS Technology Maestro 3i Stereo conversion 16 bit analog to digital and digital to analog Interfaces Internal PCI bus AC 97 External stereo line in microphone headphones speaker line out Display Type 256 bit hardware accelerated video support Response time typical 50 ms Operating angle 0º closed to 180º Dot pitch 0 20 mm Panel typical Backlight 1 3 W 3 4 W using battery 4 9 W u...

Страница 50: ... available via the media bay Dimensions Depth 88 5 mm 3 48 inches Height 21 5 mm 0 83 inch Width 139 0 mm 5 47 inches Weight 8 cell 0 39 kg 0 87 lb Voltage 14 8 VDC Charge time approximate Computer on 2 5 hours Computer off 1 hour Battery life approximately 2 3 hours minimum with 8 cell standard battery Life span approximate 400 discharge charge cycles0 Temperature range Operating 0º to 45ºC 32º t...

Страница 51: ...tion spectrum that simulates user environment Storage 1 3 GRMS using a random vibration spectrum that simulates air truck shipment Maximum shock Operating 1 524 cm sec 60 inches sec equal to a half sine pulse width of 2 ms Storage 2 03 m sec 80 inches sec less than or equal to a pulse width of 2 ms Altitude maximum Operating 15 2 to 3048 m 50 to 10 000 ft Storage 15 2 to 10 668 m 50 to 35 000 ft F...

Страница 52: ...r Computer Dell Inspiron 8100 Front View Left Side View Right Side View Back View Front View Display Latch This latch keeps the display locked in place when the display is closed Display The computer has a color LCD Device Status Lights ...

Страница 53: ...icates that the battery charge is critically low Air Intake The fans work with the air intakes to prevent the computer from overheating When the computer gets hot the small internal fans turn on and draw air through the air intakes to cool the computer Hot air is expelled through the fan exhausts Keyboard Status Lights NOTICE To avoid data loss never turn off the computer while the green light lab...

Страница 54: ... Media Bay You can install devices such as a CD drive DVD drive CD RW and CD R drive second battery or Dell TravelLite travel module in the media bay Touch Pad Track Stick Buttons These buttons correspond to the left and right buttons on a standard mouse Keyboard The keyboard includes a numeric keypad as well as the Microsoft Windows logo key that supports the Windows operating systems Power Butto...

Страница 55: ... speakers press Fn and End and check the volume control buttons to make sure that the sound is not disabled HINT To launch the Dell Solution Center the computer must be turned on and functioning properly 1 Press this button to launch the Dell Solution Center where you can find support and educational tools that Dell has installed on your computer 2 Press this button to launch your default Internet...

Страница 56: ... to adjust the speaker volume S Video TV Out Connector Fixed Optical Drive Your computer supports a CD drive DVD drive or CD RW drive Right Side View Audio Connectors NOTICE Antitheft devices are of differing designs Before you buy one make sure it will work with the security cable slot in the computer Use this connector to connect your computer to a television If you have a TV digital audio adapt...

Страница 57: ...files from the computer to another infrared device without using cable connections Hard Drive The hard drive reads and writes data on a hard disk Modem Connector Use this connector to attach IEEE 1394 compatible devices such as a digital camera to your computer HINT The infrared sensor does not function when the computer is connected to a port replicator If you ordered the optional internal modem ...

Страница 58: ...mputer Hot air is expelled through the fan exhaust AC Adapter Connector If you ordered the optional integrated network adapter use this connector to connect the computer to a network NOTICE Antitheft devices are of differing designs Before you buy one make sure it works with the security cable slot in the computer HINT The computer turns on the fan only when the computer gets hot It may run most o...

Страница 59: ...ly to avoid damaging the cable Use this connector to attach a parallel device such as a printer to the computer Use these connectors to attach USB compatible devices such as a mouse keyboard printer or scanner to your computer Use this connector to attach a serial device to the computer HINT The port replicator may not be available in certain countries Refer to the documentation that came with you...

Страница 60: ...PS 2 Connector Back to Contents Page Use this connector to attach PS 2 compatible devices such as a mouse keyboard or external numeric keypad to your computer ...

Отзывы: