


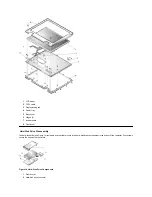


Keyboard Removal
Figure 17. Keyboard Components
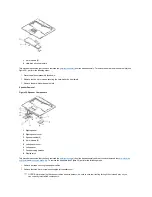
To remove the keyboard (see Figure 17), perform the following steps:
1.
Turn the computer over and remove the four 20-mm screws from the bottom of the computer.
2.
Turn the computer back over and open the display.
3.
Insert a small flat-blade screwdriver or scribe along the right top of the keyboard, just above the row of function keys.
Working from right to left, free the keyboard by prying it toward the front of the unit. When free, lift the top of the keyboard slightly to clear the
palmrest assembly
.
4.
Slide the keyboard toward the display assembly to release the front edge of the keyboard from the palmrest assembly.
5.
Rotate the bottom of the keyboard up toward the display assembly to expose the keyboard cable.
NOTICE: Lift the cable away only after you open the
. Pulling the cable from the connector damages the conductive
coating on the end of the cable.
6.
Disconnect the keyboard cable from ZIF connector JP14 on the system board. Use the pick to pry up the latches on each side of the
connector.
7.
Remove the keyboard from the palmrest assembly.
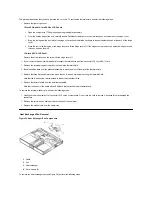
ZIF Connectors
Figure 18. ZIF Connector Release
1
20-mm screws (4)
2
Palmrest assembly
3
ZIF connector
4
Keyboard cable
5
Keyboard
Содержание Inspiron 7500
Страница 6: ...Back to Contents Page AC Adapter Dell Inspiron 7500 ...
Страница 7: ...Back to Contents Page Audio Jacks Dell Inspiron 7500 ...
Страница 10: ...Back to Contents Page Component Locations Back View Dell Inspiron 7500 ...
Страница 12: ...Back to Contents Page Battery Charge Gauge Dell Inspiron 7500 ...
Страница 13: ...Back to Contents Page Removing and Installing a Battery Dell Inspiron 7500 ...
Страница 26: ...Back to Contents Page ...
Страница 38: ...Exploded View of 13 3 Inch Display Assembly Dell Inspiron 7500 ...
Страница 39: ...Exploded View of 14 1 Inch Display Assembly Dell Inspiron 7500 ...
Страница 40: ...Back to Contents Page Exploded View of 15 Inch SXGA Display Assembly Dell Inspiron 7500 New artwork pending ...
Страница 42: ...Back to Contents Page Exploded View of 15 4 Inch SXGA Display Assembly Dell Inspiron 7500 New artwork pending ...
Страница 44: ...Back to Contents Page Exploded View of Computer Dell Inspiron 7500 ...
Страница 45: ...Back to Contents Page Exploded View of Palmrest Assembly Dell Inspiron 7500 Back to Contents Page ...
Страница 47: ...Back to Contents Page Component Locations Front View Dell Inspiron 7500 New artwork pending ...
Страница 54: ...Back to Contents Page I O Connectors Dell Inspiron 7500 ...
Страница 60: ...Back to Contents Page 30 Cone of Infrared Light Dell Inspiron 7500 ...
Страница 64: ...Back to Contents Page Embedded Numeric Keypad Dell Inspiron 7500 ...
Страница 88: ...system You can also double click the PC Card icon on the Windows 98 desktop Back to Contents Page ...
Страница 89: ...Back to Contents Page PC Card Slots Dell Inspiron 7500 ...
Страница 103: ...Back to Contents Page Removing the Memory Module Dell Inspiron 7500 ...
Страница 104: ...Back to Contents Page Removing the Memory Module Cover Dell Inspiron 7500 ...
Страница 136: ...Back to Contents Page Removing the Hard Disk Drive Dell Inspiron 7500 ...
Страница 138: ...Back to Contents Page Removing Devices From the Media Bay Dell Inspiron 7500 ...
Страница 140: ...Back to Contents Page Security Cable Slot Dell Inspiron 7500 ...
Страница 159: ...Back to Contents Page Touch Pad Dell Inspiron 7500 ...
Страница 162: ...8 Unlatch the display assembly and lift the assembly off the computer base Back to Contents Page ...


