2
During POST, when the DELL logo is displayed, watch for the F2 prompt to
appear, and then press F2 immediately.
NOTE: The F2 prompt indicates that the keyboard is initialized. This
prompt can appear very quickly, so you must watch for it, and then
press F2. If you press F2 before the F2 prompt, this keystroke is lost. If
you wait too long and the operating system logo appears, continue to
wait until you see the desktop. Then, turn off your computer and try
again.
System Setup Options
NOTE: Depending on your computer and its installed devices, the items
listed in this section may or may not appear.
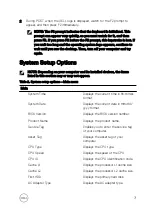
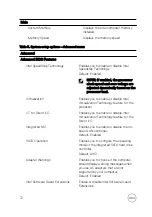
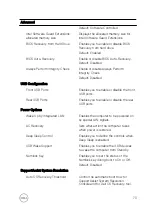
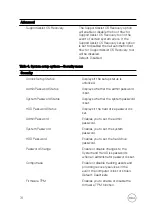
Table 2. System setup options—Main menu
Main
System Time
Displays the current time in hh:mm:ss
format.
System Date
Displays the current date in mm/dd/
yyyy format.
BIOS Version
Displays the BIOS version number.
Product Name
Displays the product name.
Service Tag
Enables you to enter the service tag
of your computer.
Asset Tag
Displays the asset tag of your
computer.
CPU Type
Displays the CPU type.
CPU Speed
Displays the speed of the CPU.
CPU ID
Displays the CPU identification code.
Cache L1
Displays the processor L1 cache size.
Cache L2
Displays the processor L2 cache size.
First HDD
Displays the primary hard disk.
AC Adapter Type
Displays the AC adapter type.
71
Содержание Inspiron 3472
Страница 14: ...System board components 1 power button cable connector 2 coin cell battery 14 ...
Страница 19: ...2 Release the tabs on the front bezel sequentially from the top by pushing them outwards from the chassis 19 ...
Страница 28: ...2 Remove the two screws 6 32xL6 35 that secure the hard drive assembly to the drive cage 28 ...
Страница 30: ...5 Slide the hard drive out of the hard drive bracket 30 ...
Страница 41: ...2 Remove the coin cell battery from the socket 41 ...
Страница 45: ...5 Slide and remove the wireless card from the wireless card slot 45 ...
Страница 49: ...3 Remove the antenna modules along with the cables off the chassis 49 ...
Страница 53: ...5 Remove the power button module along with its cable through the slot on the front panel 53 ...
Страница 56: ...3 Lift the thermal cooling assembly off the system board 56 ...
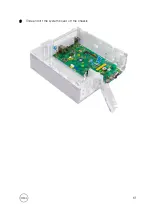
Страница 61: ...8 Slide and lift the system board off the chassis 61 ...

