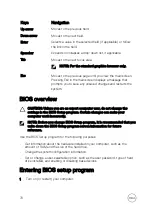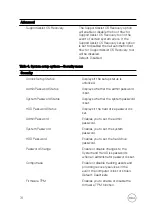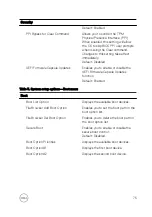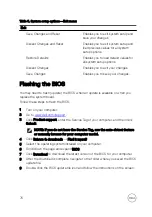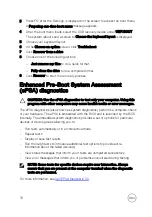
Keys
Navigation
Up arrow
Moves to the previous field.
Down arrow
Moves to the next field.
Enter
Selects a value in the selected field (if applicable) or follow
the link in the field.
Spacebar
Expands or collapses a drop
‐
down list, if applicable.
Tab
Moves to the next focus area.
NOTE: For the standard graphics browser only.
Esc
Moves to the previous page until you view the main screen.
Pressing Esc in the main screen displays a message that
prompts you to save any unsaved changes and restarts the
system.
BIOS overview
CAUTION: Unless you are an expert computer user, do not change the
settings in the BIOS Setup program. Certain changes can make your
computer work incorrectly.
NOTE: Before you change BIOS Setup program, it is recommended that you
write down the BIOS Setup program screen information for future
reference.
Use the BIOS Setup program for the following purposes:
•
Get information about the hardware installed in your computer, such as the
amount of RAM and the size of the hard drive.
•
Change the system configuration information.
•
Set or change a user-selectable option, such as the user password, type of hard
drive installed, and enabling or disabling base devices.
Entering BIOS setup program
1
Turn on (or restart) your computer.
70
Содержание Inspiron 3472
Страница 14: ...System board components 1 power button cable connector 2 coin cell battery 14 ...
Страница 19: ...2 Release the tabs on the front bezel sequentially from the top by pushing them outwards from the chassis 19 ...
Страница 28: ...2 Remove the two screws 6 32xL6 35 that secure the hard drive assembly to the drive cage 28 ...
Страница 30: ...5 Slide the hard drive out of the hard drive bracket 30 ...
Страница 41: ...2 Remove the coin cell battery from the socket 41 ...
Страница 45: ...5 Slide and remove the wireless card from the wireless card slot 45 ...
Страница 49: ...3 Remove the antenna modules along with the cables off the chassis 49 ...
Страница 53: ...5 Remove the power button module along with its cable through the slot on the front panel 53 ...
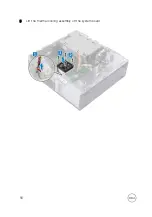
Страница 56: ...3 Lift the thermal cooling assembly off the system board 56 ...
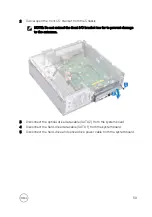
Страница 61: ...8 Slide and lift the system board off the chassis 61 ...

