background image

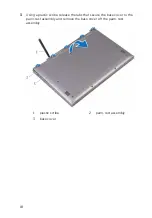
Using a plastic scribe, release the tabs that secure the base cover to the 
palm-rest assembly and remove the base cover off the palm-rest 
assembly.

1

plastic scribe

2

palm-rest assembly

3

base cover

18

Содержание Inspiron 13 5000

Страница 1: ...Inspiron 13 5000 2 in 1 Service Manual Computer Model Inspiron 13 5378 Regulatory Model P69G Regulatory Type P69G001 ...

Страница 2: ... the problem WARNING A WARNING indicates a potential for property damage personal injury or death 2016 Dell Inc All rights reserved This product is protected by U S and international copyright and intellectual property laws Dell and the Dell logo are trademarks of Dell Inc in the United States and or other jurisdictions All other marks and names mentioned herein may be trademarks of their respecti...

Страница 3: ...inside your computer 15 Removing the base cover 16 Procedure 16 Replacing the base cover 19 Procedure 19 Removing the battery 20 Prerequisites 20 Procedure 20 Replacing the battery 22 Procedure 22 Post requisites 22 Removing the memory modules 23 Prerequisites 23 Procedure 24 Replacing the memory modules 26 Procedure 26 Post requisites 27 3 ...

Страница 4: ...uisites 33 Procedure 33 Replacing the coin cell battery 35 Procedure 35 Post requisites 35 Removing the wireless card 36 Prerequisites 36 Procedure 36 Replacing the wireless card 38 Procedure 38 Post requisites 39 Removing the keyboard daughter board 40 Prerequisites 40 Procedure 40 Replacing the keyboard daughter board 42 Procedure 42 Post requisites 42 4 ...

Страница 5: ...es 46 Procedure 46 Replacing the fan 48 Procedure 48 Post requisites 48 Removing the heat sink 49 Prerequisites 49 Procedure 49 Replacing the heat sink 51 Procedure 51 Post requisites 51 Removing the power and volume buttons board 52 Prerequisites 52 Procedure 52 Replacing the power and volume buttons board 54 Procedure 54 Post requisites 54 5 ...

Страница 6: ...touch pad 59 Prerequisites 59 Procedure 59 Replacing the touch pad 63 Procedure 63 Post requisites 63 Removing the I O board 64 Prerequisites 64 Procedure 64 Replacing the I O board 66 Procedure 66 Post requisites 66 Removing the display assembly 67 Prerequisites 67 Procedure 67 Replacing the display assembly 71 Procedure 71 Post requisites 71 6 ...

Страница 7: ...lacing the system board 79 Procedure 79 Post requisites 79 Entering the Service Tag in the BIOS setup program 80 Removing the palm rest and keyboard assembly 81 Prerequisites 81 Procedure 81 Replacing the palm rest and keyboard assembly 83 Procedure 83 Post requisites 83 Removing the display panel 84 Prerequisites 84 Procedure 84 Replacing the display panel 87 Procedure 87 Post requisites 87 7 ...

Страница 8: ...uisites 90 Removing the camera 91 Prerequisites 91 Procedure 91 Replacing the camera 93 Procedure 93 Post requisites 93 Removing the display cable 94 Prerequisites 94 Procedure 94 Replacing the display cable 96 Procedure 96 Post requisites 96 Removing the sensor board 97 Prerequisites 97 Procedure 97 Replacing the sensor board 99 Procedure 99 Post requisites 99 8 ...

Страница 9: ...4 Rotating the display 105 Cleaning the display 106 HDMI 106 Connecting to external display devices 106 Graphics 108 Downloading the graphics driver 108 Identifying the display adapter 108 Changing the display settings in Intel HD Graphics Control Panel 109 Intel WiDi 109 Downloading the WiDi application 110 Setting up the wireless display 110 USB 111 Downloading the USB 3 0 driver 111 Enabling or...

Страница 10: ...d 118 Changing the keyboard language 118 Keyboard shortcuts 118 Touch pad 119 Identifying the touch pad 120 Touch pad gestures 120 Power adapter 120 Battery 121 Chipset 121 Downloading the chipset driver 121 Identifying the chipset 122 Memory 123 Checking the system memory in Windows 123 Verifying the system memory in BIOS setup program 123 Testing memory using ePSA 123 Processors 123 Identifying ...

Страница 11: ...ine Interface 128 Intel Virtual Button driver 129 Intel Wireless 3165 WiFi and Bluetooth drivers 130 BIOS overview 131 Entering the BIOS setup program 131 Boot menu 131 Boot menu enhancements 131 Timing key sequences 131 System diagnostic lights 132 Getting help and contacting Dell 134 Self help resources 134 Contacting Dell 135 11 ...

Страница 12: ... down Windows 7 Click or tap Start Shut down NOTE If you are using a different operating system see the documentation of your operating system for shut down instructions 3 Disconnect your computer and all attached devices from their electrical outlets 4 Disconnect all cables such as telephone cables and network cables from your computer 5 Disconnect all attached devices and peripherals such as key...

Страница 13: ...Dell is not covered by your warranty See the safety instructions that shipped with the product or at www dell com regulatory_compliance CAUTION Before touching anything inside your computer ground yourself by touching an unpainted metal surface such as the metal at the back of the computer While you work periodically touch an unpainted metal surface to dissipate static electricity which could harm...

Страница 14: ...ly M2x3 5 2 Hard drive bracket Hard drive M3x3 4 Wireless card bracket Palm rest assembly M2x3 5 1 Fan Palm rest assembly M2x3 5 2 Power and volume buttons board Palm rest assembly M2x3 5 1 Touch pad bracket Palm rest assembly M2x2 4 Touch pad Palm rest assembly M2x2 5 4 I O board Palm rest assembly M2x3 5 2 Display assembly Palm rest assembly M2 5x2 5 4 Power adapter port Palm rest assembly M2x3 ...

Страница 15: ...nsure that no stray screws remain inside your computer 2 Connect any external devices peripherals or cables you removed before working on your computer 3 Replace any media cards discs or any other parts that you removed before working on your computer 4 Connect your computer and all attached devices to their electrical outlets 5 Turn on your computer 15 ...

Страница 16: ...r and follow the steps in Before working inside your computer After working inside your computer follow the instructions in After working inside your computer For more safety best practices see the Regulatory Compliance home page at www dell com regulatory_compliance Procedure 1 Close the display and turn the computer over 16 ...

Страница 17: ...2 Remove the screws that secure the base cover to the palm rest assembly 1 screws 9 2 base cover 3 palm rest assembly 17 ...

Страница 18: ...3 Using a plastic scribe release the tabs that secure the base cover to the palm rest assembly and remove the base cover off the palm rest assembly 1 plastic scribe 2 palm rest assembly 3 base cover 18 ...

Страница 19: ...ur computer After working inside your computer follow the instructions in After working inside your computer For more safety best practices see the Regulatory Compliance home page at www dell com regulatory_compliance Procedure 1 Align the base cover with the palm rest assembly and snap it into place 2 Replace the screws that secure the base cover to the palm rest assembly 19 ...

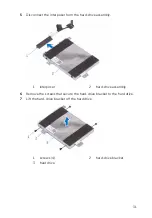
Страница 20: ...uter After working inside your computer follow the instructions in After working inside your computer For more safety best practices see the Regulatory Compliance home page at www dell com regulatory_compliance Prerequisites Remove the base cover Procedure 1 Disconnect the battery cable from the system board 2 Remove the screws that secure the battery to the palm rest assembly 20 ...

Страница 21: ...3 Lift the battery off the palm rest assembly 1 system board 2 battery cable 3 screws 4 4 palm rest assembly 5 battery 4 Press and hold the power button for five seconds to ground the system board 21 ...

Страница 22: ...llow the instructions in After working inside your computer For more safety best practices see the Regulatory Compliance home page at www dell com regulatory_compliance Procedure 1 Align the screw holes on the battery with the screw holes on the palm rest assembly 2 Replace the screws that secure the battery to the palm rest assembly 3 Connect the battery cable to the system board Post requisites ...

Страница 23: ...er and follow the steps in Before working inside your computer After working inside your computer follow the instructions in After working inside your computer For more safety best practices see the Regulatory Compliance home page at www dell com regulatory_compliance Prerequisites 1 Remove the base cover 2 Remove the battery 23 ...

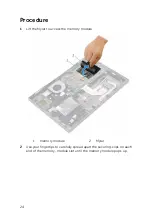
Страница 24: ...e 1 Lift the Mylar to access the memory module 1 memory module 2 Mylar 2 Use your fingertips to carefully spread apart the securing clips on each end of the memory module slot until the memory module pops up 24 ...

Страница 25: ...3 Remove the memory module from the memory module slot 1 securing clips 2 2 memory module 3 memory module slot 25 ...

Страница 26: ...ng inside your computer After working inside your computer follow the instructions in After working inside your computer For more safety best practices see the Regulatory Compliance home page at www dell com regulatory_compliance Procedure 1 Lift the Mylar to access the memory module slot 2 Align the notch on the memory module with the tab on the memory module slot 26 ...

Страница 27: ... at an angle and press the memory module down until it clicks into place NOTE If you do not hear the click remove the memory module and reinstall it 1 memory module 2 memory module slot 3 notch 4 tab 5 Mylar Post requisites 1 Replace the battery 27 ...

Страница 28: ...2 Replace the base cover 28 ...

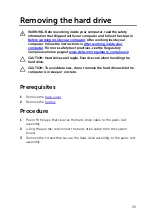
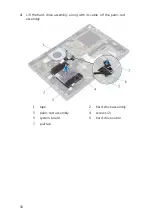
Страница 29: ...mpliance home page at www dell com regulatory_compliance CAUTION Hard drives are fragile Exercise care when handling the hard drive CAUTION To avoid data loss do not remove the hard drive while the computer is in sleep or on state Prerequisites 1 Remove the base cover 2 Remove the battery Procedure 1 Peel off the tape that secures the hard drive cable to the palm rest assembly 2 Using the pull tab...

Страница 30: ...4 Lift the hard drive assembly along with its cable off the palm rest assembly 1 tape 2 hard drive assembly 3 palm rest assembly 4 screws 2 5 system board 6 hard drive cable 7 pull tab 30 ...

Страница 31: ...om the hard drive assembly 1 interposer 2 hard drive assembly 6 Remove the screws that secure the hard drive bracket to the hard drive 7 Lift the hard drive bracket off the hard drive 1 screws 4 2 hard drive bracket 3 hard drive 31 ...

Страница 32: ...e care when handling the hard drive Procedure 1 Align the screw holes on the hard drive bracket with the screw holes on the hard drive 2 Replace the screws that secure the hard drive bracket to the hard drive 3 Connect the interposer to the hard drive assembly 4 Align the screw holes on the hard drive assembly with the screw holes on the palm rest assembly 5 Replace the screws that secure the hard...

Страница 33: ...working inside your computer For more safety best practices see the Regulatory Compliance home page at www dell com regulatory_compliance CAUTION Removing the coin cell battery resets the BIOS setup program s settings to default It is recommended that you note the BIOS setup program s settings before removing the coin cell battery Prerequisites 1 Remove the base cover 2 Remove the battery Procedur...

Страница 34: ...2 Peel the coin cell battery off the palm rest assembly 1 I O board 2 coin cell battery cable 3 coin cell battery 4 palm rest assembly 34 ...

Страница 35: ...r After working inside your computer follow the instructions in After working inside your computer For more safety best practices see the Regulatory Compliance home page at www dell com regulatory_compliance Procedure 1 Adhere the coin cell battery to the palm rest assembly 2 Connect the coin cell battery cable to the I O board Post requisites 1 Replace the battery 2 Replace the base cover 35 ...

Страница 36: ...king inside your computer follow the instructions in After working inside your computer For more safety best practices see the Regulatory Compliance home page at www dell com regulatory_compliance Prerequisites 1 Remove the base cover 2 Remove the battery Procedure 1 Remove the screw that secures the wireless card bracket to the wireless card 2 Disconnect the antenna cables from the wireless card ...

Страница 37: ...3 Slide and remove the wireless card from the wireless card slot 1 screw 2 wireless card bracket 3 wireless card slot 4 wireless card 5 antenna cables 2 37 ...

Страница 38: ...e Procedure CAUTION To avoid damage to the wireless card do not place any cables under it 1 Align the notch on the wireless card with the tab on the wireless card slot 2 Insert the wireless card at an angle into the wireless card slot 3 Connect the antenna cables to the wireless card The following table provides the antenna cable color scheme for the wireless card supported by your computer Connec...

Страница 39: ...t secures the wireless card bracket to the wireless card 1 tab 2 notch 3 wireless card slot 4 wireless card 5 antenna cables 2 6 wireless card bracket 7 screw Post requisites 1 Replace the battery 2 Replace the base cover 39 ...

Страница 40: ...de your computer follow the instructions in After working inside your computer For more safety best practices see the Regulatory Compliance home page at www dell com regulatory_compliance Prerequisites 1 Remove the base cover 2 Remove the battery Procedure 1 Open the latches and disconnect the keyboard cable keyboard daughter board cable touch pad cable and status light board cable from the keyboa...

Страница 41: ...pry the keyboard daughter board off the palm rest assembly 1 keyboard cable 2 palm rest assembly 3 touch pad cable 4 keyboard daughter board cable 5 latch 6 status light board cable 7 plastic scribe 8 keyboard daughter board 41 ...

Страница 42: ...e instructions in After working inside your computer For more safety best practices see the Regulatory Compliance home page at www dell com regulatory_compliance Procedure 1 Adhere the keyboard daughter board on the palm rest assembly 2 Connect the keyboard cable keyboard daughter board cable touch pad cable and status light board cable and close the latches to secure the cables Post requisites 1 ...

Страница 43: ...computer For more safety best practices see the Regulatory Compliance home page at www dell com regulatory_compliance Prerequisites 1 Remove the base cover 2 Remove the battery Procedure 1 Disconnect the speaker cable from the system board 2 Peel off the pieces of tape that secure the speaker cable to the palm rest assembly 3 Remove the speaker cable from the routing guides on the palm rest assemb...

Страница 44: ...speakers from the alignment posts and lift the speakers off the palm rest assembly 1 system board 2 speaker cable 3 palm rest assembly 4 routing guides 5 tape 3 6 alignment posts 7 speakers 2 8 rubber grommets 5 44 ...

Страница 45: ...he rubber grommets may get pushed out while replacing the speaker Ensure that the rubber grommets are in their position after placing the speaker on the palm rest assembly 1 Using the alignment posts align and place the speakers on the palm rest assembly 2 Replace the rubber grommets if they are pushed up while replacing the speaker 3 Route the speaker cable through the routing guides on the palm ...

Страница 46: ... working inside your computer follow the instructions in After working inside your computer For more safety best practices see the Regulatory Compliance home page at www dell com regulatory_compliance Prerequisites 1 Remove the base cover 2 Remove the battery Procedure 1 Remove the screws that secure the fan to the palm rest assembly 2 Disconnect the fan cable from the system board 46 ...

Страница 47: ...3 Lift the fan off the palm rest assembly 1 palm rest assembly 2 fan 3 screws 2 4 fan cable 5 system board 47 ...

Страница 48: ... instructions in After working inside your computer For more safety best practices see the Regulatory Compliance home page at www dell com regulatory_compliance Procedure 1 Align the screw holes on the fan with the screw holes on the palm rest assembly 2 Replace the screws that secure the fan to the palm rest assembly 3 Connect the fan cable to the system board Post requisites 1 Replace the batter...

Страница 49: ... page at www dell com regulatory_compliance WARNING The heat sink may become hot during normal operation Allow sufficient time for the heat sink to cool before you touch it CAUTION For maximum cooling of the processor do not touch the heat transfer areas on the heat sink The oils in your skin can reduce the heat transfer capability of the thermal grease Prerequisites 1 Remove the base cover 2 Remo...

Страница 50: ...2 Lift the heat sink off the system board 1 heat sink 2 captive screws 4 3 system board 50 ...

Страница 51: ...eat sink can damage the system board and processor NOTE The original thermal grease can be reused if the original system board and heat sink are reinstalled together If either the system board or the heat sink is replaced use the thermal pad provided in the kit to ensure that thermal conductivity is achieved Procedure 1 Place the heat sink on the system board 2 Align the screw holes on the heat si...

Страница 52: ...ee the Regulatory Compliance home page at www dell com regulatory_compliance Prerequisites 1 Remove the base cover 2 Remove the battery 3 Remove the hard drive Procedure 1 Peel off the tape that secures the power and volume buttons board cable to the palm rest assembly 2 Disconnect the power and volume buttons board cable from the I O board 3 Remove the power and volume buttons board cable from th...

Страница 53: ...5 Lift the power and volume buttons board off the palm rest assembly 1 tape 2 power and volume buttons board cable 3 routing guides 2 4 power and volume buttons board 5 screw 6 palm rest assembly 53 ...

Страница 54: ...m regulatory_compliance Procedure 1 Align the screw hole on the power and volume buttons board with the screw hole on the palm rest assembly 2 Replace the screw that secures the power and volume buttons board to the palm rest assembly 3 Route the power and volume buttons board cable through the routing guides on the palm rest assembly 4 Connect the power and volume buttons board cable to the I O b...

Страница 55: ... your computer follow the instructions in After working inside your computer For more safety best practices see the Regulatory Compliance home page at www dell com regulatory_compliance Prerequisites 1 Remove the base cover 2 Remove the battery Procedure 1 Peel off the pieces of tape securing the speaker cable to the palm rest assembly 2 Remove the speaker cable from the routing guides on the palm...

Страница 56: ...t the speaker cable off the status light board 1 tape 2 2 speaker cable 3 routing guides 4 palm rest assembly 4 Open the latch and disconnect the status light board cable from the keyboard daughter board 56 ...

Страница 57: ...5 Lift the status light board off the palm rest assembly 1 latch 2 status light board cable 3 keyboard daughter board 4 status light board 57 ...

Страница 58: ...ur computer For more safety best practices see the Regulatory Compliance home page at www dell com regulatory_compliance Procedure 1 Align and place the status light board in the slot on the palm rest assembly 2 Slide the status light board cable into the connector on the keyboard daughter board and close the latch to secure the cable 3 Adhere the pieces of tape securing the speaker cable to the p...

Страница 59: ...your computer follow the instructions in After working inside your computer For more safety best practices see the Regulatory Compliance home page at www dell com regulatory_compliance Prerequisites 1 Remove the base cover 2 Remove the battery 3 Remove the status light board Procedure 1 Open the latches and disconnect the keyboard daughter board cable from the keyboard daughter board and the syste...

Страница 60: ...hter board 1 system board 2 keyboard daughter board cable 3 latch 4 touch pad cable 5 keyboard daughter board 6 palm rest assembly 3 Peel off the pieces of tape that secure the touch pad to the palm rest assembly 4 Remove the screws that secure the touch pad bracket to the palm rest assembly 60 ...

Страница 61: ...5 Lift the touch pad bracket off the palm rest assembly 1 screws 4 2 palm rest assembly 3 touch pad bracket 4 tape 2 6 Remove the screws that secure the touch pad to the palm rest assembly 61 ...

Страница 62: ...7 Lift the touch pad off the palm rest assembly 1 screws 4 2 palm rest assembly 3 touch pad 62 ...

Страница 63: ...ace the screws that secure the touch pad to the palm rest assembly 4 Align the screw holes on the touch pad bracket with the screw holes on the palm rest assembly 5 Replace the screws that secure the touch pad bracket to the palm rest assembly 6 Adhere the pieces of tape that secure the touch pad to the palm rest assembly 7 Slide both ends of the touch pad cable into their respective connectors on...

Страница 64: ...www dell com regulatory_compliance Prerequisites 1 Remove the base cover 2 Remove the battery 3 Remove the wireless card Procedure 1 Peel off the tape that secures the I O board cable to the I O board 2 Disconnect the I O board cable from the I O board 3 Peel off the tape that secures the power and volume buttons board cable to the palm rest assembly 4 Disconnect the power and volume buttons board...

Страница 65: ...7 Lift the I O board off the palm rest assembly 1 I O board 2 tape 3 I O board cable 4 screws 2 5 latch 6 palm rest assembly 7 coin cell battery cable 8 tape 9 power and volume buttons board cable 65 ...

Страница 66: ...Place the I O board on the palm rest assembly 2 Align the screw hole on the I O board with the screw hole on the palm rest assembly 3 Replace the screw that secures the I O board to the palm rest assembly 4 Connect the power and volume buttons board cable and coin cell battery cable to the I O board 5 Connect the I O board cable to the I O board 6 Adhere the tape that secures the power and volume ...

Страница 67: ...king inside your computer follow the instructions in After working inside your computer For more safety best practices see the Regulatory Compliance home page at www dell com regulatory_compliance Prerequisites 1 Remove the base cover 2 Remove the battery 3 Remove the wireless card Procedure 1 Peel off the pieces of tape that secure the display cable and touch screen board cable to the system boar...

Страница 68: ...system board 1 antenna cables 2 2 display cable 3 touch screen board cable 4 latch 5 tape 2 3 Turn the computer over and open the display as far as possible CAUTION Place the computer on a soft and clean surface to avoid scratching the display 4 Place the computer face down on a flat surface 68 ...

Страница 69: ...5 Remove the screws that secure the display assembly to the palm rest assembly 1 display assembly 2 screws 4 3 display hinges 2 4 palm rest assembly 69 ...

Страница 70: ...6 Lift the display assembly off the palm rest assembly 1 display assembly 70 ...

Страница 71: ...the display 1 Place the display assembly face down on the palm rest assembly 2 Align the screw holes on the display hinges with the screw holes on the palm rest assembly 3 Replace the screws that secure the display assembly to the palm rest assembly 4 Close the display and turn the computer over 5 Slide the display cable and the touch screen board cable into their respective connectors on the syst...

Страница 72: ... the instructions in After working inside your computer For more safety best practices see the Regulatory Compliance home page at www dell com regulatory_compliance Prerequisites 1 Remove the base cover 2 Remove the battery 3 Remove the wireless card 4 Remove the display assembly Procedure 1 Disconnect the power adapter port cable from the system board 2 Remove the screw that secures the power ada...

Страница 73: ...3 Lift the power adapter port off the palm rest assembly 1 power adapter port cable 2 screw 3 power adapter port 4 system board 5 palm rest assembly 73 ...

Страница 74: ...ces see the Regulatory Compliance home page at www dell com regulatory_compliance Procedure 1 Place the power adapter port into the slot on the palm rest assembly 2 Align the screw hole on the power adapter port with the screw hole on the palm rest assembly 3 Replace the screw that secures the power adapter port to the palm rest assembly 4 Connect the power adapter port cable to the system board P...

Страница 75: ...rvice Tag in the BIOS setup program after you replace the system board NOTE Replacing the system board removes any changes you have made to the BIOS using the BIOS setup program You must make the appropriate changes again after you replace the system board NOTE Before disconnecting the cables from the system board note the location of the connectors so that you can reconnect the cables correctly a...

Страница 76: ...d 3 Open the latches to disconnect the display cable and the touch screen board cable from the system board 4 Open the latch to disconnect the I O board cable from the system board 5 Disconnect the power adapter cable and the speaker cable from the system board 6 Open the latch and disconnect the keyboard daughter board cable from the system board 76 ...

Страница 77: ...ard 1 display cable 2 touch screen cable 3 tape 4 power adapter port cable 5 speaker cable 6 latch 7 keyboard daughter board cable 8 hard drive cable 9 I O board cable 10 tape 8 Remove the screws that secure the system board to the palm rest assembly 77 ...

Страница 78: ...9 Lift the system board off the palm rest assembly 1 screw 2 system board 3 palm rest assembly 78 ...

Страница 79: ...you replace the system board Procedure 1 Align the screw holes on the system board with the screw holes on the palm rest assembly 2 Replace the screw that secures the system board to the palm rest assembly 3 Slide the I O board cable into the system board connector close the latch to secure the cable 4 Adhere the tape that secures the I O board cable to the system board 5 Connect the power adapter...

Страница 80: ... Replace the base cover Entering the Service Tag in the BIOS setup program 1 Turn on or restart your computer 2 Press F2 when the Dell logo is displayed to enter the BIOS setup program 3 Navigate to the Main tab and enter the Service Tag in the Service Tag Input field 80 ...

Страница 81: ...compliance Prerequisites 1 Remove the base cover 2 Remove the battery 3 Remove the memory modules 4 Remove the coin cell battery 5 Remove the hard drive 6 Remove the wireless card 7 Remove the keyboard daughter board 8 Remove the touch pad 9 Remove the fan 10 Remove the heat sink 11 Remove the I O board 12 Remove the power and volume buttons board 13 Remove the status light board 14 Remove the spe...

Страница 82: ...1 palm rest 82 ...

Страница 83: ...ance Procedure Place the palm rest and keyboard assembly on a flat surface with the keyboard facing down Post requisites 1 Replace the system board 2 Replace the power adapter port 3 Replace the display assembly 4 Replace the speakers 5 Replace the status light board 6 Replace the power and volume buttons board 7 Replace the I O board 8 Replace the heat sink 9 Replace the fan 10 Replace the touch ...

Страница 84: ...uter After working inside your computer follow the instructions in After working inside your computer For more safety best practices see the Regulatory Compliance home page at www dell com regulatory_compliance Prerequisites 1 Remove the base cover 2 Remove the battery 3 Remove the display assembly Procedure 1 Remove the display cable from the routing guides inside the hinge covers 84 ...

Страница 85: ...display panel assembly off the display back cover and antenna assembly 1 plastic scribe 2 display back cover 3 routing guides 4 display cable 5 hinge covers 6 display panel 3 Turn over the display panel assembly 4 Remove the camera 85 ...

Страница 86: ...5 Remove the sensor board After performing the above steps we are left with the display panel 1 display panel 86 ...

Страница 87: ...the Regulatory Compliance home page at www dell com regulatory_compliance Procedure 1 Place the display panel on a flat surface 2 Replace the sensor board 3 Replace the camera 4 Turn over the display panel assembly 5 Route the display cable through the routing guides inside the hinge covers 6 Align the display panel assembly with the display back cover and antenna assembly and gently snap the disp...

Страница 88: ...er follow the instructions in After working inside your computer For more safety best practices see the Regulatory Compliance home page at www dell com regulatory_compliance Prerequisites 1 Remove the base cover 2 Remove the battery 3 Remove the display assembly 4 Follow the procedure from step 1 to 2 in Removing the display panel Procedure After performing the steps in prerequisites we are left w...

Страница 89: ...1 display back cover and antenna assembly 2 antenna cables 89 ...

Страница 90: ...puter After working inside your computer follow the instructions in After working inside your computer For more safety best practices see the Regulatory Compliance home page at www dell com regulatory_compliance Procedure Place the display back cover and antenna assembly on a flat surface Post requisites 1 Replace the display panel 2 Replace the display assembly 3 Replace the battery 4 Replace the...

Страница 91: ...your computer For more safety best practices see the Regulatory Compliance home page at www dell com regulatory_compliance Prerequisites 1 Remove the base cover 2 Remove the battery 3 Remove the display assembly 4 Follow the procedure from step 1 to step 3 in Removing the display panel Procedure CAUTION Place the display panel assembly on a soft and clean surface to avoid scratching the display 1 ...

Страница 92: ...2 Turn the camera over and peel off the tape to disconnect the camera cable from the camera module 1 display panel 2 plastic scribe 3 camera module 4 camera cable 5 tape 92 ...

Страница 93: ...afety best practices see the Regulatory Compliance home page at www dell com regulatory_compliance Procedure 1 Connect the camera cable to the camera module 2 Adhere the tape that secures the camera cable to the camera module 3 Using the alignment post place the camera module on the display panel and snap it into place Post requisites 1 Follow the procedure from step 4 to step 6 in Replacing the d...

Страница 94: ... dell com regulatory_compliance Prerequisites 1 Remove the base cover 2 Remove the battery 3 Remove the display assembly 4 Follow the procedure from step 1 to step 3 in Removing the display panel 5 Remove the camera Procedure 1 Peel off the tape and open the latch to disconnect the display cable from the display panel 2 Peel off the sensor board cable tape and disconnect the sensor board cable 3 O...

Страница 95: ...5 Lift the display cable off the display panel 1 tape 2 sensor board cable tape 3 sensor board cable 4 display cable 5 latch 6 display panel 95 ...

Страница 96: ...ance Procedure 1 Route the display cable through the routing guides on the display panel 2 Slide the display cable into the connector and press down the latch to secure the cable 3 Slide the sensor board cable into the connector on the sensor board and press down the latch to secure the cable 4 Adhere the sensor board cable tape 5 Adhere the tape that secures the display cable to the display panel...

Страница 97: ...e the Regulatory Compliance home page at www dell com regulatory_compliance Prerequisites 1 Remove the base cover 2 Remove the battery 3 Remove the display assembly 4 Follow the procedure from step 1 to step 3 in Removing the display panel Procedure CAUTION Place the display panel assembly on a soft and clean surface to avoid scratching the display 1 Remove the screw that secures the sensor board ...

Страница 98: ...3 Lift the sensor board off the display panel 1 sensor board 2 screw 3 tape 4 sensor board cable 5 latch 98 ...

Страница 99: ... www dell com regulatory_compliance Procedure 1 Align the screw hole on the sensor board to the display panel and snap the sensor board in place 2 Slide the sensor board cable into the slot on sensor board and press down the latch to secure the cable 3 Adhere the tape on the sensor board connector to secure the cable 4 Replace the screw that secures the sensor board to the display panel Post requi...

Страница 100: ...ave the Service Tag use the auto detect feature or manually browse for your computer model 4 Click or tap Drivers downloads Find it myself 5 Select the operating system installed on your computer 6 Scroll down the page and expand BIOS 7 Click or tap Download to download the latest version of the BIOS for your computer 8 After the download is complete navigate to the folder where you saved the BIOS...

Страница 101: ...e the Service Tag use the auto detect feature or manually browse for your computer model 4 Click or tap Drivers downloads Find it myself 5 Scroll down the page and expand Audio 6 Click or tap Download to download the audio driver for your computer 7 After the download is complete navigate to the folder where you saved the audio driver file 8 Double click or double tap the audio driver file icon an...

Страница 102: ...e camera has built in digital array microphones NOTE You must replace the camera module if you encounter any issues with the built in microphones Infrared camera optional Allows you to video chat capture photos and record videos Depth sensing feature of the camera enhances security when paired with Windows Hello Identifying the webcam in device manager 1 On the taskbar click or tap the search box ...

Страница 103: ... with your computer which contains the Dell Webcam Central software If you do not have the software you can download it by registering through My Account on the Dell website NOTE The Dell Webcam Central is not available for download from the support site or the resource CD 103 ...

Страница 104: ...ck or touch and hold on your desktop and select Display settings 2 Drag or swipe the Adjust brightness level slider to adjust the brightness You can press F11 to decrease brightness and F12 to increase brightness Changing the screen resolution 1 Right click or touch and hold on your desktop and select Display settings 2 Click or tap Advanced display settings 3 Select the appropriate resolution fro...

Страница 105: ...owing options Rotate to 0 Degrees Rotate to 90 Degrees Rotate to 180 Degrees Rotate to 270 Degrees The display can also be rotated using the following key combinations Ctrl Alt Up arrow key Rotate to 0 Degrees Ctrl Alt Right arrow key Rotate to 90 Degrees Ctrl Alt Down arrow key Rotate to 180 Degrees Ctrl Alt Left arrow key Rotate to 270 Degrees 105 ...

Страница 106: ...computer and display before cleaning 2 Gently wipe the display in circular motions to remove any dust or dirt particles 3 Let the display dry thoroughly before turning it on HDMI The Inspiron 13 5378 supports HDMI to connect a TV or another HDMI in enabled device It provides video and audio output The HDMI port is located on the left side of your computer NOTE Appropriate converters sold separatel...

Страница 107: ...3 Select one of the following display modes PC screen only Duplicate Extend Second screen only NOTE For more information see the document that shipped with your display device 107 ...

Страница 108: ...the Service Tag use the auto detect feature or manually browse for your computer model 4 Click or tap Drivers downloads Find it myself 5 Scroll down the page and expand Video 6 Click or tap Download to download the graphics driver for your computer 7 After the download is complete navigate to the folder where you saved the graphics driver file 8 Double click or double tap the graphics driver file ...

Страница 109: ...play feature allows you to share your computer display with a compatible TV without using cables You must connect a wireless display adapter to your TV before setting up the wireless display To check if your TV supports this feature see the documentation that is shipped with the TV The following table provides the basic system requirements for a wireless display Processor 2nd generation Intel Core...

Страница 110: ... for your computer 7 After the download is complete navigate to the folder where you saved the WiDi application file 8 Double click or double tap the application icon and follow the instructions on the screen to install the application Setting up the wireless display 1 Turn on your computer NOTE Ensure that Wi Fi is enabled 2 Connect the wireless display adapter to the TV 3 Turn on the TV and the ...

Страница 111: ...r computer model 4 Click or tap Drivers Downloads Find it myself 5 Scroll down the page and expand Chipset 6 Click or tap Download to download the USB 3 0 driver for your computer 7 After the download is complete navigate to the folder where you saved USB 3 0 driver file 8 Double click or double tap the USB 3 0 driver file icon and follow the instructions on screen to install the driver Enabling o...

Страница 112: ...een to enter the BIOS setup program The BIOS setup program is displayed 3 On the left pane select Settings System Configuration USB Configuration The USB configuration is displayed on the right pane 4 Clear the Enable Boot Support check box to disable it 5 Save the settings and exit Wi Fi The Inspiron 13 5378 is shipped with Wi Fi 802 11ac Turning on or off Wi Fi NOTE There is no physical switch t...

Страница 113: ...he Wi Fi driver file 8 Double click or double tap the driver file icon and follow the on screen instructions to install the driver Configuring Wi Fi 1 Turn on Wi Fi For more information see Turning on or off Wi Fi 2 Swipe in from the right edge of the display or click or tap the Action Center icon on the task bar to access the Action Center 3 Right click or touch and hold Wi Fi and then click or t...

Страница 114: ...lick or tap Bluetooth to turn Bluetooth on or off Pairing the Bluetooth enabled devices 1 Turn on Bluetooth For more information see Turning on or off Bluetooth 2 Swipe in from the right edge of the display or click or tap the Action Center icon on the task bar to access the Action Center 3 Right click or touch and hold Bluetooth and then click or tap Go to settings 4 Select the required Bluetooth...

Страница 115: ...n the task bar to access the Action Center 2 Right click or touch and hold Bluetooth and then click or tap Go to settings 3 Click or tap the device you want to remove and click or tap Remove device Transferring files between devices using Bluetooth 1 Swipe in from the right edge of the display or click or tap the Action Center icon on the task bar to access the Action Center 115 ...

Страница 116: ... or tap Send files and then select the file you want to transfer Hard drive The following table shows the hard drive options available in Inspiron 13 5378 Capacity Dimensions HDD 2 5 inch drive SSD 2 5 inch drive Identifying the hard drive 1 On the taskbar click or tap the search box and then type Device Manager 2 Click or tap Device Manager The Device Managerwindow is displayed 3 Expand Disk driv...

Страница 117: ...ions on the screen Downloading the media card reader driver 1 Turn on your computer 2 Go to www dell com support 3 Click or tap Product Support enter the Service Tag of your computer and then click or tap Submit NOTE If you do not have the Service Tag use the auto detect feature or manually browse for your computer model 4 Click or tap Drivers Downloads Find it myself 5 Scroll down the page and ex...

Страница 118: ...language 5 Choose the language you want to add and select a country for the language 6 Under Languages click or tap the language that you want to set as the default language 7 Click or tap Set as default Keyboard shortcuts Keys Description Mute audio Decrease volume Increase volume Play previous track chapter Play Pause Play next track chapter Switch to external display Search Toggle keyboard back...

Страница 119: ... lock End Home Page down Page up Touch pad The Inspiron 13 5378 is shipped with a Precision touch pad A precision touch pad is a new class of input device that provides high precision pointer input and gesture functionality Precision touch pads interact with the operating system directly without a driver The operating system handles the overall functionality of the touch pad and there are no separ...

Страница 120: ...n item Slide to scroll Place two fingers on the touch pad and then slide Scrolls the page Pages can scroll left and right up and down or both Pinch or stretch to zoom Place two fingers on the touch pad and move them toward each other or away from each other Zooms in stretch or zooms out pinch on the touch pad Swipe for Action Center Swipe in from the right edge Opens the Action Center Swipe again ...

Страница 121: ...ing the power adapter Battery The Inspiron 13 5378 is shipped with 4 cell smart lithium ion 56 WHr battery NOTE Batteries are covered for a period of one year from the invoice date unless stated otherwise in the invoice Chipset The chipset is virtually divided into two sections Northbridge and Southbridge All computer components communicate with the CPU through the chipset The Inspiron 13 5378 is ...

Страница 122: ...ou saved the chipset driver file 8 Double click or double tap the chipset driver file icon and follow the instructions on the screen to install the driver Identifying the chipset 1 On the taskbar click or tap the search box and then type Device Manager 2 Click or tap Device Manager The Device Manager window is displayed 3 Expand System devices 122 ...

Страница 123: ...the left pane select Settings General System Information The memory information is displayed on the right pane Testing memory using ePSA 1 Turn on or restart your computer 2 Press F12 after the Dell logo is displayed on the screen to access the boot menu 3 Use the arrow keys to highlight the Diagnostics menu option and press Enter 4 Follow the instructions on the screen to complete the ePSA Pre bo...

Страница 124: ...vice Manager window is displayed 3 Expand Processors Checking the processor usage in the task manager 1 Right click or double tap on the taskbar 2 Click or tap Task Manager The Task Manager window is displayed 3 Click or tap Performance tab to display processor performance details Operating System The Inspiron 13 5378 is shipped with the Windows 10 factory installation 124 ...

Страница 125: ...formation Device drivers Intel Dynamic Platform and Thermal Framework In the Device Manager check if the Intel Dynamic Platform and Thermal Framework is installed Install the driver updates from www dell com support Intel Chipset Software Installation Utility In the Device Manager check if the chipset driver is installed Install the Intel chipset updates from www dell com support 125 ...

Страница 126: ...check if the video driver is installed Install the video driver updates from www dell com support Intel Serial IO Driver In the Device Manager check if the Intel Serial IO Driver is installed Install the driver updates from www dell com support 126 ...

Страница 127: ...127 ...

Страница 128: ...Intel Trusted Execution Engine Interface In the device manager check if the Intel Trusted Execution Engine Interface driver is installed Install the driver updates from www dell com support 128 ...

Страница 129: ...Intel Virtual Button driver Check if the Intel Virtual Button driver is installed by looking at Device Manager under System devices shown below Install the driver update from www dell com support 129 ...

Страница 130: ...rs In the Device Manager check if the network card driver is installed Install the driver updates from www dell com support In the Device Manager check if the Bluetooth driver is installed Install the driver updates from www dell com support 130 ...

Страница 131: ...ements The boot menu enhancements are as follows Easier Access Press F12 to access the boot selection menu User Prompting The user is prompted to use the keystroke on the BIOS screen Diagnostics Options The boot menu includes the ePSA diagnostic options Timing key sequences The keyboard is not the first device initialized by Setup As a result if you press a keystroke too early the keyboard is lock...

Страница 132: ...Computer is running on battery and the battery has more than 5 percent charge Computer is in sleep state hibernation or turned off The power and battery status light blinks amber along with beep codes indicating failures For example the power and battery status light blinks amber two times followed by a pause and then blinks white three times followed by a pause This 2 3 pattern continues until th...

Страница 133: ...r chip failure Replace the CMOS battery 3 3 Recovery image not found Reimage the system 3 4 Recovery image found but invalid Reimage the system The computer may emit a series of beeps during start up if the errors or problems cannot be displayed The repetitive beep codes help the user troubleshoot problems with the computer Camera status light Indicates whether the camera is in use Solid white Cam...

Страница 134: ...ows 8 1 and Windows 10 In Windows search type Help and Support and press Enter Accessing help in Windows 7 Click Start Help and Support Online help for operating system www dell com support windows www dell com support linux Troubleshooting information user manuals setup instructions product specifications technical help blogs drivers software updates and so on www dell com support Learn about you...

Страница 135: ...see www dell com contactdell NOTE Availability varies by country and product and some services may not be available in your country NOTE If you do not have an active internet connection you can find contact information on your purchase invoice packing slip bill or Dell product catalog 135 ...

Отзывы: