background image

Removing and Installing Parts

61

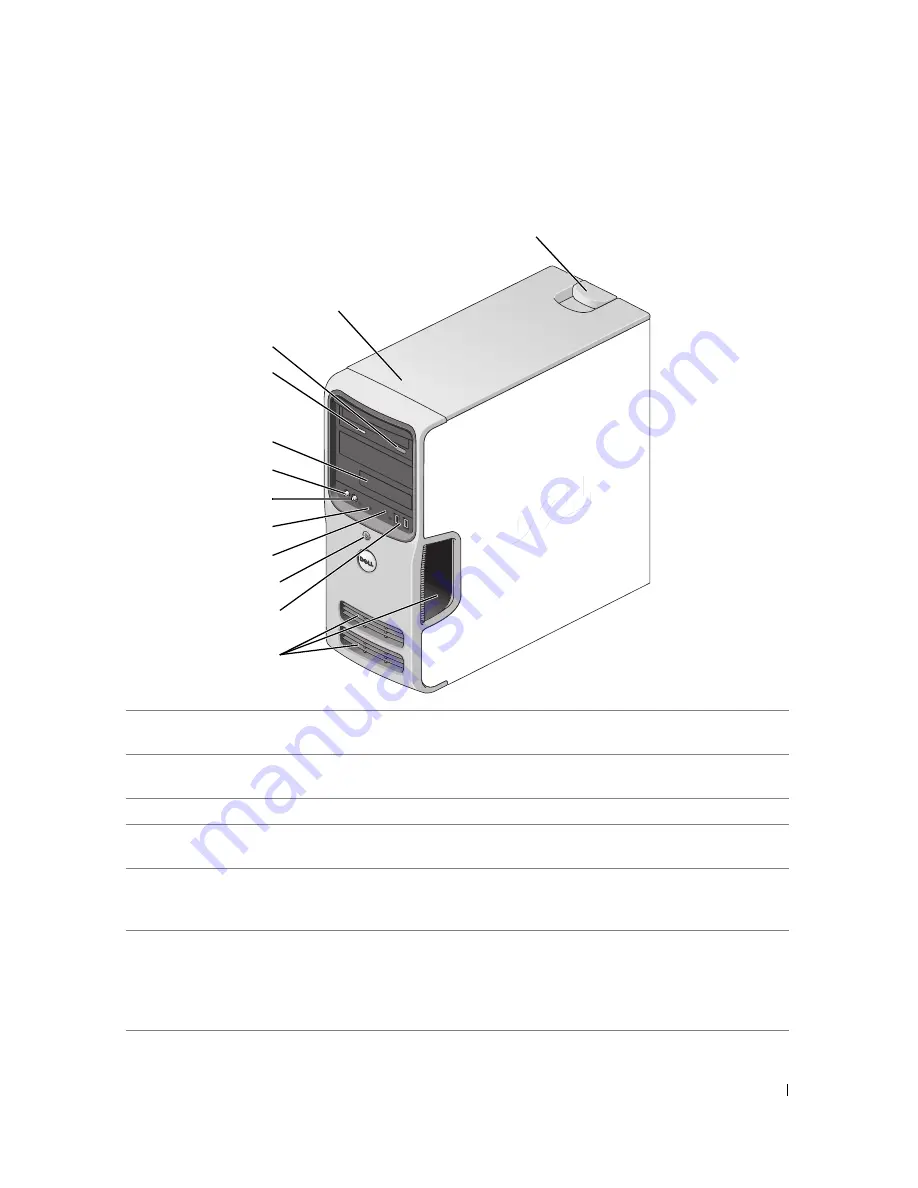
Front View of the Computer

1

cover latch release 

Use this latch to remove the cover. See "Removing the 
Computer Cover" on page 65.

2

location of Service Tag

Use the Service Tag to identify your computer when you access 
the Dell Support website or call technical support.

3

CD or DVD eject button

Press to eject a disk from the CD or DVD drive.

4

CD or DVD activity light

The drive light is on when the computer reads data from the 
CD or DVD drive.

5

FlexBay drive

Can contain an optional floppy drive or optional Media Card 
Reader. For information on using the Media Card Reader, see 
"Using a Media Card Reader (Optional)" on page 20.

6

microphone connector

Use the microphone connector to attach a personal computer 
microphone for voice or musical input into a sound or 
telephony program.
On computers with a sound card, the microphone connector is 
on the card.

2

1

3

4

5

6

7

8

9

10

11

12

Содержание Dimension E520

Страница 1: ...connector headphone connector CD or DVD activity light CD or DVD eject button diagnostic lights USB 2 0 connectors 2 cover latch release Service Tag power button power activity light power connector USB 2 0 connectors 6 optional VGA video connector integrated network adapter sound connectors integrated 6 card slots for PCI Express x16 1 PCI 2 PCI Express x1 1 PCI Express graphics card ...

Страница 2: ... any manner whatsoever without the written permission of Dell Inc is strictly forbidden Trademarks used in this text Dell the DELL logo Inspiron Dell Precision Dimension OptiPlex Latitude PowerEdge PowerVault PowerApp DellNet Dell TravelLite Strike Zone and PowerConnect are trademarks of Dell Inc Bluetooth is a registered trademark owned by Bluetooth SIG Inc and is used by Dell under license Intel...

Страница 3: ...w to Copy a CD or DVD 18 Using Blank CDs and DVDs 18 Helpful Tips 19 Using a Media Card Reader Optional 20 Connecting Two Monitors 22 Connecting Two Monitors With VGA Connectors 22 Connecting One Monitor With a VGA Connector and One Monitor With a DVI Connector 23 Connecting a TV 23 Changing the Display Settings 23 Setting Up a Home and Office Network 23 Connecting to a Network Adapter 23 Network ...

Страница 4: ...ms 31 Troubleshooting Tips 31 Battery Problems 31 Drive Problems 32 CD and DVD drive problems 32 Hard drive problems 33 E Mail Modem and Internet Problems 33 Error Messages 34 Keyboard Problems 35 Lockups and Software Problems 36 The computer does not start up 36 The computer stops responding 36 A program stops responding 36 A program crashes repeatedly 37 A program is designed for an earlier Micr...

Страница 5: ...stics Main Menu 50 Drivers 51 What Is a Driver 51 Identifying Drivers 52 Reinstalling Drivers 52 Resolving Software and Hardware Incompatibilities 53 Restoring Your Operating System 53 Using Microsoft Windows XP System Restore 54 Using Dell PC Restore by Symantec 55 Using the Operating System CD 57 4 Removing and Installing Parts 59 Before You Begin 59 Recommended Tools 59 Turning Off Your Compute...

Страница 6: ...ve Panel Insert 84 Replacing the Drive Panel Insert 84 Replacing the Drive Panel 85 Drives 86 Connecting Drive Cables 87 Drive Interface Connectors 87 Connecting and Disconnecting Drive Cables 88 Hard Drive 88 Removing a Hard Drive 88 Installing a Hard Drive 90 Adding a Second Hard Drive 91 Floppy Drive 93 Removing a Floppy Drive 93 Installing a Floppy Drive 94 Media Card Reader 97 Removing a Medi...

Страница 7: ...ce 119 Clearing Forgotten Passwords 120 Clearing CMOS Settings 121 Cleaning Your Computer 121 Computer Keyboard and Monitor 121 Mouse 122 Floppy Drive 122 CDs and DVDs 122 Dell Technical Support Policy U S Only 123 Definition of Dell Installed Software and Peripherals 123 Definition of Third Party Software and Peripherals 123 FCC Notice U S Only 123 FCC Class B 123 Contacting Dell 124 Glossary 147...

Страница 8: ...8 Contents ...

Страница 9: ...y not be available in certain countries NOTE Additional information may ship with your computer What Are You Looking For Find it Here Warranty information Terms and Conditions U S only Safety instructions Regulatory information Ergonomics information End User License Agreement Dell Product Information Guide How to set up my computer Setup Diagram ...

Страница 10: ...d drivers patches and software updates Dell Support Website support dell com NOTE Select your region to view the appropriate support site NOTE Corporate government and education customers can also use the customized Dell Premier Support website at premier support dell com Desktop System Software DSS If you reinstall the operating system for your computer you should also reinstall the DSS utility D...

Страница 11: ...o personalize my desktop Windows Help and Support Center 1 Click Start Help and Support 2 Type a word or phrase that describes your problem and click the arrow icon 3 Click the topic that describes your problem 4 Follow the instructions on the screen What Are You Looking For Find it Here ...

Страница 12: ...12 Finding Information ...

Страница 13: ... s manual or contact the printer manufacturer Printer Cable Your printer connects to your computer with a USB cable Your printer may not come with a printer cable so if you purchase a cable separately ensure that it is compatible with your printer If you purchased a printer cable at the same time you purchased your computer the cable may arrive in the computer box Connecting a Printer NOTE You can...

Страница 14: ...rough a telephone line Dial up connections are considerably slower than DSL and cable modem connections DSL connections that provide high speed Internet access through your existing telephone line With a DSL connection you can access the Internet and use your telephone on the same line simultaneously Cable modem connections that provide high speed Internet access through your local cable TV line I...

Страница 15: ...hoose from a list of Internet service providers ISPs If you have already obtained setup information from your ISP but you did not receive a setup CD click Set up my connection manually If you have a CD click Use the CD I got from an ISP 5 Click Next If you selected Set up my connection manually continue to step 6 Otherwise follow the instructions on the screen to complete the setup NOTE If you do ...

Страница 16: ...the drive 2 Place the disc label side up in the center of the tray 3 Press the eject button or gently push in the tray To format CDs for storing data to create music CDs or to copy CDs see the CD software that came with your computer NOTE Ensure that you follow all copyright laws when you create CDs A CD player includes the following basic buttons Play Move backward within the current track Pause ...

Страница 17: ...trol window Adjusting the Picture If an error message notifies you that the current resolution and color depth are using too much memory and preventing DVD playback adjust the display properties 1 Click the Start button and click Control Panel 2 Under Pick a category click Appearance and Themes 3 Under Pick a task click Change the screen resolution 4 In the Display Properties window click and drag...

Страница 18: ...AM or DVD R DL media NOTE Most commercial DVDs have copyright protection and cannot be copied using Sonic DigitalMedia 1 Click Start All Programs Sonic DigitalMedia Projects Copy Disc Copy 2 To copy the CD or DVD If you have one CD or DVD drive ensure that the settings are correct and click the Disc Copy button The computer reads your source CD or DVD and copies the data to a temporary folder on y...

Страница 19: ... not play in most home or car stereos You cannot create audio DVDs with Sonic DigitalMedia Music MP3 files can be played only on MP3 players or on computers that have MP3 software installed Commercially available DVD players used in home theater systems may not support all available DVD formats For a list of formats supported by your DVD player see the documentation provided with your DVD player o...

Страница 20: ...ermanently to a blank CD R See the Sonic website at www sonic com for additional information Using a Media Card Reader Optional Use the Media Card Reader to transfer data directly to your computer The Media Card Reader supports the following memory types xD Picture Card SmartMedia SMC CompactFlash Type I and II CF I II MicroDrive Card SecureDigital Card SD MultiMediaCard MMC Memory Stick MS MS Pro...

Страница 21: ...media or card into the appropriate slot until it is completely seated in the connector If you encounter resistance do not force the media or card Check the card orientation and try again 1 xD Picture Card and SmartMedia SMC 2 CompactFlash Type I and II CF I II and MicroDrive Card 3 Memory Stick MS MS Pro 4 SecureDigital Card SD MultiMediaCard MMC 1 3 4 2 ...

Страница 22: ...u how to connect either two monitors each with a VGA connector one monitor with a VGA connector and one monitor with a DVI connector or a TV Connecting Two Monitors With VGA Connectors 1 Follow the procedures in Before You Begin on page 59 NOTE If your computer has integrated video do not connect either monitor to the integrated video connector If the integrated video connector is covered by a cap...

Страница 23: ...uter The Microsoft Windows desktop displays on the primary monitor 2 Enable clone mode or extended desktop mode in the display settings In clone mode both monitors display the same image In extended desktop mode you can drag objects from one screen to the other effectively doubling the amount of viewable work space For information on changing the display settings for your graphics card see the use...

Страница 24: ...he integrated firewall provided with Windows XP Service Pack 4 Complete the checklist and required preparations 5 Return to the Network Setup Wizard and follow the instructions on the screen Power Management The Microsoft Windows XP power management features can reduce the amount of electricity your computer uses when it is on and you are not using it You can reduce power to just the monitor or th...

Страница 25: ... in standby mode it may lose data Hibernate Mode Hibernate mode conserves power by copying system data to a reserved area on the hard drive and then completely turning off the computer When the computer exits from hibernate mode the desktop is restored to the state it was in before it entered hibernate mode To activate hibernate mode 1 Click the Start button and click Control Panel 2 Under Pick a ...

Страница 26: ...f you want your computer to run without interruption using no power conservation Minimal Power Management If you want your computer to run with minimal power conservation Max Battery If your computer is a portable computer and you run your computer from batteries for extended periods of time If you want to change the default settings for a scheme click the drop down menu in the Turn off monitor Tu...

Страница 27: ... using Hyper Threading with your software To determine whether your computer is using Hyper Threading technology 1 Click the Start button right click My Computer and then click Properties 2 Click Hardware and click Device Manager 3 In the Device Manager window click the plus sign next to Processors If Hyper Threading is enabled the processor is listed twice You can enable or disable Hyper Threadin...

Страница 28: ...ted the replacement connection of a secondary hard drive and will automatically restore the RAID configuration the next time the operating system loads RAID Level 1 RAID level 1 uses a data redundancy storage technique known as mirroring When data is written to the primary drive the data is then duplicated or mirrored on the other drive A RAID level 1 configuration sacrifices high data access rate...

Страница 29: ...n will be equivalent to the smaller of the two drives used 1 Set your computer to RAID enabled mode see Setting Your Computer to RAID Enabled Mode on page 30 2 Press Ctrl i when you are prompted to enter the Intel RAID Option ROM utility 3 Use the up and down arrow keys to highlight Create RAID Volume and press Enter 4 Enter a RAID volume name or accept the default and press Enter 5 Select RAID1 M...

Страница 30: ...the boot process Dell DataSafe Optional Dell DataSafe is a solution that helps you protect your data from unfortunate events such as data loss from system crashes hard drive failures software corruption viruses and other accidents Using Intel technology your computer has a robust level of data protection out of the factory With Dell DataSafe you will have a selected area on your system that automa...

Страница 31: ...ee the program s documentation Battery Problems CAUTION There is a danger of a new battery exploding if it is incorrectly installed Replace the battery only with the same or equivalent type recommended by the manufacturer Discard used batteries according to the manufacturer s instructions CAUTION Before you begin any of the procedures in this section follow the safety instructions in the Product I...

Страница 32: ... check for and remove viruses Viruses can sometimes prevent Windows from recognizing the drive TEST THE DRIVE Insert another floppy disk CD or DVD to eliminate the possibility that the original one is defective Insert bootable media and restart the computer CLEAN THE DRIVE OR DISK See Cleaning Your Computer on page 121 CHECK THE CABLE CONNECTIONS RUN THE HARDWARE TROUBLESHOOTER See Resolving Softw...

Страница 33: ...e stream is interrupted an error occurs Try closing all programs before you write to the CD DVD RW TURN OFF STANDBY MODE IN WINDOWS BEFORE WRITING TO A CD DVD RW DISC Search for the keyword standby in Windows Help RUN CHECK DISK 1 Click the Start button and click My Computer 2 Right click Local Disk C 3 Click Properties 4 Click the Tools tab 5 Under Error checking click Check Now 6 Click Scan for ...

Страница 34: ... 10 ft or more in length try a shorter one RUN THE MODEM HELPER DIAGNOSTICS Click the Start button point to All Programs and then click Modem Helper Follow the instructions on the screen to identify and resolve modem problems Modem Helper is not available on all computers VERIFY THAT THE MODEM IS COMMUNICATING WITH WINDOWS 1 Click the Start button and click Control Panel 2 Click Printers and Other...

Страница 35: ...g Dell on page 124 drive letter IS NOT ACCESSIBLE THE DEVICE IS NOT READY The drive cannot read the disk Insert a disk into the drive and try again INSERT BOOTABLE MEDIA Insert a bootable floppy disk or CD NON SYSTEM DISK ERROR Remove the floppy disk from the drive and restart your computer NOT ENOUGH MEMORY OR RESOURCES CLOSE SOME PROGRAMS AND TRY AGAIN Close all windows and open the program that...

Страница 36: ...the keyboard RUN THE HARDWARE TROUBLESHOOTER See Resolving Software and Hardware Incompatibilities on page 53 CHECK THE DIAGNOSTIC LIGHTS See Diagnostic Lights on page 47 ENSURE THAT THE POWER CABLE IS FIRMLY CONNECTED TO THE COMPUTER AND TO THE ELECTRICAL OUTLET TURN THE COMPUTER OFF If you are unable to get a response by pressing a key on your keyboard or moving your mouse press and hold the pow...

Страница 37: ...ollow the instructions on the screen TURN THE COMPUTER OFF If you are unable to get a response by pressing a key on your keyboard or moving your mouse press and hold the power button for at least 8 to 10 seconds until the computer turns off Then restart your computer CHECK THE SOFTWARE DOCUMENTATION OR CONTACT THE SOFTWARE MANUFACTURER FOR TROUBLESHOOTING INFORMATION Ensure that the program is com...

Страница 38: ... Select the Disk Management option 3 Right click the corresponding drive letter in the right pane that needs to be changed 4 Select Drive Letter and Paths 5 From the drop down list select the new drive letter assignment for the Media Card Reader 6 Click OK to confirm your selection NOTE The Media Card Reader only appears as a mapped drive when it is connected Each of the four Media Card Reader slo...

Страница 39: ...0 to ensure that your computer is successfully communicating with the memory Run the Dell Diagnostics see Dell Diagnostics on page 50 IF YOU EXPERIENCE OTHER MEMORY PROBLEMS Reseat the memory modules see Installing Memory on page 70 to ensure that your computer is successfully communicating with the memory Ensure that you are following the memory installation guidelines see Installing Memory on pa...

Страница 40: ...her Hardware 2 Click Mouse 3 Try adjusting the settings REINSTALL THE MOUSE DRIVER See Reinstalling Drivers on page 52 RUN THE HARDWARE TROUBLESHOOTER See Resolving Software and Hardware Incompatibilities on page 53 CHECK THE NETWORK CABLE CONNECTOR Ensure that the network cable is firmly inserted into both the network connector on the back of the computer and the network port or device CHECK THE ...

Страница 41: ...xtension cables to verify that the computer turns on properly Ensure that the electrical outlet is working by testing it with another device such as a lamp Ensure that the main power cable and front panel cable are securely connected to the system board see System Board Components on page 68 IF THE POWER LIGHT IS STEADY AMBER A device might be malfunctioning or incorrectly installed Ensure that th...

Страница 42: ...INTER IS TURNED ON CHECK THE PRINTER CABLE CONNECTIONS See the printer documentation for cable connection information Ensure that the printer cables are securely connected to the printer and the computer see Setting Up a Printer on page 13 TEST THE ELECTRICAL OUTLET Ensure that the electrical outlet is working by testing it with another device such as a lamp VERIFY THAT THE PRINTER IS RECOGNIZED B...

Страница 43: ...or setup and troubleshooting information UNLOCK THE SCANNER Ensure that your scanner is unlocked if it has a locking tab or button RESTART THE COMPUTER AND TRY THE SCANNER AGAIN CHECK THE CABLE CONNECTIONS See the scanner documentation for cable connection information Ensure that the scanner cables are securely connected to the scanner and the computer VERIFY THAT THE SCANNER IS RECOGNIZED BY MICR...

Страница 44: ...front panel headphone connector TEST THE ELECTRICAL OUTLET Ensure that the electrical outlet is working by testing it with another device such as a lamp ELIMINATE POSSIBLE INTERFERENCE Turn off nearby fans fluorescent lights or halogen lamps to check for interference REINSTALL THE SOUND DRIVER See Manually Reinstalling Drivers on page 53 RUN THE HARDWARE TROUBLESHOOTER See Resolving Software and H...

Страница 45: ...ress the button to ensure that the monitor is turned on If the power light is lit or blinking the monitor has power If the power light is blinking press a key on the keyboard or move the mouse TEST THE ELECTRICAL OUTLET Ensure that the electrical outlet is working by testing it with another device such as a lamp CHECK THE DIAGNOSTIC LIGHTS See Diagnostic Lights on page 47 CHECK THE MONITOR SETTING...

Страница 46: ...JUST THE WINDOWS DISPLAY SETTINGS 1 Click the Start button click Control Panel and then click Appearance and Themes 2 Click Display and click the Settings tab 3 Try different settings for Screen resolution and Color quality ...

Страница 47: ... booted to the operating system or a possible pre BIOS failure has occurred Plug the computer into a working electrical outlet and press the power button Also see Power Problems on page 41 A possible processor failure has occurred Contact Dell see Contacting Dell on page 124 Memory modules are detected but a memory failure has occurred If you have two or more memory modules installed remove the mo...

Страница 48: ...installed remove the modules reinstall one module see Installing Memory on page 70 and then restart the computer If the computer starts normally reinstall an additional module Continue until you have identified a faulty module or reinstalled all modules without error If available install properly working memory of the same type into your computer see Installing Memory on page 70 If the problem per...

Страница 49: ...age 124 Another failure has occurred Ensure that the cables are properly connected to the system board from the hard drive CD drive and DVD drive see Drives on page 86 If there is an error message on your screen identifying a problem with a device such as the floppy drive or hard drive check the device to ensure that it is functioning properly The operating system is attempting to boot from a devi...

Страница 50: ...s loads and the Main Menu screen appears click the button for the option you want 2 If a problem is encountered during a test a message appears with an error code and a description of the problem Write down the error code and problem description and follow the instructions on the screen If you cannot resolve the error condition contact Dell see Contacting Dell on page 124 NOTE The Service Tag for ...

Страница 51: ... drivers such as the keyboard driver come with your Microsoft Windows operating system You may need to install drivers if you Upgrade your operating system Reinstall your operating system Connect or install a new device Tab Function Results Displays the results of the test and any error conditions encountered Errors Displays error conditions encountered error codes and the problem description Help...

Страница 52: ...proved drivers for Dell computers If you install drivers obtained from other sources your computer might not work correctly Using Windows XP Device Driver Rollback If a problem occurs on your computer after you install or update a driver use Windows XP Device Driver Rollback to replace the driver with the previously installed version 1 Click the Start button and click Control Panel 2 Under Pick a ...

Страница 53: ...he Hardware Troubleshooter 1 Click the Start button and click Help and Support 2 Type hardware troubleshooter in the Search field and click the arrow to start the search 3 Click Hardware Troubleshooter in the Search Results list 4 In the Hardware Troubleshooter list click I need to resolve a hardware conflict on my computer and click Next Restoring Your Operating System You can restore your operat...

Страница 54: ...g Windows XP Device Driver Rollback on page 52 to resolve the problem If that is unsuccessful then use System Restore NOTICE Before you restore the computer to an earlier operating state save and close any open files and exit any open programs Do not alter open or delete any files or programs until the system restoration is complete 1 Click the Start button point to All Programs Accessories System...

Страница 55: ... data before using PC Restore Use PC Restore only if System Restore did not resolve your operating system problem NOTE Dell PC Restore by Symantec is not available in all countries or on all computers Use Dell PC Restore by Symantec only as the last method to restore your operating system PC Restore restores your hard drive to the operating state it was in when you purchased the computer Any progr...

Страница 56: ...nal hard drive space If you remove PC Restore from the hard drive you cannot ever recall it and you will never be able to use PC Restore to return your computer s operating system to its original state To remove PC Restore 1 Log on to the computer as a local administrator 2 In Windows Explorer go to c dell utilities DSR 3 Double click the filename DSRIRRemv2 exe NOTE If you do not log on as a loca...

Страница 57: ...er Use the ResourceCD to load any required drivers Depending on the region from where you ordered your computer or whether you requested the CDs the Drivers and Utilities CD and Operating System CD may not ship with your system Reinstalling Windows XP The reinstallation process can take 1 to 2 hours to complete After you reinstall the operating system you must also reinstall the device drivers vir...

Страница 58: ...58 Troubleshooting Tools ...

Страница 59: ...river Phillips screwdriver Flash BIOS update program floppy disk or CD Turning Off Your Computer NOTICE To avoid losing data save and close any open files and exit any open programs before you turn off your computer 1 Shut down the operating system a Save and close any open files exit any open programs click the Start button and then click Turn Off Computer b In the Turn off computer window click ...

Страница 60: ...or pins Also before you connect a cable ensure that both connectors are correctly oriented and aligned NOTICE To avoid damaging the computer perform the following steps before you begin working inside the computer 1 Turn off your computer see Turning Off Your Computer on page 59 NOTICE To disconnect a network cable first unplug the cable from your computer and then unplug it from the network devic...

Страница 61: ...he CD or DVD drive 4 CD or DVD activity light The drive light is on when the computer reads data from the CD or DVD drive 5 FlexBay drive Can contain an optional floppy drive or optional Media Card Reader For information on using the Media Card Reader see Using a Media Card Reader Optional on page 20 6 microphone connector Use the microphone connector to attach a personal computer microphone for v...

Страница 62: ...111 for more information NOTICE To avoid losing data do not use the power button to turn off the computer Instead perform an operating system shutdown 11 USB 2 0 connectors 2 Use the front USB connectors for devices that you connect occasionally such as joysticks or cameras or for bootable USB devices see System Setup Options on page 114 for more information on booting to a USB device It is recomm...

Страница 63: ...y instructions in the Product Information Guide for more information 2 power connector Insert the power cable 3 back panel connectors Plug USB audio and other devices into the appropriate connector See Back Panel Connectors on page 64 for more information 4 card slots Access connectors for any installed PCI and PCI Express cards 1 3 4 2 ...

Страница 64: ...able to the network adapter connector on the back panel of your computer A click indicates that the network cable has been securely attached NOTE Do not plug a telephone cable into the network connector On computers with a network connector card use the connector on the card It is recommended that you use Category 5 wiring and connectors for your network If you must use Category 3 wiring force the...

Страница 65: ...on the card 6 line out connector Use the green line out connector available on computers with integrated sound to attach headphones and most speakers with integrated amplifiers On computers with a sound card use the connector on the card 7 micro phone Use the pink connector to attach a personal computer microphone for voice or musical input into a sound or telephony program On computers with a sou...

Страница 66: ...e of the computer 5 Grip the sides of the computer cover and pivot the cover up using the bottom hinges as leverage points 6 Release the cover from the hinge tabs and set it aside in a secure location 1 cover latch release 2 computer cover 3 back of computer 4 bottom hinges 2 1 3 4 ...

Страница 67: ...omputer CAUTION Before you begin any of the procedures in this section follow the safety instructions in the Product Information Guide 1 floppy drive 2 CD or DVD drive 3 power supply 4 system board 5 hard drive 5 3 4 1 2 May not be present on all computers ...

Страница 68: ...nal video connector VGA line in line out microphone side surround center and LFE connectors processor fan connector CPUFAN floppy drive connector FLOPPY PCI Express x1 connector SLOT2 PCI Express x16 connector SLOT1 network connector NIC and USB connectors 2 USB2 USB connectors 4 USBBACK battery socket BATTERY PCI connectors SLOT4 Media Card Reader connector USBINT air temperature sensor connector...

Страница 69: ... module to determine the module s capacity NOTE Always install DDR2 memory modules in the order indicated on the system board The recommended memory configurations are A pair of matched memory modules installed in DIMM connectors 1 and 2 or A pair of matched memory modules installed in DIMM connectors 1 and 2 and another matched pair installed in DIMM connectors 3 and 4 NOTICE Do not install ECC o...

Страница 70: ... Microsoft Windows XP can use a maximum of 4 GB of address space however the amount of memory available to the operating system is less than that installed Certain components within the computer require address space in the 4 GB range Any address space reserved for these components cannot be used by computer memory Installing Memory CAUTION Before you begin any of the procedures in this section fo...

Страница 71: ... board is on the bottom of the inside of the computer 3 Press out the securing clip at each end of the memory module connector 4 Align the notch on the bottom of the module with the crossbar in the connector 1 memory connector closest to processor 2 securing clips 2 3 connector 1 cutouts 2 2 memory module 3 notch 4 crossbar 2 3 1 3 2 1 4 ...

Страница 72: ...uter icon and click Properties 9 Click the General tab 10 To verify that the memory is installed correctly check the amount of memory RAM listed Removing Memory CAUTION Before you begin any of the procedures in this section follow the safety instructions in the Product Information Guide NOTICE To prevent static damage to components inside your computer discharge static electricity from your body b...

Страница 73: ...ace on the computer chassis Your Dell computer provides the following slots for PCI and PCI Express cards Two PCI card slots One PCI Express x16 card slot One PCI Express x1 card slot PCI Cards Your computer supports two PCI cards If you are installing or replacing a card follow the procedures in the next section If you are removing but not replacing a PCI card see Removing a PCI Card on page 77 I...

Страница 74: ...ecessary disconnect any cables connected to the card Grasp the card by its top corners and ease it out of its connector 5 Prepare the card for installation See the documentation that came with the card for information on configuring the card making internal connections or otherwise customizing it for your computer CAUTION Some network adapters automatically start the computer when they are connect...

Страница 75: ...ps of all cards and filler brackets are flush with the alignment bar The notch in the top of the card or filler bracket fits around the alignment guide 1 alignment bar 2 fully seated card 3 not fully seated card 4 alignment guide 5 bracket within slot 6 bracket caught outside of slot 2 3 6 5 4 1 ...

Страница 76: ...ons NOTICE To connect a network cable first plug the cable into the network device and then plug it into the computer 10 Replace the computer cover reconnect the computer and devices to electrical outlets and then turn them on 11 If you installed a sound card a Enter system setup see System Setup on page 113 select Audio Controller and then change the setting to Off b Connect external audio device...

Страница 77: ...t into place to secure the cards NOTICE To connect a network cable first plug the cable into the network device and then plug it into the computer 5 Replace the computer cover reconnect the computer and devices to electrical outlets and then turn them on 6 Remove the card s driver from the operating system 7 If you removed a sound card a Enter system setup see System Setup on page 113 select Audio...

Страница 78: ...e in on the sides to release the mechanism from the two tab slots holding it in place b Set the retention mechanism aside in a secure location 4 If you are installing a new card remove the filler bracket to create a card slot opening Then continue with step 5 5 If you are replacing a card that is already installed in the computer remove the card If necessary disconnect any cables connected to the ...

Страница 79: ...etwork To guard against electrical shock be sure to unplug your computer from its electrical outlet before installing any cards 7 If you are installing the card into the x16 card connector position the card so the securing slot is aligned with the securing tab and gently pull the securing tab 8 Place the card in the connector and press down firmly Ensure that the card is fully seated in the slot 1...

Страница 80: ...rd retention mechanism ensure that The tops of all cards and filler brackets are flush with the alignment bar The notch in the top of the card or filler bracket fits around the alignment guide 11 Snap the card retention mechanism into place securing the x16 PCI card 1 alignment bar 2 fully seated card 3 not fully seated card 4 alignment guide 5 bracket within slot 6 bracket caught outside of slot ...

Страница 81: ...roller and then change the setting to Off b Connect external audio devices to the sound card s connectors Do not connect external audio devices to the microphone speaker headphone or line in connectors on the back panel 14 If you installed an add in network adapter and want to disable the integrated network adapter a Enter system setup see System Setup on page 113 select Integrated NIC and then ch...

Страница 82: ...nward to snap it into place 6 Close the card retention door to snap it into place securing the cards NOTICE To connect a network cable first plug the cable into the network device and then plug it into the computer 7 Replace the computer cover reconnect the computer and devices to electrical outlets and then turn them on 8 Remove the card s driver from the operating system 9 If you removed a sound...

Страница 83: ...ate to the right until it snaps into the open position NOTE This sliding plate secures and releases the drive panel and helps to secure the drives 3 By pushing from the inside and pivoting the drive panel to the left you can release the drive panel from its side hinges 4 Set the drive panel aside in a secure location 1 sliding plate lever 2 sliding plate 3 drive panel 3 2 1 ...

Страница 84: ...nsert from the drive panel 2 Without releasing the tab pivot the drive panel insert out and away from the drive panel 3 Set the drive panel insert aside in a secure location Replacing the Drive Panel Insert 1 drive panel 2 drive panel insert tab 3 drive panel insert 1 center drive panel tab 2 drive panel 3 drive panel insert tab 4 drive panel insert 1 3 2 1 3 2 4 ...

Страница 85: ...e and snap the drive panel insert tab over the corresponding tab on the drive panel Replacing the Drive Panel 1 Follow the procedures in Before You Begin on page 59 2 Align the drive panel tabs with the side door hinges 3 Rotate the drive panel toward the computer until it snaps into place on the front panel 1 sliding plate lever 2 sliding plate 3 drive panel 3 2 1 ...

Страница 86: ...drive or an optional Media Card Reader Up to two CD or DVD drives Connect serial ATA CD or DVD drives to connectors labeled SATA3 or SATA4 on the system board Serial ATA hard drives should be connected to connectors labeled SATA0 or SATA2 on the system board 1 CD DVD drive 2 FlexBay for optional floppy drive or Media Card Reader 3 hard drive 1 2 3 ...

Страница 87: ...at is a notch or a missing pin on one connector matches a tab or a filled in hole on the other connector Keyed connectors ensure that the pin 1 wire in the cable goes to the pin 1 end of the connector The pin 1 end of a connector on a board or a card is usually indicated by a silk screened 1 printed directly on the board or card 1 power cable 2 power input connector 1 interface cable 2 interface c...

Страница 88: ... against electrical shock always unplug your computer from the electrical outlet before removing the cover NOTICE To avoid damage to the drive do not set it on a hard surface Instead set the drive on a surface such as a foam pad that will sufficiently cushion it NOTICE If you are replacing a hard drive that contains data you want to keep back up your files before you begin this procedure Check the...

Страница 89: ...Removing and Installing Parts 89 3 Press in on the blue tabs on each side of the drive and slide the drive up and out of the computer 1 serial ATA data cable 2 power cable 1 tabs 2 2 hard drive 1 2 1 2 ...

Страница 90: ...ured for your computer NOTE If your replacement hard drive does not have the hard drive bracket attached remove the bracket from the old drive by unsnapping it from the drive Snap the bracket onto the new drive 3 Gently slide the drive into place until you feel a click or feel the drive securely installed 4 Connect the power and hard drive cables to the drive 1 drive 2 hard drive bracket 1 2 ...

Страница 91: ... 7 Connect your computer and devices to electrical outlets and turn them on See the documentation that came with the drive for instructions on installing any software required for drive operation Adding a Second Hard Drive CAUTION Before you begin any of the procedures in this section follow the safety instructions in the Product Information Guide CAUTION To guard against electrical shock always u...

Страница 92: ...he drive securely installed 6 Connect the power and hard drive cables to the drive 7 Ensure that the data cable is securely connected to the system board see System Board Components on page 68 8 Check all connectors to be certain that they are properly cabled and firmly seated 9 Replace the computer cover see Replacing the Computer Cover on page 106 NOTICE To connect a network cable first plug the...

Страница 93: ...Removing a Floppy Drive 1 Follow the procedures in Before You Begin on page 59 2 Remove the drive panel see Removing the Drive Panel on page 83 3 Disconnect the power and data cables from the back of the floppy drive NOTE If you have installed a PCI Express x16 card this card may cover the floppy drive connectors Remove this card before connecting the floppy drive cables 4 Slide the drive latch re...

Страница 94: ...e event that the replacement or new floppy drive does not have shoulder screws check for the screws located within the drive panel insert or if applicable reuse screws attached to the drive that you are replacing 1 drive latch release 2 sliding plate 3 floppy drive 3 2 1 ...

Страница 95: ...ve rather than replacing a drive remove the drive panel insert where you want the drive to be installed insert the shoulder screws located in the back of the drive panel insert into the drive and then slide the drive back into place 4 Attach the power and data cables to the floppy drive 5 Connect the other end of the data cable to the connector labeled DSKT2 on the system board see System Board Co...

Страница 96: ... cover see Replacing the Computer Cover on page 106 NOTICE To connect a network cable first plug the cable into the network device and then plug it into the computer 10 Connect your computer and devices to their electrical outlets and turn them on See the documentation that came with the drive for instructions on installing any software required for drive operation 11 Enter system setup see System...

Страница 97: ... located in the Product Information Guide NOTICE To prevent static damage to components inside your computer discharge static electricity from your body before you touch any of your computer s electronic components You can do so by touching an unpainted metal surface on the computer chassis 1 Follow the procedures in Before You Begin on page 59 2 Remove the drive panel see Removing the Drive Panel...

Страница 98: ...e cable through the cable routing clip 4 Slide the drive latch release toward the bottom of the computer and without releasing the drive latch release slide the Media Card Reader out through the front of the computer 5 Replace the drive panel see Replacing the Drive Panel on page 85 6 Replace the computer cover see Replacing the Computer Cover on page 106 1 drive latch release 2 sliding plate 3 Me...

Страница 99: ...ectronic components You can do so by touching an unpainted metal surface on the computer chassis 1 Follow the procedures in Before You Begin on page 59 2 Remove the drive panel see Removing the Drive Panel on page 83 3 Remove the Media Card Reader and bracket from its packaging and ensure that all of the screws are included 4 Gently slide the Media Card Reader into place until you feel a click or ...

Страница 100: ...eplacing the Computer Cover on page 106 CD DVD Drive CAUTION Before you begin any of the procedures in this section follow the safety instructions located in the Product Information Guide CAUTION To guard against electrical shock always unplug your computer from the electrical outlet before removing the cover Removing a CD DVD Drive 1 Follow the procedures in Before You Begin on page 59 2 Remove t...

Страница 101: ...power and data cables from the back of the drive 4 Slide the drive latch release toward the bottom of the computer and without releasing the drive latch release slide the CD DVD drive out through the front of the computer 1 power cable 2 data cable 1 2 ...

Страница 102: ...2 If you are installing a new CD DVD drive rather than replacing a drive remove the appropriate drive panel insert see Removing the Drive Panel Insert on page 84 3 Gently slide the drive into place until you feel a click or feel the drive securely installed 1 drive latch release 2 sliding plate 3 CD DVD drive 3 2 1 ...

Страница 103: ...Removing and Installing Parts 103 4 Connect the power and data cables to the drive 1 CD DVD drive 2 screws 3 1 2 ...

Страница 104: ...work cable first plug the cable into the network device and then plug it into the computer 8 Connect your computer and devices to their electrical outlets and turn them on See the documentation that came with the drive for instructions on installing any software required for drive operation 9 Enter system setup see System Setup on page 113 and select the appropriate Drive option 10 Verify that you...

Страница 105: ...lent type recommended by the manufacturer Discard used batteries according to the manufacturer s instructions To replace the battery 1 Record all the screens in system setup see System Setup on page 113 so that you can restore the correct settings in step 8 2 Follow the procedures in Before You Begin on page 59 3 Locate the battery socket see System Board Components on page 68 NOTICE If you pry th...

Страница 106: ...e of the old battery See the Product Information Guide for battery disposal information Replacing the Computer Cover CAUTION Before you begin any of the procedures in this section follow the safety instructions located in the Product Information Guide 1 Ensure that all cables are connected and fold cables out of the way 2 Ensure that no tools or extra parts are left inside the computer 3 Align the...

Страница 107: ...re moving it to the upright position NOTICE To connect a network cable first plug the cable into the network device and then plug it into the computer 6 Connect your computer and devices to electrical outlets and turn them on 1 computer cover 2 back of computer 3 bottom hinges 1 2 3 ...

Страница 108: ...108 Removing and Installing Parts ...

Страница 109: ... 533 MHz and 667 MHz dual DDR2 unbuffered SDRAM Memory connectors four Memory capacities 256 MB 512 MB or 1 GB non ECC Minimum memory 256 MB Maximum memory 4 GB NOTE See Addressing Memory With 4 GB Configurations on page 70 to verify the amount of memory available to the operating system BIOS address F0000h Computer Information Chipset 965 RAID Support RAID 1 Mirroring DMA channels eight Interrupt...

Страница 110: ...ze 120 pins connector data width maximum 32 bits PCI Express connector one x1 connector size 36 pins connector data width maximum 1 PCI Express lane PCI Express connector one x16 connector size 164 pins connector data width maximum 16 PCI Express lanes Drives Externally accessible Bays one 3 5 inch drive bay FlexBay two 5 25 inch drive bays Available devices Serial ATA drives 4 floppy drive USB me...

Страница 111: ...h button Power light green light Blinking green in sleep state solid green for power on state amber light Blinking amber indicates a problem with the power supply inside the computer If the system cannot boot and there is a solid amber light this indicates a problem with the system board see Power Problems on page 41 Hard drive access light green Link integrity light on integrated network adapter ...

Страница 112: ...s Depth 45 7 cm 18 0 inches Weight 12 7 kg 28 0 lb Environmental Temperature Operating 10 to 35 C 50 to 95 F Storage 40 to 65 C 40 to 149 F Relative humidity 20 to 80 noncondensing Maximum vibration Operating 5 to 350 Hz at 0 0002 G2 Hz Storage 5 to 500 Hz at 0 001 to 0 01 G2 Hz Maximum shock Operating 40 G 5 with pulse duration of 2 msec 10 equivalent to 20 in sec 51 cm sec Storage 105 G 5 with p...

Страница 113: ...omputer work incorrectly Entering System Setup 1 Turn on or restart your computer 2 When the blue DELL logo is displayed you must watch for the F2 prompt to appear 3 Once this F2 prompt appears press F2 immediately NOTE The F2 prompt indicates that the keyboard has initialized This prompt can appear very quickly so you must watch for it to display and then press F2 If you press F2 before you are p...

Страница 114: ...ag Express Service Code and Asset Tag NOTE The system name listed in the BIOS may not appear exactly as the name that appears on the computer or in the computer s documentation Processor Info Displays the following information for the processor installed in the system Processor Type Processor Clock Speed Processor Bus Speed Processor Cache Size Processor ID number whether the processor is Hyperthr...

Страница 115: ...les the internal drive controller and allows the internal floppy drive read only permission NOTE Operating systems with USB support will recognize USB floppy drives regardless of this setting Drives 0 through 3 On default Enables or disables an ATA or SATA device such as hard drive CD drive or DVD drive On enables the interface so that the device can be used Displays the Controller type ATA or SAT...

Страница 116: ...fan and speed based on processor temperature readings NOTE SpeedStep is not supported by all processors therefore this option will appear only when a supported processor is installed HDD Acoustic Mode Bypass Your computer does not test or change the current acoustics mode setting Quiet The hard drive operates at its most quiet setting Suggested The hard drive operates at the level suggested by the...

Страница 117: ... was turned off Auto Power On Off default Sets the computer to automatically turn on Off disables the Auto Power On feature Everyday turns the computer on every day at the time set in Auto Power Time Weekdays turns the computer on every day from Monday through Friday at the time set in Auto Power Time NOTE This feature does not work if you turn off your computer using a power strip or surge protec...

Страница 118: ... numeric keys on the right side of your keyboard Off commands the right keypad keys to function as arrows On commands the right keypad keys to function as numbers POST Hotkeys Setup Boot Menu default Determines whether the sign on screen displays a message stating the keystroke sequence that is required to enter the Setup program or the Quickboot feature Setup Boot Menu displays both messages F2 S...

Страница 119: ...e check the device documentation Changing Boot Sequence for the Current Boot You can use this feature for example to restart your computer to a USB device such as a floppy drive memory key or CD RW drive NOTE If you are booting to a USB floppy drive you must first set the floppy drive to OFF in system setup see System Setup on page 113 1 If you are booting to a USB device connect the USB device to...

Страница 120: ...orgotten Passwords CAUTION Before you begin any of the procedures in this section follow the safety instructions located in the Product Information Guide 1 Follow the procedures in Before You Begin on page 59 2 Locate the 2 pin password jumper CLRPSWD on the system board see System Board Components on page 68 and remove the jumper plug from pins 1 and 2 to clear the password 3 Close the computer c...

Страница 121: ...MOS jumper CLRCMOS on the system board see System Board Components on page 68 b Remove the 2 pin password jumper CLRPSWD from its pins c Place the password jumper plug on the CLRCMOS pins and wait approximately 5 seconds d Remove the jumper plug from the CLRCMOS pins and place it back upon the password CLRPSWD pins 3 Close the computer cover see Replacing the Computer Cover on page 106 NOTICE To c...

Страница 122: ...llers 6 Replace the ball and retainer ring and turn the retainer ring clockwise until it clicks into place Floppy Drive NOTICE Do not attempt to clean drive heads with a swab You might accidentally misalign the heads which prevents the drive from operating Clean your floppy drive using a commercially available cleaning kit These kits contain pretreated floppy disks to remove contaminants that accu...

Страница 123: ...r However Dell also extends a parts replacement program to cover all nonstandard third party hardware components integrated through CFI for the duration of the computer s service contract Definition of Dell Installed Software and Peripherals Dell installed software includes the operating system and some of the software programs that are installed on the computer during the manufacturing process Mi...

Страница 124: ...uipment off and on you are encouraged to try to correct the interference by one or more of the following measures Reorient the receiving antenna Relocate the system with respect to the receiver Move the system away from the receiver Plug the system into a different outlet so that the system and the receiver are on different branch circuits If necessary consult a representative of Dell Inc or an ex...

Страница 125: ...eemed correct at the time that this document went to print and is subject to change Country City International Access Code Country Code City Code Department Name or Service Area Website and E Mail Address Area Codes Local Numbers and Toll Free Numbers Anguilla Website www dell com ai E mail la techsupport dell com General Support toll free 800 335 0031 Antigua and Barbuda Website www dell com ag E...

Страница 126: ...ell computers 0820 240 530 17 Preferred Accounts Corporate Support 0820 240 530 17 Switchboard 0820 240 530 00 Bahamas Website www dell com bs E mail la techsupport dell com General Support toll free 1 866 278 6818 Barbados Website www dell com bb E mail la techsupport dell com General Support 1 800 534 3142 Belgium Brussels International Access Code 00 Country Code 32 City Code 2 Website support ...

Страница 127: ...atus www dell ca ostatus AutoTech automated Hardware and Warranty Support toll free 1 800 247 9362 Customer Service Home Sales Small Business toll free 1 800 847 4096 Customer Service med large business government toll free 1 800 326 9463 Customer Service printers projectors televisions handhelds digital jukebox and wireless toll free 1 800 847 4096 Hardware Warranty Support Home Sales Small Busin...

Страница 128: ...go Country Code 56 City Code 2 Website www dell com cl E mail la techsupport dell com Sales and Customer Support toll free 1230 020 4823 Country City International Access Code Country Code City Code Department Name or Service Area Website and E Mail Address Area Codes Local Numbers and Toll Free Numbers ...

Страница 129: ...s Division toll free 800 858 2557 Large Corporate Accounts GCP toll free 800 858 2055 Large Corporate Accounts Key Accounts toll free 800 858 2628 Large Corporate Accounts North toll free 800 858 2999 Large Corporate Accounts North Government and Education toll free 800 858 2955 Large Corporate Accounts East toll free 800 858 2020 Large Corporate Accounts East Government and Education toll free 80...

Страница 130: ... Small Business Customer Care 3287 5505 Switchboard Relational 3287 1200 Switchboard Fax Relational 3287 1201 Switchboard Home Small Business 3287 5000 Switchboard Fax Home Small Business 3287 5001 Dominica Website www dell com dm E mail la techsupport dell com General Support toll free 1 866 278 6821 Dominican Republic Website www dell com do E mail la techsupport dell com General Support 1 800 1...

Страница 131: ...e 00 Country Code 33 City Codes 1 4 Website support euro dell com Home and Small Business Technical Support for XPS 0825 387 129 Technical Support for all other Dell computers 0825 387 270 Customer Care 0825 823 833 Switchboard 0825 004 700 Switchboard calls from outside of France 04 99 75 40 00 Sales 0825 004 700 Fax 0825 004 701 Fax calls from outside of France 04 99 75 40 01 Corporate Technical...

Страница 132: ...320 Switchboard 069 9792 7000 Greece International Access Code 00 Country Code 30 Website support euro dell com Technical Support 00800 44 14 95 18 Gold Service Technical Support 00800 44 14 00 83 Switchboard 2108129810 Gold Service Switchboard 2108129811 Sales 2108129800 Fax 2108129812 Grenada E mail la techsupport dell com General Support toll free 1 866 540 3355 Guatemala E mail la techsupport ...

Страница 133: ...910 Large Corporate Accounts 3416 0907 Global Customer Programs 3416 0908 Medium Business Division 3416 0912 Home and Small Business Division 2969 3105 India E mail india_support_desktop dell com india_support_notebook dell com india_support_Server dell com Technical Support 1600338045 and 1600448046 Sales Large Corporate Accounts 1600 33 8044 Sales Home and Small Business 1600 33 8046 Country Cit...

Страница 134: ...ral Fax Sales Fax 01 204 0103 Switchboard 01 204 4444 U K Customer Care dial within U K only 0870 906 0010 Corporate Customer Care dial within U K only 0870 907 4499 U K Sales dial within U K only 0870 907 4000 Italy Milan International Access Code 00 Country Code 39 City Code 02 Website support euro dell com Home and Small Business Technical Support 02 577 826 90 Customer Care 02 696 821 14 Fax 0...

Страница 135: ...cision OptiPlex and Latitude 81 44 556 3894 Technical Support PDAs projectors printers routers toll free 0120 981 690 Technical Support outside of Japan PDAs projectors printers routers 81 44 556 3468 Faxbox Service 044 556 3490 24 Hour Automated Order Status Service 044 556 3801 Customer Care 044 556 4240 Business Sales Division up to 400 employees 044 556 1465 Preferred Accounts Division Sales o...

Страница 136: ...as U S A 512 728 3883 Sales Austin Texas U S A 512 728 4397 SalesFax Austin Texas U S A 512 728 4600 or 512 728 3772 Luxembourg International Access Code 00 Country Code 352 Website support euro dell com Support 342 08 08 075 Home Small Business Sales 32 0 2 713 15 96 Corporate Sales 26 25 77 81 Customer Care 32 0 2 481 91 19 Fax 26 25 77 82 Macao Country Code 853 Technical Support toll free 0800 ...

Страница 137: ...888 202 Corporate Sales toll free 1 800 888 213 Mexico International Access Code 00 Country Code 52 E mail la techsupport dell com Customer Technical Support 001 877 384 8979 or 001 877 269 3383 Sales 50 81 8800 or 01 800 888 3355 Customer Service 001 877 384 8979 or 001 877 269 3383 Main 50 81 8800 or 01 800 888 3355 Montserrat E mail la techsupport dell com General Support toll free 1 866 278 68...

Страница 138: ...Country Code 64 Website support ap dell com E mail support ap dell com contactus General Support 0800 441 567 Nicaragua E mail la techsupport dell com General Support 001 800 220 1377 Norway Lysaker International Access Code 00 Country Code 47 Website support euro dell com Technical Support for XPS 815 35 043 Technical Support for all other Dell products 671 16882 Relational Customer Care 671 1757...

Страница 139: ...00 300 410 or 800 300 411 or 800 300 412 or 21 422 07 10 Fax 21 424 01 12 Puerto Rico E mail la techsupport dell com General Support 1 877 537 3355 St Kitts and Nevis Website www dell com kn E mail la techsupport dell com General Support toll free 1 866 540 3355 St Lucia Website www dell com lc E mail la techsupport dell com General Support 1 800 882 1521 St Vincent and the Grenadines Website www ...

Страница 140: ...ague International Access Code 00 Country Code 421 Website support euro dell com E mail czech_dell dell com Technical Support 02 5441 5727 Customer Care 420 22537 2707 Fax 02 5441 8328 Tech Fax 02 5441 8328 Switchboard Sales 02 5441 7585 South Africa Johannesburg International Access Code 09 091 Country Code 27 City Code 11 Website support euro dell com E mail dell_za_support dell com Gold Queue 0...

Страница 141: ...Care 08 590 05 642 Home Small Business Customer Care 08 587 70 527 Employee Purchase Program EPP Support 020 140 14 44 Technical Support Fax 08 590 05 594 Sales 08 590 05 185 Switzerland Geneva International Access Code 00 Country Code 41 City Code 22 Website support euro dell com E mail Tech_support_central_Europe dell com Technical Support for XPS 0848 33 88 57 Technical Support Home and Small B...

Страница 142: ...ebsite support ap dell com Technical Support OptiPlex Latitude and Dell Precision toll free 1800 0060 07 Technical Support PowerApp PowerEdge PowerConnect and PowerVault toll free 1800 0600 09 Customer Care toll free 1800 006 007 option 7 Corporate Sales toll free 1800 006 009 Transaction Sales toll free 1800 006 006 Trinidad Tobago Website www dell com tt E mail la techsupport dell com General Su...

Страница 143: ...tomer Care 01344 373 186 Central Government Customer Care 01344 373 193 Local Government Education Customer Care 01344 373 199 Health Customer Care 01344 373 194 Technical Support Technical Support for XPS computers only 0870 366 4180 Technical Support Corporate Preferred Accounts PAD 1000 employees 0870 908 0500 Technical Support for all other products 0870 353 0800 General Home and Small Busines...

Страница 144: ...ness Customer Service and Support toll free 1 800 456 3355 Employee Purchase Program EPP Customers toll free 1 800 695 8133 Support for printers projectors PDAs and MP3 players toll free 1 877 459 7298 Public government education and healthcare Customer Service and Support toll free 1 800 456 3355 Employee Purchase Program EPP Customers toll free 1 800 695 8133 Dell Sales toll free 1 800 289 3355 ...

Страница 145: ...t 1 877 702 4288 Venezuela Website www dell com ve E mail la techsupport dell com General Support 0800 100 4752 Country City International Access Code Country Code City Code Department Name or Service Area Website and E Mail Address Area Codes Local Numbers and Toll Free Numbers ...

Страница 146: ...146 Appendix ...

Страница 147: ...ftware alerts to a management console ASF is designed to be platform and operating system independent B battery life span The length of time years during which a portable computer battery is able to be depleted and recharged battery operating time The length of time minutes or hours that a portable computer battery powers the computer BIOS basic input output system A program or utility that serves...

Страница 148: ...times but you can write to CD R discs only once clock speed The speed given in MHz that indicates how fast computer components that are connected to the system bus operate COA Certificate of Authenticity The Windows alpha numeric code located on a sticker on your computer Also referred to as the Product Key or Product ID Control Panel A Windows utility that allows you to modify operating system an...

Страница 149: ...logy is different from DVD RW technology DVD RW drive drive that can read DVDs and most CD media and write to DVD RW rewritable DVDs discs DVI digital video interface A standard for digital transmission between a computer and a digital video display E ECC error checking and correction A type of memory that includes special circuitry for testing the accuracy of data as it passes in and out of memor...

Страница 150: ...A measurement of data storage that equals 1024 MB 1 073 741 824 bytes When used to refer to hard drive storage the term is often rounded to 1 000 000 000 bytes GHz gigahertz A measurement of frequency that equals one thousand million Hz or one thousand MHz The speeds for computer processors buses and interfaces are often measured in GHz graphics mode A video mode that can be defined as x horizonta...

Страница 151: ...nnot operate both devices simultaneously ISP Internet service provider A company that allows you to access its host server to connect directly to the Internet send and receive e mail and access websites The ISP typically provides you with a software package user name and access phone numbers for a fee K Kb kilobit A unit of data that equals 1024 bits A measurement of the capacity of memory integra...

Страница 152: ...our computer to communicate with other computers over analog telephone lines Three types of modems include external PC Card and internal You typically use your modem to connect to the Internet and exchange e mail module bay See media bay MP megapixel A measure of image resolution used for digital cameras ms millisecond A measure of time that equals one thousandth of a second Access times of storag...

Страница 153: ...ching a PS 2 compatible keyboard mouse or keypad PXE pre boot execution environment A WfM Wired for Management standard that allows networked computers that do not have an operating system to be configured and started remotely R RAID redundant array of independent disks A method of providing data redundancy Some common implementations of RAID include RAID 0 RAID 1 RAID 5 RAID 10 and RAID 50 RAM ra...

Страница 154: ...les folders and drives When you place a shortcut on your Windows desktop and double click the icon you can open its corresponding folder or file without having to find it first Shortcut icons do not change the location of files If you delete a shortcut the original file is not affected Also you can rename a shortcut icon SIM Subscriber Identity Module A SIM card contains a microchip that encrypts ...

Страница 155: ... for a limited amount of time when there is no electrical power UPS systems typically provide surge suppression and may also provide voltage regulation Small UPS systems provide battery power for a few minutes to enable you to shut down your computer USB universal serial bus A hardware interface for a low speed device such as a USB compatible keyboard mouse joystick scanner set of speakers printer...

Страница 156: ...o scan in your favorite picture and make it wallpaper WLAN wireless local area network A series of interconnected computers that communicate with each other over the air waves using access points or wireless routers to provide Internet access write protected Files or media that cannot be changed Use write protection when you want to protect data from being changed or destroyed To write protect a 3...

Страница 157: ...omponents inside 67 crashes 36 37 inside view 67 restore to previous state 53 54 stops responding 36 connectors headphone 62 microphone 61 USB 62 copying CDs general information 18 helpful tips 19 how to 18 copying DVDs general information 18 helpful tips 19 how to 18 cover removing 65 replacing 106 D Dell contacting 124 Dell Diagnostics 50 support policy 123 support site 10 diagnostic lights 47 d...

Страница 158: ...alling second 91 problems 33 removing 88 hardware Dell Diagnostics 50 Hardware Troubleshooter 53 headphone connector 62 Help and Support Center 11 help file Windows Help and Support Center 11 hibernate mode 25 27 Hyper Threading 27 I installing parts before you begin 59 recommended tools 59 turning off your computer 59 Internet connection about 14 connection options 14 problems 33 Internet connect...

Страница 159: ...ging 24 options 26 options advanced 26 options hibernate 27 options schemes 26 problems 41 standby mode 25 power light conditions 41 Power Options Properties 26 printer cable 13 connecting 13 problems 42 setting up 13 USB 13 problems battery 31 blue screen 37 CD drive 32 CD RW drive 33 computer crashes 36 37 computer stops responding 36 Dell Diagnostics 50 diagnostic lights 47 drives 32 DVD drive ...

Страница 160: ...10 memory 109 physical 112 power 112 processor 109 technical 109 video 110 standby mode 25 support contacting Dell 124 policy 123 support website 10 system board 68 System Restore 53 54 system setup about 113 entering 113 options 114 screens 113 T technical support policy 123 transferring information to a new computer 27 troubleshooting Dell Diagnostics 50 diagnostic lights 47 Hardware Troubleshoo...

Страница 161: ...Index 161 Windows XP continued reinstalling 54 scanner 43 System Restore 53 54 wizards Files and Settings Transfer Wizard 27 Network Setup Wizard 24 Program Compatibility Wizard 37 ...

Страница 162: ...62 Index 162 Index ...

Отзывы: