


Next step
1
.
Installing the system board
Prerequisite
Follow the safety guidelines listed in
Steps
1
Unpack the new system board assembly.
CAUTION:
Do not lift the system board by holding a memory module, processor, or other components.
CAUTION:
Take care not to damage the system identification button while placing the system board into the chassis.
2
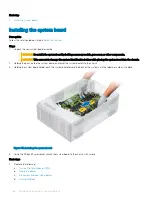
Holding the post, incline the system board, and lower the system board into the chassis.
3
Holding the system board holder, push the system board toward the back of the system until the release pin clicks into place.
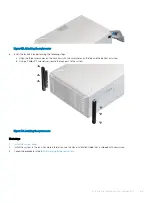
Figure 107. Installing the system board
4
Using the Phillips #2 screwdriver secure the system board to the chassis with screws.
Next steps
1
Replace the following:
a
b
c
Processors and heat sink modules
d
158
Installing and removing system components
Содержание PowerEdge T640
Страница 23: ...Figure 16 Configuration and layout Dell EMC PowerEdge T640 overview 23 ...
Страница 24: ...Figure 17 Electrical overview 24 Dell EMC PowerEdge T640 overview ...
Страница 25: ...Figure 18 Memory information Dell EMC PowerEdge T640 overview 25 ...
Страница 26: ...26 Dell EMC PowerEdge T640 overview ...


