background image

53  

L

og


into


the

 dVr (U

sing

 i

nternet

 e

xpLorer

):

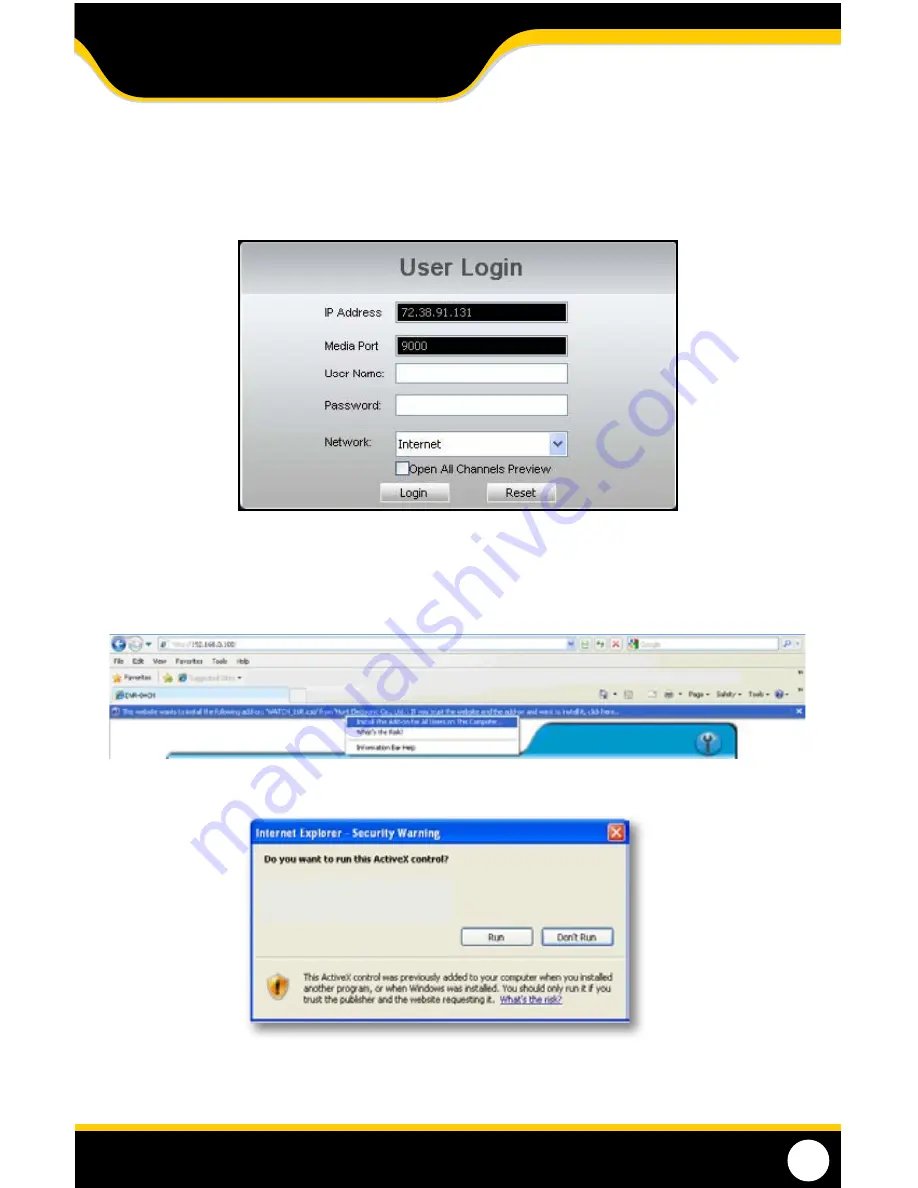
1.  By default the DVR will require a user to input a username and password before being able to view the DVR online. 

The default username is: admin and the password is: 123456


i

nstaLLing


the

 a

CtiVe

ControLs

:

2.  There will be a yellow information bar that pops up below the address bar in Internet Explorer. Click on the 

yellow information bar and then select INSTALL THIS ADD-ON FOR ALL USERS ON THIS COMPUTER…. Please be 
patient as the installation process can take 1-2 minutes. 

3.  If your ActiveX settings are set correctly you will see the following dialogue box. 

4.  Click RUN.

Once everything has installed and loaded, you will see the web player and the connected cameras.

NETWORK GUIDE

Содержание 21101

Страница 1: ......

Страница 2: ...eatures specifications or assistance with setup Please contact us via one of the methods below Telephone 1 866 946 7828 For more product information visit www defender usa com Email support defender usa com Online live web chat Visit www defender usa com Note This is manual version 1 0 you may find updated versions by visiting our website IMPORTANT PLEASE READ ...

Страница 3: ...als This warranty is limited to the repair replacement or refund of the purchase price at DEFENDER S option 2 Thiswarrantybecomesvoidiftheproductshowsevidenceofhavingbeenmisused mishandledortamperedwith contrary to the applicable instruction manual 3 Routinecleaning normalcosmeticandmechanicalwearandteararenotcoveredunderthetermsofthiswarranty 4 Thewarrantyexpresslyprovidedforhereinisthesolewarran...

Страница 4: ...TED 13 Using the Mouse 13 ScreenViewing 13 FUNCTIONTOOLBAR 14 FunctionToolbar Options 14 MAIN MENU 17 Using the Keyboard 18 Display Setup 19 LiveTab 19 OutputTab 21 PrivacyTab 22 Record Setup 23 Record ParametersTab 23 ScheduleTab 24 MainstreamTab 25 Search Setup 26 PlaybackTab 26 Event SearchTab 27 BackupTab 28 LogTab 28 Network Setup 28 NetworkTab 29 SubstreamTab 31 DDNSTab 31 EmailTab 32 Mobile...

Страница 5: ...PreparingYour Computer forViewing the DVR 51 Method1 52 Method2 53 Viewing DVR OnYour Computer 53 Log in to the DVR Using Internet Explorer 54 Installing ActiveX 54 Viewing DVR Outside ofYour Network 55 Option1 56 Option 2 57 Testing Port Forwarding 58 IfYou Cannot Connect 59 ToView Online Software Using External IP Address 60 DDNS Setup 60 Logging into Software 61 ONLINE SOFTWARE 62 Live Mode 62 ...

Страница 6: ... DVR comes equipped with H 264 compression which allows you to record and store more footage using less space therefore never missing an event This manual was written to ensure that you get the most out of your purchase WHAT IS INCLUDED DVR 4Window Warning Stickers DC12V Power Adapter for DVR 10ft RJ 45 Cable Software and Manual CD IR Remote Control USB Mouse Quick Start Guide RCA to RCA Male Cabl...

Страница 7: ...n your property This DEFENDER system is designed to send you an email alert complete with photo if any motion is detected on your property or if any of your cameras experience video loss You ll always be in the know no matter where you are TwoYears Worth of Footage Storage and More if you Need it The included hard drive allows continuous monitoring and recording of over two years worth of footage ...

Страница 8: ... Connects to speaker audio input 9 Audio Input Accepts a microphone and or audio supported camera not included 10 VGA Connects toVGA monitor 11 USB Connection Connect USB drive for backup 12 PTZ Connects to two wire PTZ camera not included MOUSE 1 4 2 3 1 Select Click this button to select highlighted object 2 ScrollWheel This wheel has no function on this DVR 3 USB Connection Connects to the USB ...

Страница 9: ...5 Directional Keys Allow you to navigate through the menu 6 Audio Search Searches and finds any channels that have an audio supported camera attached to it not included 7 Mute Mutes sound 8 Rewind Rewinds footage 9 Record Begins recording based on the 24 hour schedule 10 Pause Pauses playback footage and starts stops sequence mode 11 Play Calls up the playback menu 12 Fast Forward Fast forwards th...

Страница 10: ...nting the camera on a wall or ceiling use the included mounting hardware We recommend that the mounting bracket s secured using the included screws for all installations Each camera comes with 65ft of video power wire Please make sure that you mount the cameras no more than195ft from the DVR If longer wiring distance is required extension cables can be purchased 21007 21008 21009 from your local r...

Страница 11: ...11 Wiring for Cameras BASIC SETUP ...

Страница 12: ...video out would be the same as plugging it into the top video output Connect BNC to RCA connector Plug RCA cable to BNC connector POWERING ON DVR 1 Insert the included power cord into the included power supply 2 Plug the power cord into a power outlet surge protected power outlet recommended 3 InsertthepowersupplywireintotherearDC12Vport on the DVR Afterafewsecondsthesplashscreenwillappear andthe ...

Страница 13: ...utomatically begin recording once it is powered on as long as at least one camera is connected Using the Mouse TheincludedUSBmousemakesusingtheDVRsimple and efficient Using the mouse will make controlling theDVRverysimilartousingacomputer Itwillallow you to easily click on items to select them and make desired changes Screen Viewing By double clicking one of the camera screens the viewing mode wil...

Страница 14: ...few quick activating settings To exit move the pointer off the menu and right click 3 Pressing SELECT ontheremote To access items on this menu with the remote use the arrow keys to move and when the option is highlighted press select To exit press the MENU button Main Menu This icon accesses the MAIN MENU which enables you to change settings in Display Record Search Network Alarm Device System and...

Страница 15: ...on 3 Select the channel that the PTZ camera is connected to The PTZ camera must already be configured 4 Click on theTIME text field and input the time in seconds for how long you would like the PTZ camera to stay at that position 5 UsethedirectionalbuttonstoadjustthecameratotheareasyouwouldlikethePTZcameratoviewincruisemode Press the SET button at each desired position 6 To review your set points ...

Страница 16: ...would like to record in between motion detection events Start Stop Rotate 1 Right click the mouse and select START ROTATE The cameras will then start sequencing through 2 To stop auto sequence double click the screen or open the functionTOOLBAR and select the STOP ROTATE ICON 3 To return to quad 9 or 16 screen view open the functionTOOLBAR and select the SPLIT screen icon Volume If you have connec...

Страница 17: ...schangesmadetothecurrent menu page 3 Exit Exits the current menu Using the Keyboard The keyboard below is used when typing in passwords dates and to label name certain functions This keyboard will appear multiple times when working with your DVR 1 To select letters left click the mouse or press select on the remote control Selecting the SHIFT key on the keyboard changes the letters to lower case a...

Страница 18: ...eras 1 Select the camera that you would like to adjust the settings for 2 Select the camera NAME option under the camera number you would like to change and a keyboard will appear 3 Enterthetitle ofthecamerayouwouldlike then select enter to close the keyboard 4 Select apply from the main camera menu to save your changes 5 Repeat for all desired cameras Position This will determine where the camera...

Страница 19: ...normally but it will not appear on the liveviewing screen This is beneficial so that only authorized users can see what the camera is monitoring Toturnthe Live Viewing ofacameraonoroff 1 Select the live option and a drop down list will open 2 Select ENABLE or DISABLE from the drop down list to turn the camera on or off 3 Repeat for all desired cameras 4 Select APPLY to save the changes DisplayTime...

Страница 20: ...amount of time in seconds that you would like each camera view to play full screen on your DVR Select ENTER key 2 Select apply to save your changes VGA Resolution ToadjustVGARESOLUTION 1 SelectthescrollbarnexttoVGAresolution and a list will appear 2 Highlight the resolution you would like NOTE The higher the resolution the more space it will use on your HDD 3 Select apply to save your changes Init...

Страница 21: ...being the highest 3 Select apply to save your changes Privacy Zone Tab ThisDVRallowsyoutohaveONEPrivacyZonepercamera APrivacyZoneappearsasblackareaonaliveviewscreenand are never recorded This is convenient if you have a safe or other area that you do not wish to be viewed Toseta Privacy Zone 1 Choose the desired camera using the drop down box 2 Select the Privacy Zone drop down box and select ON 3...

Страница 22: ...ke the camera enabled or disabled and press SELECT 3 Select APPLY to save settings To copy settings 1 Select the channel at the bottom of the page that you wish to copy 2 Select which channels you would like to apply the settings to 3 Select COPY then select APPLY to save settings Pack Duration The DVR allows you to choose the maximum length that each recorded video clip will be This is for backup...

Страница 23: ...epresentsonehour Tode select clicktheboxagain For example all boxes from 0 to 23 need to be GREEN 3 The bottom line is to schedule MOTION RECORD Motion Record allows you to record only if motion is detected One click selects the individual box Each box represents one hour To de select click the box again For example all boxes from 0 to 23 need to beYELLOW 4 To apply your customized settins to anot...

Страница 24: ...customize the quality of your recordings Here you can change the Resolution the Frames per Second FPS the Bitrate as well as enable audio recording if you have audio enabled cameras Resolution Measuresthesharpnessoftheimage Thehighertheresolution thesharpertheimagewillappear Ahigherresolution uses more space when storing on the HDD Frames Per Second FPS TheFPSsettingsareadjustable AhigherFPSwillre...

Страница 25: ...ined in RED indicates the search date The days and times that have Motion Alarm recorded footage are red in the time schedule The days and times that have Schedule Recording are green in the time schedule If the time is not red or green it means there was no recording during that time To view other days or times that have footage double click on the day in the calendar 4 To search for a particular...

Страница 26: ...d like to see from the drop down menu next to the word TYPE You can view MOTION recordings SCHEDULE recordings or all recordings 5 The list displays the following information from left to right CH The channel with recorded footage Time The time range that the footage was recorded Size The size of the file the larger the file the longer the video clip Type The type of footage that was recorded Alar...

Страница 27: ...rner a message will appear BACKUP FINISHED Select EXIT to exit the menu 7 To view the backed up footage on your USB device please see COMPUTER PLAYBACK section of the manual To view the backed up footage on a CD DVD follow the basic instructions for your CD DVD player Log Tab To view the log of files in the order that they were recorded Here you can choose to view files based on recording type and...

Страница 28: ...r office networks This allows the DVR to automatically receive an IP address from the router By default the IP mode will be DHCP Static IP Static IP addresses are manually assigned by an administrator A static IP address would be beneficial if your internal IP addresschangesoften Most homeorofficenetworkstoday donot usestaticIPaddresses Ifyouareunsureofwhether you need a static or dynamic IP addre...

Страница 29: ...rly connected to therouter theaddresswillappearas0 0 0 0 or192 168 1 100 will be displayed ToacquireanIPaddress 1 Make sure the DVR s IP mode is set to DHCP 2 Once adjusted to DHCP select APPLY to save and exit the menu 3 Unplug the power cable from the DVR 4 Connect the included network cable from the back of the DVR to your router 5 Plug the power cable back into the DVR 6 Enter the NETWORK tab ...

Страница 30: ... adjustable A higher FPS will result in smoother and better quality recorded video A lower FPS will result in a choppy video however it will use less space on the HDD Toadjustthe frame rate ofvideo 1 Find the channel that you wish to adjust the FPS 2 Scroll through the list 1 to 30 and the FPS you wish to record on that channel 3 Select APPLY to save your settings Bitrate The bitrate represents th...

Страница 31: ...s provided by your email provider Gmail SMTP address smtp gmail com Select the ENTER key 5 Select the Sender Email box and input the email address in which the email notification will be coming from 6 Select the Sender Password box and input the password for the sending email account 7 Select the Receiver Email box and input the email address in which the email notification will be going to The Se...

Страница 32: ...mTime This DVR does not support this function Show Message DVR will display a message on screen when motion is detected Buzzer Set the length of the buzzer sounding when motion is detected 10s 20s 40s 60s Send Email Send an email when motion is detected Full Screen When motion is detected on a specific channel that channel will be switched to full screen mode Record Channel The channel will begin ...

Страница 33: ... allows you to adjust particular areas of each camerawheremotionwillandwillnotbedetected Thisisusefulifyouhaveacamerapointedtowardssomethingthat is alwaysmoving suchasabusyroad Thisway theDVRonlyrecordsmotionthat isout oftheordinary thussavingyou HDD space and providing you with more days of recording ToadjusttheAREAsetup 1 Select the AREA SETUP option under the camera you would like to adjust the...

Страница 34: ...s still available to record AvailTime Amount of remaining time available to record Select Select which HDD to modify Overwrite When the overwrite mode is enabled the DVR will record over the oldest footage once the HDD is full instead of stopping the recording once it is full Overwriting allows the DVR to never stop recording If you want to stop recording once the HDD is full set overwrite to DISA...

Страница 35: ...anythingyouhavestoredonyourUSBdevice Beforeformatting besuretoconnectyourUSBdevice to a USB port ToFormattheattachedUSBdrive 1 Click the FORMAT USB button 2 A screen will appear advising FORMATWILL REMOVE ALL FILES FROM USB 3 Select OK to format the USB or CANCEL to prevent formatting 4 It may take a few minutes to format the attached USB Do not remove the USB drive during this time 5 Once formatt...

Страница 36: ... manual ToinputthePTZinformation 1 FindwhichcamerachannelthePTZcamera s arehooked uptoonthePTZsetupmenu Onthatchannel srowinput the proper information for your PTZ camera 2 Theinformationyouneedtoselectwillbespecifiedinthe PTZ manufacturer s manual 3 Choose to enable disable CRUISE MODE for the PTZ camera once all the correct information is entered into the DVR select APPLY to save changes SYSTEM ...

Страница 37: ...order of the selected format then select the ENTER key i e mm dd yyyy 3 Select APPLY to save your changes SettheTIMEFORMAT 1 Select the scroll bar next totime format and a list will appear 2 Highlight and select your preferredTIME FORMAT 12 hour clock or a 24 hour clock 3 If selecting the 12 hour clock format a drop down box will appear select AM or PM 4 Select APPLY to save your changes SettheTIM...

Страница 38: ...c date ByWeek Select the drop down box next to DAYLIGHT SAVINGTIME MODE and selectWEEK Select the drop down box next to StartTime and select the month Select the drop down box below and select the week Select the drop down box below and select the weekday Select the box below and input the time for DST to take effect Select the ENTER key Repeat steps above for EndTime By Date Select the drop down ...

Страница 39: ...it the menu completely 4 The system will restart and open with your chosen language settings Video Format Throughout the world there are two main video systems NTSC and PAL NTSC stands for National Television System Committee andisusedinpartsofNorthAmericaandJapan PALstandsforPhaseAlteringLineanditisusedinEuropean countries The DVR is automatically set to NTSC as DEFENDER distributes DVRs within N...

Страница 40: ...ect apply to save your changes EnablingUser profiles 1 Click the box below SEL next to one of the Users No 2 7 2 Click the EDIT button and a box will appear 3 Click the username box a keyboard will appear create change the username Click ENTER once complete 4 To enable password protection click the box next to PASSWORD ENABLE and select ENABLE 5 Click the PASSWORD box create change the password Cl...

Страница 41: ...own box to select the day of the week month you would like the system to reboot 3 Insert a specific time to reboot in the last box on the right Based on a 24 hr clock 4 Select apply to save your changes To reboot theDVR 1 Click the reboot button 2 A screen will appear asking for confirmation to reboot Select OK to continue or cancel to quit 3 Once prompted to reboot the DVR the DVR will shut down ...

Страница 42: ...to SHUTDOWN Select OK to continue or cancel to quit 3 A message YOU MAY NOW power off will appear You can now UNPLUG the power supply to the DVR Events Tab The EVENTS tab allows you to choose which alarms you would like set adjust the length of time the internal buzzer will sound as well as set email notifications You can also have email alerts sent when motion is detected TurnonEVENTALARMS 1 Clic...

Страница 43: ...es for that date Once you have searched for a particular month you can view times and footage from each day of that month by double clicking on the day in the calendar below 4 The days and times that have Motion Alarm recorded footage stored on them are red in the time schedule 5 The days and times that have Schedule Recording stored on them are green If the time is not red or green it means there...

Страница 44: ...an view alarm motion recordings normal recordings or all recordings 5 The list displays the following information from left to right CH The channel with recorded footage TYPE The type of footage that was recorded MOTION DETECTION or SCHEDULED RECORDING DATE The date that the footage was recorded START The start time that the footage was recorded END The end time that the footage was recorded SIZE ...

Страница 45: ... Forward Pressing this button once will pause the playback footage After that each time you press this button the playback footage will move forward a frame and pause again Fast Forward Pressingthisfastforwardsthefootage themoretimesyoupressthisthefasterthefootagewillfast forward x2 x4 x8 Mute Selectingthisoptionwillmutethesoundfromtheplaybackfootage Soundwillonlyplaythoughif you have an audio sup...

Страница 46: ...ge directly to your computer Toviewfootagethoughyourcomputer 1 Insert included software CD into disk drive and double click to install the playback software 2 Follow the installation guide until the end 3 Once everything has been successfully installed insert USB device into USB port on computer Make sure USB device has backed up footage on it 4 Open the playback software you installed Software In...

Страница 47: ...n 4 Once you have selected open the video will NOT play automatically You must prompt the video to play 5 To view the footage you must select play from the bottom menu Once play is selected the video will begin To add anentire folder 1 Select and select the folder with your footage 2 Highlight all the files you would like to view and select open 3 Once you have selected open the video will play au...

Страница 48: ... Opens the last folder you accessed to add videos 7 Backward Frame Moves the video backward a frame 8 Play Pause Pressing PLAY plays the footage Once PLAY is pressed the PAUSE l l button will appear 9 Forward Frame Moves the video forward a frame 10 Stop Stops the footage 11 Fast Forward Slows down video 12 Volume Bar Allows you to adjust the volume if you have recorded footage from an audio enabl...

Страница 49: ...at is connected to the same router as the DVR The PC can be connected by a wired or wireless connection InternetExplorer IE 6 0orhigher tocheckyourversionofInternetExplorer open IE In the top Menu bar select Help and then select About Internet Explorer The version of IE will be displayed A genuine and fully updated version ofWindows XP Vista or newer Note ThecomputerandDVRneedtobeconnectedtothesam...

Страница 50: ...AY This information will be used in the next few steps to view the DVR on your computer as well as for viewing the DVR over the Internet Preparing Your Computer for Viewing the DVR Every computer that is accessing the DVR will need to be configured to download and run ActiveX controls This change only needs to be made one time on the computer that is accessing the DVR This can be done by performin...

Страница 51: ...LED Download unsigned ActiveX controls PROMPT Initialize and script ActiveX controls not marked as safe PROMPT Run ActiveX controls and plug ins ENABLE Script ActiveX controls marked as safe for scripting ENABLE If this is an option Allow automatic prompting for file and code downloads ENABLE 6 Click OK 7 Click apply 8 Close the options window Note Thismethodneedstobedoneoneverycomputeryouwishtovi...

Страница 52: ...aded and the DVR to be viewed on the computer 10 Click apply 11 Click OK Viewing Your DVR on Your Computer Now that the computer is installed with the necessary ActiveX changes listed above you are ready to start viewing the DVR using your computer Open Internet Explorer and type the IP address of the DVR into the address bar using the following format http 192 168 0 108 then press ENTER If the co...

Страница 53: ... yellow information bar that pops up below the address bar in Internet Explorer Click on the yellowinformationbarandthenselectInstallThis Add on for All Users onThis Computer Pleasebe patient as the installation process can take 1 2 minutes 3 If your ActiveX settings are set correctly you will see the following dialogue box 4 Click RUN Once everything has installed and loaded you will see the web ...

Страница 54: ...d com BEFOREYOU BEGIN PORT FORWARDINGYOUWILL NEED The DVR connected to a router Your computer must be connected to the same network router as the DVR The brand and model number of your router this is usually located on the back or bottom of the router Internet Explorer 6 0 or higher The Internal IP address of your DVR and the GATEWAY number The CLIENT PORT and HTTP PORT numbers that the DVR is pro...

Страница 55: ...f different types of routers Select the router most similar to yours 4 Once selected another program will appear in a separate screen Select the get started icon in the bottom left corner 5 Make sure the volume is at a reasonable listening level on your computer and follow the instructions given in the pop up window 6 Once you have completed port forwarding seeTESTING PORT FORWARDING Select your D...

Страница 56: ...the instructions for port forwarding are similar for all products or the default guide 6 Follow the step by step instructions for your router on www portforward com Be sure to use the set ports on the DVR Default Port 80 and 9000 and 18004 for mobile viewing Theinstructionswillwalkyouthroughtheportforwardingprocessfromstarttofinish Yourroutermayrequire a username and password If you do not know th...

Страница 57: ...it you will see a box sayingwhat port 6 In the box put the port numbers you set the DVR to The default ports are 80 and 9000 This is to confirm that your PORT FORWARDING is successful 7 Click the check button and scroll down 8 You will see a message that tells you it can successfully see your port This means you have successfully port forwarded 9 If you receive an error message please refer to IF ...

Страница 58: ...and or www portforward com to ensure you have the correct port forwarding settings 6 A pop up blocker is preventing the ActiveX controls from prompting you to install 7 Your router is blocking your computer from using the External IP address from the same network as the DVR Try connecting to the External IP Address from a computer that is not connected to the same network 8 Port 80 is being blocke...

Страница 59: ... login screen for your DVR The default username is admin and the password is 123456 4 Install any ActiveX controls or software settings that may appear 5 Onceeverythingisproperlyinstalled youwillbeviewingtheonlinesoftware PleaserefertoONLINESOFTWAREin this manual DDNS Dynamic DNS SETUP Instead of having to type in the IP address to access the DVR online you can use DDNS to create an easy to rememb...

Страница 60: ...linesoftwareyouareaskedtologinwithapassword Youcaneitherusetheadminoryour own user password and the footage will appear 3 The login screen also has the option to adjust which connection you are viewing the software with internet or LAN Leave this option set to Internet 4 Default username Admin and Default Password 123456 5 Once the password is inserted select login and the DVR software and footage...

Страница 61: ...r to Settings in this manual 4 Capture Takes a snapshot of the screen and automatically save the picture to the selected location on your computer To select a location refer to Settings in this manual 5 Open and Close All Live Channels Allows you to view or stop all live feed from showing 6 Display Previous and Next Channels Cycle through and view 8 or 16 cameras in quad screen mode 7 WidescreenVi...

Страница 62: ...ult To restore all default settings Tosetupcruise 1 Move the camera view to the places you would like the PTZ camera to cruise to and click the button at each desired position 2 If you select the button the set position will be cleared 3 To start the PTZ cruise select the arrow next to CRUISE to stop the PTZ select the square next to CRUISE OTHER MOUSE OPTIONS When you right click the mouse a sepa...

Страница 63: ...inistrator 2 Selectthedateyouwouldliketoviewthefootagefromthecalendarbyclickingonthedate Ifthedatehasavailable footage it will be in bold Click SEARCH 3 It may take a few moments to load the available footage The footage will appear in the space below the calendar 4 The list will display the footage in the following format The time the footage was recorded and the channel the footage was recorded ...

Страница 64: ...ootage from the beginning F F Fast forward Fast forwards through the footage The more times you select this the faster the footage will fast forward 2x 4x 8x 16x Rewind Rewinds the footage The more times you select this the faster the footage will rewind 2x 4x 8x 16x Next Frame Moves the footage forward a single frame Volume If you have an audio supported camera not included connected clicking and...

Страница 65: ... of a file Select the save location in local settings Start All Playback Starts playing all channels that have recordings Stop All Playback Stops playing all channels that have recordings Stop All Menu Stops all playback stops all downloads and stops all windows Single CHView Select to view one channel Quad ScreenView Select to view 4 channels at once WidescreenView Switches the footage to widescr...

Страница 66: ... Live ChangingthecameraNAME 1 Select the camera next to channel 2 Click the NAME box and a keyboard will appear 3 Enter the NAME of the camera then select enter to close the keyboard 3 Select SAVE in the upper right corner to save your changes 4 Repeat the steps above for all desired cameras Changingthetitle position 1 Click the box next to position and a drop down list will open 2 Select the posi...

Страница 67: ... the Privacy Zone checkbox 3 Click and drag the box around the screen to place it where you need a privacy zone The box will turn RED 4 Select SAVE in the upper right corner to save your changes 5 Repeat for all desired cameras Todeletethe Privacy Zones 1 Click the red privacy zone 2 Select the delete button below the black screen 3 Press the save button to save your changes Tocopyyoursettingstoan...

Страница 68: ...n hour Click the boxes for the times that you wish to record in the row that corresponds to the type of recording that you have selected 5 Select save to save settings Tocopyoneday sschedule toanotherday 1 Selectthedropdownmenubeside Copyandhighlightthedayyouwantcopied 2 SelectthedropdownmenubesideToandhighlightthedayyouwantthecopied schedule to be pasted into 3 Press the copy button and the copie...

Страница 69: ...ation DDNS DDNSsettings 1 To set DDNS protection on your DVR feed enter a username and password in this menu 2 Select save to save settings Mobile Mobile settings You can view your footage from your smartphone In the MOBILE menu you can assign a username and password to protect your video feed 1 Enter in a username and password to protect your video feed 2 It is necessary to assign a different por...

Страница 70: ...s 1min 3min 5min 10min Alarm Motion Enable or disable motion detection adjust the motion detection area as well as enable the alarm and the length of it Motion Toenable disablethestatusof motion detection foreachcamera 1 Click the drop down list next to Channel and select the camera you wish to make changes to 2 Select the enable checkbox to turn the motion detection on for that camera 3 Select th...

Страница 71: ...ding If you want to stop recording when the HDD is full set overwrite to Close Toenable disable overwrite mode 1 Select the drop down menu beside Overwrite 2 Select either auto to turn overwrite on you can also set the DVR to overwrite for just a few hours or days or choose close to turn overwrite off 3 Select save to save settings PTZ PTZ setup allows you to input information for a PTZ camera PTZ...

Страница 72: ... changes ToadjusttheTIMEFORMAT 1 Select the scroll bar next totime format and a list will appear 2 Highlight and select the type of time format you would like Choose between a 12 hour clock or a 24 hour clock 3 Select SAVE to save your changes ToadjusttheTIME 1 Select the column next to the time you would like to change and a keyboard will appear 2 Type the time in the order of the selected format...

Страница 73: ...ect theweek Select the drop down box below and select theweekday Repeat above steps for EndTime If by Date Select the box next to StartTime and input the specific date A keyboard will appear Select the box below and input thetime you want the DST to change Repeat above steps for EndTime 5 Once everything has been adjusted to your liking select save to save your settings NTP NetworkTime Protocol Yo...

Страница 74: ...he search menu to view saved footage while the administrator has unlimited access Both default passwords are 123456 1 Highlight and click the user you wish to change the password for 2 Make sure password enable is set to Enable 3 Type the password you would like in the box next to password 4 Type in the same password again next to confirm to confirm the password 5 Once you have input the passwords...

Страница 75: ... up to receive alerts 6 Select save to save settings Maintain Toturn auto maintenance onoroff 1 Select the Maintain tab 2 Select the drop down box next to Auto Reboot and select Enable or Disable 3 Input the date and time with the drop down boxes when you would like the reboot to happen 4 Select save to save your changes Load Default Loading default settings will restore all settings on your DVR t...

Страница 76: ...Find the location you want the files to be saved to and double click the area 3 Select OK 4 The file you want the footage pictures saved to will appear in the box 5 Select save to save settings Logout Clicking on the LOGOUT tab logs you out of the online software and DVR viewing When this tab is clicked the software will shut down the screen will refresh and return to the initial user login screen...

Страница 77: ...ouriPhone pleaseensurethatyouhaveiTunes setuponyourcomputerwith an activated account and that you have port forwarded an extra port for mobile viewing DownloadfromAppStore 1 Open App Store 2 Select the search icon at the bottom of the screen Search Asee 3 Select the Asee application then Install 4 Once application has downloaded it will appear on your iPhone screen FromyourcomputeroriPhone 1 Open ...

Страница 78: ...press the Back button in the top left corner of the iPhone screen 5 Press the play button in the bottom left of the screen to start playing live footage from your DVR 6 Fore more information on the Asee please review the buttons and connections section below BUTTONS AND CONNECTIONS 1 Viewing Screen 2 PTZ controls 3 Channel selection keys 4 Play Pause 5 Snapshot 6 Full screen 7 Setup 8 Next group o...

Страница 79: ...application 2 Once the program has started select the settings icon from the settings screen and input the following information Host Input your DVR s IP address Port Input the port you forwarded for your mobile setup Ensure that this port is also listed under mobile settings on your DVR User Input the user ID that you have set under the mobile settings on your DVR Password Input the password that...

Страница 80: ... The application will begin downloading and install automatically when the download is finished 5 Once the application finishes installing there will be an option to open the application Choose this option on the bottom of your screen 6 From now on the Asee application will be available from your main menu Installingviewingsoftwaretoyourphone sSDcard fromyourcomputer 1 Connect phone to computer an...

Страница 81: ... then the hard drive will fill up faster Try lowering the video quality Adjust your schedule or resolution If you are on Schedule Record for 24 hours a day the hard drive will fill up faster Try switching periodically to Motion record DVR beeps whenever motion is detected Buzzer is set to on Go to the alarm setup and turn the buzzer function off The DVR keeps beeping There could be video loss HDD ...

Страница 82: ...all the cameras are set to ON Check your record schedule to make sure the DVR is set to record that hour Verify that the HDD is installed and formatted in the device menu The camera picture is too dark Adjust the camera s brightness settings under Main Menu Camera Color Try moving your camera to a brighter area Make sure the camera is not pointing directly into a light source Your camera may not b...

Страница 83: ...ort to 8080 Be sure to reconfigure the port forwarding Refer to the Network Setup section of the manual for detailed instructions on RemoteViewing set up The browser keeps freezing I can t play the footage Make sure you have an up to date browser to view the footage with the proper ActiveX options Make sure the browser is Internet Explorer The software will not play on any other browser Download a...

Страница 84: ...e the use of any DEFENDER products for illegal activities Defender is not responsible or liable in any way shape or form for any damage vandalism theft or any other action that may occur while a Defender product is in use by the consumer ...

Отзывы: