H
A R D W A R E
I
N S T A L L A T I O N
Local Computer Installation
7
L o c a l C o m p u t e r I n s ta l la t i o n
The instructions below explain how to make a typical local connection. Note that
if you extend the cable run beyond 48’ (14.4 m), the software may have difficulty
communicating with the station.
Note: Mac Users - Refer to your WeatherLink for Mac OS X Getting Started Guide for addi-
tional installation instructions.
Local Computer Installation
Installing with a Local Computer
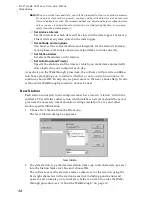
1. Locate a free serial port on the back of your computer and connect the DB9 to
the port.
2. Insert the cable plug at the end of the short cable coming from the data logger
into the receptacle on the end of the 8’ cable. Then insert the cable plug on the
end of the 8’ cable into the DB9 adapter.
The cable connecting the data logger to the computer is 8’ (2.4 m) long. If you
need to place the station console more than 8’ from the computer, use a 40’ (12
m) standard 4-conductor extension cable (#7876-040). Do not attempt to use
more than 40’ of extension cable, or the data logger may have difficulty com-
municating with the computer.
Note: The Weather Envoy data logger does not need to be connected to the computer for
the logging to work. You can connect the cable to the computer when you’re ready to
download, then disconnect it if you want to place the Weather Envoy somewhere
else. However, the WeatherLink bulletin, summary, or real-time strip charts can be
displayed only while the Weather Envoy is attached to the computer.
9-Pin
Connector
(DB-9)
Optional 40' (12 m) 4-Conductor
Extension Cable and Coupler
8' (2.5 m) Cable
AC Power
Adapter
Weather Envoy
Data Logger


