background image

Dashboard User Guide

16

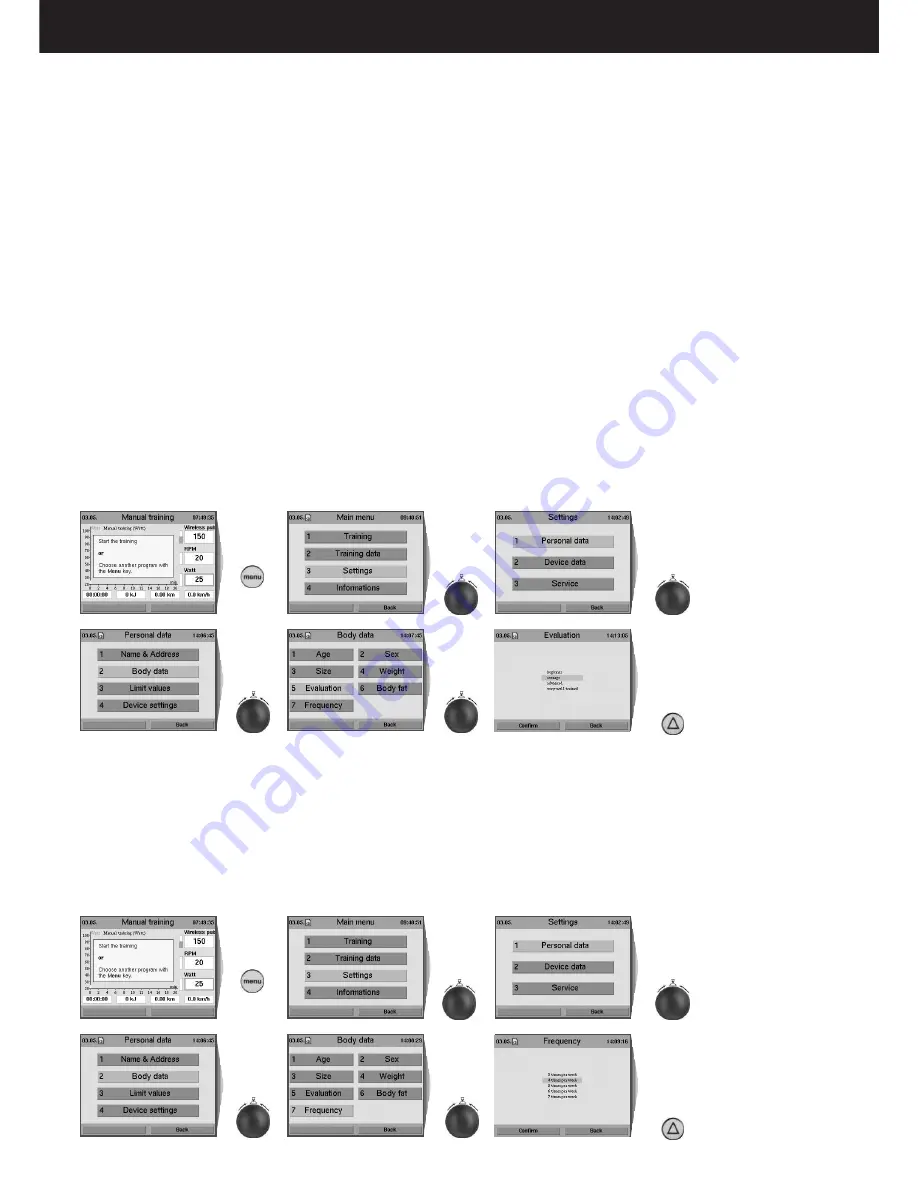
Press the

Menu key

Turn and

press control

button to

select

“Personal data”

Turn control

button to select

the evaluation

value and

press the

function key

under “Confirm”

Turn and

press control

button to

select

“Setting”

Turn and

press control

button to

select

“Body data”

Turn and

press control

button to

select

“Evaluation”

Press the

Menu key

Turn and

press control

button to

select

“Personal data”

Turn and

press control

button to

select

“Setting”

Turn control
button to select
the Frequency
value and
press the
function key
under “Confirm”

Turn and

press control

button to

select

“Body data”

Turn and

press control

button to

select

“Frequency”

Personal Performance Evaluation

The users must evaluate their very personal performance capacities (in 4 levels)
in connection with the entry of the required personal data and alarm values,
particularly for the utilisation of the coaching program. The directions provided
in the following section should help the users evaluate their own performance
capacities.

Beginner:

You don’t have any training experience or practice physical activity only occasionally
and very irregularly. In this case we recommend selecting the beginner category.
This applies also for users who are returning from a long training interruption
(e.g. because of an injury or an illness).

Average:

You do sport regularly. But you are mainly oriented toward recreational sport
activities, less toward endurance sport. The training frequency is about 1 to 2
hours per week.

Advanced:

You do regularly endurance sport (e.g. jogging, biking, etc.). The training frequency
is about 2 to 4 hours per week.

Very well trained:

You have an extensive training experience in endurance sport. Your physical
performance and load capacity is above average. Your present training frequency
is at least 3 hours per week, preferably in endurance sport.

Entry of your Personal Performance Evaluation:

Training Frequency

By setting the training frequency the user sets the number of training units per
week independently of the days. The user has the possibility to choose from “3
times per week” to a maximum of “7 times per week”. In order to achieve the
personal training objective the user must complete these training units. This
guarantees that the Coaching program produces an efficient training plan with
the prescribed training objective.

Entry of the Training Frequency

:

Содержание ego_bike Premium 8

Страница 1: ...User Manual ...

Страница 2: ...ssories 3 Software 3 Documentation 3 Other Notes 3 Information About Personal Safety 3 Setting Up Control Elements and Connections 4 Switching On Off 5 U shaped handle 5 Notes about Pulse Rate Measure 6 The Dashboard Top panel Overview of the control elements 7 Underside Overview of the connectors 7 Dashboard User Guide Switching On 8 Starting Training Without Selecting a Program 8 Setting Persona...

Страница 3: ...r devices DIN EN 60601 1 for electromedical devices Software The supplied software may only be copied and archived for safety and functional reasons In special cases a request must be addressed in writing to daum electronic gmbh Releasing it to non authorised persons is not allowed The ergo lyps premium8 may only be used with the internal and external softwares supplied and authorised by daum elec...

Страница 4: ... Rear foot Dashboard support Step plates right and left side Base frame Steel frame with transparent cover plates Foot rods right and left side right and left side internal and external Transparent sweat protection Power switch On Off Swivel joint of the oscillating poles lock lever handle U shaped handle Handle M8 locking screws Tube of the dashboard housing with protective cover with Drive unit ...

Страница 5: ...ar knob 1 adjust the U shaped handle and the dashboard to the required position and tighten the star knob back Be careful while adjusting the handle to avoid cutting the cable On Off power switch When switched on the system takes about 1 minute to load the software The colour screen displays during this time a software load progress bar Wait for the beep signal before using the dashboard If the me...

Страница 6: ...the ear lobe the closest possible to the head The contact surfaces must sit entirely on the skin The scattering in the display of the pulse rate variability is larger than with the wireless pulse measure factor 2 Note Strong light sources like sunlight halogen projectors and neon lamps and also ear piercing or ear rings or the intake of beta blocker could affect the measurements Wirless Pulse Meas...

Страница 7: ...ardio connector Used to connect the ear clip 13 Relax connector Used to connect the Relax sensor 14 Card reader for the ergo_memo card2 Underside 15 RS422 interface to the control board 16 Treadmill keyboard 17 Reset key 18 USB Host 19 USB Slave 20 Wireless pulse rate 21 Operating power from control board 22 Hand pulse rate 23 Audio connector L R to external amplifier Line Out 24 Network connector...

Страница 8: ...d by means of the control button the Menu key the Info key and two function keys Use the info key to obtain more information about the individual menu items If the requested information spans many pages you can leaf through the pages by turning the control button Press the Info key to display the keywords glossary page 17 Note We reserve the right to modify the figures Insert the ergo_memo card2 i...

Страница 9: ...ficient and simulate a realistic biking tour Only here you have the possibility to use the gearshift Training Programs Pulse Rate Training Programs Constant Pulse Rate With the pulse rate programs the heart pulse rate is controlled and adjusted automatically by means of the braking power Watt Training Programs With the watt controlled programs the braking power is adjusted according to the set up ...

Страница 10: ... and press control button to select Dynamic limit values Setting Limit Values In order to protect the user against overloading or physical injuries the training intensity can be controlled by various adjustable limit values These should be set in menu Setting before starting training or before setting the loading values after a few training units Dynamic Limit Values and Static Limit Values can be...

Страница 11: ...lect Training Unit GB Reviewing Stored Training Data Recalling stored training data e g Individual Training The individual training units can be recalled under several specific performance diagrams Time limit value reached while training When the Time limit value is exceeded during training the braking load is automatically reduced to a minimal value Simultaneously the system displays a warning me...

Страница 12: ...e of stress level You can assist this process by getting off the device and sit in a relaxed position or even lay down close to the ergo_lyps and calm down Fitness Test and Fitness Mark The fitness test can be executed anytime during training A pulse rate measuring device pulse sensor ear clip or chest strap must be connected and functional and the training should had already started at least 10 m...

Страница 13: ...on the ergo_memo card2 Every premium program consists of a file with the extension dpp and the corresponding folder Starting the premium programs Select a premium program by turning and pressing the control button Each program has an introduction melody Connecting the relax sensor 1 Attach the relax sensor tape with the big contact surface Fig A to the fingertip of the middle and index fingers on ...

Страница 14: ...conds Now you can be really proud of yourself It was sometimes very tough Congratulations good work So you are already through the first level of your warm up training We will now gradually raise the speed of your training You should now hold a pedalling speed of 60 RPM for now if you pedal too fast things get more difficult if you pedal too slowly things get easier Only at the proper speed will y...

Страница 15: ...ing 2 The user is required to enter the amount of time he or she can or want to train the number of training units per week and to evaluate his own fitness level The user should not overestimate his capacity regarding the number of training units and their difficulty grade In sport activity overworking does not help while a thoughtful and controlled training plan leads generally faster and more ef...

Страница 16: ...ical activity only occasionally and very irregularly In this case we recommend selecting the beginner category This applies also for users who are returning from a long training interruption e g because of an injury or an illness Average You do sport regularly But you are mainly oriented toward recreational sport activities less toward endurance sport The training frequency is about 1 to 2 hours p...

Страница 17: ... the user to choose his personal Coaching type Next the performance test can be taken immediately There are 4 Coaching types to choose from Heart circulation cardiovascular Weight and fat reduction Fitness training Muscle build up We urgently advise you to undergo a medical physical aptitude test before starting a training with the intelligent coaching program As long as the first performance test...

Страница 18: ...t If the user tries to start before the end of this period a warning message is displayed Coaching week 1 begins on the day following the first performance test The training progress is measured in Coaching weeks and is not related to calendar weeks After the first Coaching unit is completed the Coaching menu will present all the options Coaching type Last Test Results Downgrading and Coaching Inf...

Страница 19: ...en units may be run per week The frequency can be set through the Menu Weekly Planning for Coaching Units When all the Coaching units scheduled for a week are completed the Coaching menu will not allow any further training A warning message will be displayed to this effect along with the next scheduled program Displaying the Coaching Units The units displayed for the selected week refer always to ...

Страница 20: ...e training frequency If the set frequency is already the minimum allowable frequency the system displays a warning that you should train at least 3 times per week to achieve an effect from the training Use the Info key to obtain more information about the individual menu items Frequency of the Performance Test The performance test is scheduled to run every 4 weeks and is executed as the last unit ...

Страница 21: ...rm of an Update Card or as an Update file to download from our Internet site at www daum electronic de Order the Update Card directly from daum electronic once the update operation is complete you can use this card as an additional ergo_memo card2 for another user If you prefer to use the possibility to update on Internet you will need a computer and a SD card reader available from electronic stor...

Страница 22: ...e the system will not save any training data on the card Insert the memory card in the dashboard at the front side of the device Starting the MP3 Player Press the mp3 player key the system will display a list with the music titles saved on the card Select a title by turning the control button Press the control button to start playing the selected title The system continues with playing all the mus...

Страница 23: ...nt to use the hand pulse rate measurement you must switch it On TeamAward Your perseverance will be rewarded By training on this Ergometer you are automatically participating in the TeamAward contest of daum electronic When you reach one of many distance limits 1 000 5 000 10 000 and 20 000 kilometres you will be invited to enter the TeamAward Code on our Web site at www daum electronic de under T...

Страница 24: ...feel absolutely fit for the training should prepare himself for the training on the ergometer or if in doubt consult a physician A relaxed body posture is essential for the efficiency and the benefit of the training with the ergo_lyps You should not be tensed up while training You should wear loose training garments so that you don t get into sweat too easily and are not constricted by the clothes...

Страница 25: ...ww daum electronic de Should the dashboard operation fail and cannot be restored by mean of normal keys operations then the solution would be to press the recessed RESET key Page 7 No 17 underneath the dashboard with a pointed tool e g a pencil or ball pen Please note that the last set of training data and results will be definitively lost when you press the RESET key Outside cleaning Clean the ou...

Страница 26: ...um 8 article number 9150282 complies with all applicable requirements of the following prescriptions 2004 108 EG EMC Electromagnetic Compatibility 2006 95 EG Low Voltage Directive Applied standards EN 957 1 2005 EN 60601 1 2 2007 EN 60335 1 2007 daum electronic gmbh Flugplatzst 100 D 90768 Fürth Tel 49 0 911 9 75 36 0 Fax 49 0 911 9 75 36 96 Fürth 18 12 2009 ...

Страница 27: ...00 RPM Load precision Conform to DIN EN 957 1 9 Class SA HA Loading levels In 5 Watt increments manually adjustable Drive Single stage maintenance free V ribbed belt drive in a spring supported drive unit Flywheel Precision machined Displays Colour screen 256 Colours 320 x 240 76800 Pixels Pulse rate measurement On the ear measuring range 40 to 200 pulses min Telemetric using the Cardio sensor che...

Страница 28: ...ts for the oscillating poles right and left 2 Bearing shafts for the crank lever right and left 1 Drinking bottle with holder and screws 8 Swivel joint caps Mounting hardware 4 Recessed head screws M 8x50 A 4 Spacer sleeves 12 Ø x 37 5 mm B 11 Hexagonal head screws M8 x 20 C 7 Spring washers DIN 127 8 1 D 4 Washers DIN 9021 8 4 E 4 Flat head screws M5 x 40 F 4 Washers DIN 125 5 3 G 4 Hexagonal nut...

Страница 29: ... 5 Put the foot with casters in the rear crossbar and align the holes to the threads in the crossbar 1 6 Insert the first recessed head screw with spacer sleeve into one of the holes and screw it in lightly Do not tighten the screw yet and do not use force to screw it in 1 7 Repeat this operation with the second recessed head screw with spacer sleeve as described under step 1 6 1 8 Tighten the rec...

Страница 30: ...gs the connectors X Y together Then they together install the dashboard support column 3 carefully on the receptacle ST of the frame Take care at this moment not to jam or separate the cables 2 3 After the support column 3 is loosely installed it must be oriented to align the holes to the threaded holes in the receptacle ST Then screw in the three M8 screws C with the supplied spring washers D wit...

Страница 31: ...3 3 We recommend to proceed as illustrated below to hammer the extensions 4b into the oscillating poles The best proceeding is to find an underlay foot mat or similar and to lean the lower end of the oscillating pole into a wall corner in such a way that the rounded bearing cannot slip on the ground and prevent it from being damaged Put the two halves 4b 1 together by hand or using a big pliers to...

Страница 32: ...urved washer K supplied in the hardware kit must be fitted on the hinge pin 4c before the pole This washer then sits between the welded bearing support 3 1 of the dashboard column 3 and the bearing bracket 4 2 of the oscillating pole 3 6 Attach the oscillating poles 4 4a to the hinge pins 4c with the hexagon head screw C and the washer D At this moment the screw should be screwed loosely not tight...

Страница 33: ...te 4g 4g 1 and the corresponding holes in the foot rods 4f 4e and secure screw it from underneath with the M5 nuts H and the appropriate washers G You only have to pay attention that the side retaining wall on the step plates 4g 4g 1 is positioned on the proper side of the foot rods 4f 4e The retaining walls must be mounted towards the device body They may not be positioned outwards Bearing retain...

Страница 34: ...t rods 4f 4e into one of the threaded holes a b c of the crank levers 5 5a without tightening them 2 Warning watch for the left and right thread For the standard position use the 17mm wrench to screw the hinge pins 5b 5c to the outer threaded hole c See page 12 for the other optional positions of the crank swivel pin Then screw the corresponding M8 hexagonal head screws C with the appropriate big ...

Страница 35: ...ing screw 2 Pull the handle out until it stops 3 Lift the ergometer by the handle at the front until the roller casters on the rear foot touch the ground 4 Lift the ergometer until the person lifting it is standing straight and his back is not overloaded 5 It is then relatively easy to move the ergometer on the integrated roller casters on a flat floor GB Mounting the bottle holder Bringing the li...

Страница 36: ... order to adjust the foot rods to a flatter angle The consequence of this setting is that the foot rods 4f 4e and particularly the step plates 4g move over a flatter ellipse This alternative movement is particularly intended for older and handicapped persons whose motion capabilities at the knee level is limited Pictures 1 to 8 illustrate the steps sequence to unmount and modify the setting The co...

Страница 37: ...faces of the pulley and the drive shaft as well as the belt itself with alcohol or cleaning petrol to remove the grease Liability The manufacturer will not be held liable if the ergometer is not used in compliance with the provided instructions and recommendations and if the prescription are ignored Replacement of the Dashboard Battery CAUTION Failure to correctly replace the battery may create an...

Страница 38: ...bic Zone You should train in the aerobic zone if you want to increase your load capacity In this zone more glucide get burned that fat The benefits of the strengthening have an important impact on the heart and respiratory systems Danger Zone High performance training hard training with typical phenomena like pain exhaustion fatigue Lactic acid is transferred in the metabolism without producing ex...

Страница 39: ...der must point to the bottom when the card is inserted into the dashboard This will make it possible to write to the card If the slider points upward the card is locked Earclip Connect the ear clip to the Cardio socket The pulse rate is measured by means of an infrared sensor and shown on the screen Cardio Sensor Chest Strap Special Accessory The chest strap contains a wireless transmitter that tr...

Страница 40: ...d part by us 4 All other warranty claims specially claims for the compensation of direct or indirect damages or damage to a third party or damages to other objects as well as of damages due to failure and of labour costs are expressly excluded to the extend authorised by law Should the repair fail within a reasonable delay the customer has the right to demand a price reduction or the cancellation ...

Страница 41: ...on and only if you received the program in object code or executable form with such an offer in accord with Subsection b above The source code for a work means the preferred form of the work for making modifications to it For an executable work complete source code means all the 1 Information Some sections of the software used on your Daum premium 8 i or medical 8 i training device are covered by ...

Страница 42: ...al distribution limitation excluding those countries so that distribution is permitted only in or among countries not thus excluded In such case this License incorporates the limitation as if written in the body of this License 9 The Free Software Foundation may publish revised and or new versions of the General Public License from time to time Such new versions will be similar in spirit to the pr...

Страница 43: ... if any to sign a copyright disclaimer for the program if necessary Here is a sample alter the names Yoyodyne Inc hereby disclaims all copyright interest in the program Gnomovision which makes passes at compilers written by James Hacker signature of Ty Coon 1 April 1989 Ty Coon President of Vice This General Public License does not permit incorporating your program into proprietary programs If you...

Страница 44: ...Stand 26012010 Artikelnummer 0640683e 0005 daum electronic gmbh Flugplatzstr 100 D 90768 Fürth Tel 49 0 911 97536 0 Fax 49 0 911 753714 www daum electronic de ...

Отзывы: