102
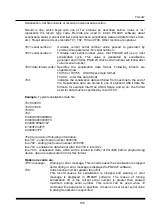
Address
Data
0000800
00 00 00 00 00 00 00 00 xx xx xx xx xx xx xx xx
xx – means any byte value
B)
Set the serialization options as following:
S/N size:
3 bytes
Address:
800h
Start value:
123456h
Step:
1
S/N mode:
BIN
Style:
HEX
Save to buffer:
LS byte first
Split
serial number: checked
Split gap:
2 byte(s)
S/N fragment size:
2 byte(s)
Split settings described above mean split of serial number into fragments with 16 bit (2 bytes)
size to buffer with gap of 2 bytes between fragments. The correct serial number is set tightly
before device programming operation starts.
The buffer content of serial number when programming the first device will be:
Address
Data
0000800
56 34 00 00 12 00 00 00 xx xx xx xx xx xx xx xx
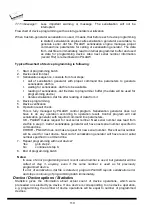
The second device will have:
Address
Data
0000800
57 34 00 00 12 00 00 00 xx xx xx xx xx xx xx xx
Next devices will have same format of serial number incremented by 1 for each device.
Example 3:
Following example uses the same serialization options as Example number 2a, instead the
serial number Split gap is set to 2 and 3.
When Split gap is set to 2 bytes, the buffer content will look as following:
Byte buffer organization:
Address Data
0000080 CD xx xx AB xx xx 34 xx xx 12 xx xx xx xx xx xx
Word16 buffer organization:
Address Data
0000040 xxCD ABxx xxxx xx34 12xx xxxx xxxx xxxx
When Split gap is set to 3 bytes, the buffer content will look as following:
Byte buffer organization:
Address Data
0000080 CD xx xx xx AB xx xx xx 34 xx xx xx 12
Содержание Dataman-40Pro
Страница 7: ...Quick Start 7 Introduction ...
Страница 12: ...12 Quick Start ...
Страница 14: ...14 4 check if the device is blank click on 5 program device click on 6 additional verify of device click on ...
Страница 15: ...Detailed description 15 Detailed description ...
Страница 16: ...16 DATAMAN 448PRO2 ...
Страница 30: ...30 DATAMAN 48PRO2 DATAMAN 48PRO2C ...
Страница 45: ...DATAMAN 40PRO 45 DATAMAN 40PRO ...
Страница 54: ...54 DATAMAN MEMPRO ...
Страница 61: ...Setup 61 Setup ...
Страница 65: ...Setup 65 Step 6 Check your setting and then click on Install button Step 7 Installation process will start ...
Страница 70: ...70 Step 6 Click on Continue Anyway button For Windows Vista Click Install this driver software anyway ...
Страница 72: ...72 PG4UW ...
Страница 141: ...PG4UWMC 141 PG4UWMC ...
Страница 154: ...154 Installation procedure customized ...
Страница 159: ...Common notes 159 Common notes ...
Страница 171: ...Troubleshooting and warranty 171 Troubleshooting and warranty ...


