Attaching and Configuring a Screw Terminal Panel
39
4
4
4
4
4
4
4
4
4
These resistor locations connect the high side to the low side of the
corresponding channels, thereby acting as shunts. If, for example,
you add a 250
Ω
resistor to location R17, and connect a 4 to 20 mA
current loop input to channel 0, the input range is converted to 1 to
5 V. Note that, depending on your application, you may need to use
resistors R1 to R16 with resistors R17 to R32 for proper operation.
Refer to
for an example of using current shunt resistors.
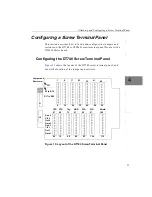
Configuring the STP268 Screw Terminal Panel
shows the layout of the STP268 screw terminal panel,
including the location of jumper W1 and the resistors.
Figure 14: Layout of the STP268 Screw Terminal Panel
J1
1
R1
to
R16
R17
to
R32
16
17
32
33
40
41
52
55
68
W1
Jumper and
Resistors
Содержание DT3010 Series
Страница 1: ...R DT3010 Series UM 16868 C Getting Started Manual ...
Страница 11: ...1 1 Overview DT3010 Series Key Hardware Features 2 DT3010 Series Software 3 Getting Started Procedure 4 ...
Страница 22: ...Chapter 2 12 ...
Страница 36: ...Chapter 3 26 ...
Страница 114: ...Chapter 5 104 ...
Страница 136: ...Appendix A 126 ...
Страница 142: ...Index 132 ...


