Data Industrial Series 340 Btu transmitter Owner’s Manual
2
Se
ns
or I
np
ut
Power Out
Signal
+
Signal
-
Shield
Po
w
er I
n
AC L/DC
+
AC C/DC
-
Ou
tp
ut
Pulse Out
-
Pulse Out
+
Te
m
p 2
Te
m
p 1
Output LED
Model: 340
S/N 340-XXXXX
®
Input LED
Mattapoisett, MA 02739
D.I
.C
.
Co
m
m
Po
rt
1.60”
(40.6mm)
3.65”
(92.7mm)
2.95”
(74.9mm)
.88”
(22mm)
.60”
(15mm)
4.5”
4.50”
2.00
”
Side
Top
Sid
e
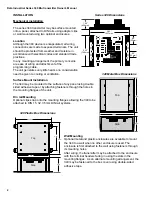
INSTALLATION
Mechanical installation
The series 340 transmitter may be surface mounted
onto a panel, attached to DIN rails using adapter clips
or wall mounted using two optional enclosures.
Location
Although the 340 device is encapsulated, all wiring
connections are made to exposed terminals. The unit
should be protected from weather and moisture in
accordance with electrical codes and standard trade
practices.
In any mounting arrangement, the primary concerns
are ease of wiring and attachment of the
programming cable.
The unit generates very little heat so no consideration
need be given to cooling or ventilation.
Surface Mount Installation
The 340 may be mounted to the surface of any panel using double
sided adhesive tape or by attaching fasteners through the holes in
the mounting flanges of the unit.
Din rail Mounting
Optional clips snap onto the mounting flanges allowing the 340 to be
attached to DIN 15, 32, 35 mm DIN rail systems.
Wall Mounting
Optional metal and plastic enclosures are available to mount
the 340 to a wall when no other enclosure is used. The
enclosure is first attached to the wall using fasteners through
its mounting holes.
After wiring, the transmitter may be attached to the enclosure
with the terminal headers facing in using the slots in the
mounting flanges. As an alternate mounting arrangement, the
340 may be fastened to the box cover using double-sided
adhesive tape.
Series 340 Dimensions
340 Metal Box Dimensions
4.60”
4.60”
2.25
”
Side
Top
Sid
e
3.25”
5.125”
340 Plastic Box Dimensions


