


5-17
Chapter 5 User Menu
Absolute precision correction
values
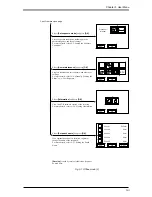
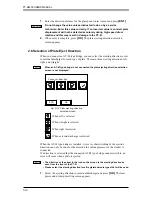
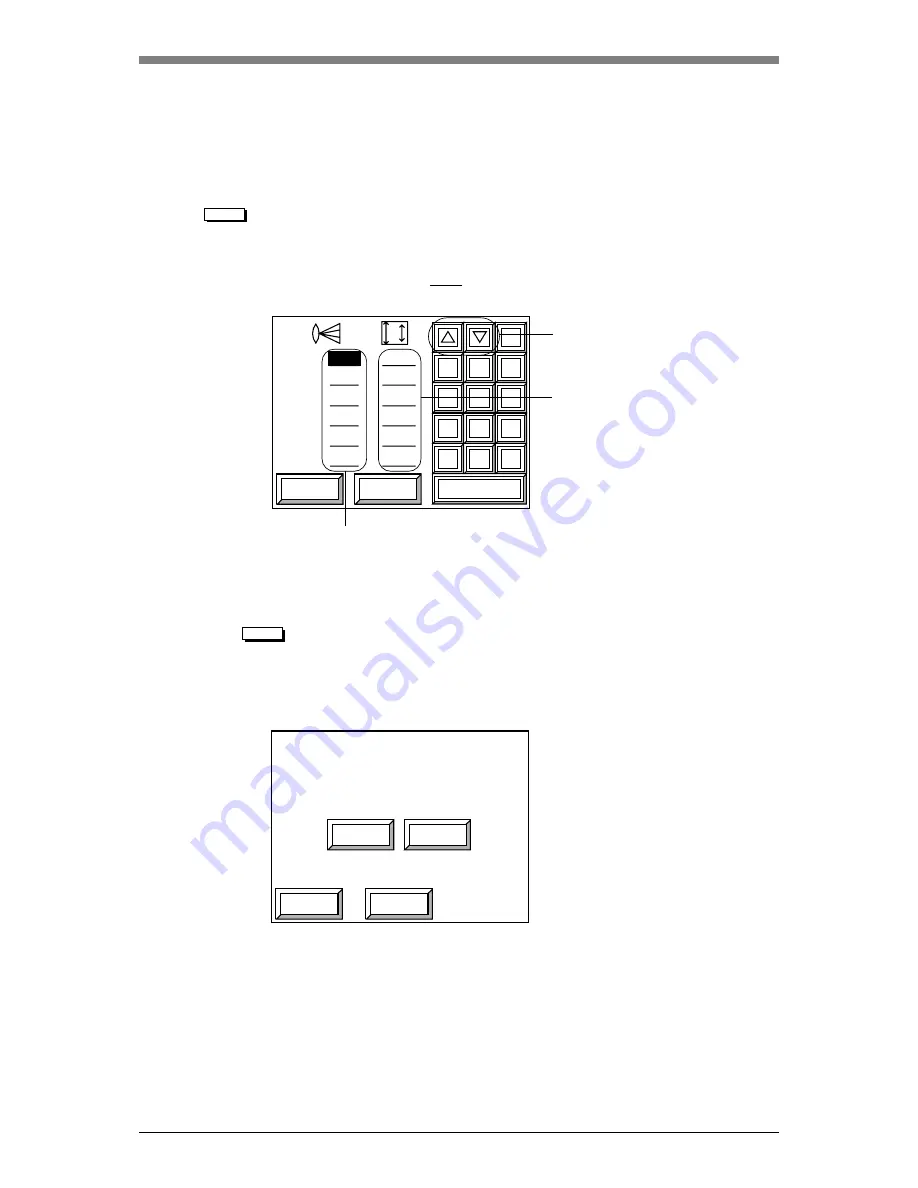
2.9 Setting the Zoom Value and Absolute Precision Correction Value
For each resolution of the plate, set the zoom value and the absolute precision
correction value for the primary scanning direction.
NOTE
The absolute precision correction value is a correction of the length of the primary
scanning direction. For example, if this value is initially 0 and an image is exposed
that is 800 mm in the primary scanning direction, but the exposed image is
actually 799 mm, entering a correction value of
(800 - 799)/800
×
100 = 0.125(%)
will cause the correct length to be exposed.
OK
YES
NO
ESC
Save Data ?
SAVE
ESC
dpi
R
[pulse]
[%]
1200
2000
2400
4000
2438
2540
0.000
0.000
0.000
0.000
0.000
0.000
CLR
7
8
9
4
5
6
1
2
3
0
.
—
ENT
6450
6200
6300
6200
6200
6200
These keys also move the
highlighted portion.
Zoom values
1.
The highlight moves between the zoom values and the absolute precision
correction values each time you press
[ENT]
. Enter each value and press
[ENT]
.
NOTE
To check the zoom value and absolute precision correction value settings,
or perform a text exposure to determine the optimum zoom values and
absolute precision correction values, refer to “9. Test Exposure.”
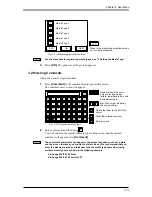
2.
When entry is complete, press
[SAVE]
.
The save confirmation screen appears.
3.
To save all of the set information as one Media Type 1, press
[YES]
and then
[OK]
. Data is saved and the screen returns to the media type selection screen.
To not save, press
[NO]
and then
[OK]
. The screen returns to the media type
selection screen.
Fig. 5-15 Zoom value and absolute precision correction value setting screen
Fig. 5-16 Save confirmation screen
Содержание PLATE RITE 4300
Страница 10: ...x...
Страница 11: ...Chapter 1 Ensuring Safety 1 This chapter gives information necessary for safe use of the PT R...
Страница 26: ...PT R4300 USERS MANUAL 1 16 End of Chapter 1...
Страница 27: ...Chapter 2 This chapter explains precautions for installing and moving the PT R Installing and Moving the PT R 2...
Страница 31: ...Chapter 3 Names of Each Part 3 This chapter gives an overview of the PT R and explains its configuration...
Страница 38: ...PT R4300 USERS MANUAL 3 8 End of Chapter 3...
Страница 39: ...This chapter explains the basic procedures for operating the PT R Chapter 4 Basic Operation 4...
Страница 60: ...PT R4300 USERS MANUAL 4 22 End of Chapter 4...
Страница 61: ...This chapter explains the procedures for setting PT R parameters Chapter 5 User Menu 5...
Страница 122: ...PT R4300 USERS MANUAL 5 62 End of Chapter 5...
Страница 123: ...Chapter 6 Maintenance 6 This chapter explains daily maintenance and inspection procedures for the PT R...
Страница 137: ...Chapter 7 Messages 7 This chapter explains the messages that appear in the display of the PT R operation panel...
Страница 157: ...This chapter explains this typical PT R problem and the solutions Chapter 8 Jamming 8...
Страница 163: ...This chapter gives technical information on the PT R Chapter 9 Technical Information 9...
Страница 166: ...PT R4300 USERS MANUAL 9 4 End of Chapter 9...


