【INSTRUCTION MANUAL】
DAIKIN INDUSTRIES, LTD
.
SE-04430
・
Use alternating current (AC) which is suitable for the power source specifications of the product.
・
Use the electric wire which is suitable for AWG14 (2sq~2.5sq).
・
Do not connect the power source wire (L1,L2,L3) to earth connection point of power source terminal.
・
The earth connection point is connected with the motor frame, and ground the earth over the third class
ground.
・
Be careful not to damage the conductor when stripping electric wire.
・
Be careful not to stick out the conductor of wiring from the terminal stand.
●
The wiring of the main power source
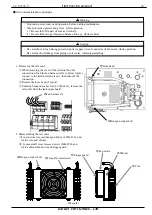
(1) Wire the electric cable through the wiring port of the terminal
box. Use the wire and the cable clamp to be suitable for the
wiring port that satisfies protection grade over IP54.
[Recommended cable clamp : Laap Co.,Ltd. made ST16]
[screw size : PG16]
(2) Connect the earth line to the earth terminal of the terminal
stand for power source.
(3) Connect power source line to terminal stand (L1,L2,L3) of the
power source. (There is not polarity.)
Refer to the below figure to connect with the terminal board.
(4) After wiring, be sure to install the cover of the terminal box as
it was.
①
Insert special driver or precision driver (width
2.4~3mm) as left figure.
②
Make sure of stripped wire length, and insert
them until the end without separating.
③
Pull special driver out.
④
Make sure of wiring by pulling the electric wire
slightly.
How to connect the power source wire to the
terminal stand board.
Terminal stand for
power source
Stripped wire length: 9mm
9mm
◆
Wiring point
When wiring the main power source and the alarm output signal wire, the cover of the terminal box has to be
removed.
《
Removing the cover of the terminal box by loosening the cross recessed screw (M4) that installed on the cover.
》
13
Danger
・
In case of preventing end of the wire from separating, treat its end with solder or use the below mentioned
crimping terminal with insulated sleeve. (Refer to maker’s catalogue “WAGO made” for handling them.)
For 2
sq
:
216-205 yellow
For 2.5 sq
:
216-206 blue
Press tool
:
206-204 Bio- crimp
Special driver
:
WAGO made 210-257 or 210-350/01 etc.
(Terminal stand: WAGO made 745series)
Caution
Wiring port for power source
Wire insert port
Special driver
Refer to page 12, ”wiring diagram” as for the arrangement of the terminal board.


