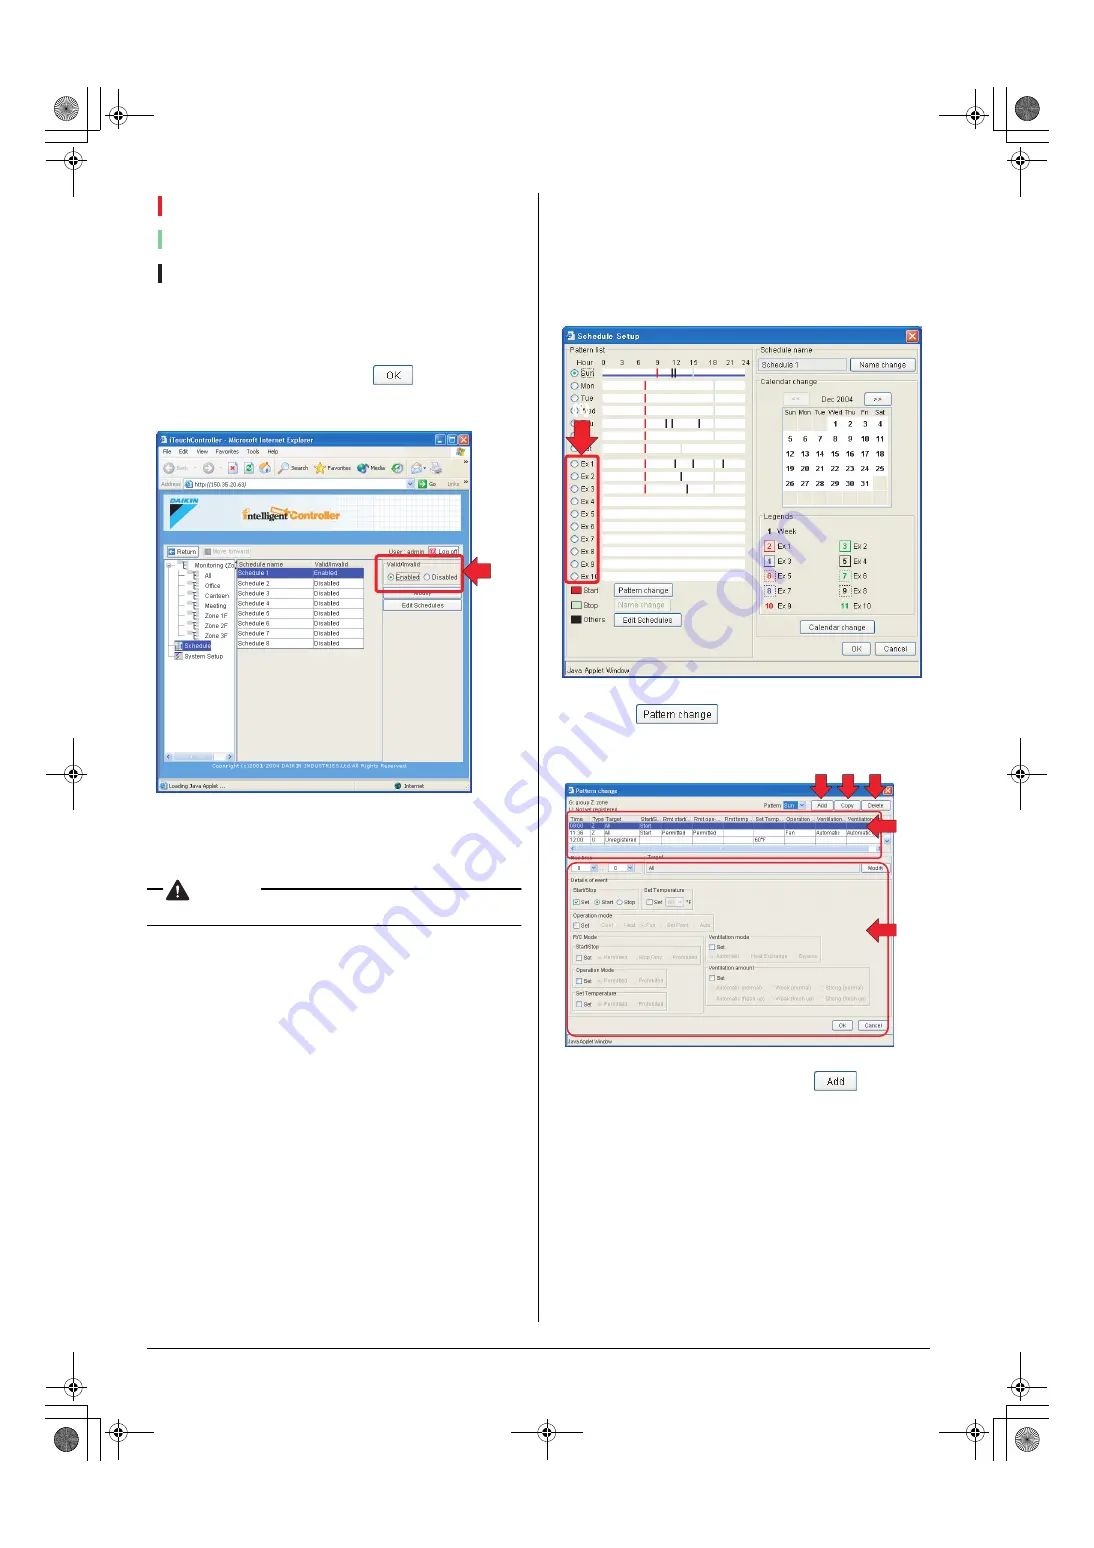
background image

44

English

(Red):

Start event

(Green): Stop event

(Black):

Event other than start/stop events

The marks on the bar indicate the time frame (half-hour unit, for 
example: 0:00 to 0:29, 0:30 to 0:59) within which the event 
should occur. (See the examples in the Screen 5.)

If the setting is satisfactory, click the “

” button.

Return to the main scheduling screen (Screen 6).

7.

In this screen you can enable the schedule program just cre-
ated. By default it is disabled. Click the Enable (1) radio but-
ton to enable it.

CAUTION

Disabled schedule programs do not work.

The regular schedule patterns are now created.

8-5 Creating Ex Schedule Patterns

To create Ex schedule patterns

1.

You can also create 10 extra schedule patterns (Ex1 to 10) in 
the Schedule Setup screen (Screen 1). Click an appropriate 
radio button (1) to select the Ex schedule pattern to be set up 
or changed.

2.

Click the “

” button to display the Pattern 

change dialog box (Screen 2).

3.

To add a new schedule event, click the “

” button (3).

A new event item appears in the top row of the schedule 
event list (6).
You can set up or change a new or existing event in this list.

4.

Select the new event added in the step 3 or an existing 
event, and set up or change various variables of the event 
using options in the schedule event setup area (7).
To set up or change these variables, select the Set check-
box in each frame and click a desired radio button. For the 
description of the setting options, see the “Creating Regular 
Schedule Patterns” section.

(1)

Screen 6: Main scheduling screen

(1)

Screen 1: Schedule Setup screen

Screen 2: Pattern change dialog box

(3) (4) (5)

(6)

(7)

01_EN_EM05A059.fm  Page 44  Wednesday, October 19, 2005  7:13 PM

Содержание DCS004A71

Страница 1: ...safe use of the product Fou correct use be sure to read this manual carefully before use Store this manual close at hand so that it can be referred to as required MODEL DCS004A71 intelligent Touch Controller Web Software OPERATION MANUAL 00_CV_EM05A059 fm Page 1 Wednesday October 19 2005 11 18 AM ...

Страница 2: ......

Страница 3: ...ing a Schedule Program 47 9 BEFORE CONTACTING US TROUBLESHOOTING 48 10 AFTER SALES SERVICE 50 1 SAFETY CONSIDERATIONS Please read these SAFETY CONSIDERATIONS carefully before installing air conditioning equipment and be sure to install it correctly After completing the installation make sure that the unit oper ates properly during the start up operation Please instruct the customer on how to opera...

Страница 4: ...ime If left in a damaged condition the unit may fall and cause injury Placing a flower vase or other containers with water or other liquids on the unit could result in a shock hazard or fire if a spill occurs CAUTION Avoid placing the controller in a spot splashed with water Water coming inside the machine may cause an electric leak or may damage the internal electronic parts Do not operate the ai...

Страница 5: ...strator who can setup the system and change system settings See page 5 Two Display Modes You can select the display mode from two modes during login process the Basic mode which provides a simple and easy to use interface and the Advanced mode which allows you to use advanced setting options Basic Mode See page 7 Advanced Mode See page 22 Start Stop Operation You can start or stop all the devices ...

Страница 6: ...onitor air conditioners that other General Users can also operate monitor 1 00 1 01 1 02 1 03 1 04 1 05 1 06 1 07 User 64 1 08 LAN User 1 1 00 1 01 1 02 User 1 User 1 User 2 User 3 User 3 Administrator User 2 64 User 2 1 03 1 04 1 05 User 3 1 06 1 07 1 08 User 64 1 01 1 04 1 07 Inter device communication Maximum number of the registered users Administrator 1 General Users 64 Total 65 Figure 1 Exam...

Страница 7: ...itioners Monitor air conditioners Advanced Mode General Users are able to Monitor air conditioners Operate air conditioners Permit and or prohibit local remote controller operations Change his her own password The Administrator is able to Operate air conditioners Monitor air conditioners Permit and or prohibit local remote controller operations Create schedules Set his her own password Administrat...

Страница 8: ...trator cannot log into the web interface via multiple PC at a time 4 5 Selecting Display Language To select a display language to be used for the web interface 1 Click the button 1 to display the Display language setting screen Screen 2 2 Click the or button to select a language to be used in this screen 3 Select a language to be used in the web interface by clicking a radio button 2 4 To reflect ...

Страница 9: ...describes the Main screen shown in the figure See the next page for more information on each item on this screen 2 4 The above figure shows the Main screen displayed in the Icon display mode 1 3 1 2 3 4 The figure to the left shows the Main screen displayed in the List display mode 01_EN_EM05A059 fm Page 7 Wednesday October 19 2005 7 13 PM ...

Страница 10: ...n in the figures to the right Devices are grouped into these categories in advance using the intelligent Touch Controller console Icon assigned to each device cannot be changed via the web interface This section explains features of each icon Indoor Units A device registered as an indoor unit appears as an indoor unit icon see Figure 1 In the Icon display mode a temperature value next to each icon...

Страница 11: ...low Air volume COOL HEAT AUTO FAN SET POINT Either of the mode icons to the left OFF ON Communication error Device error 1 2 3 4 0 In the Swing mode the direction changes in the following order and this pattern repeats permanently 0 1 2 3 4 3 2 1 High Low 01_EN_EM05A059 fm Page 9 Wednesday October 19 2005 7 13 PM ...

Страница 12: ...Ventilation Amount Start Stop state Error Automatic ventilation All heat exchanger ventilation Normal ventilation Low High AUTO Low Fresh up High Fresh up AUTO Fresh up OFF ON Communication error Device error 01_EN_EM05A059 fm Page 10 Wednesday October 19 2005 7 13 PM ...

Страница 13: ...ouch Controller console Universal device Start Stop state Universal device Error Lighting device Start Stop state Lighting device Error Zone Start Stop state Zone Error OFF Start 1 Communication error Device error Turning off Turning on Communication error Device error OFF Start 1 Communication error Device error 01_EN_EM05A059 fm Page 11 Wednesday October 19 2005 7 13 PM ...

Страница 14: ... spond to the actual room temperature 8 Set temperature Displays the temperature setting of air conditioners You can change this value if required See page 19 9 Air flow flap Displays the direction of air flow of air conditioners You can change this setting if required See page 19 10 Fan speed Displays the air volume of air conditioners You can change this setting if required See page 19 8 Set tem...

Страница 15: ...ired See page 20 8 Freshen up function setting Displays Start Stop state of the Freshen up function You can turn the function on or off if required See page 20 CAUTION For some HRV models 5 7 and or 8 may not be con figured In this case unavailable buttons are grayed out 7 Ventilation amount setting 8 Freshen up function setting 5 Ventilation mode 3 Start Stop 1 Group name 6 Sign display area 2 St...

Страница 16: ...ppear CAUTION When lighting devices are connected via Dio units The Start Stop buttons 3 can be used When lighting devices are connected via Di units The Start Stop buttons 3 are not displayed 1 Group name 2 Status icon 3 Start Stop 4 Sign display area 5 System status display area CAUTION Note Indicates that the selected group is associated with one or more schedule programs Inter central device c...

Страница 17: ...appear CAUTION When lighting devices are connected via Dio units The Start Stop buttons 3 can be used When lighting devices are connected via Di units The Start Stop buttons 3 are not displayed 1 Group name 2 Status icon 3 Start Stop 4 Sign display area 5 System status display area CAUTION Note Indicates that the selected group is associated with one or more schedule programs Inter central device ...

Страница 18: ... or more schedule programs In the air conditioner zone area information on the room temperature set temperature operation mode air volume and direction of air flow is provided In the HRV zone area information on the Ventilation mode Ventilation amount and Freshen up setting is pro vided Data of the representative unit is displayed rather than that of the entire zone Representative Unit In a zone m...

Страница 19: ...not undo your operation Therefore be sure to click only an appropriate button especially when your operation target is a zone 5 8 Starting Stopping All the Devices in a Specific Zone Procedure for starting stopping all the devices in a specific zone Start or stop all the devices included in a specific zone This procedure supports both the Icon display and List display modes In the figure Screen 1 ...

Страница 20: ...g area Screen 3 to change the setting of all the devices in a group Click one of the following buttons according to your requirement Changes the operation mode to Cool Changes the operation mode to Heat Changes the operation mode to Fan Changes the operation mode to Set Point Changes the operation mode to Auto HRV Devices Click the tab in the zone setting area Screen 4 to change the setting of all...

Страница 21: ...herent to the air conditioner main unit Range of temperature as a result of the restriction by tempera ture setting limit set on the intelligent Touch Controller console For more information refer to the intelligent Touch Controller Software manual 5 11 Changing the Direction of Air Flow and Air Volume Procedure for changing the direction of air flow air volume Change the fan direction or volume o...

Страница 22: ...ach screen Turns the Freshen up function On Turns the Freshen up function Off Adjusts the Ventilation amount Indicates the Automatic ventilation amount setting Indicates the Strong ventilation amount setting Indicates the Weak ventilation amount setting CAUTION For some HRV models the Freshen up and or Ventilation amount settings cannot be changed In this case unavail able buttons are grayed out 5...

Страница 23: ... information on the room temperature set temperature operation mode air vol ume and direction of air flow is provided In the HRV zone area information on the Ventilation mode Ventilation amount and Freshen up function is provided Data of the representative unit is displayed rather than that of the entire zone For more information on the zone representative unit is follow on In the List Display Mod...

Страница 24: ...plication in the Advanced mode you will see the following screen 1 2 3 4 5 The above figure shows the Main screen displayed in the Icon display mode 1 2 4 3 The figure to the left shows the Main screen displayed in the List display mode In the List display mode the area 5 is not provided 01_EN_EM05A059 fm Page 22 Wednesday October 19 2005 7 13 PM ...

Страница 25: ...og box displaying detailed information on the selected zone or group See page 31 Launches a dialog box where you can set up the selected zone or group See page 24 Launches a dialog box describing detailed information on items displayed in the Icon List display modes See page 30 Returns to the screen specified by the previous zone tree setting You can return to the screen up to 20 generations maxi ...

Страница 26: ...on mode of the air conditioner On the Monitoring screen operation is allowed with either Icon or List as the display type In the figure Screen 1 the devices are displayed in the Icon dis play mode The operation mode can be switched by zone or by group Procedure 1 To change the setting for all the devices in a zone select the Monitoring Zone list item from the zone tree area 1 and select the zone f...

Страница 27: ...the Set checkbox 3 in the Set temperature frame and set the integral and decimal parts using the pull down menus 4 In a zone setting the pull down menus are pre populated with allowable temperature values for the air conditioners in the zone See the following example 4 Press the To cancel the setting press the Ex For the zone setting in the figure 1 the temperature settings available are between 6...

Страница 28: ...nitoring select a zone or a group from the pull down menu 1 Select a zone or a group of which the temperature setting is to be changed 2 To change the setting for all the devices in a group select the zone including the group from the zone tree area 1 and select the group from the main display area 2 2 Press the Screen 2 Operation appears 3 Select the Reset checkbox in the Filter sign frame 4 Pres...

Страница 29: ...igh to select desired air volume When setting the direction of air flow select the Set checkbox in the Direction of air flow frame 4 and select your desired value using the pull down menu Any integer value from 0 to 7 can be selected 4 Press the To cancel the setting press the Guideline for determining the direction of air flow and air volume 6 9 Changing the HRV settings Procedure for changing th...

Страница 30: ... stop the devices Select the Set checkbox and check a desired radio button 9 Ventilation mode In this frame you can select a Ventilation mode Select the Set checkbox and check a desired radio button 10 Ventilation amount In this frame you can select a Ventilation amount setting Select the Set checkbox and check a desired radio button 11 Filter sign When the Reset indicator is not grayed out one or...

Страница 31: ...r Prohibited Set Temperature Permitted or Prohibited 4 Upon completion click the button To cancel your settings click the button 6 11 Monitoring Operations of All the Devices in a Specific Zone or Group Procedures for monitoring zone or group operations Monitor operations in both the Icon and List display modes Select a display mode using the or button Operations can be monitored by zone or by gro...

Страница 32: ...tart Stop state For a zone see the following section Presence absence of error For a zone see the following section Presence absence of Auto Control setting For a zone see the following section Presence absence of filter element signs For a zone see the following section Temperature setting For a zone the temperature setting of the representative unit is shown Operation mode For a zone the operati...

Страница 33: ...m the zone tree area Then select the target zone or group in the main display area 2 2 Click the button The Information screen Screen 2 appears and provides the following data items For an air conditioner group 1 Name Group name 2 Description Group description 3 Type Air conditioner or device 4 D3 Address Address between 1 00 and 4 15 5 Schedule Enable Disabled 6 Heating Optimization Enabled Disab...

Страница 34: ...ct the target zone or group in the main display area 2 2 Click the button to display the Setup screen Screen 2 This screen provides the following information 1 Name Description Displays the name and description of a zone or group 2 Current Condition Start Stop state Room temperature Operation Mode Presence or absence of filter signs 3 Air volume Displays current air volume 4 Direction of air flow ...

Страница 35: ...on amount Displays the current Ventilation amount Upon completion click the 6 button to return to the Main screen When Monitoring a Group of HRVs When selecting an HRV group the Group setup screen Screen 4 appears You can view the following items in this screen 7 Current Condition Start Stop state Ventilation mode Ventilation amount Filter sign 8 R C Mode Start Stop Displays the setting for permit...

Страница 36: ...w Schedule Creation Procedure The Schedule menu item allows you to create operation schedules and link it to one or more zones or groups You can automatically start stop air conditioners at a point in time The time value Year Month Day Day of week Hour Minute is set in advance on the intelligent Touch Controller according to the usage of the air conditioners The options provided for creating sched...

Страница 37: ... Holiday MON 9 30 18 00 Duty hours 8 30 17 00 Duty hours 12 00 13 00 Lunch break 17 00 22 00 Overtime hours 22 00 Closing office 9 00 14 30 Duty hours TUE ditto ditto ditto WED 9 30 17 00 Duty hours ditto ditto THU same as Mon ditto ditto FRI same as Mon ditto ditto SAT Holiday Holiday Holiday Ex1 third Sat of every month Concerned as a working day Concerned as a working day Concerned as a working...

Страница 38: ...its remote controller operations Time Target Zone Start Stop Opera tion mode Set temperature Remote Controller Code 9 00 Zone 2F Null Null Null Override 17 00 Zone 2F OFF Null Null Prohibits remote controller operations Time Target Zone Start Stop Opera tion mode Set temperature Remote Controller Code 8 30 Zone 2F ON Null Null Override 12 00 Zone 2F OFF Null Null Null 13 00 Zone 2F ON Null Null Ov...

Страница 39: ...nd console A new Administrator password set in this screen is also used for the system console menu and you will not be able to use the system console menu without entering the new password On the other hand setting an Administrator password on the system console not only makes the console unavailable with out entering the password but also replaces the existing Administrator password for the web ...

Страница 40: ...tor and select the System Setup node 1 from the zone tree area to display the System setup main screen Screen 1 2 Double click the User settg icon 2 to display the User settg dialog box Screen 2 3 Click the button 3 to display the Add user dialog box Screen 3 4 Enter the user name to be registered in the User name field 4 5 Enter a new password of the User in the Password field 5 and re enter the ...

Страница 41: ...firmation dialog box Screen 3 Click the Yes button to confirm your selection Assigning Zones to General Users 1 Log into the interface as the Administrator and select the System Setup node 1 from the zone tree area to display the System setup main screen Screen 1 2 Double click the User settg icon 2 to display the User settg dialog box Screen 2 1 2 Screen 1 System setup main screen 3 4 Screen 2 Us...

Страница 42: ...e components of the main sched uling screen When selecting the Schedule node 1 from the zone tree area you will see the following screen the main scheduling screen 1 Schedule node in the zone tree area Selecting this node displays the main scheduling screen 2 Schedule program list Lists the name and status Enabled disabled for each schedule program 3 Enable Disable radio buttons Displays the statu...

Страница 43: ...es or deletes schedule patterns See page 46 4 Renames Ex schedule patterns See page 47 5 Renames schedule programs displayed on the main sched uling screen See page 47 6 Schedule Calendar area Renames schedule programs displayed on the main sched uling screen See page 45 7 Legends area Describes the symbols representing each schedule pattern 8 Used to assign one or more dates to an Ex schedule See...

Страница 44: ...ages for the instructions Regular schedule pattern This page Ex schedule pattern See page 44 8 4 Creating Regular Schedule Patterns To create regular schedule patterns 1 To create regular schedule patterns Sun to Sat select a tar get day of the week by clicking an appropriate pattern radio button 1 2 Click the button 2 to display the Pattern change dialog box Screen 2 1 2 3 Screen1 Main scheduling...

Страница 45: ...rough remote controllers Operation Mode Permit or prohibit the modification of the operation mode through remote controllers Set Temperature Permit or prohibit the modification of the temperature setting through remote controllers Ventilation mode Set the HRV s ventilation mode using the radio buttons Ventilation amount Set the HRV s ventilation amount CAUTION When the devices in the target group ...

Страница 46: ...chedule Setup screen Screen 1 Click an appropriate radio button 1 to select the Ex schedule pattern to be set up or changed 2 Click the button to display the Pattern change dialog box Screen 2 3 To add a new schedule event click the button 3 A new event item appears in the top row of the schedule event list 6 You can set up or change a new or existing event in this list 4 Select the new event adde...

Страница 47: ... change screen Screen 2 appears Click the Set checkbox 2 10 Click the appropriate radio button to select the Ex schedule pattern to be set 11 With the Ex schedule pattern radio button selected click a date on the calendar to assign that date to the Ex schedule pattern To deselect an Ex schedule pattern assigned date select the Week radio button and then click the date 12 Upon completion click the ...

Страница 48: ...d All settings are deleted Only the calendar setting is deleted Click the button 5 Then click the button to complete the copy pro cess 8 7 Copying or Deleting Schedule Events To copy or delete schedule events 1 Click the button 1 in the Schedule Setup screen Screen 1 2 The Edit Schedule screen Screen 2 appears Copy Procedure Select a source date in the left pull down menu 2 and a tar get date in t...

Страница 49: ...screen Screen 2 appears Click the button 2 3 The Name Change dialog box Screen 3 appears Enter a name into the field of this box Up to 16 characters can be entered 4 Click the button to complete this process 5 To name an Ex schedule pattern select the Ex schedule pattern from the list 3 on the Schedule Setup screen Screen 2 and click the button 4 6 The Name Change dialog box Screen 4 appears Enter...

Страница 50: ...igent Touch Controller console or any centralized controller 3 A schedule program set via the web interface started the con ditioners 4 The Temperature Limit function of the intelligent Touch Con troller started the air conditioners This function prevents room temperature from becoming extremely high or low by automatically starting air condition ers when a specified temperature threshold is excee...

Страница 51: ...the browser is incorrect The intelligent Touch Controller is turned off The network is congested for any reason In this case wait for a while and then access it again When accessing the intelligent Touch Controller web interface the following screen appears This message informs you that Java plugin is not installed or the version of the installed Java plugin is not supported Install the correct ve...

Страница 52: ...n In this case wait for a while and then access it again The room temperature value on the intelligent Touch Controller web interface does not match the actual measurement value Since the suction temperature of air conditioners is used this may not reflect the actual measurement value especially when the indoor unit s fans are stopped This temperature value should be considered as a rough indicato...

Страница 53: ......

Страница 54: ...1645 Wallace Drive Suite 110 Carrollton TX 75006 info daikinac com www daikinac com 0510 HT EM05A059 00_CV_EM05A059 fm Page 2 Wednesday October 19 2005 11 18 AM ...

Отзывы: