background image

www.DaikinApplied.com 37 

IM 817-7

Unit Ventilator Split Systems 

Guidelines

The following provides basic guidelines that will provide 

proper system cooling and operation of an R-410 

commercial DX/hot water system for school applications. 

DX system components must be matched and sized 

correctly (not oversized) for the load.
The DX system must incorporate the following, provided 

by others, for proper operation:

• 

Size piping per ASHRAE Refrigeration Handbook 

(correct refrigerant and compressor oil flow), see 

Table 31 on page 38

.

• 

Use clean sealed refrigerant grade piping (prevent 

system contamination)

• 

Install Liquid Line Filter Dryer (clean/dry system to 

prevent damage of operating components), see 

Figure 

97 on page 38

.

• 

Install Liquid Line Sight Glass (indicates refrigerant 

dryness and if liquid in liquid line - do not use the 

sight glass to determine when refrigerant system is 

charged correctly), see 

Figure 97 on page 38

.

• 

Install pressure taps on the unit ventilator’s liquid 

line and suction lines for subcooling and superheat 

measurements at the unit ventilator, see 

Figure 97 on 

page 38

.

• 

Install High Pressure Switch at condensing unit wired 

in condenser control system (protects compressor 

and refrigerant system from excessive pressures - 

condenser fan failure or overcharging), see 

Figure 98 

on page 39

.

• 

Install Low Pressure Switch at condensing unit wired in 

the condenser control system (low refrigerant pressure 

switch protects the system under low refrigerant 

suction conditions), see 

Figure 98 on page 39

.

• 

Install Low Ambient Temperature Switch at 

condensing unit wired in the condenser control 

system (locks out mechanical cooling below 60ºF - 

proper system operation and free economizer usage), 

see 

Figure 98 on page 39

.

• 

Incorporate Compressor Time Delay (5 minute) in 

condensing unit control system (reduces excessive 

compressor cycling), see 

Figure 98 on page 39

.

• 

Single phase compressors - consider hard start kits to 

overcome non-equalized pressure in refrigerant lines.

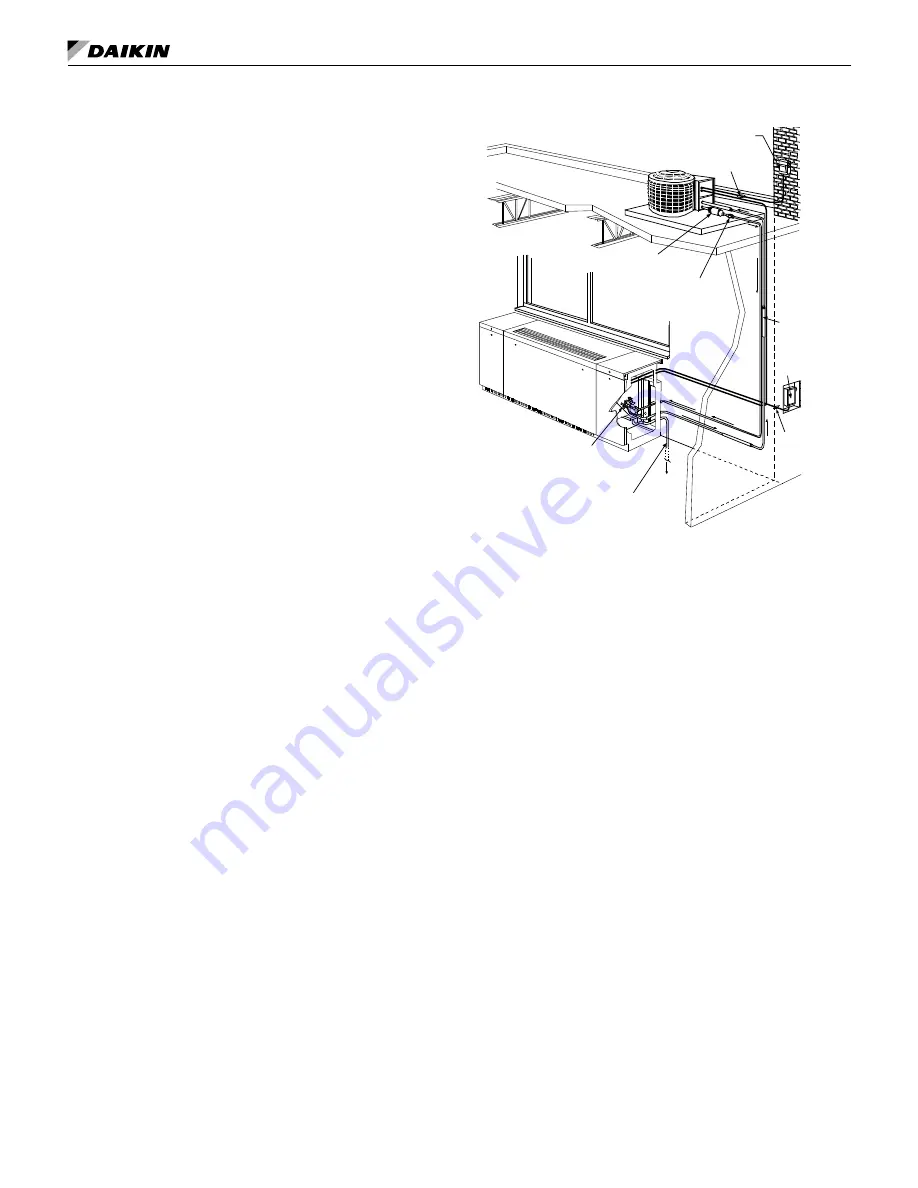
Figure 95: Typical Piping and Wiring for Split System

2 Wires (+) Ground

To Open Sight Drain

TXV

(Thermal Expansion 

Valve)

Filter Drier (Field Supplied)

Moisture Indicator Sight 

Glass (Field Supplied)

Weatherproof Fused Disconnect Per NEC

2 Wires 

(+) Ground

Insulated 

Suction Line

Fused 

Disconnect

• 

Incorporate Low Refrigerant Temperature Sensor 

(T4) in condensing unit control system (T4 protects 

the system under low refrigerant suction conditions) 

see 

Figure 98 on page 39

.

• 

UV fans must continue to run upon Low Refrigerant 

Temperature trip of T4 (controls by others) or ICT 

(MicroTech) (evaporator air flow dissipates residual low 

coil surface temperatures - suction pressures raised, coil 

frosting reduced), see 

Figure 98 on page 39

.

• 

UV fans must continue to run for set time period 

during unoccupied mode after satisfaction of the 

space sensor (dissipates residual low evaporator coil 

surface temperatures - reducing coil frosting), see 

Figure 98 on page 39

.

• 

Lock the Face and Bypass Damper (actuator spring 

return to full face when de-energized) in the full face 

position during mechanical cooling (full air through 

evaporator coil reduces low refrigerant suction 

conditions, potential coil frosting)

• 

When Brazing bleed Nitrogen through piping 

(reduced oxides and blockage in piping/TXV)

• 

Use Heat Sink when brazing to prevent overheating 

the TXV valve body and bulb (avoid valve damage 

and erratic operation), see 

Figure 94 on page 36

.

• 

Verify the TXV bulb securely attached at 2 or 10 

o’clock for 7/8" and smaller diameter suction line 

piping (proper suction gas sensing and reduced 

hunting) See 

Figure 94 on page 36

.

• 

Insulate the TXV bulb (reacts to refrigerant 

temperatures and not ambient), see 

Figure 96

.

Содержание AVV

Страница 1: ...Maintenance Manual IM 817 7 Group WSHP Document PN 9102047358 Date October 2018 Daikin Classroom Unit Ventilators Floor Models AVS AVV AVB and AVR Digital Ready MicroTech Control J Vintage Field Cont...

Страница 2: ...ondensate Piping 36 Unit Ventilator Split Systems Guidelines 37 Checking System Charge 38 Determining Subcooling 38 Determining System Superheat 39 Superheat Adjustment 40 Making Control Connections 4...

Страница 3: ...c Heat 68 Steam Low Cap 13 6 Element Low Cap Electric Heat 69 Steam High Cap 65 1 Row HW 78 Opposite End Steam Low Cap 66 2 Row HW 79 Opposite End Steam High Cap 67 3 Row HW 00 None Hand Orientation 8...

Страница 4: ...carrier since such damage is the carrier s responsibility Storage If equipment is stored for any length of time before installation it should remain in its shipping packaging in a clean dry climate co...

Страница 5: ...ost serious hazards that will result in death or severe personal injury WARNING means the hazards can result in death or severe personal injury CAUTION identifies unsafe practices that can result in p...

Страница 6: ...o the unit itself A weather tight seal keeps unwanted air and moisture from entering the occupied space See Figure 6 on page 7 through Figure 21 on page 11 and Table 2 on page 10 for various louver de...

Страница 7: ...nd Vertical Blade Louvers Without Flanges With Grille or With Flange Without Grille Louver drain lip Grille Louver with weep hole Flange Flange Outside Air Vertical Louver with Flange without Grille H...

Страница 8: ...intel By Others Accumulatedmoisturecancausepropertydamageifnotproperly drained Installing contractor must provide such drainage CAUTION Figure 11 Above Floor Level Outdoor Air Intake Using Arrangement...

Страница 9: ...th High Louver Application Not More Than 28 711mm Sealed Cement Mortar Pitch Away From Unit Important Gasket sealing surface is required Louver Lintel By Others Piping Piping Floor Line Unit Configura...

Страница 10: ...base is 1 25mm thick at the unit and tapers toward the louver The mortar at the unit also acts as a backing against which the open cell gasket of the unit itself can seal This is critical in preventi...

Страница 11: ...Pitched Away from Unit Toward Louver Figure 21 Vertical or Horizontal Blade Wall Intake Louver Recessed Without Flange Horizontal Blade Shown Drain Holes Do Not Block With Mortar or Caulking Materials...

Страница 12: ...while supporting the unit from the front until it is possible to slide skid out from under the unit GENTLY LOWER the rear of the unit to the floor 3 Figure 25 Removing Unit from Skid 1 Carefully slid...

Страница 13: ...al power before servicing unit to prevent injury or death due to electrical shock DANGER Personal injury hazard Wear protective gloves to avoid possible cuts and abrasions from exposed edges Avoid con...

Страница 14: ...llow Upper Plate Deep Lower Bracket Drain Pan Standard Drain Connection 1 4 hex head screws To Clean the Drain Pan 1 Remove the shallow and deep upper plates from the unit 2 Spray water into the drain...

Страница 15: ...aulk Weep Holes Floor Unit Insulating Blanket Back Of Unit Unit Bottom Gasket Seal Under Unit Bird Screen Internal Column For Wall Bracing By Others Unit Gasket 1 End Panel w Cut Out Lintel by others...

Страница 16: ...d chilled water supply and return system are thoroughly flushed and cleaned before connecting piping to the unit ventilator Debris in the lines can damage the unit For All Systems Be sure to install t...

Страница 17: ...unions for future servicing by others Air Flow Figure 39 Protect Components From Overheating Before Brazing Use A Quenching Cloth When Brazing to Prevent Overheating The Piping Components Avoid Valve...

Страница 18: ...zing valve and a 24 610mm long pressure equalizing line which terminates in a 1 2 M P T fitting 3 Steam hot water connections may be same end as cooling coil connections but they are recommended to be...

Страница 19: ...ply and return connections 2 Steam coils have a factory installed pressure equalizing valve and a 24 610mm long pressure equalizing line which terminates in a 1 2 M P T fitting 3 Steam hot water conne...

Страница 20: ...ent Plug HW DX Heating Right Hand R S 13 3 4 350mm A B J Air Flow Vent Plug HW DX 8 1 2 216mm S Supply R Return Direct Expansion and Steam Unit Note For opposite end drain steam coils code 78 79 Retur...

Страница 21: ...e SL Suction Line LL SL J D C 7 1 4 184mm Air Flow 11 3 4 299mm Cooling Left Hand Table 6 Coil Connection Dimensions For Lettered Values1 Unit Depth Dimensions A B C D E F G H I J K in 16 5 8 3 3 4 12...

Страница 22: ...bottom of unit and H 2 51mm from the back of unit Unless otherwise noted LH and RH connections are the same Figure 63 Direct Expansion Cooling Coils G 9 14 1 4 368mm J 10 1 8 257mm R S H K Air Flow J...

Страница 23: ...ends Face Bypass End of Cycle Valves 2 Way End of Cylce Valve When piping the 2 Way End of Cycle valve refer to label to determine the direction of flow The valve should be installed so that there is...

Страница 24: ...When using MicroTech controls they must be opposite end The End of Cycle valve accessory must be field installed on the unit for which it was selected Figure 70 3 Way EOC Valve Dimensions Connection C...

Страница 25: ...osition Running Time Motor 95 sec Running Time Fail Safe 25 sec Ambient Humidity max 95 RH non condensing Ambient Temperature Range 22 F to 122 F 30 C to 50 C Storage Temperature Range 40 F to 176 F 4...

Страница 26: ...ing Time Motor 95 sec Running Time Fail Safe 25 sec Ambient Humidity max 95 RH non condensing Ambient Temperature Range 22 F to 122 F 30 C to 50 C Storage Temperature Range 40 F to 176 F 40 C to 80 C...

Страница 27: ...Running Time Motor 150 sec constant independent of load Running Time Fail Safe 25 sec 4 F to 122 F 20 C to 50 C 60 sec 22 F 30 C Ambient Temperature Range 22 F to 122 F 30 C to 50 C Storage Temperatu...

Страница 28: ...Safe 25 sec Ambient Humidity max 95 RH non condensing Ambient Temperature Range 22 F to 122 F 30 C to 50 C Storage Temperature Range 40 F to 176 F 40 C to 80 C Table 25 3 Way Valve Body Specification...

Страница 29: ...can begin to have any influence on the water flow through the coil The control system no matter how sophisticated cannot overcome this Oversized control valves can also result in hunting which will s...

Страница 30: ...n provide unions for removal of the unit coil and or the control valve Heating Hot Water End of Cycle Valve Piping The 2 way End of Cycle hot water or 2 pipe CW HW valve is furnished normally open to...

Страница 31: ...Return Balancing and Shutoff Valve Shutoff Valve Supply Supply 2 way EOC Valve Unit Coil Unions A B Note For Erie E O C water valves always have the direction of water flow piped to the B port of the...

Страница 32: ...end as cooling coil connections but are recommended to be opposite end to facilitate piping When using Daikin factory controls they must be opposite end The modulating valve accessory must be field i...

Страница 33: ...Note Left Hand Steam Supply and Right Hand Steam Return Shown Typical Steam Coil Piping Figure 86 Face and Bypass With 2 Way End of Cycle Valve Same End Drain Connection Piping Within Unit End Compar...

Страница 34: ...pen Hot Water or 2 pipe CW HW Valve Piping typical The 2 way Modulating hot water or 2 pipe CW HW valve is furnished normally open to the coil When the valve is de energized off there is full flow thr...

Страница 35: ...Figure 90 2 Way Modulating Valve Control Normally Closed Chilled Water Piping Return Return Balancing and Shutoff Valve Shutoff Valve Supply Supply 2 way Modu lating Valve Unit Coil Unions Figure 91 2...

Страница 36: ...s of the material Likewise insulate the suction line See Figure 95 through Figure 98 for typical piping and wiring Ensure proper insulation of supply and return piping Proper insulation prevents loss...

Страница 37: ...ncorporate Compressor Time Delay 5 minute in condensing unit control system reduces excessive compressor cycling see Figure 98 on page 39 Single phase compressors consider hard start kits to overcome...

Страница 38: ...harge should be checked under design conditions 95 F outside air 80 F 67 F DB WB indoor air Refer to condensing unit manufacturer s guidelines Before adjusting refrigerant charge verify that the unit...

Страница 39: ...cessary to adjust TXV to obtain correct superheat Table 32 Saturated Temperature Pressure Chart F R410A PSIG F R410A PSIG F R410A PSIG 32 101 1 44 127 7 80 235 8 33 103 2 45 130 2 85 254 7 34 105 2 46...

Страница 40: ...a local peer to peer network between these units network wiring between these units needs to be field installed Optional network communication is provided via plug in communication modules that conne...

Страница 41: ...ding Edge indoor outdoor true enthalpy comparison economizer The sensor is located in the outdoor air section of the unit before the outdoor air damper With network applications the unit mounted senso...

Страница 42: ...trol Board Note If Installing Communication Module refer to the installation instructions specific to that Communication Module Figure 100 AV Top View 3 Figure 101 MicroTech Sensor and Component Locat...

Страница 43: ...es for quick diagnostics at the unit The LUI has a built in menu structure Password protected with 4 keys and 2 individual LED indicators to adjust the unit ventilator operating parameters shown in th...

Страница 44: ...IM 817 7 44 www DaikinApplied com Typical MicroTech Wiring 115Volt 60Hz 1 Phase Note See on page 45 for typical MicroTech service and disconnect wiring and wiring schematic legend...

Страница 45: ...R4L Relay Fan Low Speed TBE Terminal Block Electric Heat FC FD Fuse Control Transformer R32 Relay Drain Pan Heater TR1 Transformer Motor Speed HP High Pressure Switch R28 Relay Outdoor Motor Air TR3 T...

Страница 46: ...ventilator electric connection box to load side of unit power switch switch provided by Daikin The junction box has 1 25mm and 2 51mm knockouts located 10 1 2 267mm from right end of unit 3 Provide g...

Страница 47: ...r sensor then placement of the Remote Wall Mounted Temperature Sensor is critical for proper room temperature sensing see Figure 107 and Figure 108 The UVC is capable of using one of four remote wall...

Страница 48: ...at back of Local User Interface LUI Panel Plug for unit mounted sensor Sensor Functions Display sensor to show room Temperature fan speed AUTO HIGH MEDIUM LOW system mode HEAT COOL AUTO OFF ALARM Ove...

Страница 49: ...cotton cloth Do not use any type of cleaner as it may damage the buttons or scratch the display Do not paint Terminations Daikin Applied recommends using shielded 22AWG for all connections and a sepa...

Страница 50: ...or 910247453 Sensor 910247450 Description 24VAC Occupancy Shutdown Not Used Status LED Setpoint Unit Mode Fan Speed 10K RTD Ground Wire 908 907 906 909 912 901 902 911 910 Typical Wiring Terminal Labe...

Страница 51: ...cuts out below 38 F 2 F and automatically resets above 45 F 2 F Responds when any 15 of the capillary length senses these temperatures Wired so that upon T6 cut out the outside air damper A1 closes t...

Страница 52: ...IM 817 7 52 www DaikinApplied com Figure 112 Component Locations Vertical Floor Unit Shown 1 2 3 4 5 7 8 9 10 12 11 6 13 15 Outdoor Air Opening Sensor Motor...

Страница 53: ...www DaikinApplied com 53 IM 817 7 Typical Wiring Diagram Digital Ready Face and Bypass Control CAUTION Refer to unit wiring diagram located on the right front panel for actual wiring...

Страница 54: ...hm NTC sensor is constructed from stainless steel with an epoxy seal and twisted wire leads Type 10K ohm 25 C Accuracy 0 2 F 40 F 80 F 0 36 F 32 F 158 F 1 K ohm PTC Sensor The 1 K ohm sensor is a shri...

Страница 55: ...Unit Ventilator Controller UVC A 4 to 20 mA input signal can be used with the field addition of a Belimo ZG R01 or equivalent 500 ohm resistor by others Refer to the wiring diagram for proper installa...

Страница 56: ...unit nameplate CAUTION Use copper conductors only Use of aluminum conductors may result in equipment failure and overheating hazards All wiring in right hand compartment must be class 1 2 Wire leads...

Страница 57: ...Air Temperature limit T6 freezestat across leaving air side of hydronic heating coil Cuts out below 38 F 2 F and automatically resets above 45 F 2 F Responds when any 15 of the capillary length senses...

Страница 58: ...ls Making Control Connections For field provided control wiring connections refer to the appropriate control wiring schematic page 59 or page 60 Connect the field supplied controller to the harness pr...

Страница 59: ...Fuse FB wire 56 furnished on 208 230 volt units only 4 T6 wires 550 551 furnished only on units with hot water or chilled water all others connect transformer wire to wire 501 6 Jumper wire A must be...

Страница 60: ...sible to ensure controls operate correctly and protect the unit 3 Cap all unused transformer leads 4 X3 unused terminal 2 or 3 must be insulated 5 Fuse FB wire 56 57 furnished on 208 230 volt units on...

Страница 61: ...ikinApplied com 61 IM 817 7 Controls by Others Field Installed CAUTION Refer to unit wiring diagram located on the right front panel for actual wiring Improper wiring can cause equipment and property...

Страница 62: ...f unit power switch switch provided by Daikin The junction box has 1 25mm and 2 51mm knockouts located 10 1 2 267mm from right end of unit 3 Provide ground wire from grounding screw in switch junction...

Страница 63: ...IM 817 7 Figure 122 Controls by Others Unit Power and Junction Box Connection Location Auto Transformer Fuses High Med Low Off Motor Speed Switch Switch Junction Box Terminal Strip Electric Power Wir...

Страница 64: ...plied com Electric Heat Wiring Diagram Typical Figure 123 460 Volt 60 Hz 3 Phase CAUTION Refer to unit wiring diagram located on the right front panel for actual wiring Improper wiring can cause equip...

Страница 65: ...80 55 100 70 130 80 150 230 60 1 Electric Heating Amperes 25 04 50 09 33 18 66 37 41 63 83 27 50 09 100 17 Unit Minimum Circuit Ampacity 34 40 65 71 44 58 86 06 55 14 107 19 65 71 128 32 Maximum Fuse...

Страница 66: ...8 81 47 68 89 16 58 24 110 29 68 81 131 42 Maximum Fuse Size or Circuit Breaker Amps 40 70 50 90 60 120 70 140 265 60 1 Electric Heating Amperes 21 74 43 59 28 85 57 70 36 17 72 33 43 59 87 07 Unit Mi...

Страница 67: ...40 of the total outside wall area 2 Single pane glass is used 3 Outside temperatures are below 35 F for a significant portion of the occupied period The need for window down draft protection will not...

Страница 68: ...ns included with the Draftstop system for more detailed information Upper Channel or Backplate Assembly 1 Establish a level chalk line on the wall at a height specified for the top of the enclosure Se...

Страница 69: ...7mm 4 102mm 1 25mm 277 8 708mm 18 457mm 4 102mm 1 25mm End View With 4 x 22 102mm x 559mm Cut out 277 8 708mm 22 559mm 4 102mm 1 25mm 277 8 708mm 22 559mm 4 102mm 1 25mm End View With 2 x 51 4 51mm x...

Страница 70: ...p View 28 711mm 6 152mm End View With No Cut out 277 8 708mm Finned Radiation System Finned radiation down draft control is available for those who prefer it Made of furniture quality steel and design...

Страница 71: ...tinnerman clips on unit subbase Screws insert through upper mounting holes inside unit end compartment and thread into tinnerman clips on end panel End Panel w Cut out Figure 132 Install End Panels W...

Страница 72: ...emove debris dust dirt and any obstruction from the area in front of the return air intake grille at the floor as this will affect unit performance If a draftstop system has been installed be sure tha...

Страница 73: ...omponents CAUTION Dirty or clogged filters can impact unit performance resulting in damage to the unit Figure 135 Filter installation 12 Left Front Access Panel Motor 12 Right Front Access Panel Top A...

Страница 74: ..._______________________ Supply Voltage L1 L2___________ L2 L3___________ L3 L1____________ Rated _ _____________________________ Room Fan Motor Amps T1 ___________ RPM_ _________ Nameplate Rating _ __...

Страница 75: ...ion system A Has all field piping been leak tested to 100 psig AVS AVV AVR AHF AHV AHR Yes No B Is expansion valve bulb properly installed and insulated Yes No C High pressure control cutout if applic...

Страница 76: ...ndard terms and conditions of sale including Limited Product Warranty Consult your local Daikin Applied representative for warranty details Refer to Form 933 430285Y To find your local Daikin Applied...

Отзывы: