


Installation
www.DaikinApplied.com 31
IM 1240-4 • INTELLIGENT EQUIPMENT
Wi-Fi Configuration
The following procedures should be used to configure the
Intelligent Equipment solution for Wi-Fi connectivity.
NOTE:
Wi-Fi is one of three possible methods of cloud
connectivity. The method of connectivity is specified
at the time of order. You should only configure the
gateway for Wi-Fi connectivity if certain that Wi-Fi
was specified at the time of order. If unsure, contact
the salesperson or Daikin Applied Controls Technical
Response Center. Prior to configuring the gateway for
Wi-Fi, please refer to Appendix A of this document for
required IT information.
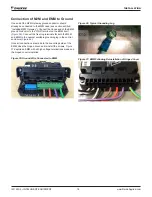
1. Mount and connect the wireless antenna per the
instructions included in document section,
.
2. Using a laptop computer and Ethernet cable, connect
to the “ETH” port of the M2M Gateway (you will need to
temporarily disconnect the Ethernet cable between the
M2M Gateway and the MicroTech III controller, to make
use of the “ETH” port on the M2M Gateway).
3. Navigate to your laptop’s Local Area Connection settings
screen and change the IP subnet mask to
255 .255 .0 .0
,
and set the IP address to be compatible with the default
M2M Gateway IP address of
https://172 .31 .255 .1
(example compatible address: 172.31.255.7). For
more information on how to change your computer’s IP
settings, consult the Operating System’s “Help” files.
4. Temporarily disable the wireless adapter(s) on the
computer, as these may prevent accessing the HTML
Interface page.
5. Open a web browser page and type,
https://172 .31 .255 .1
, then press enter.
NOTE:
Your browser will likely notify you of a security risk
related to an unsigned security certificate. This is
expected, and does not indicate a gateway defect.
Simply click the ‘advanced’ menu link within the
browser, then accept the security exception.
a. When prompted, enter the User Name: “
service
”
b.
Enter the unique password that was provided with
the Gateway hardware and press ENTER.
c. This opens the Gateway home page (
). The System Information section of the
Gateway home page will indicate that permission
is denied. This is expected, and does not inhibit
access to the functionalities required for properly
configuring the gateway.
6. If the M2M Gateway will be using DHCP, skip to step 8.
If the M2M Gateway will be using a Static IP address, go
to step 7.
7. Click the
‘Network’
tab
a.
Under wlan0 Configuration (
‘Static IP’
for Connection Type
b. Enter the IP, Subnet, and Gateway address
information
c. Under wlan0 DNS Servers enter the primary DNS
server and click ‘Add’
d. If a secondary DNS server address is to be
entered, enter it after the page has reloaded and
click
‘Add’
and enter the secondary address or set
ESSID Broadcast to ON.
e. Click
‘Save’
.
f. Click
‘Apply Changes’
8. Click the
‘Wireless’
)
a. Enter the ESSID of the network
b. If Wi-Fi security is enabled enter in Wi-Fi network
SSID and password and security type
9. Click the
‘Save Changes’
button in the lower right corner
of the page. Then, click
‘Apply Changes’
.
10. Click the System tab, then click the Reboot tab.
a.
Click the ‘Yes, really reboot now’ button
b. The gateway will automatically refresh after several
minutes.
11. Click the
‘Status’
tab
a. Under
‘WLAN’
, verify Wi-Fi signal strength (
12. Adjust antenna as necessary to establish a strong Wi-Fi
connection
a. For reliable operation, signal level should be 60
dBm or lower and link quality power should be
50/70 or higher.
b. As the antenna is adjusted, be mindful that
signal strength is impacted by structures or other
antennas. As much as practically possible, make
efforts to avoid such interference while adjusting
the antenna.
Содержание AGZ-D
Страница 45: ......


