256
(
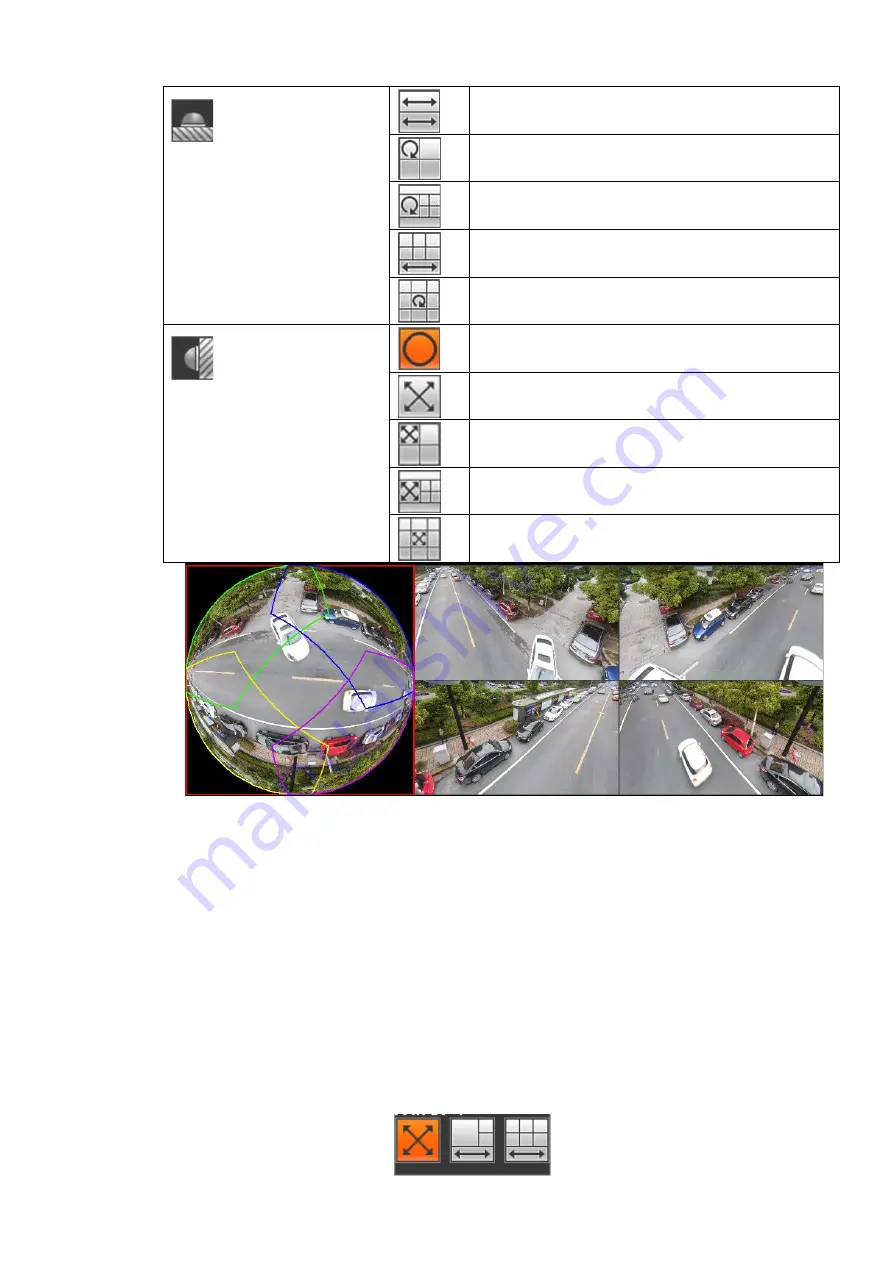
Ground mount
)
2 panorama stretching view
1 360° panorama view+3 de-warp windows
1 360°panorama view+4 de-warp windows
4 de-warp 1 panorama stretching
1 360° panorama view+8 de-warp windows
(
Wall mount
)
360°panorama original view
Panorama stretching
1 panorama unfolding view+3 de-warp windows
1 panorama unfolding view +4 de warp windows
1 panorama unfolding view +8 de warp windows
Figure 4-17
Take 1 360° pa 4 correction windows for example: You can use the color areas in the
pamoramic pictures on the right for correction action, or by moving the small pictures on the
right with the mouse to do fisheye de-warping.
Operation: Use the mouse to zoom in, zoom out, move and rotate the picture (wall mount
does not support it).
4.5.1.3 Split Track
It is to display one video channel in several windows.
On the preview interface, right click mouse and then select split track, you can see an interface
shown as below. See Figure 4-18
Содержание NVR608-32-4KS2
Страница 1: ...I Network Video Recorder User s Manual V6 0 0 ZHEJIANG DAHUA VISION TECHNOLOGY CO LTD...
Страница 56: ...40 Figure 3 14 Step 2 Click Add new holiday button and device displays the following interface See Figure 3 15...
Страница 121: ...105 Figure 3 92 Figure 3 93...
Страница 144: ...128 Figure 3 111 Figure 3 112 Figure 3 113...
Страница 157: ...141 Figure 3 126 Figure 3 127...
Страница 159: ...143 Figure 3 129 Click draw button to draw the zone See Figure 3 130 Figure 3 130...
Страница 162: ...146 Figure 3 133 Click Draw button to draw a zone See Figure 3 134 Figure 3 134...
Страница 167: ...151 Figure 3 139 Click draw button to draw the zone See Figure 3 140...
Страница 178: ...162 Figure 3 151 Step 2 Add surveillance scene 1 Click Add The Add interface is displayed See Figure 3 152...
Страница 185: ...169 Figure 3 157 Figure 3 158...
Страница 186: ...170 Figure 3 159 Figure 3 160...
Страница 189: ...173 Figure 3 164 Figure 3 165...
Страница 224: ...208 Figure 3 199...
Страница 231: ...215 Figure 3 206 Step 2 Click Add user button in Figure 3 206 The interface is shown as in Figure 3 207 Figure 3 207...
Страница 247: ...231 Figure 3 227 Step 2 Click Add group Enter add group interface See Figure 3 228 Figure 3 228...
Страница 311: ...295 Figure 4 56 Figure 4 57...
Страница 317: ...301 Figure 4 62 Figure 4 63...
Страница 318: ...302 Figure 4 64 Figure 4 65...
Страница 343: ...327 Figure 4 101 Figure 4 102...
Страница 352: ...336 Figure 4 115 Figure 4 116...
Страница 372: ...356 Figure 4 144 Note For admin you can change the email information See Figure 4 145...


