background image

User's Manual 

88 


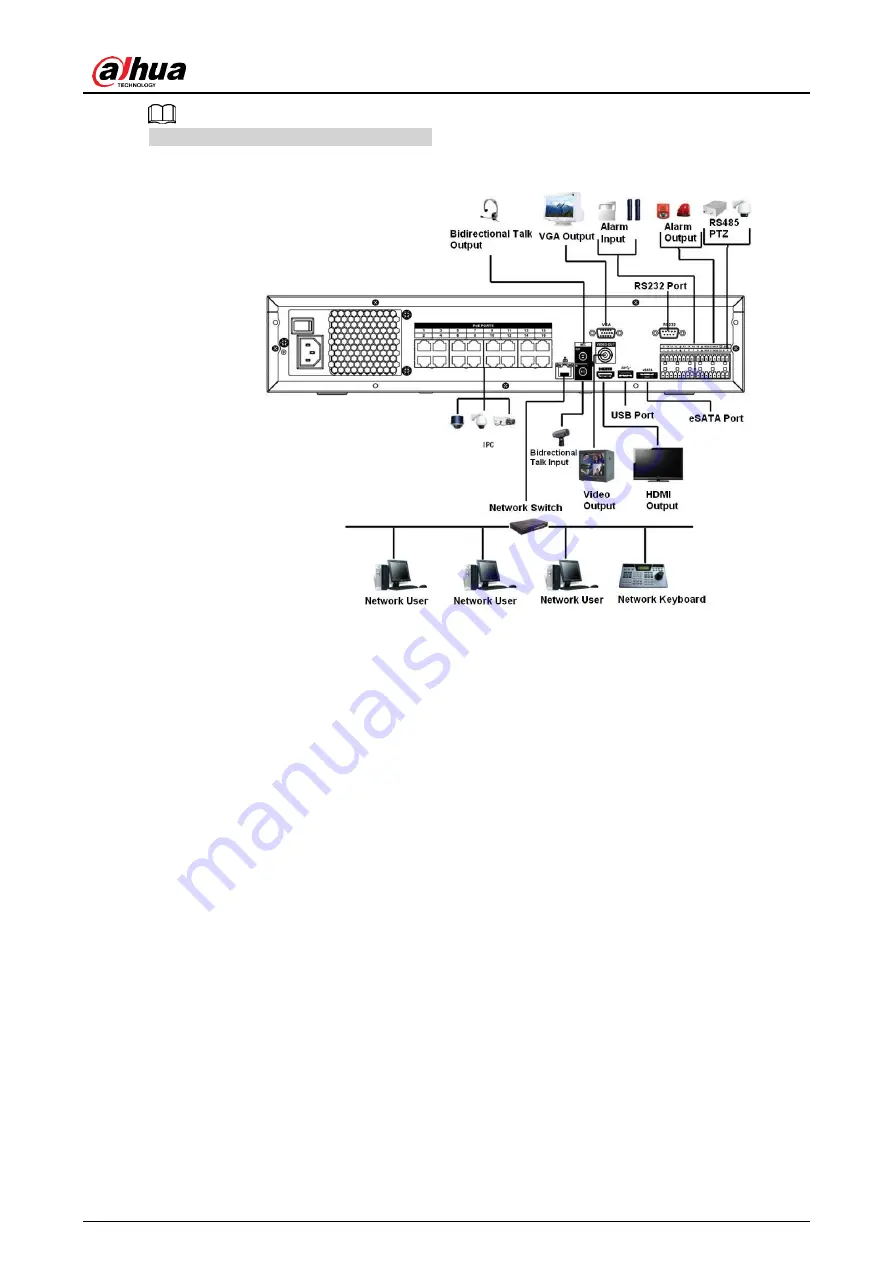
The following figure is for reference only. 

Figure 3-50   


3.6.12 NVR42V-8P Series 

See Figure 3-51 for connection sample. 

Содержание NVR41 series

Страница 1: ...Dahua Network Video Recorder User s Manual ZHEJIANG DAHUA VISION TECHNOLOGY CO LTD V4 5 1...

Страница 2: ...u solve a problem or save you time Provides additional information as the emphasis and supplement to the text Revision History Version Revision Content Release Time V4 5 1 Added four models Deleted pa...

Страница 3: ...according to the latest laws and regulations of related regions For detailed information see the paper manual CD ROM QR code or our official website If there is inconsistency between paper manual and...

Страница 4: ...ransport use and store the device within allowed humidity and temperature range Power Requirement Make sure to use the designated battery type Otherwise there may be explosion risk Make sure to use ba...

Страница 5: ...4KS2 42 P 4KS2 42 8P 4KS2 42 16P 4KS2 5224 24P 4KS2 54 4KS2 54 16P 4KS2 44 4KS2 44 16P 4KS2 5424 24P 4KS2 58 4KS2 S258 16P 4KS2 48 4KS2 48 16P 4KS2 22 4KS2 22 P 4KS 2 22 8P 4KS2 52 8P 4KS2E 52 16P 4KS...

Страница 6: ...input and output port 58 2 3 4 Alarm relay specifications 58 2 4 Two way talk 59 2 4 1 Device end to PC end 59 2 4 2 PC end to the device end 60 2 5 Mouse Operation 60 2 6 Remote Control 61 3 Device I...

Страница 7: ...52 8P 4KS2 52 16P 4KS2 5224 24P 4KS2 52 8P 4KS 2E 52 16P 4KS2E Series 83 3 6 8 NVR42 8P 4K 42 4KS2 42 P 4KS2 42 8P 4KS2 42 16P 4KS2 Series 84 3 6 9 NVR54 4KS2 54 16P 4KS2 58 4KS2 58 16P 4KS2 5424 24P...

Страница 8: ...4 Image 142 4 2 5 Video Overlay 144 4 2 5 1 Overlay 144 4 2 5 2 Privacy Masking 145 4 2 6 Encode 146 4 2 6 1 Encode 146 4 2 6 2 Snapshot 149 4 2 7 Channel Name 150 4 2 8 Remote Update 151 4 2 9 Remot...

Страница 9: ...ns 183 4 4 3 4 Configuring AutoScan 184 4 4 4 Calling PTZ Functions 185 4 4 4 1 Calling Presets 185 4 4 4 2 Calling Tours 185 4 4 4 3 Calling Patterns 185 4 4 4 4 Calling AutoScan 185 4 4 4 5 Calling...

Страница 10: ...ion 210 4 7 1 8 People Counting 212 4 7 1 9 Heat map 213 4 7 1 9 1 General 213 4 7 1 9 2 Fisheye 213 4 7 1 10 SMD 214 4 7 2 Parameters 214 4 7 2 1 Smart Plan 214 4 7 2 2 Face Detection 217 4 7 2 3 Fac...

Страница 11: ...Alarm Status 263 4 8 3 Alarm Input 264 4 8 4 Alarm Control 267 4 8 5 Video Detection 268 4 8 5 1 Motion Detection 268 4 8 5 1 1 Setting the Motion Detection Region 270 4 8 5 1 2 Setting Schedule 271 4...

Страница 12: ...301 4 10 4 4 2 Online Upgrade 303 4 10 4 4 3 Uboot Upgrading 304 4 11 File Backup 304 4 12 Network 305 4 12 1 TCP IP 305 4 12 2 Port 307 4 12 3 External Wi Fi 309 4 12 4 Wi Fi AP 310 4 12 4 1 General...

Страница 13: ...FTP 342 4 14 System 344 4 14 1 General 344 4 14 2 RS232 344 4 15 Security 345 4 15 1 Security Status 345 4 15 2 System Service 347 4 15 2 1 Basic Services 347 4 15 2 2 802 1x 349 4 15 2 3 HTTPS 350 4...

Страница 14: ...d Display 370 4 18 Audio 373 4 18 1 File Management 373 4 18 2 Audio Play 375 4 18 3 Broadcast 376 4 19 USB Device Auto Pop up 378 4 20 Shutdown 379 5 Web Operation 383 5 1 Network Connection 383 5 2...

Страница 15: ...maintenance work This series NVR can be widely used in many areas such as public security water conservancy transportation and education 1 2 Features Feature Description Cloud Upgrade For the NVR conn...

Страница 16: ...the same time Transmit audio video data by HTTP TCP UDP MULTICAST RTP RTCP and etc Transmit some alarm data or alarm info by SNMP Support WEB access in WAN LAN Window Split Adopt the video compression...

Страница 17: ...real time system resources information and running statistics display Support log file Local GUI output Shortcut menu operation via mouse IR control function For some series product only Shortcut menu...

Страница 18: ...duct shall prevail 2 1 Front Panel 2 1 1 NVR41 41 P 41 W 41 4KS2 41 P 4KS2 21 S2 21 P S2 21 8P S2 4 1 4KS2 41 P 4KS2 41 8P 4KS2 21 4KS2 21 P 4KS2 21 8P 4KS2 Series The front panel is shown as in Figur...

Страница 19: ...n Figure 2 2 Figure 2 2 Front panel Table 2 2 Icon Name Function NET Network status indicator light The red light becomes on when the network connection is abnormal PWR Power indicator light The red l...

Страница 20: ...unction NET Network status indicator light The blue light is on when the network connection is abnormal POWER Power status indicator light The blue light is on when the power connection is OK USB2 0 p...

Страница 21: ...2 Power indicator light The red light becomes on when the power connection is OK 3 HDD status indicator light The red light becomes on when HDD is abnormal 4 USB USB port 2 1 5 NVR41 8P 4KS2 L Series...

Страница 22: ...apitalized donation and etc Up 1 Down 4 Activate current control modify setup and then move up and down Increase decrease numeral Assistant function such as PTZ menu In text mode input number 1 4 Engl...

Страница 23: ...normal playback or pause mode click this button to reverse playback In reverse playback click this button to pause playback In text mode input number 6 English character M N O Play Next 9 In playback...

Страница 24: ...ction is OK USB port Connect to peripheral USB storage device mouse and etc 2 1 8 NVR 22 S2 22 P S2 22 8P S2 42 16P 42N 52 4KS2 52 8P 4KS2 5 2 16P 4KS2 42 4KS2 42 P 4KS2 42 8P 4KS2 42 16P 4KS2 5224 24...

Страница 25: ...r light The blue light is on when the HDD is malfunction NET Network status indicator light The blue light is on when the network connection is abnormal POWER Power status indicator light The blue lig...

Страница 26: ...ion Go to default button Go to menu Record REC Manually stop start recording working with direction keys or numeral keys to select the recording channel Slow play 8 Multiple slow play speeds or normal...

Страница 27: ...character J K L USB port To connect USB storage device USB mouse Network abnormal indicator light Net Network error occurs or there is no network connection the light becomes red to alert you HDD abn...

Страница 28: ...peration Go to default button Go to menu Record REC Manually stop start recording working with direction keys or numeral keys to select the recording channel Slow play Multiple slow play speeds or nor...

Страница 29: ...me special versions USB port To connect USB storage device USB mouse Remote control indicator light ACT Remote control indicator light Status indicator light Status If there is Fn indicator light curr...

Страница 30: ...age color Backspace function in numeral control or text control press it for 1 5 seconds to delete the previous character before the cursor In motion detection setup working with Fn and direction keys...

Страница 31: ...d value the light becomes red to alert you Network abnormal indicator light Network error occurs or there is no network connection the light becomes red to alert you Alarm indicator light The light be...

Страница 32: ...2 15 Table 2 12 Icon Name Function HDD HDD status indicator light The blue light is on when the HDD is malfunction NET Network status indicator light The blue light is on when the network connection...

Страница 33: ...ble 2 13 Icon Name Function HDD HDD status indicator light The blue light is on when the HDD is malfunction NET Network status indicator light The blue light is on when the network connection is abnor...

Страница 34: ...eneficio Smart 1U series rear panel is shown as below See Figure 2 18 Figure 2 18 The NVR41 P rear panel is shown as below See Figure 2 19 Figure 2 19 The NVR41 8P rear panel is shown as below See Fig...

Страница 35: ...nition audio and video signal output port It transmits uncompressed high definition video and multiple channel data to the HDMI port of the display device HDMI version is 1 4 VGA VGA video output port...

Страница 36: ...monitor Audio output on 1 window video playback PoE PORT PoE port Built in switch Support PoE function For PoE series product you can use this port to provide power to the network camera Wireless AP S...

Страница 37: ...HDMI version is 1 4 VGA VGA video output port VGA video output port Output analog video signal It can connect to the monitor to view analog video MIC IN Audio input port Bidirectional talk input port...

Страница 38: ...finition audio and video signal output port It transmits uncompressed high definition video and multiple channel data to the HDMI port of the display device HDMI version is 1 4 VGA VGA video output po...

Страница 39: ...port PoE function For PoE series product you can use this port to provide power to the network camera 2 2 4 NVR11HS S3H 11HS P S3H 11HS 8P S3H 21HS S2 21HS P S2 2 1HS 8P S2 21HS 4KS2 21HS P 4KS2 21HS...

Страница 40: ...lay device HDMI version is 1 4 VGA VGA video output port VGA video output port Output analog video signal It can connect to the monitor to view analog video MIC IN Audio input port Bidirectional talk...

Страница 41: ...High Definition Media Interface High definition audio and video signal output port It transmits uncompressed high definition video and multiple channel data to the HDMI port of the display device HDM...

Страница 42: ...8P 4KS2 series input DC 53V 120W Network port 10M 100Mbps self adaptive Ethernet port Connect to the network cable USB port USB port Connect to mouse USB storage device and etc HDMI High Definition Me...

Страница 43: ...itch Support PoE function For PoE series product you can use this port to provide power to the network camera 2 2 7 NVR42 42N 42 P 42 8P 42 16P Series The NVR42 series rear panel is shown as below See...

Страница 44: ...the devices such as microphone pickup MIC OUT Audio output port Audio output port It is to output the analog audio signal to the devices such as the sound box Bidirectional talk output Audio output o...

Страница 45: ...2 RS 232 debug COM It is for general COM debug to configure IP address or transfer transparent COM data HDMI High Definition Media Interface High definition audio and video signal output port It trans...

Страница 46: ...ure 2 44 The following figure takes NVR52 16P 4KS2E series as an example NVR52 8P 4KS2E series has 8 ePoE ports only Figure 2 44 Table 2 21 Icon Port Name Function Network port 10M 100M 1000Mbps self...

Страница 47: ...two types NO normal open NC normal close When your alarm input device is using external power please make sure the device and the NVR have the same ground GND Alarm input ground port NO1 NO3 Alarm out...

Страница 48: ...me Function Power switch Power on off button Power input port Input AC 100 240V MIC IN Audio input port Bidirectional talk input port It is to receive the analog audio signal output from the devices s...

Страница 49: ...larm output public end NC Normal close alarm output port C1 C5 NC5 A RS 485 communication port RS485_A port It is the cable A You can connect to the control devices such as speed dome PTZ B RS485_B It...

Страница 50: ...e monitor to view analog video PoE PORTS 8 PoE ports Built in Switch Support PoE The 8 PoE ports series products supports total 48V 120W power One PoE port supports up to 15W 16 PoE ports Built in Swi...

Страница 51: ...M 1000Mbps self adaptive Ethernet port Connect to the network cable eSATA eSATA port External SATA port It can connect to the device of the SATA port Please jump the HDD when there is peripheral conne...

Страница 52: ...ground Ground Alarm input ground end NO1 NO5 Alarm output port 1 5 5 groups of alarm output ports Group 1 port NO1 C1 Group 2 port NO2 C2 Group 3 port NO3 C3 Group 4 port NO4 C4 Group 5 port NO5 C5 NC...

Страница 53: ...PoE series product supports total 150W 2 2 11 NVR48 48 16P Series The NVR48 series rear panel is shown as below See Figure 2 53 Figure 2 53 The NVR48 16P series rear panel is shown as below See Figure...

Страница 54: ...xternal alarm device NO Normal open alarm output port C Alarm output public end NC Normal close alarm output port C1 C5 NC5 A RS 485 communication port RS485_A port It is the cable A You can connect t...

Страница 55: ...ay device HDMI version is 1 3 VGA VGA video output port VGA video output port Output analog video signal It can connect to the monitor to view analog video PoE PORTS 16 PoE ports Built in Switch Suppo...

Страница 56: ...ernet port Connect to the network cable USB3 0 port USB3 0 port Connect to mouse USB storage device USB burner and etc HDMI High Definition Media Interface High definition audio and video signal outpu...

Страница 57: ...of the display device HDMI version is 1 4 VGA VGA video output port VGA video output port Output analog video signal It can connect to the monitor to view analog video GND Ground end Power input port...

Страница 58: ...ries rear panel is shown as below See Figure 2 60 Figure 2 60 The NVR41HS 8P 4KS2 series rear panel is shown as below See Figure 2 61 Figure 2 61 Table 2 27 Port Name Connection Function USB port USB...

Страница 59: ...T Audio output port Audio output port It is to output the analog audio signal to the devices such as the sound box Bidirectional talk output Audio output on 1 window video monitor Audio output on 1 wi...

Страница 60: ...p MIC OUT Audio output port Audio output port It is to output the analog audio signal to the devices such as the sound box Bidirectional talk output Audio output on 1 window video monitor Audio output...

Страница 61: ...ncompressed high definition video and multiple channel data to the HDMI port of the display device HDMI version is 1 4 VGA VGA video output port VGA video output port Output analog video signal It can...

Страница 62: ...port NO4 C4 Group 5 port NO5 C5 NC5 Output alarm signal to the alarm device Please make sure there is power to the external alarm device NO Normal open alarm output port C Alarm output public end NC N...

Страница 63: ...eo output port Output analog video signal It can connect to the monitor to view analog video PoE PORTS PoE port Built in Switch Support PoE For PoE series product you can use this port to provide powe...

Страница 64: ...roup 1 port NO1 C1 Group 2 port NO2 C2 Group 3 port NO3 C3 Group 4 port NO4 C4 Group 5 port NO5 C5 NC5 Output alarm signal to the alarm device Please make sure there is power to the external alarm dev...

Страница 65: ...HDMI High Definition Media Interface High definition audio and video signal output port It transmits uncompressed high definition video and multiple channel data to the HDMI port of the display device...

Страница 66: ...high definition video and multiple channel data to the HDMI port of the display device HDMI version is 1 4 VGA VGA video output port VGA video output port Output analog video signal It can connect to...

Страница 67: ...utput port It transmits uncompressed high definition video and multiple channel data to the HDMI port of the display device HDMI version is 1 4 VGA VGA video output port VGA video output port Output a...

Страница 68: ...input socket Power socket NVR1104HC S3 NVR1108HC S3 Input DC12V 2A NVR1104HC P S3 Input DC48V DC53 1 25A 1 13A NVR1108HS 8P S3 Input DC48V DC53V 2A 1 8A Network port 10M 100Mbps self adaptive Etherne...

Страница 69: ...ies The NVR1104HS W NVR1108HS W Series rear panel is shown as in Figure 2 76 Figure 2 76 Table 2 33 Icon Name Function Power input socket Power socket Input DC12V 2A MIC IN Audio input port Bidirectio...

Страница 70: ...ut port VGA video output port Output analog video signal It can connect to the monitor to view analog video GND Ground end 2 3 Alarm Connection 2 3 1 Alarm Port The alarm port is shown as below See Fi...

Страница 71: ...ers Different models support different alarm input ports Please refer to the specifications sheet for detailed information Slight difference may be found on the alarm port layout 2 3 2 Alarm input por...

Страница 72: ...e please make sure it is earthed with the NVR 2 3 3 Alarm input and output port There is peripheral power supplying for the external alarm device In case overload may result in NVR damage please refer...

Страница 73: ...N 3Hz Electrical 200 103 MIN 0 5Hz Temperature 40 70 2 4 Two way talk 2 4 1 Device end to PC end Device Connection Please connect the speaker or the pickup to the first audio input port in the device...

Страница 74: ...lease refer to the above interface Figure 2 79 to enable bidirectional talk Listening Operation At the PC end speak via the speaker or the pickup and then you can get the audio from the earphone or so...

Страница 75: ...e file list to playback the video In multiple window mode double left click one channel to view in full window Double left click current video again to go back to previous multiple window mode Right c...

Страница 76: ...put device serial number so that you can control the Device 3 Forward Multi step forward speed and normal speed playback 4 Slow motion Multi step slow motion speed or normal playback 5 Next record In...

Страница 77: ...be displayed 11 Direction keys Switch between current activated controls by going left or right In playback state the keys control the playback progress bar Aux function such as operating the PTZ men...

Страница 78: ...al 64 3 Device Installation All the installation and operations here should conform to your local electric safety rules 3 1 Device Installation Diagrams Please refer to the following diagrams to insta...

Страница 79: ...Usually we need you to represent the serial number when we provide the service after sales 3 4 HDD Installation For the first time installation make sure whether the HDD has been installed or not We r...

Страница 80: ...ace the HDD in accordance with the four holes in the bottom Figure 3 2 Step 3 Turn the device upside down and then secure the screws firmly Figure 3 3 Step 4 Connect the HDD cable and power cable to t...

Страница 81: ...ws of the rear panel The installation is complete Figure 3 5 3 4 2 NVR41H 41H P 41H 8P 21HS S2 21HS P S2 21HS 8P S2 41HS W S2 41HS 4KS2 41HS P 4KS2 41HS 8P 4KS2 21HS 4KS2 21H S P 4KS2 21HS 8P 4KS2 21H...

Страница 82: ...data cable and the power cable to the HDD Figure 3 8 Step 4 Place the HDD in accordance with the four holes on the bottom of the chassis Figure 3 9 Step 5 Turn the device upside down fix the screws t...

Страница 83: ...ries Connect cable and then secure the HDD on the NVR if it is not convenient to connect the HDD data cable and power cable at first Step 1 Loosen the screws of the rear panel and side panel Figure 3...

Страница 84: ...4KS2 54 16P 4KS2 44 4KS2 44 16P 4K S2 5424 24P 4KS2 54 16P 4KS2E Series Step 1 Use the screwdriver to loose the screws of the rear panel and then remove the front cover Figure 3 17 Step 2 Put the HDD...

Страница 85: ...onnect another end of the power cable to the HDD port Figure 3 19 Step 4 After connect the cable put the front cover back to the device and then fix screws of the rear panel Figure 3 20 3 4 5 NVR48 48...

Страница 86: ...o fix the screws firmly to secure HDD on the HDD bracket Figure 3 22 Step 3 Connect to the HDD data cable to the main board and the HDD port respectively Loosen the power cable of the chassis and conn...

Страница 87: ...R42V 8P Series Step 1 Use 4 screws to secure the HDD Figure 3 25 Step 2 Put the HDD to the HDD box at the front Figure 3 26 Step 3 Pull the HDD knob up when you put the HDD into the box in case the kn...

Страница 88: ...p 4 Put the knob back after you insert the HDD to the SATA board Figure 3 28 3 5 CD ROM Installation Step 1 Open top cover and then remove the HDD bracket Figure 3 29 Step 2 Take off the bottom of the...

Страница 89: ...User s Manual 75 Figure 3 30 Figure 3 31 Step 3 Fix the CD ROM bracket at the HDD bracket Figure 3 32 Step 4 Install a pair of the CD ROM bracket Please make sure that the reverse side is secure too...

Страница 90: ...User s Manual 76 Figure 3 33 Figure 3 34 Step 5 Install SATA burner Line up the SATA burner to the hole positions Figure 3 35 Step 6 Use screw driver to fix the screws...

Страница 91: ...36 Step 7 Put the bracket back Please adjust the CD ROM to the proper position so that the button of the front panel is directly facing the pop up button of the CD ROM Figure 3 37 Step 8 Connect the...

Страница 92: ...ecure the HDD bracket and put the top cover back Figure 3 39 3 6 Connection Sample 3 6 1 NVR41 41 P 41 8P 41 W 21 S2 21 P S2 21 8P S2 41 4KS2 41 P 4 KS2 41 8P 4KS2 21 4KS2 21 P 4KS2 21 8P 4KS2 Series...

Страница 93: ...User s Manual 79 The following figure is for reference only Figure 3 40 3 6 2 NVR41H 41H P 41H 8P Series See Figure 3 41for connection sample...

Страница 94: ...User s Manual 80 The following figure is for reference only Figure 3 41 Connection sample 3 6 3 NVR41HS W S2 21 W 4KS2 21HS W 4KS2 Series See Figure 3 42for connection sample...

Страница 95: ...l 81 The following figure is for reference only Figure 3 42 3 6 4 NVR21HS S2 21HS P S2 21HS 8P S2 41HS 4KS2 41HS P 4KS2 41HS 8P 4KS2 21HS 4KS2 21HS P 4KS2 21HS 8P 4KS2 Series See Figure 3 43 for conne...

Страница 96: ...User s Manual 82 The following figure is for reference only Figure 3 43 3 6 5 NVR22 S2 22 P S2 22 8P S2 22 4KS2 22 P 4KS2 22 8P 4KS2 Series See Figure 3 44 for connection sample...

Страница 97: ...83 The following figure is for reference only Figure 3 44 Connection sample 3 6 6 NVR42N Series See Figure 3 45 for connection sample The following figure is for reference only Figure 3 45 Connection...

Страница 98: ...S2 52 16P 4KS2 52 24 24P 4KS2 52 8P 4KS2E 52 16P 4KS2E Series See Figure 3 46for connection sample The following figure is for reference only Figure 3 46 3 6 8 NVR42 8P 4K 42 4KS2 42 P 4KS2 42 8P 4KS2...

Страница 99: ...r s Manual 85 The following figure is for reference only Figure 3 47 3 6 9 NVR54 4KS2 54 16P 4KS2 58 4KS2 58 16P 4KS2 5424 24P 4KS 2 54 16P 4KS2E 5816P 4KS2E Series See Figure 3 48 for connection samp...

Страница 100: ...User s Manual 86 The following figure is for reference only Figure 3 48 3 6 10 NVR44 44 8P 44 16P 44 4KS2 44 16P 4KS2 Series See Figure 3 49 for connection sample...

Страница 101: ...User s Manual 87 The following figure is for reference only Figure 3 49 3 6 11 NVR48 48 16P 48 4KS2 48 16P 4KS2 Series See Figure 3 50 for connection sample...

Страница 102: ...User s Manual 88 The following figure is for reference only Figure 3 50 3 6 12 NVR42V 8P Series See Figure 3 51 for connection sample...

Страница 103: ...User s Manual 89 The following figure is for reference only Figure 3 51...

Страница 104: ...ys use the stable current if necessary UPS is a best alternative measure Step 1 Connect the device to the monitor and then connect a mouse Step 2 Connect power cable Step 3 Click the power button at t...

Страница 105: ...the time zone Step 3 Click Next The Device Initialization interface is displayed See Figure 4 2 Figure 4 2 Step 4 Set login password of admin See Table 4 1 Table 4 1 Parameter Description User By def...

Страница 106: ...help you reset the password For your device own safety create a strong password of your own choosing We also recommend you change your password periodically especially in the high security system Ste...

Страница 107: ...functions on the interface Table 4 2 Password Protection Mode Description Email Address Enter the reserved email address In the Email Address box enter an email address for password reset If you forg...

Страница 108: ...r some series product only 4 1 3 1 Enabling Password Reset Function After enabling password reset function you can scan QR code on the local menu to reset password Step 1 Select Main Menu Account Pass...

Страница 109: ...set security questions 4 1 3 2 Resetting Password on Local Interface Step 1 Enter the Login interface If you have configured unlock pattern the unlock pattern login interface is displayed See Figure 4...

Страница 110: ...ser s Manual 96 To login from other user account on the unlock pattern login interface click Switch User or on the password login interface in the Switch User list select other user to login Figure 4...

Страница 111: ...Click If you have set the reserved email address the Prompt interface is displayed See Figure 4 8 Click OK If you did not set the reserved email address the email entering interface is displayed See...

Страница 112: ...n for password reset purpose and the information includes but not limited to email address MAC address and device serial number Read the prompt carefully before clicking Next Step 4 Select a reset mod...

Страница 113: ...n screen instruction to acquire the security code from email Enter security code and click Next Security question On the Password Reset interface as shown below in the Reset Mode list select Security...

Страница 114: ...ns before in the Reset Type list there is no Security Question Figure 4 11 Step 5 Click Next The Reset Password interface is displayed See Figure 4 12 Figure 4 12 Step 6 In the New Password box enter...

Страница 115: ...nboard to reset the Device to the factory default settings Reset button is for some series products only Step 1 Disconnect the Device from power source and then remove the cover panel For details abou...

Страница 116: ...ou automatically when updates are available After the auto check function is enabled to notify you to update timely the system will collect the information such as IP address device name firmware vers...

Страница 117: ...ing back the recorded video The value ranges from 5 to 60 On the live view control bar click the instant playback button to play back the recorded video within the configured time Auto Logout Min In t...

Страница 118: ...ue is the faster the speed is Step 3 Click Next button to save settings 4 1 4 1 2 Date and Time You can set device time You can enable NTP Network Time Protocol function so that the device can sync ti...

Страница 119: ...Week or click Date Start Time Configure the start time and end time for the DST End Time NTP Enable the NTP function to sync the Device time with the NTP server If NTP is enabled device time will be a...

Страница 120: ...et holiday name repeat mode and holiday mode Click Add more to add new holiday information Step 4 Click Add button you can add current holiday to the list Click the drop down list of the state you can...

Страница 121: ...k settings by selecting Main Menu NETWORK TCP IP Make sure the device has properly connected to the network Step 1 Click Next The TCP IP interface is displayed See Figure 4 20 Different series product...

Страница 122: ...User s Manual 108 Figure 4 21 Step 3 Set parameters See Table 4 5...

Страница 123: ...network status the network is regarded as offline only when both of the two Ethernet ports are disconnected The two Ethernet ports are used under the same LAN Load Balance Two network cards share one...

Страница 124: ...ork segment Subnet Mask Default Gateway DNS DHCP Enable the DHCP function to get the DNS address from router Preferred DNS In the Preferred DNS box enter the IP address of DNS Alternate DNS In the Alt...

Страница 125: ...ay and DHCP are not available for configuration LAN download System can process the downloaded data first if you enable this function The download speed is 1 5X or 2 0X of the normal speed For IPv6 ve...

Страница 126: ...ot limited to email address MAC address and device serial number Step 3 Click Next button to complete setup The status is online if the P2P registration is successful 4 1 4 3 2 Client Operation Step 1...

Страница 127: ...sage reminding you to make sure the Device is initialized is displayed 3 Tap OK If the Device has not been initialized Tap Device Initialization to perform initializing by following the onscreen instr...

Страница 128: ...User s Manual 114 You can add wireless device or wired device The Manual takes adding wired device as an example Figure 4 24 5 Tap P2P The P2P interface is displayed See Figure 4 25...

Страница 129: ...Figure 4 25 6 Enter a name for the NVR the username and password scan the QR code under Device SN 7 Tap Start Live Preview The Device is added and displayed on the live view interface of the cell phon...

Страница 130: ...e remote Device interface to register a remote device After adding remote device the device can receive store and manage the video streams of the remote device You can view browse play back and manage...

Страница 131: ...st interface On the live view interface right click mouse and then select Add Camera Figure 4 27 Step 2 Register remote device Search and then add 1 Click Search The devices found are displayed at the...

Страница 132: ...isplay all types of devices IPC Display the front end devices DVR Display all storage devices such as NVR DVR and HCVR OTHER Display the devices that do not belong to IPC or DVR type Searched Device L...

Страница 133: ...in batches Export Select the added devices and then click Export The exported devices information is saved into the USB storage device Manual Add 1 Click Manual Add The Manual Add interface is display...

Страница 134: ...to TCP UDP or MULTICAST If the remote device is added through other manufacturers the system supports TCP and UDP Encrypt If the remote device is added through Onvif protocol selecting the Encrypt che...

Страница 135: ...that combines multiple physical HDD components into a single logical unit for the purposes of data redundancy performance improvement or both RAID function is for some series product only Slight diffe...

Страница 136: ...atically Click Create Manually 1 Select RAID type and disks as system instructed 2 Click Create Manually and then the format disk notice is displayed 3 Click OK Step 4 After creating RAID the disks ne...

Страница 137: ...lt You can set customized record period and record type Step 1 Click Next The Rec interface is displayed See Figure 4 32 Figure 4 32 Step 2 Select a channel from the drop down list you can set differe...

Страница 138: ...o the new schedule This function is for some series products only The redundant HDD only back up the recorded videos but not snapshots ANR You can set ANR auto network resume function The IPC continue...

Страница 139: ...User s Manual 125 Figure 4 33 Step 3 Set record type See Figure 4 34...

Страница 140: ...he alarm type is MD select Main Menu ALARM Video Detection Motion Detection select the record channel and enable record function When the record type is Motion motion detection alarm M A IVS and POS r...

Страница 141: ...ly 2 On the timeline left click mouse and then drag to define a period There are six periods in one day the Device starts recoding the selected event type in the defined period In Figure 4 38 the diff...

Страница 142: ...and then click The Period interface is displayed Figure 4 38 2 Set record type for each period There are six periods for you to set for each day Under Copy to select All to apply the settings to all...

Страница 143: ...set here For example the alarm snapshot period is from 6 00 18 00 Monday device can snapshot during the 6 00 18 00 when an alarm occurs Step 1 Click Snapshot the device goes to following interface See...

Страница 144: ...rm Input 4 7 1 3 IVS and 4 9 POS for detailed information Figure 4 41 Step 5 Refer to 4 1 4 6 1 Recording Schedule to set snapshot period Step 6 Click Apply button to save snapshot plan Enable auto sn...

Страница 145: ...s Table 4 10 Parameter Description Channel Displays all the analog channels and the connected digital channels You can select a single channel or select All Record status Auto Automatically record acc...

Страница 146: ...can view the video on the NVR and manage and storage the video file Different series products support different remote device amount Figure 4 43 4 2 1 1 Changing IP address Step 1 Select Main Menu Ca...

Страница 147: ...ocate the IP addresses If there is IP conflict when changing static IP address device pops up IP conflict dialogue box If batch change IP address device automatically skips the conflicted IP and begin...

Страница 148: ...at the bottom of the interface it is from to The function is enabled See Figure 4 43 Figure 4 45 4 2 1 3 IP Export Device can export the added device list to your local USB device Step 1 Insert the US...

Страница 149: ...k box is checked by default The file information includes IP address port channel number manufacturer user name and password If you select the File Backup Encryption check box the file format is backu...

Страница 150: ...ddress When connect a camera to the NVR via PoE port NVR automatically initialize the camera The camera adopts NVR current password and email information by default When connect a camera to the NVR vi...

Страница 151: ...trong password according to the password strength bar indication Confirm Password Step 4 Set remote device password and email information If you want to use current device password and email informati...

Страница 152: ...st two types from number letter and special characters excluding and Enter a strong password according to the password strength bar indication Confirm Password For your device own safety create a stro...

Страница 153: ...Set email information Input an email address for reset password purpose Cancel the box and then click Next or Skip if you do not want to input email information here Step 7 Click Next The Network int...

Страница 154: ...to change several devices IP addresses at the same time input incremental value Device can add the fourth address of the IP address one by one to automatically allocate the IP addresses If there is IP...

Страница 155: ...ot registered a remote device to a channel go to the live view interface to add Step 1 On the live view interface Move your mouse to window There is an icon on the channel window See Figure 4 53 Figur...

Страница 156: ...etwork camera displays different parameters The actual product shall prevail Table 4 13 Parameter Description Channel In the Channel list select the channel that you want to configure Profile There ar...

Страница 157: ...ht the video is Mirror Enable the function the left and right side of the video image will be switched It is disabled by default This function is for some series products only Flip It is to set monito...

Страница 158: ...he brightness of the whole video Stop It is to disable the BLC function WB Mode You can set camera WB mode It can affect the image whole hue so that the image can accurately displays the environment s...

Страница 159: ...be displayed in live view and playback Drag channel title to the target place and click Apply Custom Title You can custom title to be overlaid on the scree Click Setting to set the information such a...

Страница 160: ...You can select a number and drag masking areas to the screen and you can also change the size of areas or drag an area to other place You can drag up to 4 masking areas to one channel Default Set as...

Страница 161: ...onfigure parameters See Table 4 16 Table 4 16 Parameter Description Channel In the Channel list select the channel that you want to configure the settings for Smart Codec Enable the smart codec functi...

Страница 162: ...ong with the resolution Generally in PAL format you can select the value from 1 through 25 in NTSC format you can select the value from 1 through 30 However the actual range of frame rate that you can...

Страница 163: ...enabled the recorded video file is composite audio and video stream Compression In the Compressiont list select a format G711a G711u PCM AAC Sampling Frequency In the Sampling Frequency list you can s...

Страница 164: ...is taken during the scheduled period Event The snapshot is taken when there is an alarm event occurs such as motion detection event video loss and local alarms Size In the Size list select a value fo...

Страница 165: ...e the camera connected via the private protocol The channel name supports 63 English characters Step 3 Click Apply 4 2 8 Remote Update You can upgrade the connected network camera firmware It includes...

Страница 166: ...nel and then click File Update 2 Select update file on the pop up interface 3 Select the update file and then click OK After successful operation system prompts update successful dialogue box If there...

Страница 167: ...PC works properly IPC does not support There is an alarm Video loss occurs 4 2 9 2 Firmware You can view IP address manufacturer type system version of the connected remote device Select Main Menu Cam...

Страница 168: ...e monitor video of each channel The corresponding channel displays date time and channel name after you overlay the corresponding information Refer to the following table for detailed information See...

Страница 169: ...live view interface You can see navigation bar See Figure 4 63 Refer to Table 4 21 to view detailed information Figure 4 63 Table 4 21 Icon Function Open Main Menu Expand or condense the navigation ba...

Страница 170: ...Disk Manager Open the USB Management interface For details about USB operations see 4 3 2 2 USB Management 4 3 2 1 Channel Info After the remote device registered to the corresponding channel you can...

Страница 171: ...nfig file to USB device or update NVR system Click system goes to USB Management interface You can view and manage USB information See Figure 4 65 Here you can view USB information back up file and up...

Страница 172: ...rface Move your mouse to the top center of the video of current channel you can see system pops up the preview control interface See Figure 4 66 If your mouse stays in this area for more than 6 second...

Страница 173: ...User s Manual 159 Figure 4 66 4 3 3 1 Instant Replay You can play back the previous 5 60 minutes record of current channel Click to go to the instant replay interface See Figure 4 67...

Страница 174: ...tant playback and will not display until exited During playback screen split layout switch is not allowed Tour high higher priority than the instant playback The instant playback function is null when...

Страница 175: ...enlarged after the left mouse button is released Point to the center that you want to enlarge rotate the wheel button to enlarge the area For some models when the image is enlarged in the first way de...

Страница 176: ...quantity 4 3 3 5 Two way talk You can perform the voice interaction between the Device and the remote device to improve efficiency of emergency Step 1 Click to start two way talk function the icon now...

Страница 177: ...relevant operations including entering the main menu searching records and selecting screen split mode Right click on the preview interface and the right click menu is displayed See Figure 4 70 and F...

Страница 178: ...For details see 4 3 4 Wireless Paring Manual Control Select Record Mode you can configure the recording mode as Auto or Manual or stop the recording You can also enable or disable snapshot function Se...

Страница 179: ...successful Figure 4 72 4 3 5 Sequence You can set customized view layout The preview layout restores default channel layout after Default operation Step 1 On the preview interface right click mouse a...

Страница 180: ...means camera is offline In case the channel amount has exceeded the device max split amount the edit view interface can display the max screen number amount and current screen number Figure 4 73 Step...

Страница 181: ...to save current channel sequence After you change the channel sequence click Cancel or right click the live view interface device pops up the dialogue box See Figure 4 75 Click OK to save current sett...

Страница 182: ...he fisheye camera panoramic camera has wide video of angle but its video is seriously distorted The de warp function can present the proper and vivid video suitable for human eyes On the preview inter...

Страница 183: ...and does not support de warp function If system resources are insufficient system pops up the corresponding dialogue box too Figure 4 76 Now you can see an interface shown as in Figure 4 77 You can se...

Страница 184: ...4 23 Installation modes Icon Note Wall mount Ground mount 360 panorama original view 1 de warp window 1 panorama stretching 2 panorama stretching view 1 360 panorama view 3 de warp windows 1 360 panor...

Страница 185: ...p 2 Select 1 window playback mode and corresponding fish eye channel click to play Step 3 Right click the you can go to the de warp playback interface For detailed information refer to Figure 4 78 4 3...

Страница 186: ...right side of the preview interface and it supports to play back records and display feature attributes You need to enable face detection body detection vehicle detection and non motor vehicle detecti...

Страница 187: ...nding video Step 3 Click The Properties interface is displayed See Figure 4 81 Figure 4 81 Step 4 Optional Click Show Face List and select attributes to display including age gender expression glasses...

Страница 188: ...Display and select attributes to display including vehicle logo vehicle color vehicle model plate recognition plate color seatbelt call vehicle decorations and countries regions See Figure 4 83 Figur...

Страница 189: ...3 9 Quick Operation Bar You can quickly access to the function modules on function tiles and setting menu through shortcut icons on quick operation bar This topic uses ALARM and CAMERA an example to s...

Страница 190: ...nterface Click to jump to AI interface Click to jump to POS interface Click to jump to NETWORK interface Click to jump to MAINTAIN interface Click to jump to BACKUP interface Click to jump to DISPLAY...

Страница 191: ...nterface Click to jump to SECURITY interface Click to jump to ACCOUNT interface 4 4 PTZ PTZ is a mechanical platform that carries a camera and a protective cover and performs overall control remotely...

Страница 192: ...e sure you have set PTZ protocol otherwise you cannot control the local PTZ Local The PTZ device connects to the NVR via the cable Remote The PTZ device connects to the NVR via the network This functi...

Страница 193: ...s Manual 179 Figure 4 87 Figure 4 88 Step 2 Configure parameters See Table 4 26 Table 4 26 Parameter Description Channel In the Channel list select the channel that you want to connect the PTZ camera...

Страница 194: ...PTZ camera The default is 9600 Data Bit The default value is 8 Stop Bit The default value is 1 Parity The default is value NONE Step 3 Click Apply 4 4 2 PTZ Control PTZ control panel performs the oper...

Страница 195: ...out and dragging downward is to zoom in The smaller the square the larger the zoom effect This function is for some series products only and can only be controlled through mouse operations Click you c...

Страница 196: ...the expanded PTZ control panel click The Preset interface is displayed See Figure 4 91 Figure 4 91 Step 2 Click the direction arrows to the required position Step 3 In the Preset box enter the value...

Страница 197: ...for this tour You can repeat adding more presets Click Delete Preset to delete the preset for this tour This operation can be repeated to delete more presets Some protocols do not support deleting 4...

Страница 198: ...rm the operations of adjusting zoom focus iris and directions Step 5 On the PTZ interface click End to complete the settings 4 4 3 4 Configuring AutoScan Step 1 On the expanded PTZ control panel click...

Страница 199: ...call the tour Step 3 Click again to stop calling the tour 4 4 4 3 Calling Patterns Step 1 On the expanded PTZ control panel in the No box enter the value of the pattern that you want to call Step 2 Ca...

Страница 200: ...ice adopts 24 hour continuous record by default It supports customized record period and record type Refer to 4 1 4 6 Schedule for detailed information 4 6 Playback and Search 4 6 1 Instant Playback Y...

Страница 201: ...e hold down the left mouse button to select the area that you want to enlarge The area is enlarged after the left mouse button is released To exit the enlarged status right click on the image 2 Playba...

Страница 202: ...he playback of the target time You can drag the vertical orange line on the time bar to rapidly view the playback in iframe format When playing back video in one channel mode you can move mouse pointe...

Страница 203: ...lick the file to start playing Click File List the searched recorded video list is displayed You can lock unlock the files Refer to 4 6 7 File List for detailed information Fisheye dewarp It is to dis...

Страница 204: ...detection You can click the icon to select a human or motor vehicle and the system plays detected videos of the person or motor vehicle human and motor vehicle can be selected at the same time Click t...

Страница 205: ...igure 4 101 Follow the steps listed below Clip function is for one channel multiple channel Max save 1024 files at the same time This function is not for the file already checked in the file list Step...

Страница 206: ...ady enabled motion detect function Main Menu ALARM Video Detection Motion Detection Step 1 Select a channel to playback video and then click You can view the grids on the playback video This function...

Страница 207: ...system is playing back click you can go to the following interface See Figure 4 103 Figure 4 103 Play back Tag During 1 window playback mode click in Figure 4 97 you can go to tag file list interface...

Страница 208: ...face system needs to pause current playback System resume playback after you exit tag management interface If the tag file you want to playback has been removed system begins playback from the first f...

Страница 209: ...iod In the Split Mode list select 4 8 or 16 See Figure 4 105 Figure 4 105 Step 3 In the Calendar area select a date Step 4 In the Camera Name list select a channel Only single channel supports this fu...

Страница 210: ...selection interface Lock or Unlock File To lock the recorded video on the File List interface select the check box of the recorded video and then click The locked video will not be overwritten To vie...

Страница 211: ...lect from the drop down list to switch playback channel The smart search channel does not support this function either When system is playing back the record file click the number button at the front...

Страница 212: ...s to the NVR 4 7 1 1 Face Detection You can search the detected faces and play back Step 1 Select Main Menu AI AI Search Face Detection The Face Detection interface is displayed See Figure 4 109 Figur...

Страница 213: ...3 Select the face that you want to play back The picture with registered information is displayed You can also do the following operations to the recorded files To back up the recorded files to the e...

Страница 214: ...n 4 7 1 2 Face Recognition System can search and compare the human face on the video with the face image on the database and playback the corresponding record file The AI search includes two ways Sear...

Страница 215: ...4 112 Step 2 Select the channel and set the parameters such as start time end time gender age glasses beard mask and similarity according to your requirement Step 3 Click Search The search result is d...

Страница 216: ...to the external storage device select files click Backup select the save path and file type and then click Start To lock the files to make it unable to be overwritten select the files and then click...

Страница 217: ...4 114 Step 2 Select the channel and set the parameters such as start time end time gender age glasses beard mask and similarity according to your requirement Step 3 Click Search The search result is d...

Страница 218: ...to the external storage device select files click Backup select the save path and file type and then click Start To lock the files to make it unable to be overwritten select the files and then click L...

Страница 219: ...following operations to the recorded files To back up the recorded files to the external storage device select files click Backup select the save path and file type and then click Start To lock the fi...

Страница 220: ...hold left mouse key to draw an area on the screen Step 5 Configure parameters Table 4 30 Parameter Description Sensitivity Set alarm sensitivity Duration Set the minimum time of triggering an alarm w...

Страница 221: ...en repeat alarm time is reached Alarm People No When the interval between people in the area is greater than or equal to or less than the set interval threshold an alarm will be triggered Step 6 Click...

Страница 222: ...he alarm record during the specified period Step 1 Select Main Menu AI AI Search Human Detection The Human Detection interface is displayed See Figure 4 117 Figure 4 117 Step 2 Select a channel start...

Страница 223: ...ake it unable to be overwritten select the files and then click Lock To add a mark to the file select the files and then click Add Tag Go to the Attributes and Human Details to view detailed informati...

Страница 224: ...up the recorded files to the external storage device select files click Backup select the save path and file type and then click Start 2 To lock the files to make it unable to be overwritten select th...

Страница 225: ...ect the channel and the time and then select one or multiple features from Type Color Occupancy or Helmet Step 3 Click Search The search result is displayed See Figure 4 121 Figure 4 121 Step 4 Select...

Страница 226: ...cified zone and display the statistics image Step 1 Select Main Menu AI AI Search People Counting The People Counting interface is displayed See Figure 4 122 Figure 4 122 Step 2 Set parameters such as...

Страница 227: ...ct Main Menu AI AI Search Heat Map General The General interface is displayed See Figure 4 123 Figure 4 123 Step 2 Select channel start time end time Step 3 Click Search Step 4 System display heat map...

Страница 228: ...Main Menu AI AI Search SMD Step 2 Select channel type start time and end time and then click Search Click to play back the video Select a video and click Export to export video file to a USB flash dr...

Страница 229: ...m the smart network camera and set or playback the record file Step 1 Select Main menu AI Parameters Smart Plan The Smart Plan interface is displayed See Figure 4 125 Figure 4 125 Step 2 Select a chan...

Страница 230: ...lect a preset 3 Click the smart plan icon at the bottom left The icon becomes highlighted 4 Click Apply Click to delete the preset Click Add to add a preset Once the remote device does not support pre...

Страница 231: ...ice can analyze the pictures captured by the camera to detect whether the faces are on the pictures You can search and filter the recorded videos the faces and play back The connected camera shall sup...

Страница 232: ...inimum size Left click to drag the four angles to adjust the size Schedule Configure the period and in the set time range the corresponding configuration item will be linked to start the alarm Alarm o...

Страница 233: ...ng PTZ actions first see 4 4 4 Calling PTZ Functions Post Record At the end of the alarm the recording extends for a period of time The time range is from 10 seconds to 300 seconds Tour Select the che...

Страница 234: ...ement Check the box to enable face enhancement function system displays human face at the enhanced way Rule Click Setting to draw areas to filter the target You can configure two filtering targets max...

Страница 235: ...e NVR device transmits the alarm information to the alarm device Post Alarm When the alarm ends the alarm extended for a period of time The time range is from 0 seconds to 300 seconds Report Alarm Sel...

Страница 236: ...ing extends for a period of time The time range is from 10 seconds to 300 seconds Tour Select the check box and select the channel for tour When an alarm occurs the local interface of the NVR device d...

Страница 237: ...act the key information to match with the specified rules When the detected behaviors match with the rules the system activates alarms This function is for some series product only IVS function and hu...

Страница 238: ...nds The moving distance is larger than its own width and shall not be smaller than 15pixels CIF resolution The surveillance environment shall not be too complicated The IVS function is not suitable fo...

Страница 239: ...esponding parameters Step 4 Click Apply 4 7 2 4 1 Tripwire When the detection target crosses the warning line along the set direction the system performs an alarm linkage action Step 1 Select Main Men...

Страница 240: ...er s Manual 226 Figure 4 134 Step 2 Draw the detection rule 1 Click to draw the rule on the surveillance video the system displays as Figure 4 135 Figure 4 135 2 Configure the parameters See Table 4 3...

Страница 241: ...The maximum size should not be smaller than the minimum size AI Recognition Select AI recognition and the system displays alarm target The default selection is person and motor vehicle and system auto...

Страница 242: ...the check box When an alarm occurs the NVR device uploads an alarm signal to the network including the alarm center This function is for some series products only You need to set the alarm center firs...

Страница 243: ...one Check the box and then select the corresponding audio file from the dropdown list System plays the audio file when the alarm occurs Refer to 4 18 1 File Management to add audio file first Buzzer S...

Страница 244: ...ng target is smaller than the minimum target or larger than the maximum target no alarm will be generated The maximum size should not be smaller than the minimum size AI recognition Select AI recognit...

Страница 245: ...an alarm when there is abandoned object in the specified zone Step 1 In the Type drop down list select Abandoned Object The interface is shown as Figure 4 139 Figure 4 139 Step 2 Draw the detection r...

Страница 246: ...mum size that is when the passing target is smaller than the minimum target or larger than the maximum target no alarm will be generated The maximum size should not be smaller than the minimum size 3...

Страница 247: ...4 141 Step 2 Draw the detection rule 1 Click to draw the rule on the surveillance video See Figure 4 142 Figure 4 142 2 Set parameters See Table 4 42 Table 4 42 Parameter Description Preset Select a p...

Страница 248: ...maximum size should not be smaller than the minimum size 3 Draw a rule Left click mouse to draw a zone until you draw a rectangle you can right click mouse 4 Click OK to complete the rule setting Step...

Страница 249: ...rget is smaller than the minimum target or larger than the maximum target no alarm will be generated The maximum size should not be smaller than the minimum size 3 Draw a rule Left click mouse to draw...

Страница 250: ...User s Manual 236 Figure 4 145 Step 2 Draw the detection rule 1 Click to draw the rule on the surveillance video See Figure 4 146 Figure 4 146 2 Set parameters See Table 4 44...

Страница 251: ...han the minimum target or larger than the maximum target no alarm will be generated The maximum size should not be smaller than the minimum size 3 Draw a rule Left click mouse to draw a zone until you...

Страница 252: ...with the mouse Each rule can set 2 target filters maximum size and minimum size that is when the passing target is smaller than the minimum target or larger than the maximum target no alarm will be g...

Страница 253: ...drop down list select Loitering Detection The interface is shown as below See Figure 4 149 Figure 4 149 Step 2 Draw the detection rule 1 Click to draw the rule on the surveillance video See Figure 4 1...

Страница 254: ...ou draw a rectangle you can right click mouse 4 Click OK to complete the rule setting Step 3 Click you can refer to 4 7 2 4 1 Tripwire to set other parameters Step 4 Click Apply to complete the setup...

Страница 255: ...stribution Connecting to the front end device that supports crowd distribution function system can support the crowd distribution function It supports crowd distribution event subscription and receive...

Страница 256: ...some series products only You need to set the alarm center first For details see 4 12 13 Alarm Center Send Email Select the check box When an alarm occurs the NVR device sends an email to the set mai...

Страница 257: ...the box and then select the corresponding audio file from the dropdown list System plays the audio file when the alarm occurs Refer to 4 18 1 File Management to add audio file first Buzzer Select the...

Страница 258: ...ters maximum size and minimum size that is when the passing target is smaller than the minimum target or larger than the maximum target no alarm will be generated The maximum size should not be smalle...

Страница 259: ...occurs the NVR device uploads an alarm signal to the network including the alarm center This function is for some series products only You need to set the alarm center first For details see 4 12 13 Al...

Страница 260: ...ponding audio file from the dropdown list System plays the audio file when the alarm occurs Refer to 4 18 1 File Management to add audio file first Buzzer Select the check box to activate the buzzer w...

Страница 261: ...figuration item will be linked to start the alarm Alarm Out The alarm device such as lights sirens etc is connected to the alarm output port When an alarm occurs the NVR device transmits the alarm inf...

Страница 262: ...of the alarm the recording extends for a period of time The time range is from 10 seconds to 300 seconds Tour Select the check box and select the channel for tour When an alarm occurs the local inter...

Страница 263: ...specified zone Define the period by drawing Select the corresponding date and then use mouse to drag the bar to set period Define for the whole week Click next to All all the icon switches to you can...

Страница 264: ...plate recognition rule alarm linkage actions in different environments blacklist whitelist and regular Step 1 Select Main Menu AI Parameters ANPR The ANPR interface is displayed See Figure 4 157 Figu...

Страница 265: ...Channel Select the check box and select the needed recording channel support multiple choices When an alarm occurs the NVR device activates the channel for recording You need to enable intelligent rec...

Страница 266: ...10 SMD You can use SMD Smart Motion Detection to detect human and vehicle in the video and sore the detection result in structured storage for fast retrieval Step 1 Select Main Menu AI Parameter SMD...

Страница 267: ...larm Center Send Email Select the check box When an alarm occurs the NVR device sends an email to the set mailbox to notify the user You need to set the email first For details see 4 12 10 Email Recor...

Страница 268: ...n Type list Buzzer Select the check box to activate the buzzer when an alarm occurs Alarm Tone Check the box and then select the corresponding audio file from the drop down list System plays the audio...

Страница 269: ...5 Figure 4 159 Step 2 Select a channel and then click Add System displays Add interface See Figure 4 160 Figure 4 160 Step 3 Enter human face library name and then click OK System successfully saves t...

Страница 270: ...with resolution between 200 200 6000 5000 4 7 3 1 2 Adding One Face Picture You can add one face picture to the database It is for the scenario that the registered human face picture amount is small...

Страница 271: ...Manual 257 Figure 4 162 Step 4 Click to add a face picture The Browse interface is displayed See Figure 4 163 Figure 4 163 Step 5 Select a face picture and enter the registration information See Figur...

Страница 272: ...User s Manual 258 Figure 4 164 Step 6 Click OK The system prompts the registration is successful Step 7 On the Details interface click Search The system prompts modeling is successful See Figure 4 165...

Страница 273: ...Table 4 54 Naming format Description Name Enter the name Gender Enter 1 or 2 1 represents male and 2 represents female Birthday Enter numbers in the format of yyyy mm dd Country Enter the abbreviatio...

Страница 274: ...ist or whitelist System can compare the detected plate information with the plate on the blacklist whitelist and then trigger the corresponding alarm linkage After enable black whitelist on the previe...

Страница 275: ...lack list white list function 4 7 3 2 2 Deleting Black White List Set type as White List Black List or All and then click Search System displays black whitelist information See Figure 4 168 On the sea...

Страница 276: ...itelist from the USB device System supports csv or xlsx file The export file format is csv Import black whitelist Click Import and then select the corresponding file click Browse to import the file Ex...

Страница 277: ...to the external storage device Select an alarm event log and then click Backup to back up it to peripheral USB device Select an alarm event log click to play the recorded video of alarm event Double c...

Страница 278: ...nal from the alarm input port to the NVR Network alarm NVR trigger corresponding alarm operations when it receives the alarm signal via the network transmission IPC external alarm When the network cam...

Страница 279: ...me Device Type NO normal open or NC normal close Schedule Define a period during which the alarm is active For details see 4 8 5 1 Motion Detection Alarm out Port The alarm device such as lights siren...

Страница 280: ...occurs the NVR device associates the channel to perform the corresponding PTZ action For example activate the PTZ in channel one to turn to the preset point X Tripwire alarm supports to activate PTZ p...

Страница 281: ...ct the alarm device to the system alarm output port and set the mode as auto system can trigger the corresponding operations when an alarm occurs Auto Once an alarm event occurs system can generate an...

Страница 282: ...ection video loss tampering scene changing and PIR alarm 4 8 5 1 Motion Detection When the moving object appears and moves fast enough to reach the preset sensitivity value the system activates the al...

Страница 283: ...This function is for some series products only You need to set the alarm center first For details see 4 12 13 Alarm Center Send Email Select the check box When an alarm occurs the NVR device sends an...

Страница 284: ...en an alarm occurs Alarm Tone Check the box and then select the corresponding audio file from the drop down list System plays the audio file when the alarm occurs Refer to 4 18 1 File Management to ad...

Страница 285: ...the four regions activates motion detect alarm the channel where this region belongs to will activate motion detect alarm Step 4 Right click on the screen to exit the region setting interface Step 5 O...

Страница 286: ...hen select the check box to enable the settings There are six periods for you to set for each day Under Copy to select All to apply the settings to all the days of a week or select specific day s that...

Страница 287: ...pply to complete the settings Click Default to restore the default setting Click Copy to in the Copy to dialog box select the additional channel s that you want to copy the motion detection settings t...

Страница 288: ...complete the settings Click Default to restore the default setting Click Copy to in the Copy to dialog box select the additional channel s that you want to copy the motion detection settings to and t...

Страница 289: ...he detected scene has changed system can generate an alarm PIR function helps enhancing the accuracy and validity of motion detect It can filter the meaningless alarms that are activated by the object...

Страница 290: ...tion System can generate an alarm once it detect the audio is not clear the tone color has changed or there is abnormal or audio volume changes Step 1 Select Main Menu ALARM Audio Detection Step 2 Con...

Страница 291: ...e series products only You need to set the alarm center first For details see 4 12 13 Alarm Center Send Email Select the check box When an alarm occurs the NVR device sends an email to the set mailbox...

Страница 292: ...the check box to activate the buzzer when an alarm occurs Step 3 Click Apply to complete the settings 4 8 7 Thermal Alarm System supports thermal devices and receives the alarm signal from it It can r...

Страница 293: ...hts sirens etc is connected to the alarm output port When an alarm occurs the NVR device transmits the alarm information to the alarm device Post Alarm When the alarm ends the alarm extended for a per...

Страница 294: ...nds to 300 seconds Tour Select the check box and select the channel for tour When an alarm occurs the local interface of the NVR device displays the selected channel screen You need to set the time in...

Страница 295: ...User s Manual 281 Figure 4 182 Figure 4 183...

Страница 296: ...System generates an alarm once the HDD space is less than the threshold For HDD No Space type only Alarm out Port The alarm device such as lights sirens etc is connected to the alarm output port When...

Страница 297: ...set point only You need to set the corresponding PTZ actions first see 4 4 4 Calling PTZ Functions Tour Select the check box and select the channel for tour When an alarm occurs the local interface of...

Страница 298: ...mation from it This function applies to the scenarios such as supermarket POS machine After connection is established the Device can access the POS information and display the overlaid text in the cha...

Страница 299: ...unt or product name Step 3 In the Start Time box and End Time box enter the time period that you want to search the POS transaction information Step 4 Click Search The searched transaction results dis...

Страница 300: ...3 English characters Enable Enable the POS function Record Channel Click to select a channel to record Privacy Enter the privacy contents Refer to 4 9 2 1 Privacy Setup Protocol Select POS by default...

Страница 301: ...the POS information displaying For example enter 5 the POS information disappear from the screen after 5 seconds Font Size In the Font Size list select Small Medium or Big as the text size of POS inf...

Страница 302: ...P Step 2 Click The IP Address interface is displayed See Figure 4 189 Figure 4 189 Step 3 Enter Source IP and Port Refers to POS IP address and port Step 4 Click OK to complete setup 4 10 Operation an...

Страница 303: ...log type that you want to view System Config Storage Record Account Clear Log Playback and Connection or select All to view all logs Step 3 In the Start Time box and End Time box enter the time period...

Страница 304: ...ce Click Clear to remove all logs 4 10 2 System 4 10 2 1 Version Select Main Menu MAINTAIN System Info Version You can view NVR version information Slight different may be found on the user interface...

Страница 305: ...ndicates HDD type Total Space Indicates the total capacity of HDD Free Space Indicates the usable capacity of HDD Health Status Indicates the health status of the HDD S M A R T View the S M A R T repo...

Страница 306: ...Figure 4 193 4 10 2 4 Device Status You can view fan running status such as speed CPU temperature and memory Select Main Menu MAINTAIN System Info Device Status the Device Status interface is displaye...

Страница 307: ...ew HDD health status System supports Seagate SKYHAWK series 4T and higher HDD It displays HDD name space manufacturer Serial No and health status Step 1 Select Main Menu MAINTAIN System Info Health Mo...

Страница 308: ...etwork 4 10 3 1 Online User You can view the online user information or block any user for a period of time To block an online user click and then enter the time that you want to block this user The m...

Страница 309: ...rk load means the data flow which measures the transmission capability You can view the information such as data receiving speed and sending speed Step 1 Select Main Menu MAINTAIN Network Network Load...

Страница 310: ...tion of data sending speed and receiving speed System displays LAN1 load by default Only one LAN load can be displayed at one time 4 10 3 3 Network Test You can test the network connection status betw...

Страница 311: ...ay packet loss and network status 4 10 4 Maintenance and Management 4 10 4 1 Device Maintenance When the Device has been running for a long time you can configure the auto reboot when the Device is no...

Страница 312: ...and it is only supported on the local configuration interface Step 3 Click Apply to complete the settings 4 10 4 2 Exporting System Settings You can export or import the Device system settings if ther...

Страница 313: ...Manual 299 Figure 4 200 Step 2 Insert a USB storage device into one of the USB ports on the Device Step 3 Click Refresh to refresh the interface The connected USB storage device is displayed See Figur...

Страница 314: ...YYYYMMDDhhmmss Double click this folder to view the backup files 4 10 4 3 Default This function is for admin account only You can select the settings that you want to restore to the factory default S...

Страница 315: ...then click OK in the prompted dialog box 1 Enter the admin password in the second dialog box 2 Click OK The system starts restoring the whole settings 4 10 4 4 System Update 4 10 4 4 1 Upgrading File...

Страница 316: ...ure 4 203 Step 3 Click Update The Update interface is displayed See Figure 4 204 Figure 4 204 Step 4 Click the file that you want to upgrade Step 5 The selected file is displayed in the Update File bo...

Страница 317: ...ower supply and network connection during upgrading otherwise the upgrading might be failed Step 1 Select Main Menu MAINTAIN Manager Update The Update interface is displayed See Figure 4 205 Figure 4...

Страница 318: ...avoid the situation that you have to upgrade through TFTP when the Device is halted 4 11 File Backup You can back up the record file to the UBS device Step 1 Connect USB burner USB device or portable...

Страница 319: ...l not terminate backup process This function is for some series products only System pops up corresponding dialogue box if there is no backup device or no backup file or error occurs during backup pro...

Страница 320: ...tworking testing the system network status is regarded as offline Fault Tolerance Two Ethernet ports share one IP address Normally only one Ethernet port is working and when this port fails the other...

Страница 321: ...ing subnet mask and default gateway IP address and default gateway must be in the same network segment Subnet Mask Default Gateway DNS DHCP Enable the DHCP function to get the DNS address from router...

Страница 322: ...ion UDP Port The default value setting is 37778 You can enter the value according to your actual situation HTTP Port The default value setting is 80 You can enter the value according to your actual si...

Страница 323: ...al Wi Fi module is installed on the device This function is supported on select models Procedure Step 1 Select Main Menu NETWORK Wi Fi Figure 4 209 Step 2 Select a site and click Connect Table 4 66 Pa...

Страница 324: ...K dongle and EW 7811UTC wireless cards 4 12 4 Wi Fi AP Prerequisites This function requires the built in Wi Fi module in the device and actual product shall prevail You can configure Wi Fi parameters...

Страница 325: ...evice provides WPA2 PSK and WPA PSK Password Set the Wi Fi password for the device Select Channel Select the channel for device communication Network Proxy Enables the external network access through...

Страница 326: ...ers of NVR IP address and default gateway must be in the same network segment Subnet Mask Default Gateway Start IP Set the start IP address and end IP address of the DHCP server End IP Preferred DNS S...

Страница 327: ...3G 4G module Zone 2 displays the corresponding information when the 3G 4G module is connected while Zone 1 and Zone 3 will only display the corresponding content when the 3G 4G is enabled Step 2 Confi...

Страница 328: ...s Procedure Step 1 Power on the NVR and wireless relay IPC and connect all IPCs to the NVR through Wi Fi Step 2 Select Main Menu NETWORK REPEATER The REPEATER interface is displayed See Figure 4 213 G...

Страница 329: ...al cascade You can use manual cascade when there are 2 IPCs in the network at least Figure 4 214 Step 4 Click and select the channel to be added The following interface is displayed after successful a...

Страница 330: ...the Internet Service Provider Step 1 Select Main Menu NETWORK PPPoE The PPPoE interface is displayed See Figure 4 216 Figure 4 216 Step 2 Enable the PPPoE function Step 3 In the User Name box and Pas...

Страница 331: ...as domain from PC located in the WAN After you have registered and logged in the DDNS website successfully you can view the information of all the connected devices under this user name Step 1 Select...

Страница 332: ...e configuration is successful If not the configuration is failed 4 12 9 UPnP You can map the relationship between the LAN and the WAN to access the Device on the LAN through the IP address on the WAN...

Страница 333: ...e 4 71 Table 4 71 Parameter Description Port Mapping Enable the UPnP function Status Indicates the status of UPnP function Offline Failed Online Succeeded LAN IP Enter IP address of router on the LAN...

Страница 334: ...and avoid popular ports from 1 through 255 and system ports from 256 through 1023 When there are several devices in the LAN properly arrange the ports mapping to avoid mapping to the same external por...

Страница 335: ...account Password Anonymous If enable the anonymity function you can login as anonymity Receiver In the Receiver list select the number of receiver that you want to receive the notification The Device...

Страница 336: ...ue ranges from 30 to 1440 0 means that there is no interval Test Click Test to test the email sending function If the configuration is correct the receiver s email account will receive the email Befor...

Страница 337: ...ndicates the read write strings supported by the agent program Write Community Trap Address Indicates the destination address for the agent program to send the Trap information Trap Port Indicates the...

Страница 338: ...want to manage and then select the version number to query Step 6 On the MG SOFT MIB Browser unfold the tree structured directory to obtain the configurations of the Device such as the channels quant...

Страница 339: ...matically obtain the multicast IP address and join Then you can view the video through multicast function 4 12 13 Alarm Center You can configure the alarm center server to receive the uploaded alarm i...

Страница 340: ...e transit to make it easier for the client software to access the Device Step 1 Select Main Menu NETWORK Register The Register interface is displayed See Figure 4 224 Figure 4 224 Step 2 Configure the...

Страница 341: ...rwise P2P can not run properly Step 1 Select Main Menu NETWORK P2P The P2P interface is displayed See Figure 4 225 Figure 4 225 Step 2 Enable the P2P function After the P2P function is enabled and con...

Страница 342: ...Figure 4 226 2 Click and enter the Add Device interface Mobile App supports device initialization 3 Select Wired Device P2P to enter the P2P interface 4 Click the QR code icon behind the SN to enter...

Страница 343: ...r to delete the old files and if yes configure the days Deleted files cannot be recovered Step 3 Click Apply or Save to complete setup 4 13 2 Schedule You can set schedule record and schedule snapshot...

Страница 344: ...the setup System needs to restart to activate current setup if you want to format the HDD 4 13 4 Record Control After you set schedule record or schedule snapshot function set auto record snapshot fun...

Страница 345: ...ure settings to save the main stream sub stream and snapshot to different HDD group as selected by you 4 13 6 Disk Quota You can allocate a fixed storage capacity for each channel through disk quota f...

Страница 346: ...t types Quick detect is to detect via the universal system files System can quickly complete the HDD scan If you want to use this function make sure the HDD is in use now If the HDD is removed from ot...

Страница 347: ...plays the detection information When system is detecting HDD click Stop Check to stop current detection Click Start Check to detect again 4 13 7 2 Detect Report After the detect operation you can go t...

Страница 348: ...User s Manual 334 Figure 4 232 Step 2 Click The Details interface is displayed You can view detecting results and S M A R T reports See Figure 4 233 and Figure 4 234...

Страница 349: ...4 4 13 8 RAID RAID redundant array of independent disks is a data storage virtualization technology that combines multiple physical HDD components into a single logical unit for the purposes of data r...

Страница 350: ...st one click one button to create RAID For creating RAID function you can select the physical HDD that does not included in the RAID group or the created disk array to create a RAID5 You can refer to...

Страница 351: ...isks and use the existing hot spare disk automatically Click Create Manually 1 Select RAID type and disks as system instructed 2 Click Create Manually and then the format disk notice is displayed 3 Cl...

Страница 352: ...e 4 236 4 13 8 3 Hot Spare Disk You can add a hot spare disk to a specific disk in the RAID or to the entire RAID and the hot spare disk is switched into operation if any disk fails Step 1 Select Main...

Страница 353: ...isk Global Hotspare the new disk will serve as the hot spare disk of the entire RAID Step 5 Click OK Click behind a hot spare disk to delete it 4 13 9 Record Estimate Record estimate function can calc...

Страница 354: ...gure 4 241 You can configure the Resolution Frame Rate Bit Rate and Record Time for the selected channel Figure 4 241 Step 3 Click Apply to save the settings Then the system will calculate the time pe...

Страница 355: ...is displayed Step 3 Select the check box of the HDD that you want to calculate In the Known Space tab in the Time box the recording time is displayed See Figure 4 243 Figure 4 243 4 13 9 2 Calculating...

Страница 356: ...n otherwise the upload of recorded videos and snapshots will be failed Step 1 Select Main Menu STORAGE FTP The FTP interface is displayed See Figure 4 245 Figure 4 245 Step 2 Configure the settings fo...

Страница 357: ...ed video will be uploaded Picture Upload Interval If this interval is longer than snapshot interval the system takes the recent snapshot to upload For example the interval is 5 seconds and snapshot in...

Страница 358: ...layed See Figure 4 246 Figure 4 246 Step 3 Configure parameters See Table 4 80 Table 4 80 Parameter Description Function Select serial port control protocol Console Upgrade the program and debug with...

Страница 359: ...cture of device security status You can scan user service and security module status for detailed information about the security status of the device Detecting User and Service Green icon represents a...

Страница 360: ...46 Figure 4 247 Figure 4 248 Configuration Security When there s a risk in the device configuration the icon will be in orange to warn risk You can click Details to see the detailed risk description S...

Страница 361: ...ointer on the icon to see the on screen instructions Scanning Security Status You can click Rescan to scan security status 4 15 2 System Service You can set NVR basic information such as basic service...

Страница 362: ...ONVIF If this function is enabled the remote devices can be added through the ONVIF protocol This function is enabled by default NTP Server After enabling this function a NTP server can be used to sy...

Страница 363: ...e 4 82 Table 4 82 802 1x parameters Parameter Description Authentication PEAP protected EAP protocol TLS Transport Layer Security Provide privacy and data integrity between two communications applicat...

Страница 364: ...TTPSEnable to enable HTTPS function Step 3 Click Certificate Management to create or import a HTTPS certificate from USB drive For details about importing or creating a CA certificate see 4 15 4 CA Ce...

Страница 365: ...y with IP MAC hosts in Trusted Sites If Blocked Sites is enabled you cannot visit device port with IP MAC hosts in Blocked Sites Add When Type is Network Access you can configure IP Address IP Segment...

Страница 366: ...displayed See Figure 4 254 Figure 4 254 Account lockout Step 2 Set parameters See Table 4 84 Table 4 84 Account lockout parameters Parameter Description Attempt s Set the maximum number of allowable...

Страница 367: ...owed with hosts in the trusted list Step 1 Select Main Menu SECURITY Attack Defense Sync Time Whitelist The Sync Time Whitelist interface is displayed See Figure 4 256 Figure 4 256 Sync Time Whitelist...

Страница 368: ...ts When Type is IP Segment it can be configured End Address Input the end IP address of trusted hosts When Type is IP Segment it can be configured Step 4 Click Apply to complete the settings 4 15 4 CA...

Страница 369: ...icate 3 Click Create CA Application and Import Follow the on screen instructions to finish CA application and import See Figure 4 258 Figure 4 258 CA application and import Import Third Party Certific...

Страница 370: ...displayed See Figure 4 259 Figure 4 259 Creating certificate Step 3 Click Browse to select the certificate that you want to install Step 4 Click Import 4 15 5 Audio Video Encryption The device support...

Страница 371: ...sabled Encryption Type Use the default setting Update Period of Secret Key Secret key update period Value range 0 720 hours 0 means never update the secret key Default value 12 RTSP over TLS Enable En...

Страница 372: ...to enable a pop up message in your local host PC Buzzer Select the check box to activate the buzzer when an alarm occurs Alarm Tone Check the box and then select the corresponding audio file from the...

Страница 373: ...rm output port When an alarm occurs the NVR device transmits the alarm information to the alarm device Post Alarm When the alarm ends the alarm extended for a period of time The time range is from 0 s...

Страница 374: ...oup the string max length is 15 byte The user name can only contain English letters numbers and _ The default user amount is 64 and the default group amount is 20 System account adopts two level manag...

Страница 375: ...Figure 4 264 Figure 4 264 Step 3 Input the user name password select the group it belongs to from the drop down list Then you can check the corresponding rights for current user See Table 4 91 Table...

Страница 376: ...e set period Permission In the Permission area select the check boxes in the System tab Search tab and Live tab To manage the user account easily when defining the user account authority it is recomme...

Страница 377: ...ority it can modify the password of other user STRONG PASSWORD RECOMMENDED For your device own safety create a strong password of your own choosing We also recommend you change your password periodica...

Страница 378: ...Figure 4 267 Step 2 Click Add The Add interface is displayed See Figure 4 268 Step 3 Enter group name and then input some memo information if necessary Check the box to select authorities Figure 4 26...

Страница 379: ...et The Password Reset interface is displayed See Figure 4 269 Figure 4 269 Step 2 Check the box to enable Reset password function This function is enabled by default Step 3 Input proper security quest...

Страница 380: ...password is modified when you are initializing the admin password Step 1 Select Main Menu ACCOUNT ONVIF User The ONVIF User interface is displayed See Figure 4 270 Figure 4 270 Step 2 Click Add The A...

Страница 381: ...Main Menu DISPLAY Display The Display interface is displayed See Figure 4 272 Figure 4 272 Step 2 Configure the settings for the display parameters See Table 4 92 Table 4 92 Parameter Description Tra...

Страница 382: ...only be displayed when the screen is enabled Temperature Check the box to test the object temperature including trace the high low temperature Resolution Support 1920 1080 1280 1024 default 1280 720 S...

Страница 383: ...the settings for the tour parameters See Table 4 93 Table 4 93 Parameter Description Enable Tour Enable tour function Interval Enter the amount of time that you want each channel group displays on the...

Страница 384: ...box of any channel group and then click Modify or double click on the group The Modify Channel Group dialog box is displayed You can regroup the channels Click Move up or Move down to adjust the posit...

Страница 385: ...adopts the basic window mode as the new window name For example if you select the 8 display mode the default name is Split8 In regular mode drag the mouse in the preview frame you can merge several s...

Страница 386: ...Split6 Select the window you want to merge red highlighted click to cancel the merge to restore the basic mode Click to delete the customized window mode Figure 4 275 Step 3 Click Apply to exit After...

Страница 387: ...realize audio broadcast activation function This function is for some series product only 4 18 1 File Management You can add audio files listen to audio files rename and delete audio files and configu...

Страница 388: ...User s Manual 374 Figure 4 277 Step 2 Click Add The Add interface is displayed See Figure 4 278...

Страница 389: ...o files from the USB storage device If the importing is successful the audio files will display in the File Management interface 4 18 2 Audio Play You can configure the settings to play the audio file...

Страница 390: ...Output Includes two options MIC and Audio It is MIC by default The MIC function shares the same port with talkback function and the latter has the priority Some series products do not have audio port...

Страница 391: ...User s Manual 377 The Add Group interface is displayed See Figure 4 281 Figure 4 281 Step 3 Input group name and select one or more channels Step 4 Click Save to complete broadcast group setup...

Страница 392: ...logue box Select a group name and then click to begin broadcast See Figure 4 282 Figure 4 282 4 19 USB Device Auto Pop up After you inserted the USB device system can auto detect it and pop up the fol...

Страница 393: ...x System is shutting down Do not click power on off button directly Do not unplug the power cable or click power on off button to shutdown device directly when device is running especially when it is...

Страница 394: ...User s Manual 380 Figure 4 284 2 Select Shutdown Draw the unlock pattern or input password first if you have no authority to shut down See Figure 4 285 or Figure 4 286...

Страница 395: ...User s Manual 381 Figure 4 285 Figure 4 286 Remote Control Press the power button on the remote for at least 3 seconds...

Страница 396: ...r s Manual 382 Press the power button at the rear panel of the device Auto Resume after Power Failure The system can automatically backup video file and resume previous working status after power fail...

Страница 397: ...PSS user s manual 5 1 Network Connection The factory default IP of the Device is 192 168 1 108 The Device supports monitoring on different browsers such as Safari Firefox Google to perform the functio...

Страница 398: ...as configured during initial settings To security your account it is recommended to keep the password properly and change it regularly Click to display the password Step 3 Click Login 5 3 Web Main Men...

Страница 399: ...actual situation 5 Displays Cell Phone Client and Device SN QR Code Cell Phone Client Use your mobile phone to scan the QR code to add the device into the Cell Phone Client and then you can start acce...

Страница 400: ...configure alarm event actions AI Configure and manage artificial intelligent events It includes smart search parameters and database POS View POS information and configure related settings OPERATION...

Страница 401: ...logy that uses radio waves to provide wireless high speed Internet and network connections The standard is for wireless local area networks WLANs It is like a common language that all the devices use...

Страница 402: ...HDD is broken HDD ribbon is damaged HDD cable connection is loose Main board SATA port is broken There is no video output whether it is one channel multiple channel or all channel output Program is n...

Страница 403: ...ol has been disabled No dx8 1 or higher Please upgrade display card driver Network connection error Network setup error Password or user name is invalid Client end is not compatible with NVR program T...

Страница 404: ...Bundle exe or ffdshow 2004 1012 exe in Windows XP OS Forgot local menu operation password or network password Please contact your local service engineer or our sales person for help We can guide you t...

Страница 405: ...not Use telnet to access and then use command ifconfig a to check device IP address If you see the subnet mask and the gateway has changed after the reboot Please upgrade the applications and set agai...

Страница 406: ...he public network it is recommended to enable the auto check for updates function to obtain timely information of firmware updates released by the manufacturer We suggest that you download and use the...

Страница 407: ...cessary it is highly recommended that you use safe modes including but not limited to the following services SNMP Choose SNMP v3 and set up strong encryption passwords and authentication passwords SMT...

Страница 408: ...d and isolated according to the actual network needs If there are no communication requirements between two sub networks it is suggested to use VLAN network GAP and other technologies to partition the...

Страница 409: ...2 to calculate the storage capacity which is storage of each channel needed unit Mbyte In the formula means the recording time for each day hour means number of days for which the video shall be kept...

Страница 410: ...64 ONVIF Priva te P5512 H264 ONVIF Priva te Q1604 5 40 3 2 H264 ONVIF Priva te Q1604 E 5 40 9 H264 ONVIF Priva te Q6034E H264 ONVIF Priva te Q6035 5 40 9 H264 ONVIF Priva te Q1755 H264 ONVIF Priva te...

Страница 411: ...FD 100A v1 0 3 3 H264 ONVIF Cannon VB M400 H264 Private CNB MPix2 0DIR XNETM112 0111229 H264 ONVIF VIPBL1 3MI RVF XNETM210 0111229 H264 ONVIF IGC 2050F XNETM210 0111229 H264 ONVIF CP PLUS CP NC9 K 6 E...

Страница 412: ...2 H264 ONVIF MPC IPVD 0313 k20111208A NS H264 ONVIF Priva te MPC IPVD 0313AF k20111208B NS H264 ONVIF Priva te Honeywell HIDC 1100P T h 2 2 1824 H264 ONVIF HIDC 1100P h 2 2 1824 H264 ONVIF HIDC 0100P...

Страница 413: ...W352 H H264 MPEG4 ONVIF Priva te WV SW152 E 1 03 H264 MPEG4 ONVIF Priva te WV SW558 H H264 MPEG4 ONVIF Priva te WV SW559 H H264 MPEG4 ONVIF Priva te WV SP105H 1 03 H264 MPEG4 ONVIF Priva te WV SW155 E...

Страница 414: ...06 MPEG4 Private D5220 1 8 3 FC2 2 0120614 1 9 320 A1 803 5 H264 Private Samsung SNB 3000P 2 41 H264 MPEG4 ONVIF Priva te SNP 3120 1 22_11012 0_1 H264 MPEG4 ONVIF Priva te SNP 3370 1 21_11031 8 MPEG4...

Страница 415: ...74 01 H264 ONVIF Priva te SNC CH280 1 73 01 H264 ONVIF Priva te SNC RH 12 4 1 73 00 H264 ONVIF Priva te SNC RS46P 1 73 00 H264 ONVIF Priva te SNC ER550 1 74 01 H264 ONVIF Priva te SNC ER580 1 74 01 H...

Страница 416: ...User s Manual...

Отзывы: