D-Link DSL-224 Скачать руководство пользователя страница 68

Section 4 - Troubleshooting 

D-Link DSL-224 User Manual 

66 

Troubleshooting 

This chapter provides solutions to problems that might occur during the installation and operation of the DSL-224. Read the following descriptions 

if you are having problems. (The examples below are illustrated in Windows® XP. If you have a different operating system, the screenshots on your 

computer will look similar to the following examples.) 


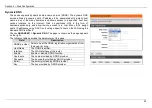
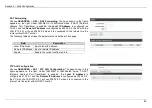
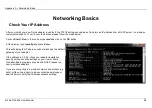
1.  How do I configure my DSL-224 Router without the CD-ROM?


Step 1 

Connect your PC to the Router using an Ethernet cable. 

Step 2 

Open a web browser and enter the address http://10.0.0.2 

Step 3 

The default username is ‘admin’ and the default password is ‘admin’. 

Step 4 

If you have changed the password and cannot remember it, you will need to reset the Router to the factory default setting (see question 2), 

which will set the password back to ‘admin’. 


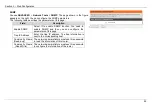
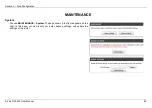
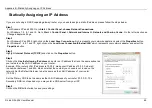
2.  How do I reset my Router to the factory default settings?


Step 1 

Ensure the Router is powered on. 

Step 2 

Press and hold the reset button on the back of the device for approximately 15~20 seconds. 

Step 3 

This process should take around 1 to 2 minutes. 


  Note: 

Resetting the Router to the factory default settings will erase the current configuration settings. 


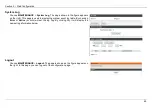
3.  What can I do if my Router is not working correctly?


There are a few quick steps you can take to try and resolve any issues: 

Step 1 

Follow the directions in Question 2 to reset the Router. 

Step 2 

Check that all the cables are firmly connected at both ends. 

Step 3 

Check the LEDs on the front of the Router. The Power indicator should be on, the Status indicator should flash, and the DSL and LAN 

Содержание DSL-224

Страница 1: ...DSL 224 User Manual Hardware Version T1...

Страница 2: ...e Router 11 TCP IP Configuration On A PC 13 WEB CONFIGURATION 14 Accessing the Router 14 SETUP 15 Wizard 15 Local Network 21 Internet Setup 25 Wireless Setup 33 Time and Date 37 ADVANCED 38 Advanced W...

Страница 3: ...Do not put this device close to over damp place Do not spill any fluid on this device Do not connect this device to PC or electronic product unless our customer engineer or your broadband provider ins...

Страница 4: ...ase T 100BaseT Ethernet adapter Web based Configuration Utility Requirement Computer with the following Windows Macintosh or Linux based operating system An installed Ethernet adapter Browser Requirem...

Страница 5: ...P Multiple PVCs the number of PVCs support is eight DHCP server relay Static route Network Address Translation NAT DMZ Virtual Server Universal plug and play UPnP Dynamic Domain Name Server DDNS Netwo...

Страница 6: ...information can be easily accessed Be sure to keep this information safe and private Low Pass Filters Since VDSL2 ADSL ADSL2 and telephone services share the same copper wiring to carry their respect...

Страница 7: ...ecessary to install software on your computer that enables the computer to access the Internet Additional software must be installed if you are using the device as a simple bridge For a bridged connec...

Страница 8: ...e following WAN Setting and Connection Type configurations Connection Type settings listed in parenthesis PPPoE PPPoA PPPoE LLC PPPoA LLC or PPPoA VC Mux Bridge Mode 1483 Bridged IP LLC or 1483 Bridge...

Страница 9: ...DSL2 ADSL ADSL2 service provider for the additional connections This setting can be changed in the WAN Setup window of the web management interface Information you will need about your DSL 224 Router...

Страница 10: ...et mask and a default gateway address to computers on your LAN The default range of IP addresses the DSL 224 will assign are from 10 0 0 1 to 10 0 0 254 Your computer or computers needs to be configur...

Страница 11: ...g LAN Green Off The Ethernet interface is not properly connected Blinking The Ethernet interface is properly connected and data is being transmitted On The Ethernet interface is properly connected but...

Страница 12: ...The following table describes the interfaces of the device Interface Button Description DSL RJ 11 interface for connecting the host to the telephone jack on the wall or the MODEM interface of the spli...

Страница 13: ...d be able to see the LED indicators in the front as you may need to view them for troubleshooting Designed to go up to 100 meters indoors and up to 300 meters outdoors wireless LAN lets you access you...

Страница 14: ...of the splitter to the uplink telephone jack on the wall The spliter has three ports LINE Connect to a wall phone jack RJ 11 jack MODEM Connect to the Line interface of the router PHONE Connect to a t...

Страница 15: ...ration steps for Windows are as follows Step 1 For Windows XP and 2000 choose Start Control Panel Network Connections For Windows 7 8 8 1 and 10 choose Start Control Panel Network and Internet Network...

Страница 16: ...ter features and system parameters in a user friendly GUI Accessing the Router The following description is a detail How To user guide and is prepared for first time users Step 1 Open the Internet Exp...

Страница 17: ...you are connected to the Internet The connection type of your physical WAN device can be Ethernet DSL or both Technical information about the properties of your Internet connection is provided by your...

Страница 18: ...Section 3 Web Configuration 16 Click Setup Wizard The page is shown as the figure appears as below There are 5 steps to configure the device Click Next to continue...

Страница 19: ...iguration 17 Step 1 Change device login password input the current password and new password and then click Next If you do not change the Login password click Skip to continue or click Cancel to retur...

Страница 20: ...Section 3 Web Configuration 18 Step 2 Please set the time and date and then click Next...

Страница 21: ...Section 3 Web Configuration 19 Step 3 Set internet connection it will show as the below appears...

Страница 22: ...Section 3 Web Configuration 20 Step 4 Configure wireless network...

Страница 23: ...ttings for the private network The IP address of the device is the base address used for DHCP To use the device for DHCP on your LAN the IP address pool used for DHCP must be compatible with the IP ad...

Страница 24: ...Step 2 Enter the subnet mask of LAN interface If the Router IP address is 10 0 0 2 the range of subnet mask is set to 255 255 255 0 Step 3 Select Secondary IP Input a secondary IP address and subnet m...

Страница 25: ...or disable the Router Advertisement feature M Flag Enable or disable the Managed address configuration flag in RA packet O Flag Enable or disable the Other configuration flag in RA packet Prefix Mode...

Страница 26: ...P pool range to the host You can keep it as defaults Step 4 Set the default gateway You can keep it as defaults 10 0 0 2 Step 5 Set the Max lease time The lease time determines the period that the hos...

Страница 27: ...llows you to reserve IP address for PC specified in this page Internet Setup Channel Config Choose SETUP Internet Setup Channel Config The page is shown as the figure appears on the right In this page...

Страница 28: ...ection type from the Type drop down list There are 3 connection types available Continuous Connect On Demand Manual Continuous The system automatically keeps dialing for WAN connection once the connec...

Страница 29: ...MER Step 4 According to the internet service provided by your ISP choose the WAN connection type For static IP user choose Fixed IP For dynamic IP user choose DHCP Step 5 If the Type is set to Fixed...

Страница 30: ...tect the flow of the user continuously the router automatically disconnects the PPPoE connection Bridge You can select Bridged Ethernet Bridged PPPoE or Disable Bridge AC Name The accessed equipment t...

Страница 31: ...on 29 VPN LITE Choose SETUP Internet Setup VPN Lite The page is shown in the below figure This page is used to setup VPN Lite Please input the correct username password IP address and subnet mask that...

Страница 32: ...S category of the PVC You can choose UBR CBR rt VBR or nrt VBR PCR Peak cell rate PCR is the maximum rate at which cells can be transmitted along a connection in the ATM network Its value ranges from...

Страница 33: ...s The page shown in the right figure appears In this page you can select the DSL modulation Mostly you need to remain this factory default settings The router supports these modulations G Lite G Dmt T...

Страница 34: ...Web Configuration 32 PVC Auto Search Choose SETUP Internet Setup PVC Auto Search The page shown in the right figure appears This page is used to configure PVC auto detect function you can add or delet...

Страница 35: ...efault the network mode of the modem is AP SSID Set a name for the wireless network of your device Wireless stations associating to the modem must have the same SSID Channel Number A channel is the ra...

Страница 36: ...on the right In this page you can configure the security for your wireless network The following table describes the parameters of this page Field Description Encryption Configure the wireless encryp...

Страница 37: ...cters or Hex 10 characters If you choose 128 bit you can choose ASCII 13 characters or Hex 26 characters Default Tx Key Choose the index of WEP Key You can choose Key 1 Key 2 Key 3 or Key 4 Encryption...

Страница 38: ...1 Do not select Disable WPS 2 Click Start PIN button beside Pin Configuration 3 Input the Device PIN a random code displayed in this page in the WPS application interface of the client to be connecte...

Страница 39: ...low In the Time and Date page you can configure update and maintain the correct time on the internal system clock You can set the time zone that you are in and the network time protocol NTP server You...

Страница 40: ...ers The following table describes parameters in this page Field Description Authentication Type It is recommended to keep it as defaults Fragmentation Threshold Set the threshold of fragmentation leng...

Страница 41: ...ntercommunication Ethernet to Wireless Blocking Whether the wireless network can communicate with the Ethernet network or not Wifi Multicast to Unicast Enable it to using unicast to transmit multicast...

Страница 42: ...dvanced Wireless MBSSID This page allows you to configure the Virtual Access Points VAP Here you will be able to enable disable the Virtual Access Points VAP and set the SSID with the Authentication t...

Страница 43: ...n ACL Mode White List permit certain types of data packets from your local network or Internet network to the Gateway Black List block certain types of data packets from your local network or Internet...

Страница 44: ...access the router Services Allowed You can choose the following services from WAN Web Telnet SSH FTP TFTP SNMP or PING Add After setting the parameters click it to add an entry to the Current ACL Tab...

Страница 45: ...lication the default Trigger settings will populate the table below If the application you want to setup isn t listed click the User defined Application Name radio button and type in a name for the tr...

Страница 46: ...rvice to the specified server DMZ Choose ADVANCED DMZ to go to the right page The page shown as the figure appears on the right Since some applications are not compatible with NAT the device supports...

Страница 47: ...he time of router must be correct Please set the system time in SETUP Time and Date To set URL Block do as follow Step 1 Set the URL to be blocked To block all websites select Block Any URL To block a...

Страница 48: ...ure the time of router must be correct Please set the system time in SETUP Time and Date Schedules Choose ADVANCED Parent Control Schedules The page is shown as the figure appears on the right It allo...

Страница 49: ...ed on IPv4 protocol Entries in the table are used to restrict certain types of data packets through the gateway These filters are helpful in securing or restricting your local network For example sele...

Страница 50: ...Filter Options IPv6 Port Filter to go to the right page The page shown as the figure appears on the right The IP Port Filter in this page is based on IPv6 protocol For the parameter descriptions in t...

Страница 51: ...CED Filter Options MAC Filter to go to the right page Entries in the table are used to restrict certain types of data packets from your local network to Internet through the gateway These filters are...

Страница 52: ...Web Configuration 50 DoS Settings Choose ADVANCED DoS Settings A denial of service DoS attack is characterized by an explicit attempt by hackers to prevent legitimate users of a service from using tha...

Страница 53: ...name it asks another one and so on until the correct IP address is returned Choose ADVANCED DNS DNS The page shown in the figure appears on the right The DNS in this page is based on IPv4 protocol Th...

Страница 54: ...ddresses using DHCP so locating a specific host on the LAN using the standard DNS is difficult Choose ADVANCED Dynamic DNS The page is shown as the page appears on the right The following table descri...

Страница 55: ...e and the LAN interface to the same group The procedure for manipulating a mapping group is as follows Step 1 Select Enable to enable this function Step 2 Select a group from the table Step 3 Select i...

Страница 56: ...system acts as a proxy for its hosts after you enable it IP QoS Choose ADVANCED Network Tools IP QoS Entries in the QoS Rule List are used to assign the precedence for each incoming packet based on p...

Страница 57: ...P Select it to enable SNMP function You need to enable SNMP and then you can configure the parameters of this page Trap IP Address Enter the trap IP address The trap information is sent to the corresp...

Страница 58: ...ption Current Forbidden Software List A list of currently forbidden applications for accessing the network Add Forbidden Software Select an application to be forbidden from accessing the network ARP B...

Страница 59: ...the subnet mask of the destination device Next Hop Enter the IP address of the next hop in the IP route to the destination device Metric The metric cost for the destination Interface The interface fo...

Страница 60: ...enabled devices Interface Choose the router interface that uses RIP Recv Version Choose the interface version that receives RIP messages You can choose RIP1 RIP2 or Both Choose RIP1 indicates the rou...

Страница 61: ...ht Choose the NAT ALG and Pass Through options and then click Apply Changes NAT Exclude IP Choose ADVANCED NAT NAT Exclude IP The page shown in the figure appears on the right In the page you can conf...

Страница 62: ...The following table describes the parameters and buttons of this page Field Description Local IP Address Input a local IP address Remote IP Address Input a remote IP address Enable Enable the current...

Страница 63: ...re one WAN IP address for multiple computers on your LAN Choose ADVANCED NAT NAT IP Mapping The page shown in the figure appears on the right Entries in this table allow you to configure one IP pool f...

Страница 64: ...tion D Link DSL 224 User Manual 62 MAINTENANCE System Choose MAINTENANCE System The page shown in the figure appears on the right In this page you can reset your router backup settings and update the...

Страница 65: ...as follow Step 1 Obtain an updated firmware image file from your ISP Step 2 Enter the path of the image file located in the box or click the Browse button to locate the image file Step 3 Click the Upd...

Страница 66: ...rs on the right In this page you can change the username password and idle logout time Diagnostics Choose MAINTENANCE Diagnostics The Diagnostics section is used to diagnose the basic running and conn...

Страница 67: ...ht This page is used to display the system event log table By checking Error or Notice or both will set the log flag By clicking it will display the newest log information below Logout Choose MAINTENA...

Страница 68: ...assword and cannot remember it you will need to reset the Router to the factory default setting see question 2 which will set the password back to admin 2 How do I reset my Router to the factory defau...

Страница 69: ...nd password are correct 5 What can I do if my Router can t be detected by running the installation CD Step 1 Ensure the Router is powered on Step 2 Check that all the cables are firmly connected at bo...

Страница 70: ...he run box type cmd and click on the OK button At the prompt type ipconfig and press Enter This will display the IP address subnet mask and the default gateway of your adapter If the address is 0 0 0...

Страница 71: ...ght click on the Local Area Connection Ethernet LAN which represents your network adapter and select the Properties button Step 3 Highlight Internet Protocol TCP IP and click on the Properties button...

Страница 72: ...rate downstream up to 12 Mbps upstream up to 12 Mbps VDSL2 ADSL ADSL2 full rate downstream up to 24 Mbps upstream up to 1 Mbps Media Interface VDSL2 ADSL ADSL2 interface RJ 11 connector for connection...

Страница 73: ...pendix B Networking Basics 71 Packing List 1 x DSL 224 1 x External splitter 1 x Power adapter 1 x Telephone cables RJ 11 1 x Ethernet cable RJ 45 1 x Quick installation guide 1 x Warranty guide 1 x C...

Отзывы: