1. INSTALLATION AND USE
PRT 80
3
1-
•
Speed/Quality:
Normal
D
, Draft or High Quality.
•
Paper Autoload:
Deactivated
D
or Activated.
•
Reset buffer:
Not implemented, At paper end
D
.
•
Print density:
Normal
D
, Light, Very light, Dark, Very dark, Double copy.
General notes:
- The parameters marked with the symbol
D
are the default values.
- The
!
symbol indicates TPL 80 model.
- The
#
symbol indicates TPL 82.5 model.
- Settings remain active even after the printer has been turned off.
The settings made are stored in EEPROM (nonvolative memory).
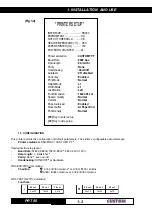
During power-up, if both the LINE FEED and FORM FEED keys are held down, the printer enters configuration
mode and prints-out the setup report; it will remain in standby until a key is pressed or characters are received
through the communication port (see Hexadecimal dump).
When the LINE FEED key is pressed, the printer skips the setup mode and terminates the Hexadecimal dump
function.
When the FORM FEED key is pressed, the printer enters the parameter entry mode.
1.4 HEXADECIMAL DUMP
This function is used to diagnose the characters received through the communication port; the characters are
printed out both as hexadecimal codes and ASCII codes.
Once the self-test routine has finished, the printer enters Hexadecimal Dump mode. The printer remains in
standby until a key is pressed or characters are received through the communication port.
For every 10 characters received, the hexadecimal and corresponding ASCII codes are printed out (if the
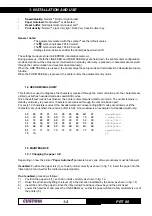
characters are underlined, the receive buffer is full). Shown below is an example of a Hexadecimal Dump:
48
65
78
61
64
65
63
69
6D
61
Hexadecima
6C
20
64
75
6D
70
20
66
75
6E
l dump fun
63
74
69
6F
6E
20
30
31
32
33
ction 0123
34
35
36
37
38
39
61
62
63
64
456789abcd
65
66
67
68
69
6A
6B
6C
6D
6E
efghijklmn
6F
70
71
72
73
74
75
76
77
78
opqrstuvwx
79
7A
yz
1.5 MAINTENANCE
1.5.1 Changing the paper roll
Depending on how the printer
“Paper Autoload”
parameter is set, one of two procedures must be followed:
If enabled:
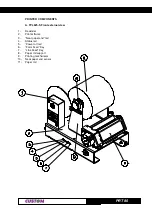
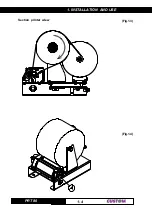
Position the paper roll (1), so that it unrolls correctly as shown in fig. 1.4; insert the paper into the
infeed slot (2) and wait for the roll to load automatically.
If not enabled,
proceed as follows:
1)
Position the paper roll (1), so that it unrolls correctly as shown in fig. 1.4;
2)
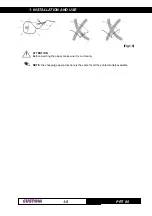
Raise the print head by lifting the lever (4) in the direction indicated by the arrow as shown in fig. 1.5;
3)
Insert the end of the paper roll into the infeed slot (2) and have it pass beyond the print head;
4)
Lower the head lever and press the LINE FEED key, so that the paper will feed a few centimeters out of
the printer (3).
Содержание PRT 80
Страница 1: ...PRT 80 Thermal printer for information kiosks and ATMs PRT 80 User Manual www custom it ...
Страница 6: ...TABLE OF CONTENTS PRT 80 ii Blank Page ...
Страница 14: ...1 INSTALLATION AND USE PRT 80 4 1 Section printer wiew Fig 1 3 Fig 1 4 ...
Страница 16: ...1 INSTALLATION AND USE PRT 80 6 1 Blank page ...
Страница 91: ...4 TECHNICAL SPECIFICATIONS PRT 80 3 4 4 2 DIMENSIONS Fig 4 1 Fig 4 2 Side view Front view B section view ...
Страница 92: ...4 TECHNICAL SPECIFICATIONS PRT 80 4 4 Fig 4 3 Top view Low view Fig 4 4 4 X M3 ...
Страница 94: ...5 CHARACTER SETS PRT 80 2 5 Blank page ...


