- 14 -
the appliance, as indicated on the data plate. If
you have any doubts, call in a qualified
technician.
If the socket and appliance plug are not
compatible, have the socket replaced with a suitable
model by a qualified technician. The latter will also
have to ensure that the cross section of the socket
cables is suitable for the power absorbed by the
appliance. The use of adapters, multiple sockets
and/or extensions, is not recommended. If their use
cannot be avoided, remember to use only single or
multiple adapters and extensions which comply with
current safety regulations. In these cases, never
exceed the maximum current capacity indicated on
the single adapter or extension and the maximum
power indicated on the multiple adapter. The plug and
socket must be easily accessible.
Connection with rigid pipe (cooper or steel)
Connection to the gas system must be made in such a
way as not to cause any stress of any kind on the
appliance. There is an adjustable L-shaped pipe fitting
on the supply ramp to the appliance, whose water
tightness is ensured by a seal. Should you need to turn
the pipe fitting, you must in all cases replace the seal
(provided with the appliance). The gas supply pipe
fitting is a threaded 1/2 gas cylindrical male
attachment.
Connecting a flexible joint-less stainless steel pipe to
a threaded attachment
The gas supply pipe fitting is a threaded 1/2 gas
cylindrical male attachment. Only use pipe and seals
that comply with the current National Norms. These
pipes must be installed so that their length is never
any longer than 2000mm when fully extended. Once
the connection has been made, ensure that the flexible
metal pipe does not touch any moving parts and is not
crushed.
Checking that the connection is tight
When installation is complete, check the pipe fittings
for leaks using a soapy solution. Never use a flame.
Adapting to different types of gas
To adapt the oven to a different type of gas with
respect to the gas for which it was manufactured
(indicated on the label), follow these simple steps:
a)
Replacing the oven burner nozzle
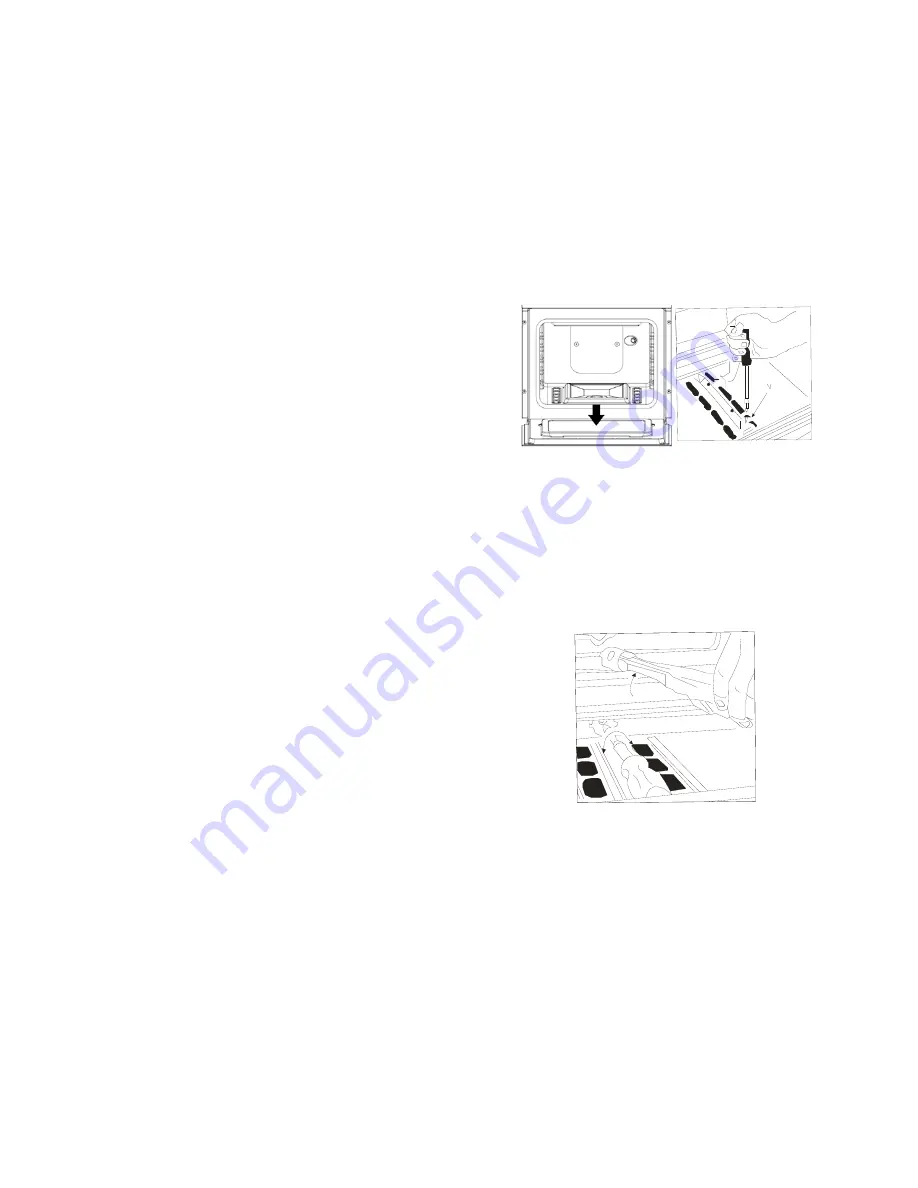
Open the oven door fully
Pull out the sliding oven bottom
Unscrew the burner fastening screws
Remove screw “V” and then the oven burner;
Unscrew the oven burner nozzle using the special
socket spanner for the nozzles, or a 7mm socket
spanner, and replace it with a nozzle suited to the
new type of gas (see Table 1)
Take care handing the spark plug wires
and the thermocouple pipes
Replace all the parts, following the steps
described above in the reverse order
Regulating the primary air for the oven
burner
b)
The burner was designed not to need any
adjustments to the primary air.
Minimum regulation of the oven door
c)
Regulate the oven burner minimum:
Turn the knob first to the
Max
setting for about
10 minutes and then to
Min;
Remove the knob
Remove the disk fastened to the control panel


