background image

- 9 - 

the countdown ends, the oven will continue to heat. You must turn off the oven/grill using 
the oven function and temperature control knob.


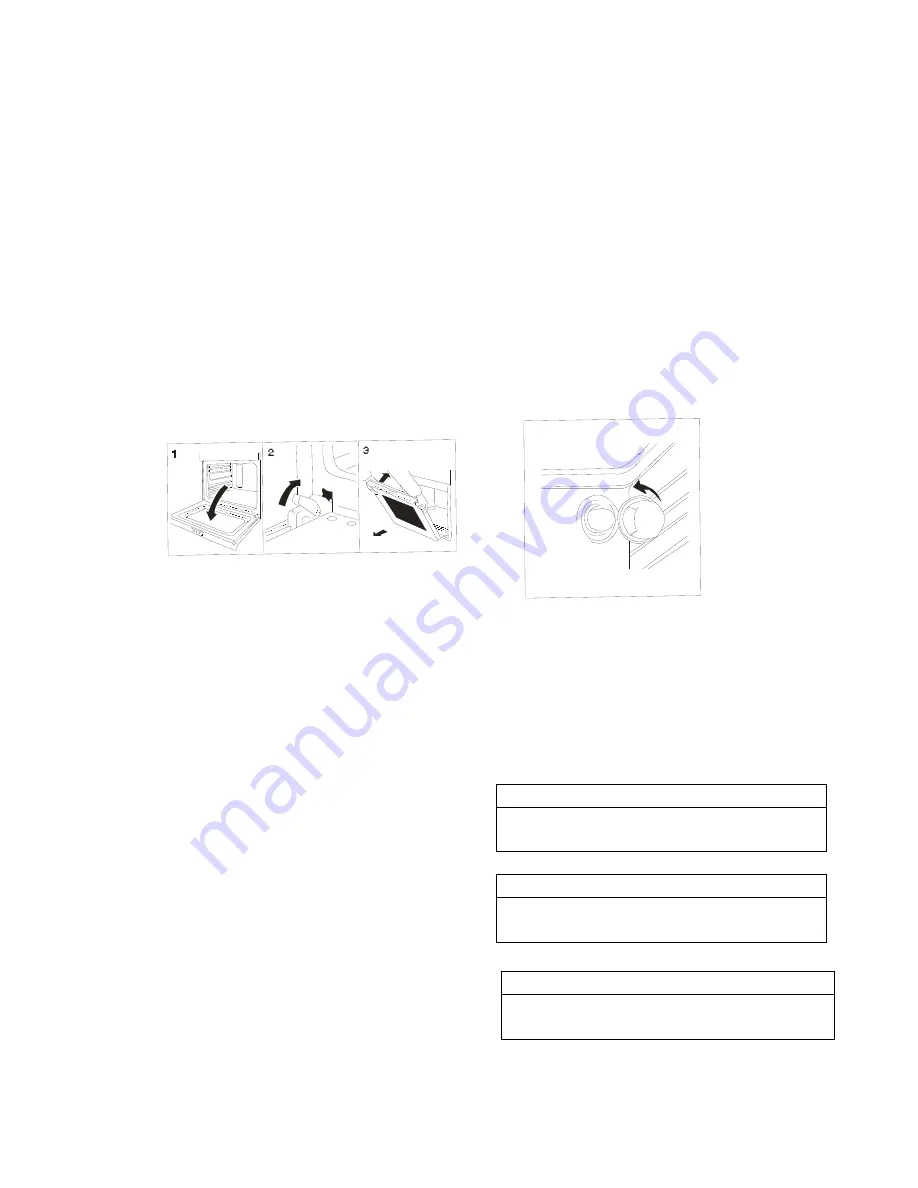
How to remove the oven door 

For  a  more  thorough  clean,  you  can  remove  the 
oven door. Proceed as follows: 

a)


open the door fully 

b)


lift and turn the small levers situated on the 
two hinges; 

c)


grip the door on the two external sides, shut 
it slowly but not completely; 

d)


pull  the  door  towards  you,  pulling  it  out  of 
its seat; 

Reassemble  the  door  by  following  the  above 
procedures backwards. 

Replacing the oven lamp 

a)


Disconnect the oven form the power supply 
by  means  of  the  unipolar  switch  used  to 
connect the appliance to the electrical mains; 
or  unplug  the  appliance  if  the  plug  is 

accessible; 

b)


Remove  the  glass  cover  of  the 

lamp-holder 
c)


Remove  the  lamp  and  replace  with 

a lamp resistant to high temperature (300) 
with the following characteristics: 


Voltage: 230/240V 


Wattage: 15W 


Type E14 

d)


    Replace  the  glass  cover  and       
reconnect  the  oven  to  the  mains 
power supply. 


Practical Cooking Advice 

The  oven  offers  a  wide  range  of  alternatives  which 
allow you to cook any type of food m the best possible 
way  with  time  you  will  learn  to  make  the  best  use  of 
this  versatile  cooking  appliance  and  the  following 
directions are only a guideline which may be varied per 
your own personal experience 

Baking Cakes 

When  baking  cakes1  always  place  them  in  the  oven 
after  it  has  been  preheated  (about  15  minutes)  The 
temperature is normally around 160'C. Do not open the 
door  while  the  cake  is  baking  to  prevent  it  from 
dropping, in general: 
 

Pastry is too dry   

Increase the temperature by 10℃ and reduce 
the time. 


Pastry dropped 

Use  less  liquid  or  lower  the  temperature 
by

10

℃ 

10


Pastry is too dark on top


Place it on a lower rack, lower increase the 
cooking time. 

Содержание UBGMMT60GF

Страница 1: ...1 Instruction Manual BUILD IN GAS OVEN UBGMMT60SS UBGMMT60GF...

Страница 2: ...the appliance If the symbol does not appear on the appliance If the symbol does not appear on the appliance it is necessary to refer to the technical instructions which will provide the necessary ins...

Страница 3: ...metal scrapers to clean the oven door glass since they can scratch the surface which may result in shattering of the glass e If the supply cord is damaged it must be replaced by the manufacturer its s...

Страница 4: ...n or instruction concerning use of the appliance in a safe way and understand the hazards involved Children shall not play with the appliance Cleaning and user maintenance shall not be made by childre...

Страница 5: ...els Notices The first time you use your appliance we recommend that you set the thermostat to the highest setting and leave the oven on for about half an hour with nothing in it with the oven door shu...

Страница 6: ...r failure the oven burner can be lit by hand a open the oven door b hold a match or lighter near the burner hold as shown in the figure press knob B in fully and turn it anticlockwise setting it to th...

Страница 7: ...he way and turn it setting it to the or position please refer to Operation for B Knob Cooling ventilation To cool down the temperature of their exterior some models are equipped with a cooling fan tha...

Страница 8: ...ounting down When the countdown ends the oven will continue to heat You must turn off the oven grill using the oven function and temperature control knob Adjusting the audible signal GB 56RCD EGB 56RC...

Страница 9: ...lamp and replace with a lamp resistant to high temperature 300 with the following characteristics Voltage 230 240V Wattage 15W Type E14 d Replace the glass cover and reconnect the oven to the mains po...

Страница 10: ...f room below use the low rack For savory especially duck and wild game dress the meat lard or bacon on the top Using the Grill Important always use the grill with the oven door shut This will allow yo...

Страница 11: ...n compliance with instructions provided The manufacturer declines all responsibility for improper installation which may harm persons and animals and damage property Important The power supply to the...

Страница 12: ...ture of the cylinder to the above 50 Prior to installation ensure that the local distribution conditions nature of the gas and gas pressure and the adjustment of the appliance are compatible The adjus...

Страница 13: ...amp and close the cover of the terminal board Connecting the supply cable to the mains Install a standardized plug corresponding to the load indicated on the data plate When connecting the cable direc...

Страница 14: ...ent The gas supply pipe fitting is a threaded 1 2 gas cylindrical male attachment Only use pipe and seals that comply with the current National Norms These pipes must be installed so that their length...

Страница 15: ...ary to fit a suitable pressure regulator onto the inlet pipe in compliance with the current National Norms regarding regulators for channeled gas Technical Specifications Inner dimensions of the oven...

Страница 16: ...kW 153 g h 20 220 24 0V 50 60 Hz 40 EGB 5 6RC EGB 5 6ERC EGB 5 6RCD 0 76 2 16 kW 158 g h 29 1 05 2 0 kW 145 g h 20 220 24 0V 50 60 Hz 2240 At 15 and 1013 mbar dry gas Propane Gross Heat Value 50 37MJ...

Отзывы: