

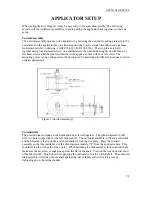

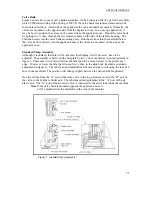


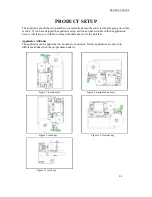
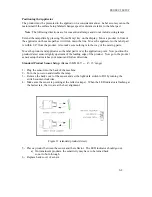

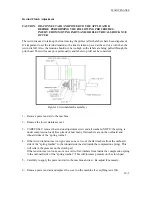


APPLICATOR SETUP
Label on Pad
With this option on, the controller will look for an input from a vacuum switch after the air assist
shuts off and the label on pad filter times out. If the vacuum switch is on then that means there is
a label on the pad and the label on pad output turns on. The output will stay on until the air blast
valve turns on. If the label falls off the pad anytime between when it first turned on and the air
blast valve, the output will turn off. An integrator will be able to monitor the air assist valve, air
blast valve and the label on pad output and determine if a label has been removed from the pad.
Note:
Vacuum switch is an option and is purchased separately
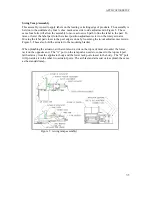
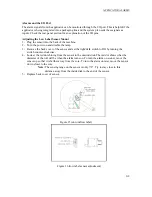
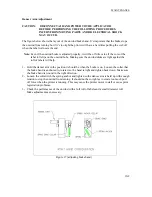
Vacuum Switch Setup
CTM # PE-SW1074
Set-up of threshold value:
With the back cover removed, labels sent down to printer and a label on the pad, take the printer
“offline” or on “pause”. Make note of the “value” on the pressure switch’s main “L.E.D. display.
For example, we will say the value is –2.0. Next, remove the label from the label pad. Make
note of the pressure switch’s main display “L.E.D.” value – example: -0.5. Add these two values
together: -2.0 + -.5 = -2.5, then divide by 2 = -1.2. This value (-1.2) is your “threshold value.
Enter this value in the sub display by the “up and down” arrow keys.
Note
: If the vacuum pressure is increased or decreased, you may have to adjust the “threshold”
value per above example
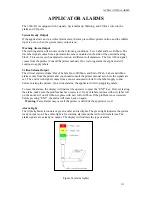
Vacuum-Off Option
This option is used to turn the vacuum to the label pad on and off to save air and to keep particles
from entering the pad when there is no label available. When the option is on, the vacuum will
turn on when the air assist is on and turns off at the beginning of the air blast. To turn this option
on, press “ENT” and the last word on the second line should start to flash. Use the arrow keys to
toggle between ‘On” and “Off”. When you get what you want, press “ENT”. Press “MENU” to
go to the next screen.
Note:
The applicators are pre-wired and logic is provided for this option but there is still some
hardware items needed to make this option work (i.e. valve bank). Please consult your distributor
for the necessary items when installing this option in the field.
Tamp Enabled/Disabled on Power-up
This option lets the operator chose whether the tamp is enabled or disabled on power-up. To turn
this option on, press “ENT” and the first line will begin to flash. Use the arrow keys to toggle
between “Tamp is Disabled” or “Tamp is Enabled”. When you get what you want, press “ENT”.
7-11
Содержание 3600-PA
Страница 8: ......
Страница 9: ......
Страница 10: ......
Страница 11: ......
Страница 12: ......
Страница 13: ......
Страница 14: ......
Страница 15: ......
Страница 16: ......
Страница 17: ......
Страница 66: ......
Страница 67: ......
Страница 68: ......
Страница 69: ......
Страница 70: ......
Страница 71: ......
Страница 72: ......
Страница 73: ......
Страница 74: ......
Страница 75: ......
Страница 76: ......
Страница 77: ......
Страница 78: ......
Страница 79: ......
Страница 80: ......
Страница 81: ......
Страница 82: ......
Страница 83: ......
Страница 84: ......
Страница 85: ......
Страница 86: ......
Страница 87: ......
Страница 88: ......
Страница 89: ......
Страница 90: ......
Страница 91: ......
Страница 92: ......
Страница 93: ......
Страница 94: ......
Страница 95: ......
Страница 96: ......
Страница 97: ......
Страница 98: ......
Страница 99: ......
Страница 100: ......
Страница 101: ......
Страница 102: ......
Страница 103: ......
Страница 104: ......
Страница 105: ......
Страница 106: ......
Страница 107: ......
Страница 108: ......
Страница 109: ......
Страница 110: ......
Страница 111: ......
Страница 112: ......
Страница 113: ......
Страница 114: ......
Страница 115: ......
Страница 120: ......
Страница 121: ......
Страница 122: ......
Страница 123: ......
Страница 143: ......
Страница 144: ......
Страница 145: ......
Страница 146: ......
Страница 147: ......
Страница 148: ......
Страница 149: ......
Страница 150: ......
Страница 151: ......
Страница 152: ......
Страница 153: ......
Страница 154: ......
Страница 155: ......
Страница 163: ...APPLY SEQUENCE Figure 28 c3 4 ...
Страница 164: ......
Страница 165: ......
Страница 166: ......
Страница 167: ......
Страница 168: ......
Страница 169: ......
Страница 170: ......
Страница 177: ......
Страница 178: ......
Страница 179: ......
Страница 180: ......
Страница 181: ......
Страница 182: ......
Страница 183: ......
Страница 184: ......
Страница 185: ......
Страница 186: ......
Страница 187: ......


