APPLICATOR SETUP
Ribbon Loading
1-
At the main menu, press the “Home/Tamp” key (refer to the applicator display section). This
will extend the tamp slide so the pad and manifold will not be in the way of opening the print-
head. If using the extended peel edge, disabling the tamp is acceptable.
2-
Open the printer cover.
3-
Refer to the printer manual for ribbon loading instructions.
Label Loading
1-
At the main menu, press the “Home/Tamp” key (refer to the applicator display section). This
will extend the tamp slide so the pad and manifold will not be in the way of opening the print-
head. If using the extended peel edge, disabling tamp is acceptable. Loosen the ratchet
handle that locks the outer unwind disk in place and remove disk.
2-
Load a roll of labels onto the hubs on the unwind shaft. Make sure the labels are against the
inner disk and are right side up.
3-
Remove the first three feet of labels from the liner.
4-
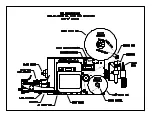
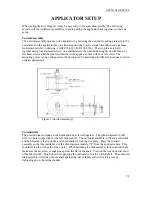
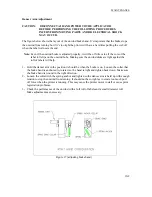
Thread the label stock around the dancer and guide rollers into the printer. Refer to Figure 6
for the web path from the unwind to the printer. Refer to the printer manual as to how to
thread the printer. Make sure the liner passes between the peel edge and the air assist tube.
Figure 6 (web path)
5-
Remove the rewind pin and wrap the liner over the rewind mandrel. Replace the rewind pin
and rotate the rewind mandrel to take the slack out between the rewind and printer.
6-
Make sure the labels track straight from the unwind into the printer. Adjust the inner unwind
hub if necessary.
7-
Bring the guide collars within 1/64” of the liner.
8-
Make sure the print head and any other latches are closed within the printer. Close the printer
cover.
7-6
Содержание 3600-PA
Страница 8: ......
Страница 9: ......
Страница 10: ......
Страница 11: ......
Страница 12: ......
Страница 13: ......
Страница 14: ......
Страница 15: ......
Страница 16: ......
Страница 17: ......
Страница 66: ......
Страница 67: ......
Страница 68: ......
Страница 69: ......
Страница 70: ......
Страница 71: ......
Страница 72: ......
Страница 73: ......
Страница 74: ......
Страница 75: ......
Страница 76: ......
Страница 77: ......
Страница 78: ......
Страница 79: ......
Страница 80: ......
Страница 81: ......
Страница 82: ......
Страница 83: ......
Страница 84: ......
Страница 85: ......
Страница 86: ......
Страница 87: ......
Страница 88: ......
Страница 89: ......
Страница 90: ......
Страница 91: ......
Страница 92: ......
Страница 93: ......
Страница 94: ......
Страница 95: ......
Страница 96: ......
Страница 97: ......
Страница 98: ......
Страница 99: ......
Страница 100: ......
Страница 101: ......
Страница 102: ......
Страница 103: ......
Страница 104: ......
Страница 105: ......
Страница 106: ......
Страница 107: ......
Страница 108: ......
Страница 109: ......
Страница 110: ......
Страница 111: ......
Страница 112: ......
Страница 113: ......
Страница 114: ......
Страница 115: ......
Страница 120: ......
Страница 121: ......
Страница 122: ......
Страница 123: ......
Страница 143: ......
Страница 144: ......
Страница 145: ......
Страница 146: ......
Страница 147: ......
Страница 148: ......
Страница 149: ......
Страница 150: ......
Страница 151: ......
Страница 152: ......
Страница 153: ......
Страница 154: ......
Страница 155: ......
Страница 163: ...APPLY SEQUENCE Figure 28 c3 4 ...
Страница 164: ......
Страница 165: ......
Страница 166: ......
Страница 167: ......
Страница 168: ......
Страница 169: ......
Страница 170: ......
Страница 177: ......
Страница 178: ......
Страница 179: ......
Страница 180: ......
Страница 181: ......
Страница 182: ......
Страница 183: ......
Страница 184: ......
Страница 185: ......
Страница 186: ......
Страница 187: ......


