Crestron CP4-R Скачать руководство пользователя страница 31


Product Manual – DOC. 8432A 

Crestron Pyng OS 2 for CP4-R  

  25 

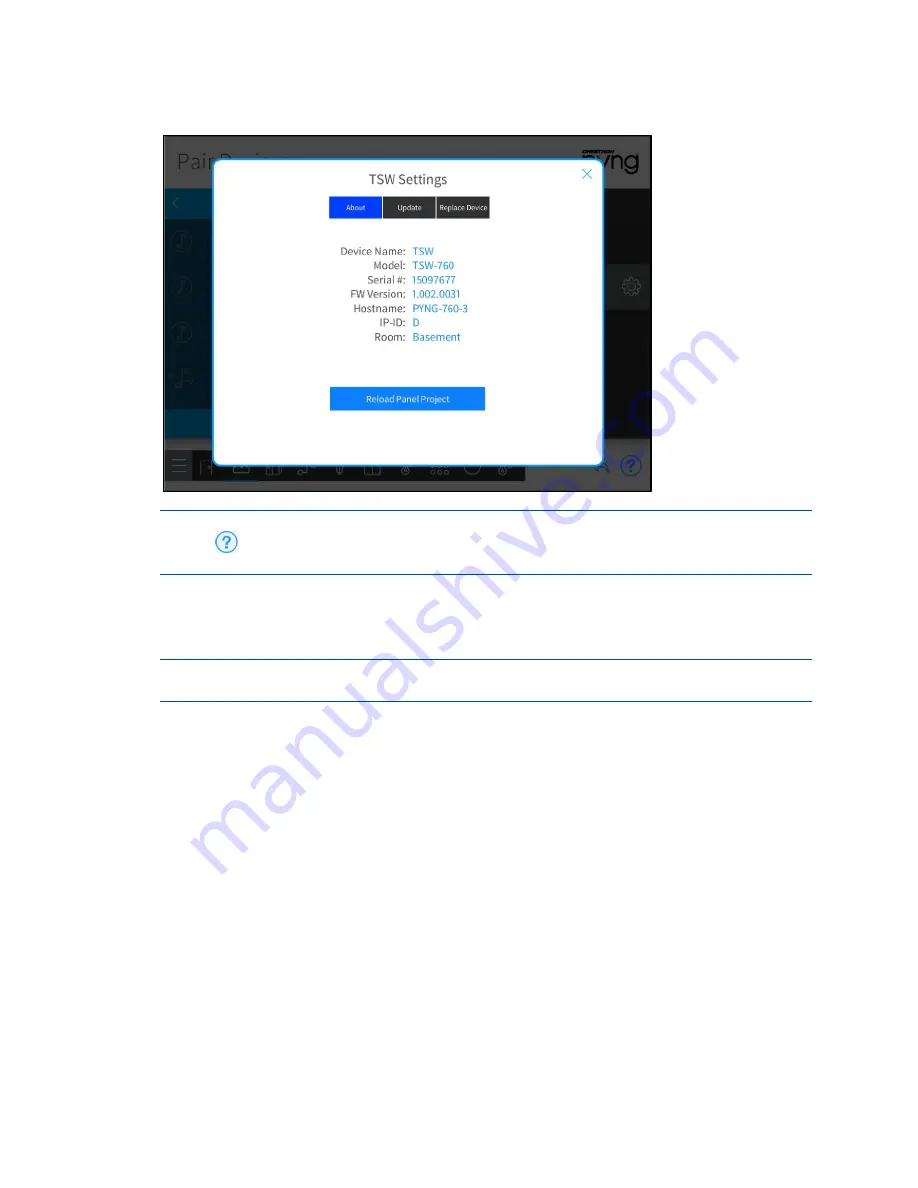
TSW Settings Dialog Box 


NOTE: 

For more information about configuring device-specific settings, click the help 

button 

 on the bottom of the device's settings dialog box (if available), or refer to the 

device documentation.


Tap the back arrow (<) next to a wired device to disassociate the device from the room. 

The device is removed from the room and is added back to the wired connection menu 

that was used to pair the device. 

NOTE: 

For most devices, removing the device from a room does not remove it from the 

entire system.


Tap the back arrow (<) next to a wired connection name to return to the Crestron Wired 

and Wi-Fi menu. 

Tap the back arrow (<) next to Crestron Wired and Wi-Fi to return to the Device Types 

menu. 


Содержание CP4-R

Страница 1: ...Crestron Pyng OS 2 for CP4 R Product Manual Crestron Electronics Inc ...

Страница 2: ...s DirecTV is either a trademark or a registered trademark of AT T Intellectual Property in the United States and or other countries Blu ray Disc and the Blu ray logo are either trademarks or registered trademarks of the Blu ray Disc Association BDA in the United States and or other countries IOS is either a trademark or a registered trademark of Cisco Systems Inc in the United States and or other ...

Страница 3: ...s 21 Pair Sonos Devices 26 Pair Third Party Devices 29 Pair Other Devices 35 Manage Gateways 41 Step 3 Build System 43 Shade Groups 44 Source Routes 47 Step 4 Create Scenes 53 Light Scenes 54 Shade Scenes 59 Media Scenes 64 Climate Scenes 67 Step 5 Customize Schedule 71 Actions Events 72 Scheduler 96 Thermostats 98 Installer Settings 101 System Configuration 102 Diagnostics 116 System Control Opti...

Страница 4: ...lume 175 Power the Media System 176 Locks 177 Security 178 Cameras 179 Door Stations 180 User Menu 182 Metrics 183 Settings 184 Touch Screen Settings 190 Quick Actions 193 Troubleshooting 194 Appendix A Sonos and Crestron Pyng Integration 195 Sonos Troubleshooting 197 Multiple Sonos Households Found 197 Desired Household Not Found 199 No Devices Found 201 No Online Devices Found 203 Speaker Pairs ...

Страница 5: ...R to MyCrestron 236 Appendix F Create and Upload a Custom Television Provider 238 Create a Channel JSON File 238 Create Channel Icon Image Files 239 Upload the Channel JSON and Icon Files to a Web Server 239 Create and Upload a Television Provider File 240 Appendix G Update Crestron Certified Drivers 242 Appendix H Connect to a 2N Door Station 244 Discover the 2N Device 245 Configure 2N Device Set...

Страница 6: ......

Страница 7: ...tron Pyng app raises or lowers the lights sets the thermostat to an ideal temperature and tunes in the media system to a favorite streaming service all with the touch of a button Crestron Pyng is designed to integrate with every Crestron system The onboard ports on the CP4 R can be used to set up media lights shades thermostats and locks in minutes Then program the rest of the devices in the syste...

Страница 8: ...dio Source Sharing Hybrid Grouping of Sonos and Sonnex Hybrid Grouping of Sonos and Sonnex Crestron Distribution Amplifiers Yes Yes Yes Video Handheld Remotes No Yes Yes Source Control No Yes Yes Display Control No Yes Yes A V Receivers No Yes Yes DigitalMedia Devices No Yes Yes DM NVX Devices No Yes Yes MyCrestron Dynamic DNS Service Automatic Backups Yes Yes Yes Monitoring Yes Yes Yes Lighting P...

Страница 9: ... GWEXER must be added 15 gateways may be added to the system with a recommended max of 50 devices per gateway RS 232 422 485 0 3 3 Relays 0 8 8 Digital I O Ports Analog In 0 8 8 Net Yes Yes Yes LAN Yes Yes Yes Devices Intentionally Not Supported TSW x52 Yes No No TS 1542 No No No TSD 2020 No No No DM MD 6X4 6X6 No Coming soon Coming soon CNX PAD8 BIPAD8 No No No RAM and CPU RAM 256 MB 1 GB 2 GB CP...

Страница 10: ...the CP4 R Crestron Pyng OS Maximum System Size Chart TYPE QUANTITY Touch Screens 16 Apps in Home 8 Remotes HR series 16 Remotes TSR series 8 Remotes per Room 2 Keypads 120 Active Audio Groups 4 Max Rooms in 1 Audio Group 20 Crestron Speaker Zones 32 Audio Sources 24 Sonos Speakers or Sonos CONNECT devices 16 Video Sources 32 Video Zones 32 Displays in a Room 1 Shades Drapes 100 Lighting Loads 300 ...

Страница 11: ...en 2 Tap the search field and enter the search term Crestron Pyng 3 Tap Search 4 Tap the Crestron Pyng app icon 5 Follow the prompts to download and install the app to the device Set Up the Crestron Pyng System Once the Crestron Pyng app is downloaded and installed system setup takes place entirely through the app NOTES The Crestron Pyng system may also be configured on a computer using the CP4 R ...

Страница 12: ...CP4 R automatically and a splash screen is displayed Crestron Pyng Splash Screen NOTE If the Crestron Pyng app does not connect to the CP4 R automatically enter the CP4 R s hostname and tap Connect The default hostname for a CP4 R is CP4 R xxxxxxxx where xxxxxxxx is the last eight digits of the device s MAC address excluding punctuation The MAC address label is located on the bottom or rear of the...

Страница 13: ... setup screen and that provide instructional videos The iPad device or setup device must be connected to the network to access videos Tap the BACK button at any point during the setup process to return to the previous screen 3 Swipe through the provided options to select a language that will be displayed by the system 4 Tap the NEXT button The Step 2 Setup System Information screen is displayed ...

Страница 14: ... tap the Synchronize with iPad button to synchronize the time zone longitude and latitude automatically with the iPad device s location services c Date Tap the wrench button to display spinners for selecting the month day and year d Time Tap the wrench button to display spinners for selecting the hour and minute buttons and for selecting AM or PM e Time Zone Tap the wrench button to display a menu...

Страница 15: ...dealer responsible for the installation NOTE Confirm that the dealer information is entered correctly as this information is needed to place custom engraving orders through the Crestron Pyng system d Dealer Password Enter an installer password for accessing the advanced system setup and configuration pages in installer configuration mode CAUTION Do not lose the installer password as the system mus...

Страница 16: ...pplication 10 Tap the I accept the terms of the agreement check box to accept the legal agreement 11 Tap the Get Started button to complete the initial setup procedure and to display the main Setup page An existing Crestron Pyng OS 2 system that was created for a CP3 R can be transferred manually to a CP4 R For more information refer to Appendix I CP3 R to CP4 R Manual Upgrade on page 252 ...

Страница 17: ...its respective button on the Setup screen 1 Build Your House 2 Pair Devices 3 Build System 4 Create Scenes 5 Customize Schedule Each configuration step is described in the sections that follow Tap the menu button on any of the setup screens to display a menu for navigating quickly through the screens Tap on a button in the menu to access its respective setup screen Tap the menu button again to hid...

Страница 18: ...e gear button to display the Installer Settings screen to configure advanced Crestron Pyng system settings For more information on the Installer Settings screen refer to Installer Settings starting on page 101 Tap the door button to leave installer configuration mode and to enter user control mode For more information of user control mode refer to Operation starting on page 151 To access the insta...

Страница 19: ...enu 2 If necessary make any modifications to the room name in the lower left text box NOTE Two rooms may not use the same name The system rejects the new room if the room has the same name as one that has already been added 3 Tap the plus button to add the room To edit an existing room select the room from the Current House menu The following options are provided for each room To edit the room nam...

Страница 20: ...tive name for the room group and then tap OK Once a room group has been added select the check box to the left of the group name to add the room to that group The following options are provided for each room group Tap the room group name and then use the on screen keyboard to edit the room name Tap the information button to view all the rooms added to the group Tap the trashcan button to delete th...

Страница 21: ...Room Configuration Dialog Box Voice Control Tab Tap Enable to enable voice control for the room or tap Disable to disable voice control for the room NOTE For more information about setting up voice control on the Crestron Pyng system refer to Voice Control Settings on page 124 Tap the x button to return to the Build House screen On the Build House screen tap the back arrow button to return to the ...

Страница 22: ...led after it is paired This process establishes automatic scenes such as All On and All Off and enables adding the device to a programmed action or event NOTE For a comprehensive list of devices that are supported by Crestron Pyng refer to the Crestron Pyng product page at www crestron com en US Products Featured Solutions Crestron Pyng Support for new devices is added to the system via firmware u...

Страница 23: ...n EX Gateway NOTES A wireless gateway such as the CEN GWEXER must be installed and configured on the network prior to pairing devices For more information refer to the gateway documentation If a TSR 310 will be added to the system ensure that the TSR 310 is connected to a WAP that is in Crestron s list of recommended WAP brands For more information and a complete list of brands refer to the TSR 31...

Страница 24: ...Stop Pairing to remove the selected gateway from acquire mode To associate a paired wireless device with a room 1 Select the room where the device is installed from the Select a room menu Refer to the image above 2 Select the device from the wireless gateway s menu Pair Devices Screen EX Gateway ...

Страница 25: ...an button to delete the device from the gateway The device must be reacquired if it needs to be added back to the system 3 Tap the plus button to add the device to the room selected in step 1 4 Enter a descriptive name for the device in the text field that is displayed 5 Tap OK The device is added to the room Pair Devices Screen EX Gateway After a wireless device is associated with a room tap the ...

Страница 26: ...umentation Tap the back arrow next to a wireless device to disassociate the device from the room The device is removed from the room and is added back to the gateway menu that was used to pair the device NOTE For most devices removing the device from a room does not remove it from the entire system Tap the back arrow next to a gateway name to return to the Select Gateway Below menu Tap the back ar...

Страница 27: ...aded to the device If a TSR 310 is added to the system and is placed in Performance UI mode the Performance UI software is displayed on the TSR 310 For more information refer to the Performance UI for TSR 310 Operations Guide 8410 at www crestron com manuals 1 Select Crestron Wired and Wi Fi from the Device Types menu Pair Devices Screen Crestron Wired and Wi Fi 2 Select a wired connection from th...

Страница 28: ...ce with connected outputs such as a SWAMP series audio expander or a DM MD series video switcher tap the device represented by a folder icon to view all of the available outputs that may be added to a room Pair Devices Screen DM MD32x32 If necessary tap Rescan to rescan the selected network for any unpaired wired devices ...

Страница 29: ...rnet and Wi Fi 3 Tap the plus button to add the device to the room selected in step 1 NOTE Tap the location button to turn on the location feature for the device if supported which is used to locate the device in the room 4 Enter a descriptive name for the device in the text field that is displayed 5 For DM NVX devices select whether the device will be configured as a receiver audio input or outpu...

Страница 30: ...n tap OK For new DM NVX devices the default username and password are both admin For more information on configuring a DM NVX device on the network refer to https support crestron com app answers answer_view a_id 5861 loc en_US After a wired device is associated with a room tap the gear button next to the device name to display a Settings dialog box which is used to configure device settings The s...

Страница 31: ... the back arrow next to a wired device to disassociate the device from the room The device is removed from the room and is added back to the wired connection menu that was used to pair the device NOTE For most devices removing the device from a room does not remove it from the entire system Tap the back arrow next to a wired connection name to return to the Crestron Wired and Wi Fi menu Tap the ba...

Страница 32: ...ork for any Sonos devices NOTE All Sonos devices must be discovered and configured using the Sonos app prior to pairing them with the Crestron Pyng system Discovered Sonos devices display underneath the Sonos menu Pair Devices Screen Sonos To associate a paired Sonos device with a room 1 Select the room where the Sonos device is installed from the Select a room menu 2 Tap the plus button next to t...

Страница 33: ...e Sonos device is added to the room If necessary tap Rescan to rescan the network for unpaired Sonos devices After a Sonos device is associated with a room tap the gear button next to the device name to display a Settings dialog box which is used to configure device settings Sonos Device Settings Screen ...

Страница 34: ...ick the help button on the bottom of the device s settings dialog box or refer to the device documentation Tap the back arrow next to a Sonos device to disassociate the device from the room The device is removed from the room and is added back to the Sonos menu Tap the back arrow next to Sonos to return to the Device Types menu ...

Страница 35: ...vice with an auto off timer is paired with the system the device may turn itself off while the room remains on This behavior causes the device to power on and become out of sync with the room after the room is powered off Pair Devices Third Party Devices Crestron Certified Drivers for third party devices are added automatically to the system after they become certified Additionally custom device d...

Страница 36: ... DOC 8432A Pair Devices Cable Box 2 Select the device manufacturer from the device type menu The menu for DirecTV cable boxes is shown below Pair Devices DirecTV 3 Select a room from the Select a room menu where the third party device is installed ...

Страница 37: ... Certified device driver refer to Appendix G Update Crestron Certified Drivers on page 242 5 Enter a descriptive name for the device in the pop up dialog box that is displayed 6 Configure the provided transport settings used for device communication For IR serial and CEC controlled devices select a control port from the list of available ports Pair Devices IR Device Configuration NOTE IP devices m...

Страница 38: ...ted devices the device s IP table must be configured manually before it reports as online Refer to the image below Pair Devices Crestron Connected Device Configuration 7 For cable boxes select a television provider from the list if it has already been added for another cable box or tap Add New to add a new provider ...

Страница 39: ... R 33 Pair Devices Please choose TV provider 8 Add a new television provider if necessary a Select a country and a zip postal code to display a list of available providers b Select a provider from the list and then tap Add Pair Devices Select a Provider ...

Страница 40: ...ces must be created manually and uploaded with the drive package file For more information refer to Appendix C Create and Upload Custom Driver Files on page 213 After a third party device is associated with a room tap the gear button next to the device name to display a Settings dialog box which is used to configure device settings The settings dialog box for a cable box is shown below Cable1 Sett...

Страница 41: ...ton 3 Enter a descriptive name for the device 4 Tap OK The device is added to the room NOTES Uncontrolled and relay controlled devices must be connected to the appropriate hardware in order to function properly in the system Set up and test connections for applicable devices in the device s settings screen The status of controlled devices is not reported by the system The device status must be ver...

Страница 42: ...d from the room Tap the back arrow next to Other to return to the Device Types menu Configure a Relay Controlled Device To configure a relay controlled device with the Crestron Pyng system NOTE The relay device must be installed in the room and wired to the relay port of a paired control device in order to function properly For more information refer to the relay device s documentation 1 Select th...

Страница 43: ...Product Manual DOC 8432A Crestron Pyng OS 2 for CP4 R 37 Fireplace1 Settings About Tab 3 Tap the Setup tab Fireplace1 Settings Setup Tab ...

Страница 44: ... to set a hardware connection for the selected behavior Fireplace1 Off Hardware Connection NOTE The appropriate devices must be added to the system prior to configuring a hardware connection a Select the appropriate input port from the provided options b If applicable select the sensor monitoring state On or Off c If applicable select the sensor contact states when turning off the relay device Con...

Страница 45: ...led in the room and wired to a paired control device in order to function properly For more information refer to the sensor device documentation 1 Select the room where the sensor device is installed from the Select a room menu 2 Tap the gear button next to the sensor device The Settings dialog box for the sensor device is displayed Alarm1 Settings About Tab 3 Tap the Setup tab ...

Страница 46: ...ect a device function from the Digital Input Configuration menu 5 Tap the gear button next to an input to set a hardware connection for the selected function Alarm1 Label Hardware Connection NOTE The appropriate devices must be added to the system prior to configuring a hardware connection ...

Страница 47: ...ice function s The hardware connection for the device function s must be configured before they may be tested Manage Gateways Tap Manage Gateways in the Device Types menu to scan the local network for any gateways that may be added to the Crestron Pyng system Discovered gateways appear under the Gateways on Network menu Gateways Screen Tap the plus button next to a discovered gateway to add it to ...

Страница 48: ...ay The device name serial number device components such as keypad or dimmer and their locations in the house and the network status are displayed for each device Tap the Channel tab to view and configure the RF channel assigned to the gateway For more information about assigning an RF channel refer to the gateway s documentation NOTE Removing a gateway also removes all devices acquired by that gat...

Страница 49: ...m button on the Setup screen to display the Build System screen Build System Screen Use the Build System screen to group multiple shade motors together and to configure audio and video source routing behavior for the Crestron Pyng system Tap the back arrow button to return to the main Setup screen ...

Страница 50: ...Rooms menu to view all of the shade motors configured for that room The user defined name the direction the associated window is facing and the fabric type are displayed for each shade motor Shades motors that share the same window facing direction the same fabric type or both are grouped together automatically From this point forward the shade groups will appear in the configuration steps instead...

Страница 51: ...or Shade Dialog Box Group Tab Tap the Group tab to change the window facing direction and the fabric type for the shade motor The following configuration options are provided Window Facing Select the direction that the shade motor s associated window is facing Shade Type Select the fabric type of the shade controlled by the shade motor Tap the Voice Control tab to enable or disable the ability to ...

Страница 52: ...o Voice Control Settings on page 124 The following configuration options are provided Enable Status Select whether voice control is enabled or disabled for the shade motor Description Enter a description for the voice control command that appears in the voice control application Tap Save on the Group tab to save any changes On the Shade Groups screen tap the back arrow button to return to the Buil...

Страница 53: ...creen to configure audio and video source routing behavior for the Crestron Pyng system Media sources and content items may be routed to the appropriate endpoints in one or more rooms across the system Rooms may also be defined as media zones so that the room s media sources may be controlled from the user control interface Select a room from the left screen menu to view all media devices for the ...

Страница 54: ...ny device ports that have been assigned to a channel Source Routes Screen Test Crestron Connected The following source routing options may be configured Tap on an input or output channel to assign an available media device port to the selected channel Tap the diagonal arrow button to the left of an input channel name to navigate to the input device s source routing selections Tap the diagonal arro...

Страница 55: ...vice s documentation when configuring source routes to determine the appropriate inputs to use for routing If the audio signal for a video source is routed to a SWAMP audio expander endpoint the audio signal will lag behind the video signal by a few seconds when the source is selected This behavior occurs because the SWAMP device is warming up Tap the gear button next to an audio input or output c...

Страница 56: ...so be configured for the media zone Rooms configured as media zones may be controlled by the TSR 310 user interface For more information refer to the Performance UI for TSR 310 Operations Guide Doc 8410 at www crestron com manuals The following options may be viewed and configured for the media zone Tap the Connections tab to view and configure the media device inputs that are available for the ro...

Страница 57: ... select the media sources that may be controlled from the room o Tap the checkbox next to a source name to enable or disable the source from appearing as a selectable item in the user control interface for the room o A filled check box indicates that the source may be selected for the room NOTE Tap and hold a media source in the Allowed Sources menu until it turns green to move it up or down in th...

Страница 58: ...Preferred Routing Use the Source menu to select the media source that will be routed to an audio endpoint Use the Audio Endpoint menu to select the preferred audio endpoint once a media source has been selected On the Source Routes screen tap the back arrow button to return to the Build System screen ...

Страница 59: ...Scenes are preset configurations for different device types that create a specific ambiance or perform a specific function when recalled Scenes may be recalled from keypads touch screens and scheduled or triggered events For more information on programming buttons and events to recall scenes refer to Actions Events on page 72 NOTE Each room may contain up to 24 scenes for each scene type For examp...

Страница 60: ... Pyng system creates All On and All Off scenes for every room with a lighting load Additionally All On and All Off scenes are created automatically for the whole house after the first lighting load has been added to the system NOTE Lighting scenes may also be created and configured by the homeowner in user control mode Refer to Create a New User Lighting Scene on page 153 Create New Lighting Scene...

Страница 61: ...t to the lighting scene name Configure Lighting Scenes A lighting scene may be configured and tested after it has been added to the system Use the List of Scenes menu to select a lighting scene for configuration Light Scenes Screen List of Scenes Menu The following configuration options are displayed next to the lighting scene selection Tap the play button to recall the lighting scene in real time...

Страница 62: ...ng load 0 o Tap the right lightbulb button to set a lighting load to its maximum brightness 100 o Use the slider to adjust the brightness level incrementally for lighting loads with dimmers NOTE Lighting loads may also be adjusted using the dimmers or switches configured to control the lighting load Fade Time Select the duration that a lighting scene fades in after being recalled and fades out aft...

Страница 63: ...ng load to add or remove it from the scene A filled check box indicates that load has been added to the scene 3 Tap Save to save any changes or Cancel to discard the changes Any new lighting loads added to the scene may be adjusted in the Lighting Loads section of the scene configuration dialog box Once all changes have been made tap Save to save any changes to the lighting scene or tap Cancel to ...

Страница 64: ... In Dialog Box Tap the check box next to a room name to make the lighting scene visible in that room A filled check box indicates that the lighting scene is visible and may be recalled from a control device in the room such as a touch screen Tap Save to save any changes Tap the trashcan button to delete the lighting scene Tap the back arrow button to return to the Setup Scenes screen ...

Страница 65: ...Pyng system creates All Open and All Closed scenes for every room with a shade group Additionally All Open and All Closed scenes are created automatically for the whole house after the first shade motor has been added to the system NOTE Shade scenes may also be created and configured by the homeowner in user control mode Refer to Create a New User Shade Scene on page 158 Create New Shade Scenes To...

Страница 66: ...ne may be configured and tested after it has been added to the system Use the List of Scenes menu to select a shade scene for configuration Shade Scenes Screen List of Scenes Menu The following configuration options are displayed next to the shade scene selection Tap the play button to recall the shade scene in real time Tap the wrench button to edit the shade groups that are affected by the scene...

Страница 67: ...or lower the shade incrementally Tap Full Open or Full Close to open or close the shade fully The icon to the left of each shade load shows the percentage that the shade group is open in real time NOTE Shade loads may also be adjusted using the shade motor controls or using keypads configured to control the shade motors Tap Add Remove Loads to add shade groups from different rooms or to remove exi...

Страница 68: ... or remove it from the scene A filled check box indicates that shade group has been added to the scene 3 Tap Save to save any changes or Cancel to discard the changes Any new shade groups added to the scene may be adjusted in the Shade Loads Groups section of the scene configuration dialog box Once all changes have been made tap Save to save any changes to the lighting scene or tap Cancel to disca...

Страница 69: ...cene In Dialog Box Tap the check box next to a room name to make the shade scene visible in that room A filled check box indicates that the shade scene is visible and may be recalled from a control device in the room such as a touch screen Tap Save to save any changes Tap the trashcan button to delete the shade scene Tap the back arrow button to return to the Setup Scenes screen ...

Страница 70: ...reate media scenes for the entire house Media scenes are used to control source routing and on off behavior for various media zones in the home Create New Media Scenes To create a new media scene 1 Tap the plus button next to Whole House in the List of Rooms menu Refer to the image above 2 Enter a descriptive name for the media scene in the dialog box that is displayed 3 Tap OK The new media scene...

Страница 71: ... Scenes menu to select a media scene for configuration Media Scenes Screen List of Scenes Menu The following configuration options are displayed next to the media scene selection Tap the play button to recall the media scene in real time Tap the wrench button to view and configure the media zone behavior for the media scene A dialog box for editing scene settings is displayed ...

Страница 72: ...rce will be routed when the scene is triggered A filled checkbox to the left of the room name indicates that the room is selected NOTE A room must be configured as a media zone before it can be selected for a media scene For more information refer to Configure a Media Zone on page 50 o Tap Select All to select all available rooms o Tap Deselect All to deselect all available rooms Tap Save at the b...

Страница 73: ...d to the system Climate scenes are used to configure predefined temperature set points or modes for a thermostat when recalled Climate scenes are ideal for changing the HVAC system parameters during specified times of day Create New Climate Scenes To create a new climate scene 1 Tap the plus button next to Whole House in the List of Rooms menu Refer to the image above 2 Enter a descriptive name fo...

Страница 74: ...enes menu to select a climate scene for configuration Climate Scenes Screen List of Scenes Menu The following configuration options are displayed next to the climate scene selection Tap the play button to recall the climate scene in real time Tap the wrench button to view and configure the thermostat behavior for the climate scene A dialog box for editing scene settings is displayed ...

Страница 75: ...hermostat schedule o Select Hold to have the scene stop the thermostat schedule o Select Unaffected to have the scene keep the current thermostat schedule NOTE If the thermostat schedule is running because Run or Unaffected was triggered by the scene the next scheduled climate event will overwrite the climate scene s set points Fan Select one of the following fan behavior options o Select Auto to ...

Страница 76: ...p the current thermostat mode Adjust Setpoint s If this checkbox is selected the scene adjusts the set points for Heat Cool and Auto modes to the chosen temperature values Select the temperature set point for each mode from the appropriate spinner menu Tap Save at the bottom of the screen to save changes or tap Cancel to discard changes Tap the trashcan button to delete the climate scene Tap the b...

Страница 77: ...lay the Configuration screen Configuration Screen Use the Configuration screen to create and schedule system events that are triggered when specific conditions are met such as by pressing a button or triggering a system event Thermostat events may also be configured using this screen Tap the back arrow button to return to the main Setup screen ...

Страница 78: ...ns Scenes and other actions may be programmed to occur when a button is pressed or a system event is triggered NOTE The same basic configuration settings are provided for each item although some settings are added or removed for different device types and models Refer to the following sections for specific information on each configurable device To select an item for configuration 1 Select the roo...

Страница 79: ...stron Pyng For more information refer to the HZ KPCN Installation Guide Doc 8285 at www crestron com manuals Actions Events Screen Basement Keypad1 Use the keypad configuration screen to configure keypad button colors and layout to create custom keypad button labels and to program keypad buttons to recall scenes and other actions The following configuration options are provided Tap the location bu...

Страница 80: ...tions Events Screen Color Tab When custom engraved keypad buttons are ordered through MyCrestron the button color is generated automatically based on the selected color NOTE Confirm that the keypad color selected with the Color tab matches the actual keypad color before ordering custom engraved buttons ...

Страница 81: ...m button layout for the keypad Actions Events Screen Layout Tab Tap Learn Layout to display options for teaching the keypad a custom button layout NOTE Install the custom buttons on the keypad prior to making this selection Tap Done to confirm the new layout once it has been assigned to the keypad ...

Страница 82: ...eypad button NOTE For more information on ordering custom labels using the MyCrestron service refer to MyCrestron Services on page 113 Tap Text to create custom text labels for the keypad button o Enter the desired label text in the text box using the on screen keyboard o Tap OK to save the label NOTE For larger buttons select the check box next to Display as Two Lines to separate the label text f...

Страница 83: ...he Mode drop down menu to select the type of action that is recalled by pressing the keypad button such as Scene o If a compatible mode is selected use the Button Behavior drop down menu to set the keypad button behavior for recalling the selected action o If Scene is selected for Mode use the Feedback Behavior drop down menu to set the feedback behavior for recalling the scene o If Scene is selec...

Страница 84: ...k box next to an action to add or remove that action from the keypad button A checked box indicates that the action is set to occur when the button is pressed o Tap the back arrow next to the room name to return to the Select Room Below menu NOTE Only rooms that contain selectable actions appear on the Select Room Below menu Once an action is selected from a room the room name is shown with blue t...

Страница 85: ...or is generated automatically based on the selected color NOTE Confirm that the remote color selected with the Color tab matches the actual remote color before ordering custom engraved buttons Tap the Layout tab to configure a custom button layout for the remote Actions Events Screen Layout Tab Tap Learn Layout to display options for teaching the remote a custom button layout NOTE Install the cust...

Страница 86: ...ring custom labels using the MyCrestron service refer to MyCrestron Services on page 113 Tap Text to create custom text labels for the remote button o Enter the desired label text in the text box using the onscreen keyboard o Tap OK to save the label NOTES For larger buttons tap the check box next to Display as Two Lines to separate the label text for the button into two lines Tap the check box ne...

Страница 87: ... be provided depending on the selected mode o Use the Mode drop down menu to select the type of action that is recalled by pressing the remote button such as Scene o If a compatible mode is selected use the Button Behavior drop down menu to set the remote button behavior for recalling the selected action o If Scene is selected for Mode use the Feedback Behavior drop down menu to set the feedback b...

Страница 88: ...nel o Tap the check box next to an action to add or remove that action from the remote button A checked box indicates that the action is set to occur when the button is pressed o Tap the back arrow next to the room name to return to the Select Room Below menu NOTE Only rooms that contain selectable actions appear on the Select Room Below menu Once an action is selected from a room the room name is...

Страница 89: ...ered such as Scene o If a compatible mode is selected use the Button Behavior drop down menu to set the occupancy event behavior for recalling the selected action o If Scene is selected for Mode tap the check box next to Enable Time of Day Actions to enable setting actions based on the time of day Use the right screen panel to associate an action with the occupancy event NOTE The same action or sc...

Страница 90: ...turn to the Select Room Below menu NOTE Only rooms that contain selectable actions appear on the Select Room Below menu Once an action is selected from a room the room name is shown with blue text in the Select Room Below menu Configure Door Locks Select a door lock from the Select an Item menu to display a configuration screen for the door lock Actions Events Screen Basement Lock Use the door loc...

Страница 91: ...ered such as Scene o If a compatible mode is selected use the Button Behavior drop down menu to set the door lock event behavior for recalling the selected action o If Scene is selected for Mode tap the check box next to Enable Time of Day Actions to enable setting actions based on the time of day Use the right screen panel to associate an action with the door lock event NOTE The same action or sc...

Страница 92: ...ction is selected from a room the room name is shown with blue text in the Select Room Below menu Configure Security Systems Select a security system from the Select an Item menu to display a configuration screen for the security system Actions Events Screen Basement Security System NOTE Security systems must be connected to a PYNG CONNECT COM device before they may be discovered by the Crestron P...

Страница 93: ...gered such as Scene o If a compatible mode is selected use the Button Behavior drop down menu to set the security event behavior for recalling the selected action o If Scene is selected for Mode tap the check box next to Enable Time of Day Actions to enable setting actions based on the time of day Use the right screen panel to associate an action with the security event NOTE The same action or sce...

Страница 94: ...return to the Select Room Below menu NOTE Only rooms that contain selectable actions appear on the Select Room Below menu Once an action is selected from a room the room name is shown with blue text in the Select Room Below menu Configure Alarms Select an alarm device from the Select an Item menu to display a configuration screen for the alarm Actions Events Screen Dressing Room Alarm 1 Use the al...

Страница 95: ...ggered such as Scene o If a compatible mode is selected use the Button Behavior drop down menu to set the alarm event behavior for recalling the selected action o If Scene is selected for Mode tap the check box next to Enable Time of Day Actions to enable setting actions based on the time of day Use the right screen panel to associate an action with the alarm event NOTE The same action or scene ma...

Страница 96: ...n selectable actions appear on the Select Room Below menu Once an action is selected from a room the room name is shown with blue text in the Select Room Below menu Configure Media Zones Select an media zone from the Select an Item menu to display a configuration screen for the media zone Actions Events Screen Dressing Room Media Zone Events NOTE For more information on configuring media zones ref...

Страница 97: ...ene o If a compatible mode is selected use the Button Behavior drop down menu to set the media zone event behavior for recalling the selected action o If Scene is selected for Mode tap the check box next to Enable Time of Day Actions to enable setting actions based on the time of day Use the right screen panel to associate an action with the media zone event NOTE The same action or scene may be as...

Страница 98: ...Select Room Below menu Once an action is selected from a room the room name is shown with blue text in the Select Room Below menu Configure Macro Buttons Select Whole House from the Select a Room menu and then select Macro Buttons from the Select an Item menu to display a configuration screen for macro buttons quick actions Actions Events Screen Whole House Macro Buttons NOTE Each Crestron Pyng sy...

Страница 99: ...ttings for the selected macro button o Enter a new macro button name or edit the existing macro button name in the text box at the top of the screen o Tap Enable or Disable next to Enable Status to enable or disable the ability to trigger the macro button with voice control NOTE For more information on configuring voice control for the Crestron Pyng system refer to Voice Control Settings on page 1...

Страница 100: ...ing on the selected mode o Use the Mode drop down menu to select the type of action that is recalled when the macro button is triggered such as Scene o If a compatible mode is selected use the Button Behavior drop down menu to set the macro button behavior for recalling the selected action o If Scene is selected for Mode tap the check box next to Enable Time of Day Actions to enable setting action...

Страница 101: ... check box next to an action to add or remove that action from the macro button A checked box indicates that the action is set to occur when the macro button is triggered o Tap the back arrow next to the room name to return to the Select Room Below menu NOTE Only rooms that contain selectable actions appear on the Select Room Below menu Once an action is selected from a room the room name is shown...

Страница 102: ...cheduler screen Scheduler Screen Use the Scheduler screen to schedule events that recall one or more scenes at specific times and days of the week Create a New Scheduled Event To create a new scheduled event 1 Tap the plus button next to Scheduled Events Refer to the image above 2 Enter a descriptive name for the event 3 Tap OK The new event is displayed in the Scheduled Events menu ...

Страница 103: ...t whether the event should occur at sunrise or sunset and set when the event should occur relative to the sunrise or sunset time NOTE To adjust the default times for sunrise and sunset navigate to Installer Settings System Configuration System Settings and then tap the wrench button on the Current Times of Day panel For more information refer to Current Time of Day on page 106 Select a room from t...

Страница 104: ...ake Leave and Return These events are disabled by default To enable them tap the event s check box to the left of the event name A filled check box indicates that the scene is enabled The List of Scheduled Events lists the thermostat events that have been created for each thermostat Each thermostat event provides the time and days that it is scheduled to occur as well as its cooling and heating se...

Страница 105: ... events are disabled by default Set the time that the thermostat event should occur using the provided spinner menus Tap the check box above each day of the week to select the days that the thermostat event should occur A filled check box indicates that the event is scheduled to occur on the associated day Select the temperature set points for cooling heating and auto modes using the appropriate s...

Страница 106: ...mostat event from the List of Scheduled Events 3 Tap Edit Event to display the Edit Event dialog box 4 Use the settings described in Creating a New Scheduled Thermostat Event on page 98 to configure the event 5 Tap OK to save the thermostat event or tap Cancel to cancel any changes Tap the trashcan button to delete the thermostat event Tap the back arrow button to return to the Configuration scree...

Страница 107: ...gure various settings for the Crestron Pyng system and the CP4 R Tap System Control Options to set up a MyCrestron account to adjust the XPanel web server settings to configure voice control settings and to update the web API authentication token Tap Privacy Controls to view and edit privacy settings for collecting system information Tap Check for Updates to check for and download software updates...

Страница 108: ...tings time of day settings and the system language Tap System Info Passwords to update the system information and to change the user password Tap Ethernet Settings to view and configure the Ethernet settings for the CP4 R Tap MyCrestron Monitoring Service to obtain a registration code for registering the CP4 R with a MyCrestron domain and to access various MyCrestron services Tap Reset to Factory ...

Страница 109: ... System Settings on the Installer Settings System Configuration screen to display the System Settings screen System Settings Screen Use the System Settings screen to configure the date and time the location settings the preset times of day used for events and the system language ...

Страница 110: ...lay selections for editing the date and time System Settings Screen Current Time and Date Set the time hour minute and AM or PM using the appropriate spinner menus that are provided under the listed time Set the date month day and year using the appropriate spinner menus that are provided under the listed date Tap OK to save any changes Tap Cancel to cancel any changes ...

Страница 111: ...ings Screen Current Location Settings NOTE If configuring the system with an iPad tap Synchronize with iPad to synchronize the time zone longitude and latitude with the iPad device s location services Select the time zone for the system using the menu provided under Time Zone Enter the system latitude in the Latitude field Enter the system longitude in the Longitude field Tap OK to save any change...

Страница 112: ...Morning preset which is when the homeowner wakes using the provided spinner menus Day Set how long before or after sunrise calculated by date and time zone the Day preset occurs using the provided spinner menus NOTE In some cases such as in the summer months the time set for the Day preset may occur before the time set for the Morning preset In these cases any actions or events set for the Morning...

Страница 113: ...n next to Current Language to edit the language displayed by the system System Settings Screen Current Language Select the system language from the menu provided under Languages Tap OK to save any changes Tap Cancel to cancel any changes Tap the back arrow button to return to the Installer Settings System Configuration screen ...

Страница 114: ... up dialog box that is displayed and then tap OK CAUTION Once an installer password is set installer configuration mode may not be accessed without entering the password If the installer password is lost all Crestron Pyng system passwords must be reset by issuing the resetpyngpasswords command via the Text Console tool in Crestron Toolbox User Password Tap Change to set a new user password Enter a...

Страница 115: ...is information is needed to place custom engraving orders through the Crestron Pyng system Tap the back arrow button to return to the Installer Settings System Configuration screen Ethernet Settings Tap Ethernet Settings on the Installer Settings System Configuration screen to display the Ethernet Settings screen Ethernet Settings Screen Use the Ethernet Settings screen to view and modify Ethernet...

Страница 116: ... be edited in the Settings panel DHCP Tap On to turn DHCP on or tap Off to turn DHCP off NOTE If DHCP is turned on the device IP address the subnet mask and the default router settings may not be changed manually Host Name Enter the CP4 R hostname Domain Enter the CP4 R domain name used for connection IP Address If DHCP is turned off enter the CP4 R IP address Subnet Mask If DHCP is turned off ent...

Страница 117: ...the DNS Servers menu to display a dialog box for entering a new DNS server IP address o Enter the new DNS server address in the provided text field o Tap OK to save the new DNS server or tap Cancel to cancel the addition CIP Port The CIP Crestron Internet Protocol port number for the CIP routing protocol Secure CIP Port The secure CIP port number for the CIP routing protocol CTP Port The CTP Crest...

Страница 118: ...rmation Dialog Box o Tap OK to proceed or Cancel to cancel enabling authentication CAUTION Once authentication is enabled do not lose the username and password required for authentication as the Crestron Pyng system may not be accessed without these credentials If the authentication credentials are lost the CP4 R must be restored to factory defaults CIP Port Enter the CIP port number for the CIP r...

Страница 119: ...en to display the MyCrestron Services screen MyCrestron Services Screen Use the MyCrestron Services screen to manage saved configuration files to send message logs to the cloud and to order custom engravings A registration code is also provided for registering the Crestron Pyng system with a MyCrestron account For more information on registering the Crestron Pyng system with a MyCrestron account r...

Страница 120: ... engravings or tap Cancel to cancel the order NOTES An email that contains all of the information needed to order the engravings is generated and sent to the integrator This information is generated based on the button layouts configured during the Actions Events step The dealer information must be entered correctly and up to date in order to ensure that the order is processed correctly For more i...

Страница 121: ...ings Screen Reset to Factory Defaults The dialog box contains a warning stating that all configured settings and devices are lost following a factory restore and provides instructions for restoring the CP4 R To restore the CP4 R press and hold the Continue button for three seconds The device reboots after the restore process completes Tap Cancel to cancel the factory restore and to return to the I...

Страница 122: ... devices and gateways connected to the system and to view system message logs Devices Tap the Devices tab to view all of the network devices that are paired with the Crestron Pyng system organized by room Each device reports its network status firmware status whether it is included in a scene and whether it is affected by a scheduled event Select a room from the list to view the status of the devi...

Страница 123: ...ulse icon is shown If a serial device is functioning but is not associated with a COM port a signal pulse icon with a red x is shown If an IR device is functioning and is associated with an IR port in the system a beamed signal icon is shown If an IR device is functioning but is not associated with an IR port a beamed signal icon with a red x is shown If a CEC device is functioning and is associat...

Страница 124: ...modify device settings If a device is configured as part of a scene tap the scene button next to the device to view the scenes that include the device If an issue is found with a device tap the warning button next to the device to view more information about the issue Gateways Tap the Gateways tab to view all of the gateways that are paired with the Crestron Pyng system The Gateways tab also provi...

Страница 125: ...hooting the Sonos system refer to Appendix A Sonos and Crestron Pyng Integration on page 195 If the Sonos system has discovered devices from multiple households after a device from one household has been paired a two house icon with a red x is shown If the Sonos system is not detected by the Crestron Pyng system a network tree icon with a red x is shown If the Sonos system is disabled an unfilled ...

Страница 126: ... have occurred in the Crestron Pyng system during a specified date and time range To navigate the message logs Select a date from the Select a Log menu Tap the left and right arrow buttons and at the top of the screen to move forward and backward through logs for each day starting with the current day Swipe up or down through the list of times on the far left of the screen to view the logs for a s...

Страница 127: ...tron Dynamic DNS Service to register the Crestron Pyng system with a MyCrestron domain and to view the current MyCrestron registration status Tap Web Settings to adjust settings for the web XPanel interface Tap Voice Control Settings to associate the Crestron Pyng system with a supported voice control service provider Tap Web API Settings to update the web API authentication token for the Crestron...

Страница 128: ...tem with a MyCrestron account 1 Enter the MyCrestron account domain name in the Domain text box 2 Enter the password for the MyCrestron account in the Password field 3 Tap Register System If the registration is successful a success message is displayed and the System Last Successfully Registered date updates in the Current Status panel The Current Status panel provides the following information Cu...

Страница 129: ...he Web Settings screen to enter a domain and port for accessing the CP4 R s built in web XPanel interface The following XPanel settings may be edited Domain Enter the XPanel web domain Port s Enter the XPanel web port s NOTE For most applications set Domain to and set Port s to 41794 41796 For more information on advanced web XPanel configurations refer to OLH article 5793 at www crestron com onli...

Страница 130: ...ce control settings for the Crestron Pyng system 1 Select the region associated with the Crestron Pyng system United States Europe or Asia Pacific NOTE Voice control via the TSR 310 is applicable only to systems that are registered in the United States region at this time 2 Tap Next 3 After a region is selected tap the URL provided on the screen to open the Crestron Admin Portal for Voice Control ...

Страница 131: ...egistration code provided under the Registration section 5 Enter the registration code obtained in the above step in the Registration Code field on the Voice Control Settings screen Voice Control Settings Screen Registration Code 6 Tap Register If the registration credentials are valid a dialog box is displayed stating that the registration was successful Tap OK to continue ...

Страница 132: ...der 8 Tap the link at the bottom of the Linked Account section A dialog box for entering the voice provider account credentials is displayed 9 Enter the credentials for the voice provider account NOTE If the control system is registered with an Amazon account a dialog box is displayed asking whether the linked account is for a smart home or for an Alexa for Business AWS account Tap Smart Home to u...

Страница 133: ...em is enabled but unable to connect to the service additional details are provided in the message logs NOTE If the system is unable to connect to the voice control service Connection Status does not display as Connected navigate to the registration portal and delete the control system from the portal If the system is registered and connected but voice commands are not working ensure that Crestron ...

Страница 134: ...Settings on the Installer Settings screen to display the Web API Settings screen Web API Settings Screen Use the Web API Settings screen to view and update the Web API Application Programming Interface authentication token used to access the Crestron Pyng system s REST API interface Tap Update Token to display a dialog box asking whether the authentication token should be updated Tap OK to update ...

Страница 135: ...screen to view a privacy statement regarding the collection of system data and to view and configure privacy controls Tap the check box next to I agree to information collection to enable or disable allowing Crestron to collect information about the Crestron Pyng system A checked box indicates that Crestron will collect information from the system Tap the back arrow button to return to the Install...

Страница 136: ...ated from this notification or from the Software Update screen Tap Download Update to update the system software if an update is available Once the software downloads tap Update Software to begin the software update NOTE A software update takes up to 30 minutes to complete and the CP4 R reboots several times throughout the update process Therefore updates should be performed when the system is not...

Страница 137: ...e Update screen presents a list of devices with recommended firmware updates Tap the check box next to a device to select the device to receive a firmware update Then tap Update Selected Drivers to perform firmware updates for the selected devices Tap the information button next to a device to view release notes for the device firmware update Tap Check For Updates to rescan the update server for n...

Страница 138: ...reen is displayed User Setup Screen The following sections describe the different settings that may be configured through the user setup screens Tap the help button on any of the user setup screens to display dialog boxes that explain the screen functions and features and provide links to tutorial videos Tap the gear button to display the User Settings screen to configure advanced Crestron Pyng sy...

Страница 139: ... screens and from scheduled events Scenes are created and configured the same way in the user setup screens as they are in the installer setup screens For more information on creating specific scenes refer to the following sections For lighting scenes refer to Light Scenes starting on page 54 For shade scenes refer to Shade Scenes starting on page 59 For media scenes refer to Media Scenes starting...

Страница 140: ...e the Scheduler screen to schedule events that trigger one or more scenes at specific times and on one or more specific days of the week Events are created and scheduled the same way in the user setup screens as they are in the installer setup screens For more information on scheduling events refer to Scheduler on page 94 Tap the back arrow button to return to the main Setup screen ...

Страница 141: ...lt each thermostat includes events for Sleep Wake Leave and Return These events are disabled by default To enable them tap the event s check box to the left of the event name A filled check box indicates that the scene is enabled Thermostat events are created and scheduled the same way in the user setup screens as they are in the installer setup screens For more information on scheduling events re...

Страница 142: ...oftware updates for the Crestron Pyng system and for connected devices Tap Diagnostics to configure various settings for the Crestron Pyng system and the CP4 R Tap MyCrestron Monitoring Service to obtain a registration code for registering the CP4 R with a MyCrestron domain and to access various MyCrestron services Tap Advanced Configuration to access the installer setup screens An installer passw...

Страница 143: ... Settings Tap System Settings on the User Settings screen to display the System Settings screen System Settings Screen Use the System Settings screen to configure the date and time the location settings the preset times of day used for events and the system language ...

Страница 144: ...lay selections for editing the date and time System Settings Screen Current Time and Date Set the time hour minute and AM or PM using the appropriate spinner menus that are provided under the listed time Set the date month day and year using the appropriate spinner menus that are provided under the listed date Tap OK to save any changes Tap Cancel to cancel any changes ...

Страница 145: ...ings Screen Current Location Settings NOTE If configuring the system with an iPad tap Synchronize with iPad to synchronize the time zone longitude and latitude with the iPad device s location services Select the time zone for the system using the menu provided under Time Zone Enter the system latitude in the Latitude field Enter the system longitude in the Longitude field Tap OK to save any change...

Страница 146: ...ing preset which is when the homeowner wakes using the provided spinner menus Day Set how long before or after sunrise calculated by date and time zone the Day preset occurs using the provided spinner menus NOTE In some cases such as in the summer months the time set for the Day preset may occur before the time set for the Morning preset In these cases any actions or events set for the Morning pre...

Страница 147: ... wrench button next to Current Language to edit the language displayed by the system System Settings Screen Current Language Select the system language from the menu provided under Languages Tap OK to save any changes Tap Cancel to cancel any changes Tap the back arrow button to return to the User Settings screen ...

Страница 148: ...Configuration screen Password Configuration Screen Use the Password Configuration screen to change the password that is required to access the user setup screens Tap Change under Password to set a new user password Enter a new password using the pop up dialog box that is displayed and then tap OK Tap the back arrow button to return to the User Settings screen ...

Страница 149: ...ated from this notification or from the Software Update screen Tap Download Update to update the system software if an update is available Once the software downloads tap Update Software to begin the software update NOTE A software update takes up to 30 minutes to complete and the CP4 R reboots several times throughout the update process Therefore updates should be performed when the system is not...

Страница 150: ...ware Update screen presents a list of devices with recommended firmware updates Tap the check box next to a device to select the device to receive a firmware update Then tap Update Selected Drivers to perform firmware updates for the selected devices Tap the information button next to a device to view release notes for the device firmware update Tap Check For Updates to rescan the update server fo...

Страница 151: ... devices and gateways connected to the system and to view system message logs Devices Tap the Devices tab to view all of the network devices that are paired with the Crestron Pyng system organized by room Each device reports its network status firmware status whether it is included in a scene and whether it is affected by a scheduled event Select a room from the list to view the status of the devi...

Страница 152: ...ulse icon is shown If a serial device is functioning but is not associated with a COM port a signal pulse icon with a red x is shown If an IR device is functioning and is associated with an IR port in the system a beamed signal icon is shown If an IR device is functioning but is not associated with an IR port a beamed signal icon with a red x is shown If a CEC device is functioning and is associat...

Страница 153: ...network status and firmware status Diagnostics Screen Gateways Tab The following status information is provided for each gateway If the gateway is online and detected by the system a green network icon is shown in the box to the far right of the device name If the gateway is offline or not detected by the system a network icon with a red x is shown If the gateway is running an outdated firmware ve...

Страница 154: ... x is shown If the Sonos system is not detected by the Crestron Pyng system a network tree icon with a red x is shown If the Sonos system is disabled an unfilled house icon is shown If a paired Sonos device is not detected by the Crestron Pyng system a music note icon with a red x is shown Tap the gear button next to a gateway to view and modify gateway settings and to view all devices paired to t...

Страница 155: ...hat have occurred in the Crestron Pyng system during a specified date and time range To navigate the message logs Select a date from the Select a Log menu Tap the left and right arrow buttons and at the top of the screen to move forward and backward through logs for each day starting with the current day Swipe up or down through the list of times on the far left of the screen to view the logs for ...

Страница 156: ...Tap Send Current Log to send the current message log file to MyCrestron Select a configuration file from the Available Configuration Files to Restore menu to restore the system to the selected configuration NOTES The Crestron Pyng system records the system configuration settings periodically and saves them in configuration files which are sorted by time and date If an issue arises with the system ...

Страница 157: ...he homeowner uses to access and create scenes to play quick actions and to edit basic configuration settings for the Crestron Pyng system The Home screen also shows the time and date as well as a weather widget if enabled Depending on the devices and scenes that are configured for the Crestron Pyng system the following selections may be selected from the home screen Home Screen Selections BUTTON D...

Страница 158: ...rmation refer to Quick Actions on page 193 NOTE The menu bar is located on the bottom of the screen in XPanel and on the left side of the screen in the touch screen user project Lights Tap the Lights button on the Home screen or select Lights from the Devices section of the user menu to display the lights screen Basement Screen Lights Use the lights screen to select and play any lighting scene or ...

Страница 159: ...formation Tap the wrench button to configure the lights screen settings After entering the user password if required the Configuration screen for the lights screen is displayed not pictured The following light screen settings may be configured Tap the Room List tab to select the rooms that may be controlled from the lights screen Tap the check box next to a room to enable or disable controlling th...

Страница 160: ...OC 8432A Basement Scenes Screen Lights 3 Tap New Scene 4 Enter a descriptive name for the new lighting scene in the dialog box that is displayed 5 Tap OK The configuration screen for the lighting scene is displayed Lighting Scene Configuration Screen ...

Страница 161: ... to set a lighting load to its maximum brightness 100 o Tap the empty sun button to turn off a lighting load 0 o Tap the plus button or minus button to raise or lower the brightness level incrementally for lighting loads with dimmers o Use the slider to adjust the brightness level manually for lighting loads with dimmers NOTE Lighting loads may also be adjusted using the dimmers or switches config...

Страница 162: ...cene or tap the back arrow button to discard the changes Configure a User Lighting Scene To configure an existing lighting scene 1 Select a room from the drop down menu on the top left of the screen 2 Tap Add Edit Scenes All lighting scenes configured for the room are displayed Basement Scenes Screen Lights The following configuration options are displayed next to each lighting scene Tap the play ...

Страница 163: ...restron Pyng system The shades screen also allows the homeowner to add and edit shade scenes This process is similar to creating shade scenes in the setup pages Use the drop down menu on the top left of the screen to select a room that contains a shade scene Only rooms with shade scenes or loads may be selected from the menu Any shade groups configured for the room appear in the left screen panel ...

Страница 164: ... configured Tap the Room List tab to select the rooms that may be controlled from the shades screen Tap the check box next to a room to enable or disable controlling the room from the shades screen Tap the Default tab to select the default room for the shades screen The default room is displayed automatically when the shades screen is accessed Tap the back arrow button to return to the shades scre...

Страница 165: ...configured for the shade scene Use the text box at the top of the screen to edit the shade scene name Use the provided controls to adjust the levels for any shade groups that have been added to the scene Shade groups are adjusted in real time o Tap the closed shade button to close a shade load fully 0 o Tap the open shade button to open a shade load fully 100 o Tap the down arrow v to lower a shad...

Страница 166: ...he scene A filled check box indicates that the shade group has been added to the scene 3 Tap Done to save any changes or Cancel to discard the changes Any shade groups added to the scene may be adjusted in the scene configuration dialog box Once all changes have been made tap Save to save any changes to the shade scene or tap the back arrow button to discard the changes Configure a User Shade Scen...

Страница 167: ...ime Tap the pencil button to edit the shade groups that are affected by the scene A dialog box for editing scene settings is displayed Use the settings described in Create a User Shade Scene on page 158 to configure the shade scene Tap the trashcan button to delete the shade scene NOTE All Open and All Closed shade scenes may not be deleted in user control mode Tap the back arrow button to return ...

Страница 168: ...schedule climate events This process is similar to creating thermostat events in the setup pages Use the drop down menu on the top left of the screen to select a thermostat The current thermostat settings and the next scheduled thermostat event are displayed Tap the plus button to raise the temperature set point of the thermostat mode configured for the room Tap the minus button to lower the tempe...

Страница 169: ... one of the following fan behavior options o Select Auto to have the scene run the fan automatically o Select On to have the scene turn the fan on Schedule Select one of the following scheduling options o Select Run to start the thermostat schedule o Select Hold to stop the thermostat schedule Edit Schedules Tap to create new climate events or to configure existing climate events Refer to Creating...

Страница 170: ...ault thermostat is displayed automatically when the climate screen is accessed Tap the back arrow button to return to the climate screen Tap Home in the user menu to return to the Home screen Create a User Climate Event To create a new climate event in user control mode 1 Select a thermostat from the drop down menu on the top left of the screen 2 Tap the menu button on the top right of the screen ...

Страница 171: ...e climate event should occur A filled check box indicates that the event is scheduled to occur on the associated day Event Setpoints Select the temperature set points for cooling heating and auto modes using the appropriate spinner menu NOTE Depending on the selected mode the thermostat switches to cooling mode when the room temperature reaches the cooling set point switches to heating mode when t...

Страница 172: ...sts the thermostat events that have been created for the thermostat Each thermostat event provides the time and days that it is scheduled to occur as well as its cooling and heating set points The following configuration options are provided Tap the pencil button to edit the thermostat behavior for the climate event A dialog box for editing event settings is displayed Use the settings described in...

Страница 173: ...x D Source Routing Behavior for Media Devices on page 233 Use the drop down menu on the top left of the screen to select a room that contains a media source Only rooms with media sources may be selected from the menu Tap the wrench button to configure the media screen settings After entering the user password if required the Configuration screen for the media screen is displayed The following medi...

Страница 174: ...168 Crestron Pyng OS 2 for CP4 R Product Manual DOC 8432A Media Configuration Audio Tap the back arrow button to return to the media screen Tap Home in the user menu to return to the Home screen ...

Страница 175: ...ce name is displayed underneath the room name and a red power icon appears to the right of the room name 2 Select the source by tapping its respective button on the screen NOTE Tap Select a Source to display the available sources in list format Then select the source from the list Once a source has been selected a screen with device controls is displayed The screen for a Samsung Blu ray Disc playe...

Страница 176: ...trols may be used For information refer to Source Routes on page 47 Custom control interfaces must be created for devices that are added to the system via custom device drivers For more information refer to Appendix C Create and Upload a Custom Device Driver on page 195 For media sources with favorites such as Sonos CONNECT devices use the Favorites menu on the right of the screen to select a favo...

Страница 177: ...nce no more than six touch panels should access the audio source page at the same time within a span of ten seconds The following volume controls are provided at the bottom of the screen if supported by the media source Tap the volume mute button to mute or unmute the source volume Use the slider to adjust the volume level Tap the levels button to manage the media volume for the room For more info...

Страница 178: ... source selected may be added as the lead room to a media group or may have other rooms grouped to it however doing so powers off the media devices in the room If the room with a video source is added to a group that contains a lead room routing an audio only source the display in the room powers off and the audio source is routed to the group source that is currently selected Tap the check box ne...

Страница 179: ... room only source devices show as available A Sonos endpoint PLAYBAR may be added to a device group in the Sonos app but it is ignored by the Crestron Pyng media system o All compatible endpoint devices have their sources displayed as one For example all Sonos speakers are displayed as one source named Sonos o Source devices that are added as individual sources and later grouped are displayed alon...

Страница 180: ...et on the previous page If a group source exists the added rooms have the source routed to them using the source routing behavior described above o If any rooms removed from the media group the compatible endpoint devices from that room are removed from the device group o All Source devices that may be grouped but are no longer available to the group or routed anywhere are removed from the device ...

Страница 181: ...r rooms that may be managed Volume Manager Menu NOTE In order for volume management controls to display on the source selection page the chosen media room must be powered on For more information refer to Power the Media System on page 176 The following options are provided for each source or room Tap the volume mute button to mute or unmute the volume for the source or room Use the slider to adjus...

Страница 182: ...put the media system to sleep A filled check box indicates that the sleep timer is enabled If Sleep Timer is enabled tap the minus or plus buttons to lower or raise respectively the sleep timer by 15 minute increments Tap Power Off Room to power off all media devices in the room If the room is off tap Power On Room to power on all media devices in the room Tap Power Off Whole House to power off al...

Страница 183: ...icate the status of the locks A closed lock icon indicates that a lock is currently closed An open lock icon indicates that a lock is currently open A low battery icon indicates that the lock battery is low and should be charged A warning icon that there is an issue with the lock For more information on troubleshooting faulty door locks refer to Devices on page 116 To control door locks Tap the op...

Страница 184: ...or the Door Locks screen is displayed o Tap the check box next to a door lock to enable or disable controlling the door lock from the Door Locks screen o Tap the back arrow button to return to the Door Locks screen Tap Home in the user menu to return to the Home screen Security Select the Security button from the Home screen or select Security from the Devices section of the user menu to display t...

Страница 185: ...e screen to enter the code for arming and disarming the security system Tap the wrench button to configure the security screen settings After entering the user password if required the Configuration screen for the security screen is displayed o Tap the check box next to a security system to enable or disable controlling the security system from the Security screen o Tap the back arrow button to re...

Страница 186: ...y the camera Tap the camera feed to view it in full screen mode Tap the camera feed again to return it to its normal size Tap Home in the user menu to return to the Home screen Door Stations If a TSW x60 series touch screen has been added to the Crestron Pyng system and is running the Crestron Pyng user project the touch screen may be connected to a 2N door station to provide a door station soluti...

Страница 187: ...utton to mute or unmute the intercom microphone Incoming Call Window Call Answered If the call is declined or ended the call window is closed Tap the lightning bolt icon on the left menu to view and activate quick actions during the call such as Open Gate A quick actions menu is displayed Incoming Call Window Quick Actions Menu Tap a quick action to activate it Tap the lightning bolt icon again to...

Страница 188: ...s menu Lights Shades Climate Media Locks Security or Cameras to load the screen for that group of devices NOTE These selections are only available if devices scenes or events have been added to the system for the device group Tap Metrics to load a screen for displaying energy usage metrics for the Crestron Pyng system For more information refer to Metrics on page 183 Tap Settings to load the Setti...

Страница 189: ...more information refer to MyCrestron Settings on page 122 Crestron Pyng Metrics Page Lighting The Crestron Pyng metrics page provides an overview of lighting and climate usage for the entire Crestron Pyng system Tap the Lighting tab to view the lighting usage for each configured room and to compare the lighting hours used during the current week to the prior week Tap the Climate tab to view the da...

Страница 190: ...r control devices such as iPad devices smart phones and touch screens configured for the Crestron Pyng system Tap Reset to Default to reset the user settings to their default values Tap Configure System to access the user setup screens by entering the user password or to access the installer setup screens by entering the installer password Tap Privacy to view privacy policies regarding use of the ...

Страница 191: ...e check box next to a room or room group in the Top Level Rooms Groups List menu to select whether the room or room group appears as a top level item Tap a room group to display a Room s In Group menu which enables the rooms in that group to be selected as top level items or to be sorted manually If Sort Alphabetically is disabled press and hold a room or room group until the list item turns green...

Страница 192: ... a device group to select whether the device group appears as a selectable item from the Home screen and the user menu If Use Default Order is disabled press and hold a device group until the list item turns green Then slide the device group up or down the list to sort the group manually Tap the check box next to Quick Actions to enable or disable showing the Quick Actions menu in user control mod...

Страница 193: ...tion appears as a selectable item from the Quick Actions menu If Sort Alphabetically is disabled press and hold a quick action until the list item turns green Then slide the quick action up or down the list to sort the quick action manually Wallpaper Tap Wallpaper from the Look Feel menu to display the Wallpaper panel Settings Screen Wallpaper Use the Wallpaper panel to select a wallpaper for the ...

Страница 194: ...ions are provided Select Disabled to disable displaying the weather widget on the Home screen Select Enabled to enable displaying the weather widget on the Home screen Select Enabled with Severe Weather Alerts to enable displaying the weather widget on the Home screen with severe weather alert notifications NOTE If Enabled with Severe Weather Alerts is selected a red exclamation mark icon appears ...

Страница 195: ... System Alerts panel to enable or disable security system alerts in User Control mode Security system alerts sounds tones that notify the user when the security system is armed or disarmed and the user control device automatically loads the security screen if an event requires the user to input a security code Tap the check box next to Enable Security System Alerts to enable or disable security sy...

Страница 196: ...key buttons on the touch screen Tap one of the following options to select it No Function Disables using the up and down hard keys for system control Lights Room Raise Lower Enables raising or lowering the lighting loads in the room using the up and down hard keys Shades Room Raise Lower Enables raising or lowering the shade loads in the room using the up and down hard keys Media Room Volume Volum...

Страница 197: ...sts its brightness based on the ambient light level in the room o Tap the up and down arrow buttons to raise or lower the touch screen brightness manually from 0 to 100 Timeout Swipe up or down through the menu to select the duration before the touch screen enters standby timeout mode and displays a black screen Select Never to disable standby timeout mode Hard Key Wakes LCD Tap On or Off to turn ...

Страница 198: ...ation intercom if configured Master Volume o Tap the up and down arrow buttons to raise or lower the master volume incrementally o Tap Mute On to mute the master volume o Tap Play Test to play a test recording at the current master volume level o Tap Mute Off to unmute the master volume Media Volume o Tap the up and down arrow buttons to raise or lower the media volume incrementally o Tap Mute On ...

Страница 199: ...tercom Volume Info Tap the information icon to view a statement describing the relationship between the master volume and media volume controls Quick Actions Tap the lightning bolt button on the bottom left of any screen in user control mode to display the Quick Actions menu on the left side of the screen Quick Actions Menu NOTE The Quick Actions menu may be accessed only if the Quick Actions sett...

Страница 200: ...tems compatible with Crestron Pyng After an Autonomic audio unit is added to the Crestron Pyng system some sources that were disabled from the MMS web user interface still appear in the Crestron Pyng source list Disabling a source in the MMS web interface does not disable it automatically in Crestron Pyng Remove the MMS and then add it back to the system using the Pair Devices screen to reflect th...

Страница 201: ...ice in the device list until it is added using the appropriate procedure Manage Add a player or sub To display devices from another household in the Sonos app select Help Reset Controller Doing so will reset the household for the Sonos app and allows for a different household to be assigned The Crestron Pyng system allows only Sonos devices that belong to the same household to be added to the syst...

Страница 202: ...Play 1 device is added to a room within the Crestron Pyng system the devices from the other Sonos household may no longer be added Pair Devices Screen Sonos Kitchen Play 1 Added If the Living Room Play 1 device is added to a room within the Crestron Pyng system the KitchenPlay1 device from the other Sonos household may no longer be added ...

Страница 203: ...ng system Multiple Sonos Households Found This issue occurs when multiple Sonos households are discovered by the Crestron Pyng system Issue s Not all discovered Sonos devices may be added to the Crestron Pyng system A Sonos device is reporting as offline after it is moved to a different Sonos household Explanation Devices from different Sonos households have been discovered on the network The Cres...

Страница 204: ...iple Sonos Households Found Tap the gear icon next to the Sonos System gateway to view the Sonos System Settings page with the About tab open by default A Multiple Households found status is indicated for Discovery Result Sonos System Settings Screen Multiple Sonos Households Found ...

Страница 205: ...sehold cannot be discovered by the Crestron Pyng system Issue s The Sonos discovery scan found Sonos devices but all Sonos devices in the Crestron Pyng system report as offline All Sonos devices in the Sonos household were reset to factory default settings Explanation When the first Sonos device is added to the Crestron Pyng system the Sonos household that the device belongs to is saved in the sys...

Страница 206: ...n Desired Household Not Found Tap the gear icon next to the Sonos System gateway to view the Sonos System Settings page with the About tab open by default A Household Not Found status is indicated for Discovery State Sonos System Settings Screen Multiple Sonos Households Found ...

Страница 207: ...ystem Issue s No Sonos devices were found during the Sonos discovery scan Explanation When a Sonos discovery is initiated a two stage discovery process begins In the first stage a multicast message is sent out on the network The Crestron Pyng system gives Sonos devices 30 seconds to respond If at least one device responds during this interval discovery is stopped On the Sonos System Settings scree...

Страница 208: ...creen No Devices Found Tap the gear icon next to the Sonos System gateway to view the Sonos System Settings page with the About tab open by default A Household Not Found status is indicated for System Connection Failure Reason Sonos System Settings Screen No Devices Found ...

Страница 209: ...able connect to any of the devices for setup Explanation After a successful Sonos discovery scan the Crestron Pyng system selects one of the Sonos devices as the primary device The system then connects to the device and subscribes for the Favorites event used to retrieve and update the Favorites list and the Group Configuration event used to retrieve and update the group and player configuration I...

Страница 210: ... No Online Devices Found Tap the gear icon next to the Sonos System gateway to view the Sonos System Settings page with the About tab open by default A No Online Devices Found status is indicated for System Connection Failure Reason Sonos System Settings Screen No Devices Found ...

Страница 211: ...ed message select the Subscriptions tab in the Sonos System Settings page and then press the Refresh button for the Favorites event For a Group Configuration Event Subscription Timeout or Group Configuration Event Subscription Failed message select the Subscriptions tab in the Sonos System Settings page and then press the Refresh button for the Group Configuration event If the above solutions do n...

Страница 212: ...ssign one of the paired speakers as the left speaker The speaker assigned as the left speaker becomes the master and from that point forward is used to represent both speakers in the pair The speaker pair is named after the speaker that was used to start the speaker pair configuration If this speaker is not chosen as the left master speaker the left speaker is renamed automatically In the followin...

Страница 213: ...reate a pair between Speaker1 and Speaker2 by following the in app instructions 4 Assign Speaker1 as the left speaker Speaker2 is hidden and the resulting speaker pair is named Speaker1 The Crestron Pyng system will be able to discover only Speaker1 If Speaker2 was assigned in the Crestron Pyng system it will report as offline and a pop up dialog is displayed stating that Speaker2 was added as a s...

Страница 214: ...a pair between Speaker1 and Speaker2 by following the in app instructions 4 Assign Speaker2 as the left speaker Speaker1 is hidden and the resulting speaker pair is named Speaker1 The Crestron Pyng system will be able to discover only Speaker2 renamed to Speaker1 If Speaker1 was assigned in the Crestron Pyng system it will report as offline and a pop up dialog is displayed stating that Speaker1 wa...

Страница 215: ...aker devices as surround speakers for a Beam PLAYBAR or PLAYBASE device The two speakers that are selected as surround speakers are hidden in the Sonos app and may no longer be controlled If any of the surround speakers were assigned in the Crestron Pyng system and a pop up dialog is displayed stating the Sonos device was added as a satellite device to the Beam PLAYBAR or PLAYBASE device ...

Страница 216: ...ource o A source device type is used for a CONNECT device that is connected as an input to an audio receiver o The line out setting for source devices should always be set to Fixed as the audio receiver is used for volume control o A notification is displayed if the line out setting for a CONNECT device with a source device type was set to Variable Speaker o A speaker device type is added to a roo...

Страница 217: ...through the Sonos app before attempting a discovery with Crestron Pyng If the Sonos device is not assigned to a room in the Sonos app it cannot be discovered by Crestron Pyng To rename a Sonos device in Crestron Pyng change the name of the Sonos room that the device is assigned to using the Sonos app The device name automatically updates in the Crestron Pyng system Do not group Sonos devices toget...

Страница 218: ...the Text Console tool in Crestron Toolbox to check for a prompt The standard device prompt should display NOTE Repeat steps 1 5 if the first attempt does not correct the issue If the CP4 R is still unresponsive contact Technical Support for assistance 6 The restore process may enable SSL Secure Sockets Layer on the CP4 R After communication returns following the restore issue the ssl off command u...

Страница 219: ...ttons Tab NOTE For more information on using the Device Learner tool to create device drivers refer to the embedded Crestron Toolbox help file Refer to the following tables for each supported device class when mapping buttons to device controls Each button mapping table except for remote controls includes the following information Button A button used by the device class that may be mapped to a co...

Страница 220: ...n the list and repeats the process for each subsequent command that does not exist Required Optional Indicates whether the command is required or optional Required commands must be included to build the driver package file Apple TV Digital Media Extender Button Mapping Apple TV User Interface Buttons Apple TV Button Mapping BUTTON PYNG COMMAND DRIVER COMMAND STANDARD COMMAND FirstPlayPause1 Not su...

Страница 221: ..._Arrow Left Navigation_Left Menu_Left Cursor_Left Track pan_left pan_lt l LT panleft Required Right_Arrow Right Navigation_Right Menu_Right Menu_RT Cursor_Right pan_right pan_rt pan right pan rt rt panright Required Up_Arrow Up Navigation_Up Menu_Up Cursor_Up tilt_up tilt up Required Select OK Navigation_Select Select Required Menu Root_Menu Disc_Menu DiscMenu List DVD_Menu DVD Menu DVDMenu Requir...

Страница 222: ... Stop Stop Stop Not supported Not supported F_Step ToggleShuffle Not supported Shuffle Eject Eject Eject ToggleRepeat Repeat Repeat_1 BACK Back Back Back TOP MENU TopMenu TopMenu TopMenu EXIT Exit Exit Exit POP UP MENU PopUpMenu PopUpMenu PopUpMenu SETTINGS Settings Options Options HOME Home Home Home NextDisc Not supported Disc PreviousDisc Not supported Disc Up Up Up_Arrow Right Right Right_Arro...

Страница 223: ...layer Button Mapping Numbers BUTTON PYNG COMMAND DRIVER COMMAND STANDARD COMMAND 1 Digit1 Digit1 1 2 Digit2 Digit2 2 3 Digit3 Digit3 3 4 Digit4 Digit4 4 5 Digit5 Digit5 5 6 Digit6 Digit6 6 7 Digit7 Digit7 7 8 Digit8 Digit8 8 9 Digit9 Digit9 9 0 Digit0 Digit0 0 ENTER Enter Enter Enter CLEAR Clear Not supported Not supported ...

Страница 224: ...ect Required TopMenu Top Top_Menu Tmenu Required Exit ESC CANCEL OSD CANCEL Navigation_MenuBack_F11 Required Track Track Chapter_ Advance Jump Skip_Fwd Chapter Track_Fwd Next F_Srch Skip FF NextTrack TRK Track_ NEXT_TRK F_TRK F_TRACK NEXT_SCENE SCENE F_Scene FTRK Required Track Track Chapter_ Chapter Track_Rev Skip_Rev Previous PreviousTrack TRK Track_ PREV_TRK R_TRK R_TRACK PREV_SCENE SCENE R_Sce...

Страница 225: ... kpd_8 kpd 8 key_8 key 8 Dial_8 Dial8 Key8 Optional 9 Disc_Key_9 Direct_Channel_Entry_9 9_WXYZ Number_9 Keyboard_9 NUM_9 kpd_9 kpd 9 key_9 key 9 Dial_9 Dial9 Key9 Optional Stop A_STOP VOD STOP Stop_Presenting StopPresenting Optional F_Step NEXT NEXT_STEP FORWARD FWD STEP SLOW STEP_FORWARD FRAME_FORWARD FRAME_ FRAME Optional R_Step Prev PREV_STEP REVERSE REV STEP_BACK STEP_ FRAME_BACK FRAME_ FRAME ...

Страница 226: ...can FirstPlayPause1 Not supported Play FastForward ForwardScan Fscan PreviousTrack ReverseSkip R_Step Pause Pause Pause NextTrack ForwardSkip F_Step Replay Replay Replay HOME Home Home Home MENU Menu Menu Menu BACK Back Back Back EXIT Exit Exit Exit Up Up Up_Arrow Right Right Right_Arrow Down Down Down_Arrow Left Left Left_Arrow Select Select Select 1 If this command does not exist for the device ...

Страница 227: ...down tilt_dn tilt down tilt dn tiltdown Required Left_Arrow Left Navigation_Left Menu_Left Cursor_Left Track pan_left pan_lt l LT panleft Required Right_Arrow Right Navigation_Right Menu_Right Menu_RT Cursor_Right pan_right pan_rt pan right pan rt rt panright Required Up_Arrow Up Navigation_Up Menu_Up Cursor_Up tilt_up tilt up Required Select OK Navigation_Select Select Required Menu Root_Menu Dis...

Страница 228: ...MMAND DRIVER COMMAND STANDARD COMMAND Rewind ReverseScan Rscan Play Play Play FastForward ForwardScan Fscan PreviousTrack ReverseSkip Track Pause Pause Pause Stop Stop Stop Replay Replay Replay Record Record Record PageUp PageUp Page_Up PageDown PageDown Page_Down ChannelUp ChannelUp CH ChannelDn ChannelDn CH GUIDE Guide Guide Guide continued on following page ...

Страница 229: ...nDemand Not supported On_Demand FAV ToggleFavorite Not supported Favorite EXIT Exit Exit Exit Up Up Up_Arrow Right Right Right_Arrow Down Down Down_Arrow Left Left Left_Arrow Select Select Select Red Red Red Green Green Green Yellow Yellow Yellow Blue Blue Blue LetterA A A LetterB B B LetterC C C UserFeedback Negative ThumbsDown Thumbs_Down UserFeedback Positve ThumbsUp Thumbs_Up LastChannel Last ...

Страница 230: ...mbers DVR and AVR Button Mapping Numbers BUTTON PYNG COMMAND DRIVER COMMAND STANDARD COMMAND 1 Digit1 Digit1 1 2 Digit2 Digit2 2 3 Digit3 Digit3 3 4 Digit4 Digit4 4 5 Digit5 Digit5 5 6 Digit6 Digit6 6 7 Digit7 Digit7 7 8 Digit8 Digit8 8 9 Digit9 Digit9 9 0 Digit0 Digit0 0 ENTER Enter Enter Enter ...

Страница 231: ...tion_Up Menu_Up Cursor_Up tilt_up tilt up Required Select OK Navigation_Select Select Required Menu Root_Menu Disc_Menu DiscMenu List DVD_Menu DVD Menu DVDMenu Required CH CH_ CHANNEL Channel_Up CHAN_UP CHAN CHAN UP CH_UP CH UP TUNE Required CH CH_ Channel_Down CHAN_DOWN CHAN CHANNEL_DN CHAN_DN CHANNEL CHAN DOWN CHAN DN CH_DN CH DN TUNE Required Back Required Last RECENT JUMP LC PC Required Guide ...

Страница 232: ...enting StopPresenting Optional F_Step NEXT NEXT_STEP FORWARD FWD STEP SLOW STEP_FORWARD FRAME_FORWARD FRAME_ FRAME Optional R_Step Prev PREV_STEP REVERSE REV STEP_BACK STEP_ FRAME_BACK FRAME_ FRAME Optional R_Skip Optional Enter Disc_Key Enter Direct_Channel Enter _Enter Partition_1_Keypad_Enter Keyboard_Enter ENT Optional Track Track Chapter_ Advance Jump Skip_Fwd Chapter Track_Fwd Next F_Srch Sk...

Страница 233: ...0 SUPPORT HR 310 SUPPORT HR 150 SUPPORT HR 100 SUPPORT 0 Digit0 Digit0 Yes No Yes No 1 Digit1 Digit1 Yes No Yes No 2 Digit2 Digit2 Yes No Yes No 3 Digit3 Digit3 Yes No Yes No 4 Digit4 Digit4 Yes No Yes No 5 Digit5 Digit5 Yes No Yes No 6 Digit6 Digit6 Yes No Yes No 7 Digit7 Digit7 Yes No Yes No 8 Digit8 Digit8 Yes No Yes No 9 Digit9 Digit9 Yes No Yes No Clear Not Supported Yes Yes Yes Yes ENTER Ent...

Страница 234: ...Down Yes Yes Yes Yes MENU The first of these available commands for the device Menu Home TopMenu Home Menu TopMenu Yes Yes Yes Yes GUIDE The first of these available commands for the device Guide Home TopMenu Guide Home TopMenu Yes Yes Yes Yes Directional pad normal non color button mode Up Right Down Left Up Right Down Left Yes Yes Yes Yes Directional pad color button mode Green Red Yellow Blue G...

Страница 235: ...ese available commands for the device PreviousTrack Replay PreviousTunerPreset PreviousDisc ReverseSkip Replay Not supported PreviousDisc No No Yes Yes Pause if available Otherwise sends TogglePlayPause Pause PlayPause Yes Yes Yes Yes The first of these available commands for the device NextTrack Advance NextTunerPreset NextFavoriteChannel PreviousDisc ForwardSkip ForwardSkip Not supported Not sup...

Страница 236: ... Rewind ReverseScan Rscan FirstPlayPause1 Not supported Play_Pause FastForward ForwardScan Fscan Asterisk Asterisk Replay Replay Replay HOME Home Home Home MENU Menu Menu Menu BACK Back Back Back Up Up Up_Arrow Right Right Right_Arrow Down Down Down_Arrow Left Left Left_Arrow Select Select Select 1 If this command does not exist for the device this button is mapped to the Play command instead ...

Страница 237: ... right pan rt rt panright Required Up_Arrow Up Navigation_Up Menu_Up Cursor_Up tilt_up tilt up Required Select OK Navigation_Select Select Required Menu Root_Menu Disc_Menu DiscMenu List DVD_Menu DVD Menu DVDMenu Required Back Required Replay REPLAY_GUIDE INSTANT_REPLAY REPLAY BACK REPLAY_ZONES Required Home Tivo Options Required Kpd key_ key Dial_ Dial Dial_Star DialStar Key Asterisk Required Loa...

Страница 238: ...nto the CP4 R that shares the same ID manufacturer model name and communication type as an existing driver the latest file will overwrite the existing entry FileTransfer Dialog Delete Device Driver Files To delete a custom device driver file from the CP4 R NOTE Drivers may be deleted to reclaim disk space to remove a known bad version of an existing driver to allow the cloud to download the latest...

Страница 239: ...connectors such as HDMI will always be labeled as GenericAV in the Crestron Pyng interface This is done to allow the mapping in the receiver to be changed without requiring an update to the Crestron Pyng interface For example if a Blu ray Disc player source is mapped to the Component 1 input and the mapping was changed to use the HDMI 1 input instead the Blu ray Disc player is still selected as th...

Страница 240: ...dia source is routed to a room For the CEN NSP 1 Autonomic streaming devices and CEN TRACK devices a discrete pause command is executed If this command is not available no command is executed For DVD players a discrete pause command is executed If this command is not available no command is executed For streaming devices such as Amazon Fire streaming devices or Apple TV digital media extenders a d...

Страница 241: ...n Dynamic DNS Service on the Installer Settings System Control Options screen to display the MyCrestron Settings screen MyCrestron Settings Screen NOTE A MyCrestron domain name must be registered at www mycrestron com prior to registering the system with MyCrestron 2 Enter the domain name of the MyCrestron account in the Domain text box 3 Enter the password for the MyCrestron account in the Passwo...

Страница 242: ...795 CTP Used for connecting to the processor in Crestron Toolbox 843 Web XPanel Interface Used for an Adobe software Flash Policy Server request For more information refer to OLH article 5793 at https support crestron com 80 HTTP Used for serving files from the HTTP folder on the processor Crestron Pyng web XPanel interface app manifest file and so forth NOTE the webport command may be issued usin...

Страница 243: ...tings Device Key Enter the device registration key which is found by navigating to Installer Settings System Configuration MyCrestron Monitoring Service Add to Group If desired add the CP4 R to a MyCrestron device group Monitor the device Click the checkbox to enable or disable remote monitoring for the PYNG HUB A filled checkbox indicates that the device will be monitored Ancillary Device If desi...

Страница 244: ...l web server Use the following procedures to create and upload a custom television provider into the Crestron Pyng system Create a Channel JSON File The television provider file obtains channel data from an externally hosted JSON file To create a custom channel JSON file 1 Open a text editor or code editing program 2 Create the channel list file schema as shown below The value for the lastUpdated ...

Страница 245: ...ilename must exactly match the imageId parameter value for the associated channel For example to use a channel icon file with a wpii png filename the imageId parameter value for the associated channel must be wpii Images with dimensions less than 150 x 150 pixels are not resized Images with dimensions larger than 150 x 150 pixels are scaled down with an aspect ratio kept to a maximum of 150 pixels...

Страница 246: ...Indicates whether the television provider file is custom Boolean channelFile The URL of the channels JSON file on the external web server string imageFile The URL of the channel icons zip file on the external web server string id custom1 name Custom Channels 1 eTag null channelsLastUpdated null custom true channelFile http yourdomain com customchannels1 json imageFile http yourdomain com customima...

Страница 247: ... system 2 Overwrite the existing channels JSON file and the channel icons zip file on the web server NOTE Overwriting the existing files on the web server updates the channel data for all customers that are using the associated custom television provider file 3 In the Crestron Pyng application navigate to any cable box in the system 4 Tap the gear button next to the cable box name 5 Click the Prov...

Страница 248: ...splayed NOTE New users to the Crestron Certified Drivers web portal must create an account in order to search for and download device drivers Crestron Certified Derivers Portal Driver Search Page 2 Navigate to the desired device driver s in the web portal Use the Version tab to confirm the version of the device driver s 3 Select the device driver s by clicking the check box to the left of a driver...

Страница 249: ...sting IR devices that were added using an older version of the driver must be deleted and added back to the system For Serial and TCP IP devices or any other DLL based devices delete all devices that were added using the older firmware Wait 60 seconds without making any other changes to the system configuration and then reboot the CP4 R After the CP4 R has rebooted add the device s back to the sys...

Страница 250: ...configuring the touch screen for 2N door station support refer to the TSW 560 TSW 760 TSW 1060 Supplemental Guide Doc 7927 at www crestron com manuals Crestron Pyng supports a connection to the following 2N door station models 2N IP Audio Kit 2N IP Audio Kit Lite 2N IP Base 2N IP Force 2N IP Safety 2N IP Solo 2N IP Uni 2N IP Vario 2N IP Verso 2N IP Video Kit Use the procedures in this appendix to ...

Страница 251: ... 2N Device To discover the 2N device on the network 1 Download and install the 2N Network Scanner application from https www 2nusa com en_US products 2n network scanner 2 Open the application All discovered 2N door stations on the network are displayed 2N Network Scanner ...

Страница 252: ...d enter the following information under Intercom Identity Enter a name for the door station in the Display Name text field This name will be shown on the touch screen to identify the door station when a call is received If configuring the door station to support Rava SIP intercom calls enter the Rava extension for the door station in the Phone Number ID text field NOTE If there are multiple door s...

Страница 253: ...Crestron multicast settings in the appropriate text fields If multicast is used and there are multiple 2N door stations on site specify the unique multicast address for each door station Multicast may not be supported if it is used with an SIP server 6 Select the Video tab and enter the following settings Click the check box to display a check mark next to H 264 Select VGA 640x480 from the Video R...

Страница 254: ...e blue users icon to display the Directory menu 2 Navigate to Users and click the add user button to create a new user 2N Configuration Utility Users Settings NOTE 2N devices also refer to users as buttons as this refers to the buttons on the 2N door station that are used to dial specific dwellings or ring groups 3 Enter rava CRESTRON in the Phone Number text field ...

Страница 255: ...d group name all capital letters with no spaces Then enter rava GROUPNAME in the Phone Number text field For example if a SIPPAGEGROUP FIRSTFLOORGROUP command was issued to the touch screen enter rava FIRSTFLOORGROUP in the Phone Number text field Hardware Settings 1 In the web configuration utility click the gray gear icon to display the Hardware menu 2 Navigate to Buttons 3 Add the button user c...

Страница 256: ...he configured 2N door station in the 2N Mobile Video web configuration interface 2 Under Mobile Video service select Manual from the Configuration mode drop down menu Mobile Video service Configuration mode NOTE If Configuration mode is set to automatic the mobile app may overwrite the existing 2N IP intercom settings including the touch screen connection 3 In the 2N device web configuration utili...

Страница 257: ...Product Manual DOC 8432A Crestron Pyng OS 2 for CP4 R 251 2N Configuration Utility Users Settings ...

Страница 258: ...om the CP3 R 1 Connect to the CP3 R using an FTP client such as FileZilla 2 Copy the following folders highlighted in the image below from the CP3 R to a location on the computer User Data User ThirdPartyDrivers User TvProviders User UsedThirdPartyDrivers CP3 R User Directory 3 Connect to the CP4 R console using the Text Console tool in Crestron Toolbox 4 Issue the following console commands to st...

Страница 259: ...e the hostname hostname command to change the CP4 R hostname to match what was used for the CP3 R 7 Unregister Alexa from the CP3 R if it is still registered If the existing Crestron Pyng system is still available navigate to Voice Control Settings and click Unregister For more information refer to Voice Control Services on page 124 If the existing Crestron Pyng system is no longer available navig...

Страница 260: ... 124 10 Reconfigure the MyCrestron DNS service if applicable For more information refer to Reconfigure MyCrestron DDNS on page 257 Method 2 Use a CP3 R Golden Configuration 1 Log into https portal my crestron com using the MyCrestron com subdomain that is paired with the system 2 Select the CP3 R from the device list 3 Click Download Backup MyCrestron Portal Download Backup 4 Expand the file list ...

Страница 261: ...omputer Golden Configuration ZIP File 7 Connect to the CP4 R console using the Text Console tool in Crestron Toolbox 8 Issue the following console commands to stop the Crestron Pyng program Enableprogramcmd Stopprog p 0 9 Connect to the CP4 R over SFTP Simple File Transfer Protocol using the device login credentials NOTE The default username is crestron and there is no default password ...

Страница 262: ...at was used for the CP3 R 11 Unregister Alexa from the CP3 R if it is still registered If the existing Crestron Pyng system is still available navigate to Voice Control Settings and click Unregister For more information refer to Voice Control Services on page 124 If the existing Crestron Pyng system is no longer available navigate to https echoadminportal crestronfusion com and click Unregister En...

Страница 263: ...124 e Reconfigure the MyCrestron DNS service if applicable For more information refer to Reconfigure MyCrestron DDNS on page 257 Reconfigure MyCrestron DDNS To reconfigure MyCrestron DDNS using the Crestron Pyng configuration utility 1 In the CP3 R configuration utility tap the gear button on the bottom right of the Setup screen to display the Installer Settings screen 2 Navigate to System Control...

Страница 264: ... the CP4 R with MyCrestron To reconfigure MyCrestron DDNS using console commands via the Text Console tool in Crestron Toolbox 1 Connect to the CP3 R with the Text Console tool 2 Issue the mycrestron command 3 Record the domain and password that are returned by the command 4 Disconnect the CP3 R from the network 5 Dissociate the CP3 R MAC address from the MyCrestron account a Navigate to https www...

Страница 265: ...Product Manual DOC 8432A Crestron Pyng OS 2 for CP4 R 259 This page is intentionally left blank ...

Страница 266: ...Crestron Electronics Inc Product Manual DOC 8432A 15 Volvo Drive Rockleigh NJ 07647 2053282 Tel 888 CRESTRON 03 19 Fax 201 767 7576 Specifications subject to www crestron com change without notice ...

Отзывы: