background image


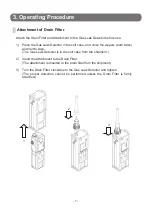
- 9 - 


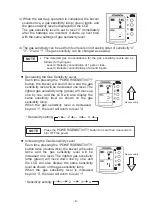
3) When the warm-up operation is completed, the buzzer 

sounds once, a gas sensitivity lamp (green) lights, and 

the gas sensitivity level is displayed on the LCD. 

The gas sensitivity level is set to level “3” immediately 

after the batteries are inserted. It starts up next time 

with the same settings of gas sensitivity level. 


4) The gas sensitivity can be set from four levels in increasing order of sensitivity “4”, 

“3”, “2” and “1”. The gas sensitivity can be changed as needed. 


  Decreasing the Gas Sensitivity Level 

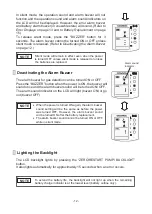
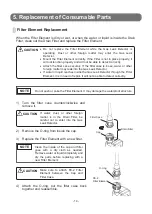
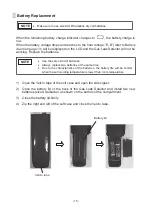
Each time pressing the “POWER/SENSITIVITY” 

button, the buzzer will sound once and the gas 

sensitivity level will be decreased one level. The 

lighted gas sensitivity lamp (green) will move up 

one by one, and the LCD will also display the 

same sensitivity level as shown on the gas 

sensitivity lamp. 

When the gas sensitivity level is decreased 

beyond “1”, the level will return to level “4”. 


  Increasing the Gas Sensitivity Level 

Each time pressing the “POWER/SENSITIVITY” 

button twice (double-click), the buzzer will sound 

twice and the gas sensitivity level will be 

increased one level. The lighted gas sensitivity 

lamp (green) will move down one by one, and 

the LCD will also display the same sensitivity 

level as shown on the gas sensitivity lamp. 

When the gas sensitivity level is increased 

beyond “4”, the level will return to level “1”. 


  The detected gas concentrations for the gas sensitivity levels are as 

follows (for hydrogen). 

Level 4: Detects concentration of 1 ppm or less. 

Level 3: Detects concentrations of around 6 ppm. 

NOTE 

* Sensitivity setting:


 1


 2 


 3


 4


Press the

 POWER/SENSITIVITY 

button for more than 3 seconds to 

turn OFF the power. 

NOTE 

* Sensitivity setting: 


  2 


 3


  4 

SENS. 

LOW 

Gas sensitivity

SENS. 

Gas sensitivity


SENS. 

HIGH 


- 8 - 


Operating Procedure 


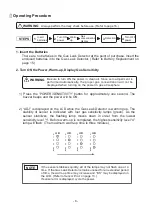
1. Insert the Batteries


There are no batteries in the Gas Leak Detector at the point of purchase. Insert the 

enclosed batteries into the Gas Leak Detector. (Refer to 

Battery Replacement

 on 

page 15.) 


2. Turn ON the Power, Warm-up, Display Gas Sensitivity


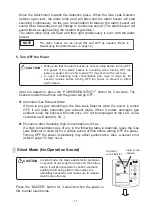
1) Press the “POWER/SENSITIVITY” button for approximately one second. The 

buzzer beeps and the power will be ON. 

 
2) “ADJ” is displayed on the LCD while the Gas Leak Detector is warming up. The 

stability of sensor is indicated with four gas sensitivity lamps (green). As the 

sensor stabilizes, the flashing lamp moves down in order from the lowest 

sensitivity level “1”. Before warm-up is completed, the highest sensitivity level “4” 

lamp will flash. (The maximum warm-up time is three minutes.) 


Always perform the daily check before use. (Refer to page 16.) 

WARNING


 STEPS  


Detection


Turn OFF 

power


Insert 

batteries 


Turn ON 

power


Warm-

up 

Gas 

concentration 

display 

Be sure to turn ON the power in clean air. Since zero adjustment is 

performed automatically, the proper gas concentration will not be 

displayed when turning on the power in gas atmosphere. 

WARNING


If the sensor stabilizes quickly, all of the lamps may not flash one at a 

time.


If the Gas Leak Detector remains unused for an extended period 

of time, the warm-up time may increase and “E-S” may be displayed on 

the LCD. (Refer to 

Sensor Error

 on page 13.)


If sensor error is displayed, cycle the power. 

NOTE 


L SENS.


L SENS.


L SENS.


L SENS.

Содержание XP-703D III

Страница 1: ...tector This instruction manual explains the use of three models listed on the left Keep this Instruction Manual available for quick reference when needed Read this Instruction Manual and thoroughly un...

Страница 2: ...ilent Mode No Operation Sound 11 Deactivating the Alarm Buzzer 12 Lighting the Backlight 12 4 Error Displays 13 5 Replacement of Consumable Parts 14 Filter Element Replacement 14 Battery Replacement 1...

Страница 3: ...in preparing the Gas Leak Detector However if any items are missing or damaged please contact your New Cosmos distributor Replacements for any missing or damaged items will be sent Name Quantity Gas...

Страница 4: ...stand thoroughly this Instruction Manual regardless of your experience with using Gas Leak Detectors Do not use this Gas Leak Detector for improper purpose Do not use this Gas Leak Detector in undocum...

Страница 5: ...the batteries are leaking when the remaining battery charge is low Do not disassemble alter or change the structure or electric circuits of the Gas Leak Detector It may affect its performance Do not l...

Страница 6: ...4 2 Part Names and Functions 1 2 10 6 8 4 3 9 7 5 11...

Страница 7: ...s light if the concentration is very high These lamps also flash when an error occurs in the pump or sensor 8 Buzzer hole The buzzer sounds 9 LCD Displays the gas sensitivity and messages a The remain...

Страница 8: ...6 No Name Functions 1 Side Zipper Open the zipper to replace the batteries 2 Back Pocket The Operating Guide is stored here 3 Inside Pocket A Replacement Filter Element is stored here Soft case 1 3 2...

Страница 9: ...d close the zippers both sides and Velcro tape The Gas Leak Detector is in the soft case from the shipment 2 Insert the Attachment to the Drain Filter The attachment is inserted to the drain filter fr...

Страница 10: ...p is completed the highest sensitivity level 4 lamp will flash The maximum warm up time is three minutes Always perform the daily check before use Refer to page 16 WARNING STEPS 3 Detection Turn OFF p...

Страница 11: ...as sensitivity lamp When the gas sensitivity level is decreased beyond 1 the level will return to level 4 Increasing the Gas Sensitivity Level Each time pressing the POWER SENSITIVITY button twice dou...

Страница 12: ...p sound for 3 seconds and then it will return to display the gas sensitivity level If Zero Adjustment is not able to be performed the buzzer sound will beep and it remains to display the gas sensitivi...

Страница 13: ...ncentration gas of any in the following table is detected leave the Gas Leak Detector in clean air for a certain period of time before turning OFF the power Turning OFF the power immediately may affec...

Страница 14: ...d ON OFF The alarm sound indicator on the LCD will light buzzer ON or go out buzzer OFF Lighting the Backlight The LCD backlight lights by pressing the ZERO RESTART PUMP BACKLIGHT button It also light...

Страница 15: ...g ON the power several times there may be a problem with the sensor Request repairs Pump Error Error lamps flash Water or liquid may have been sampled or the inlet may be blocked Remove the water or l...

Страница 16: ...function properly and will not be able to detect correctly Attach the filter case securely If the filter case is loose water or other foreign matter may leak into the Gas Leak Detector If water or li...

Страница 17: ...ipper 2 Open the battery lid of the back of the Gas Leak Detector and install two new batteries size AA alkaline as shown on the bottom of the compartment 3 Close the battery lid firmly 4 Zip the righ...

Страница 18: ...flash or the alarm buzzer will not sound contact your New Cosmos distributor Attachment Check the Attachment for any wear or damage which may affect operations If any replace with a new Attachment Fil...

Страница 19: ...lacement Parts and Options Part Name Model Part Code Remarks Filter Element 10pcs FE 2 59160022 Drain Filter DF 114 59070018 Inspection Gas EG 10D 59150300 Attachment AT 2B 20524489 For tubing and cou...

Страница 20: ...ll not turn ON by pressing the POWER SENSITIVITY button The battery polarity is reversed Insert the batteries correctly Battery Replacement on page 15 Battery exhaustion Replace the batteries Displayi...

Страница 21: ...After examination of allegedly defective product return to New Cosmos with freight prepaid should the product fail to conform to this warranty customer s only remedy and New Cosmos s only obligation...

Страница 22: ...ressure Range Atmospheric pressure 800 to 1100hPa Operating Temperature and Humidity Range 0 to 40 degrees C less than 85 RH with no condensation Dimensions Approx 38 W x 130 H x 32 D mm excluding pro...

Страница 23: ...of a metal oxide semiconductor that is sintered in a ball on a platinum wire coil that functions as both a heater and electrode It detects the change of electrical conductivity occurred by oxidation r...

Страница 24: ...naka Yodogawa ku Osaka 532 0036 Japan Tokyo Branch New Cosmos Electric Co Ltd 2 6 2 Hamamatsu cho Minato ku Tokyo 105 0013 Japan Phone 81 3 5403 2715 Fax 81 3 5403 2710 Email e info new cosmos co jp U...

Отзывы: