background image


12

Malfunction:


A.  When the speed sensor has malfunctions, the computer will indicate it. The 

machine will stop after 5 seconds if there’s problem with speed sensor, the 

computer will return to ready status and LCD show “Er”. Users can continue the 

operation when it’s under ready status. 

B.  When the incline sensor has malfunctions: if the computer doesn’t detect the 

incline, the LCD show 

“Er”

, you can still press incline up/down key to change the 

incline, for examining and repairing the treadmill. 


Adjustment                                                                                           


1.  Ask the authorized service representative or professional technician to check if the 

voltage is suitable, and if the grounded wire is reliable. Pull the running belt by 

your hand and check if it turns freely, without screech. 

2.  Insert one end of the power line into the socket at the forepart of treadmill; plug the 

other end in the electrical outlet. Put the emergency stop key on to the 

corresponding place on the computer. 

3.  Turn on the switch from “0” to “1”, the computer displays zero, the running belt do 

not move. 

4.  Press the “ON/OFF” key, the treadmill runs slowly, check if the computer and 

running belt work normally. 

5.  Press the “SPEED” key, and observe the status of the running belt and display on 

the computer. Please turn off the machine if the belt runs defectively, adjust it 

following the rules in “MAINTENANCE AND MALFUNCTION TREATMENT”. 

6.  Check all the functions keys on the computer. 

7.  Pull out emergency stop key, the treadmill should stop immediately; it’ll work when 

you put it on again. 

8.  Press the “ON/OFF” key, the treadmill will stop, and then turn off the switch if you 

want to finish your exercise. 

Operation instruction                                                                        

After assembly and adjustment you can use the treadmill: 

Содержание CMTM-4610A2

Страница 1: ......

Страница 2: ...tool 3 Exploded drawing 4 Spare parts list 5 Assembly instruction 6 Computer Instruction 8 Adjustment 11 Operation instruction 11 Folding moving and unfolding instruction 12 Maintenance and malfuncti...

Страница 3: ...his treadmill Do not run by barefoot slippers or socks only 9 Always clip the safety key on the user during exercise so that the user can pull it off to stop the treadmill immediately in case of emerg...

Страница 4: ...supervision or instruction concerning use of the appliance by a person responsible for their safety 18 Children should be supervised to ensure that they do not play with the appliance Warning It will...

Страница 5: ...4...

Страница 6: ...5 Explored drawing...

Страница 7: ...ylinder bushing 1 49 Signal wire 1 16 Cylinder support 1 50 Running belt guide hook 2 17 Cylinder spring 1 51 Computer connecting plate 2 18 Incline frame 1 52 Left base foot cover inner 1 19 Side rai...

Страница 8: ...Half round bolt M8 20 4 A20 Bolt M5 35 10 C7 Big flat washer 5 10 A21 Cross head bolt ST6 10 4 C8 Spring washer 8 4 A22 Half round bolt M8 50 4 C9 Spring washer 4 4 A23 Cross head self lock bolt ST2...

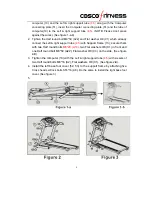
Страница 9: ...t the Left right support tube 4 5 with Support frame 13 secure them with two Half round bolts M8 20 A19 two Flat washers 8 C1 in front and one Half round bolt M8 50 A22 Flat washer 8 C3 on the side Se...

Страница 10: ...dmill starts the initial speed is 1 km h and incline is 0 The LCD will show the speed accordingly Adjust the speed and incline by pressing speed and incline buttons on computer The speed will increase...

Страница 11: ...time is 16 minutes Otherwise it shows set time Press to change program running time The scale is 10 59 minutes press ENTER to start speed and incline setting of section 3 Speed and incline setting a T...

Страница 12: ...f After all setting The LCD will twinkle and then hold both of your hands on the hand pulse to test your body fat The LCD will show your body fat when test is finished or it will show if it s failed...

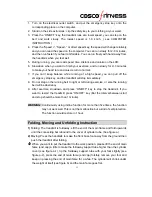
Страница 13: ...nd of the power line into the socket at the forepart of treadmill plug the other end in the electrical outlet Put the emergency stop key on to the corresponding place on the computer 3 Turn on the swi...

Страница 14: ...g exercise or else the running belt will be aberrancy 9 After exercise slowdown and press ON OFF key to stop the treadmill If you want to restart the treadmill press ON OFF key But the interval betwee...

Страница 15: ...er and then adjust the left and right bolts in rear roller with hex spanner See figure it is better to adjust 1 2 circle once Then turn on the switch check if the belt 10 runs defectively when the run...

Страница 16: ...ose Adjust the length of the running belt Warming up and cooling down A successful exercise program consists of a warm up aerobic exercise and a cool down Do the entire program at least two and prefer...

Страница 17: ...ck Next rotate your head back for one count stretching your chin to the ceiling and letting your mouth open Rotate your head to the left for one count and finally drop your head to your chest for one...

Страница 18: ...d lean forward by moving your hips toward the wall Hold then repeat on the other side for 15 counts 7 Side Stretch Open your arms to the side and continue lifting them until they are over your head Re...

Отзывы: