2. After the flywheel has been removed, remove the hub
from the crankshaft. If the hub will not slide off the
crankshaft easily, gently insert a flat head screw driver
into the split on the hub and lightly tap with a screw
driver. The hub should easily slide off the shaft.
3. Remove the bearing carrier and crankshaft from the
crankcase (see figure 5.7A for details). If corrosion or
pitting is present, the roller bearings should be replaced.
When replacing the roller bearings, always replace
the entire bearing and not just the cup or the cone.
Purchasing extra shims is recommended as well. For
crankcase assembly details, refer to Appendix D.
NOTE: REMOVING AND REPLACING THE BEARING
CONES AND BEARING CUPS (STEPS FOUR AND
FIVE LISTED BELOW) REQUIRES THE SERVICES
OF A PROFESSIONAL MACHINE SHOP. DO NOT
ATTEMPT TO REPLACE THEM IN THE FIELD.
4. To replace the bearings, press out the bearing cup
on the flywheel side of the crankcase and the other
bearing cup located on the bearing carrier. Using a
bearing puller, remove the bearing cones from each
end of the crankshaft.
5. Press one new bearing cup into the bearing
carrier and press the other new bearing cup
into the crankcase (opposite the bearing carrier
side). Press one bearing cone on each end of
the crankshaft. Insert the crankshaft through the
bearing carrier opening. The flywheel side of the
crankshaft should slide through the opening of the
bearing cup and bearing cover. Slowly lower the
opposite end of the crankshaft to the bottom of the
bearing carrier opening.
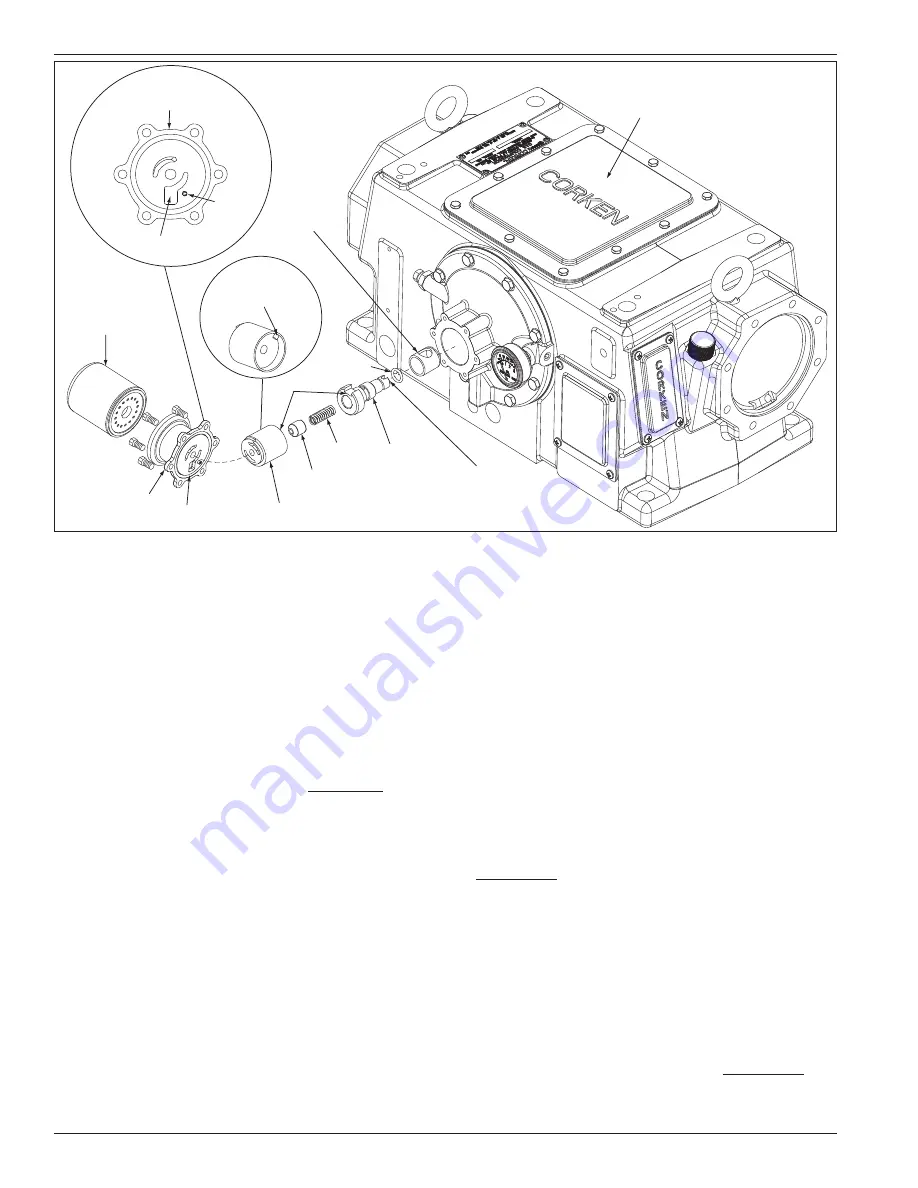
6. Before installing the bearing carrier,
make sure
the slot at the end of the oil pump shaft is
aligned with the pin located at the end of the
crankshaft .
Alignment should be either twelve and
six o’clock or nine and three o’clock. Make sure the
gasket for the bearing carrier is installed correctly.
An improperly installed gasket will block the oil
passage (see figure 5.7A).
7. Push the end of the crankshaft toward the crankcase
and pull back; if a clicking noise or motion is
detected, the crankshaft has too much endplay. See
Appendix B.
8. To reduce endplay, remove the bearing cover located
on the flywheel side of the crankcase and remove a
thin shim. Recheck the endplay after replacing the
bearing cover.
9. When there is no detectable endplay, the shaft
must still be able to rotate. If the crankshaft sticks
or becomes abnormally warm, then the crankshaft
bearings are too tight. If the crankshaft is too tight, add
more shims but do not over shim. (Appendix B lists
the proper crankshaft endplay). When the crankshaft
can be rotated by hand with proper endplay, the rest
of the compressor may be reassembled.
Oil suction
Pin
Oil filter
Oil filter adapter
O-ring
Oil pump assembly
Spring guide
Pump shaft
adapter
Spring
O-ring
Align slot with
the pin at the end of
the crankshaft.
Align pin with slot
on pump shaft
adapter.
Backside of
oil filter adapter
Crankcase inspection plate:
Fill crankcase with oil through
this opening.
Pump shaft
bushing
Figure 5.7B: Oil Pump Inspection
28


