background image

XPL

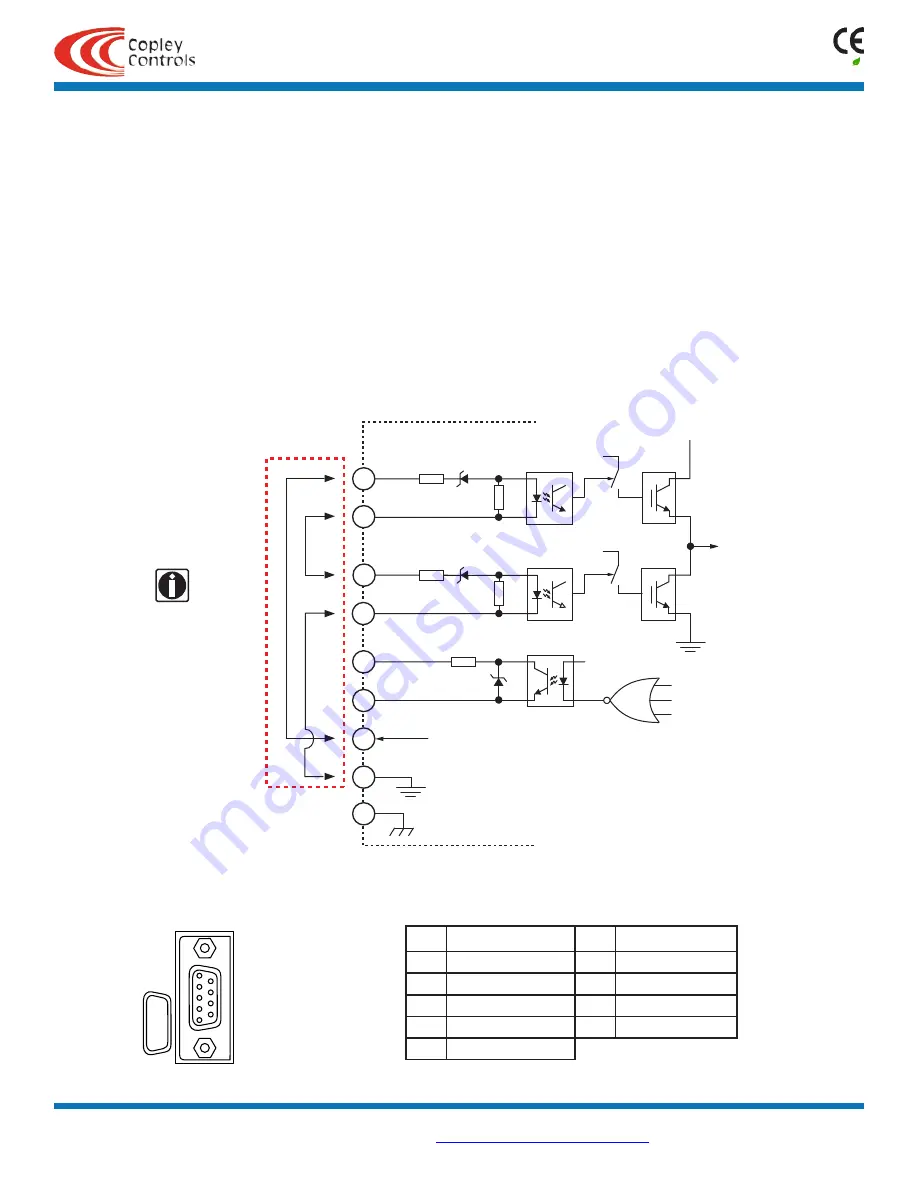
These connections 

MUST be made to 

enable the Xenus. 

Copley Controls, 20 Dan Road, Canton, MA 02021, USA 

Tel: 781-828-8090 

Fax:  781-828-6547


Tech Support: E-mail: [email protected], Web: 

http://www.copleycontrols.co

m


Page 7 of 28

RoHS

Xenus


Plus

 CANopen

Frame Ground

Signal ground

+24V Output

From 24V input on J4-3

J5

4.99k

5.1V

+HV

High Side PWM 

Low Side PWM 

Motor

Ouputs

4.99k

4.99k

5.1V

ENH

ENH

ENL

ENL

DIAG-ON

36V

10

+V

4.99k

LED(+)

ENL(-)

ENH(+)

Xenus Plus

STO (Safe Torque Off)

Override

Connections

ENH(-)

ENL(+)

LED(-)

2

3

1

4

5

6

7

9

8

description

The XPL has a safety feature that is designed to provide the Safe Torque Off (STO) function as defined in IEC 61800-5-2. Two opto-couplers are 

provided which, when de-energized, prevent the upper and lower devices in the PWM outputs from being operated by the digital control core. This 

provides a positive OFF capability that cannot be overridden by the control firmware, or associated hardware components. When the opto-couplers are 

activated (current is flowing in the input diodes), the control core will be able to control the on/off state of the PWM outputs.

SAFE TORQUE OFF (STO)

FUNCTIONAL DIAGRAM

In order for the PWM outputs of the Xenus Plus to be activated, current must be flowing through both opto-couplers that are connected to the ENH and 

ENL terminals of J5, and the drive must be in an ENABLED state. The LED outputs on J5 connect an opto-coupler to an external LED and will conduct 

current through the LED to light it whenever the PWM outputs can be activated, or the drive is in a diagnostic state. When the LED opto-coupler is OFF, 

the drive is in a Safe state and the PWM outputs cannot be activated to drive a motor.

STO OVERRIDE

The diagram below shows connections that will energize both ENH and ENL opto-couplers. 


When this is done the STO feature is defeated and control of the output PWM stage is under control of the digital control core.


If not using the STO feature, these connections must be made in order for the Xenus to be enabled.

sto connector

FUNCTIONAL DIAGRAM

pin

SIGNAL

pin

SIGNAL

1

Frame Gnd

6

Enable LED(+)

2

Safe Enable HI(+)

7

Enable LED(-)

3

Safe Enable HI(-)

8

24 Vdc Common

4

Safe Enable LO(+)

9

+24 Vdc Input

5

Safe Enable LO(-)

J5 SIGNALS

J5

1

6

9

5

S

AFETY

Содержание Xenus Plus CANopen XPL Series

Страница 1: ...Vac Ic Ip XPL 230 18 100 240 6 18 XPL 230 36 100 240 12 36 XPL 230 40 100 240 20 40 Add R for resolver feedback option Control Modes Indexer Point to Point PVT Camming Gearing Position Velocity Torqu...

Страница 2: ...n LO 2 3 Vdc Vin HI 2 7 Vdc Vhysteresis 400 mVdc Differential IN3 4 or IN5 6 Vin LO 200 mVdc Vin HI 200 mVdc Vhysteresis 200 mVdc IN7 14 Opto isolated 15 30 Vdc compatible bi polar 2 groups of 4 with...

Страница 3: ...drive without heatsink 3 1 lb 1 40 kg for XPL HS heatsink 1 86 lb 0 84 kg for XPL HL heatsink Ambient temperature 0 to 45 C operating 40 to 85 C storage Humidity 0 to 95 non condensing Contaminants Po...

Страница 4: ...nating resistors 18 M counts sec post quadrature 4 5 M lines sec As Emulated Output Quadrature encoder emulation with programmable resolution to 4096 lines 65 536 counts per rev from analog sin cos en...

Страница 5: ...lap LED color may be red green off or flashing of either color CAN status LED 6 9 1 5 D Sub 9F 3 3 2 2 1 8 CAN_L CAN_GND CAN_H CAN_L RJ 45 CAN_GND CAN_H 7 1 J7 Pin 8 Pin 1 canopen connectors Dual RJ 4...

Страница 6: ...e ASCII Interface to Enable the amplifier in Programmed Position mode Home the axis Issue a series of move commands while monitoring position velocity and other run time variables Additional informati...

Страница 7: ...ut diodes the control core will be able to control the on off state of the PWM outputs safe torque OFF STO functional diagram In order for the PWM outputs of the Xenus Plus to be activated current mus...

Страница 8: ...d from devices with active pull up and pull down to take advantage of the high speed inputs Single ended PWM Direction Single ended 50 PWM differential 50 PWM differential PWM Direction Single ended p...

Страница 9: ...ck cable that could occur if the motor encoder had to drive two differential inputs in parallel each with it s own 121 ohm terminating resistor Secondary Encoder Input Input Output Select MAX3032 MAX3...

Страница 10: ...B Quad encoder inputs for Position or Camming modes differential single ended 12 Vdc max 12 Vdc max NON ISOLATED digital INPUTS Inputs IN1 2 are 24V tolerant These are high speed types with pull up r...

Страница 11: ...99k 5 1V IN9 5 4 99k 5 1V IN10 6 24V opto isolated digital INPUTS These inputs have all the programmable functions of the GP inputs plus opto isolation There are two groups of four inputs each with it...

Страница 12: ...riving PLC inputs that are opto isolated and connected to 24 Vdc The diode prevents conduction from 24 Vdc through the 1 k resistor to 5 Vdc in the drive This could turn the PLC input on giving a fals...

Страница 13: ...ange of 10V to 13 2V 5V output 400 mA Signal Ground 21 20 17 5 19 Sin Sin Cos Cos Inx Inx 18 1 10k 121 J10 10k 121 Encoder FG sin cos 5V 0V 23 22 10k 121 indx Frame Ground 10k Sin Cos Indx 10k 10k ANA...

Страница 14: ...SI in the use of clock and data signals but which also supports analog sin cos channels from the same encoder The number of position data bits is programmable as is the use of sin cos channels Use of...

Страница 15: ...lectrical cycle of the motor There are three of them U V W and they may be sourced by magnetic sensors in the motor or by encoders that have Hall tracks as part of the encoder disc They typically oper...

Страница 16: ...e external controllers that also need the motor feedback encoder signals because these now come from J8 the Control connector In addition to eliminating Y cabling where the motor feedback cable has to...

Страница 17: ...ARE CONNECTED TO MAINS POWER Fuse Fuse Earth Fuse Fuse Optional J3 REGEN REGEN Frame Ground U V W 1 4 5 2 3 4 3 2 1 Mot U Mot V Mot W Frame Ground J4 J1 J2 J8 24V BRAKE RTN Signal Ground Aout OUT2 OUT...

Страница 18: ...RCUITS ON J1 J2 J3 ARE CONNECTED TO MAINS POWER Fuse Fuse Earth Fuse Fuse Optional J3 REGEN REGEN Frame Ground U V W 1 4 5 2 3 4 3 2 1 Mot U Mot V Mot W Frame Ground J4 J1 J2 J8 24V BRAKE RTN Signal G...

Страница 19: ...AC MAINS 100 to 240 Vac 1 or 3 47 to 63 Hz L3 L2 L1 Fuse 1 H N LINE FILTER BRUSHLESS MOTOR DANGER HIGH VOLTAGE CIRCUITS ON J1 J2 J3 ARE CONNECTED TO MAINS POWER Fuse Fuse Earth Fuse Fuse Optional J3...

Страница 20: ...nd XPL 230 40 R models AWG 14 600V for XPL 230 18 R Shielded cable required for CE compliance J2 Cable Connector Wago 51118008 or 721 104 026 047 RN01 0000 Euro style 5 0 mm pluggable female terminal...

Страница 21: ...rame Gnd 10 Enc B1 19 Sin1 2 Hall U 11 Enc B1 20 Cos1 3 Hall V 12 Enc A1 21 Cos1 4 Hall W 13 Enc A1 22 Index1 5 Signal Gnd 14 Enc S1 23 Index1 6 5 Vdc Out 15 Enc S1 24 IN15 ENCFLT 7 AIN3 Motemp 16 Sig...

Страница 22: ...30 40 R models AWG 14 600V for XPL 230 18 R Shielded cable required for CE compliance J2 Cable Connector Wago 51118008 or 721 104 026 047 RN01 0000 Euro style 5 0 mm pluggable female terminal block Ca...

Страница 23: ...c B1 19 Sin1 S3 2 Hall U 11 Enc B1 20 Cos1 S4 3 Hall V 12 Enc A1 21 Cos1 S2 4 Hall W 13 Enc A1 22 Ref R2 5 Signal Gnd 14 Enc S1 23 Ref R1 6 5 Vdc Out 15 Enc S1 24 IN15 ENCFLT 7 AIN3 Motemp 16 Signal G...

Страница 24: ...e Because of their smaller wire gauge these should not be used as part of a safety ground system Motor cases can be safety grounded either at the motor by earthing the frame or by a grounding conducto...

Страница 25: ...ive remains at earth potential and eliminating a shock hazard that could occur of the chassis were allowed to float to the potential of the mains While this connection keeps the heatplate at earth pot...

Страница 26: ...o protective sheets blue on one side and clear on the other Both must be removed when the interface pad is installed STEPS TO INSTALL 1 Remove the blue protective sheet from one side of the pad and pl...

Страница 27: ...7 6 5 4 3 2 1 Standard Heatsink Low Profile Heatsink w fan Low Profile Heatsink or no Heatsink w fan Standard Heatsink w fan 5 1 2 3 4 No Heatsink Mains 240 Vac Continuous Output Current Adc Ambient...

Страница 28: ...above Norcomp 979 015 020R121 CME 2 J5 CME 2 Drive Configuration Software CD ROM SER CK RS 232 Cable Kit Heatsink Kits for Field Installation Optional XPL HL Heatsink Kit Low Profile 1 Heatsink low p...

Отзывы: