23
B45SWDUG5 V5.1 ‒ Swift Digital User & Installation Guide
Swift Digital
22
B45SWDUG5 V5.1 ‒ Swift Digital User & Installation Guide
Swift Digital
The Swift Digital has an Aux Output phono socket.
Hearing aid users with an fm radio aid will benefit from
connecting their transmitter directly to the Swift Digital unit.
The rebroadcast sound includes the sound
from all active Swift Digital inputs
‒ teacher, multimedia etc.
Pack 45SIBKFMGB for connection to:
Connevans fmGenie transmitter,
Phonak SmartLink & Sm, ZoomLink
& Z or EasyLink & E
Pack 45SIBKINS for connection to:
Phonak inspiro or Roger Pen transmitter
Pack 45SIBK220B for connection to:
Connevans CRM 220 transmitter
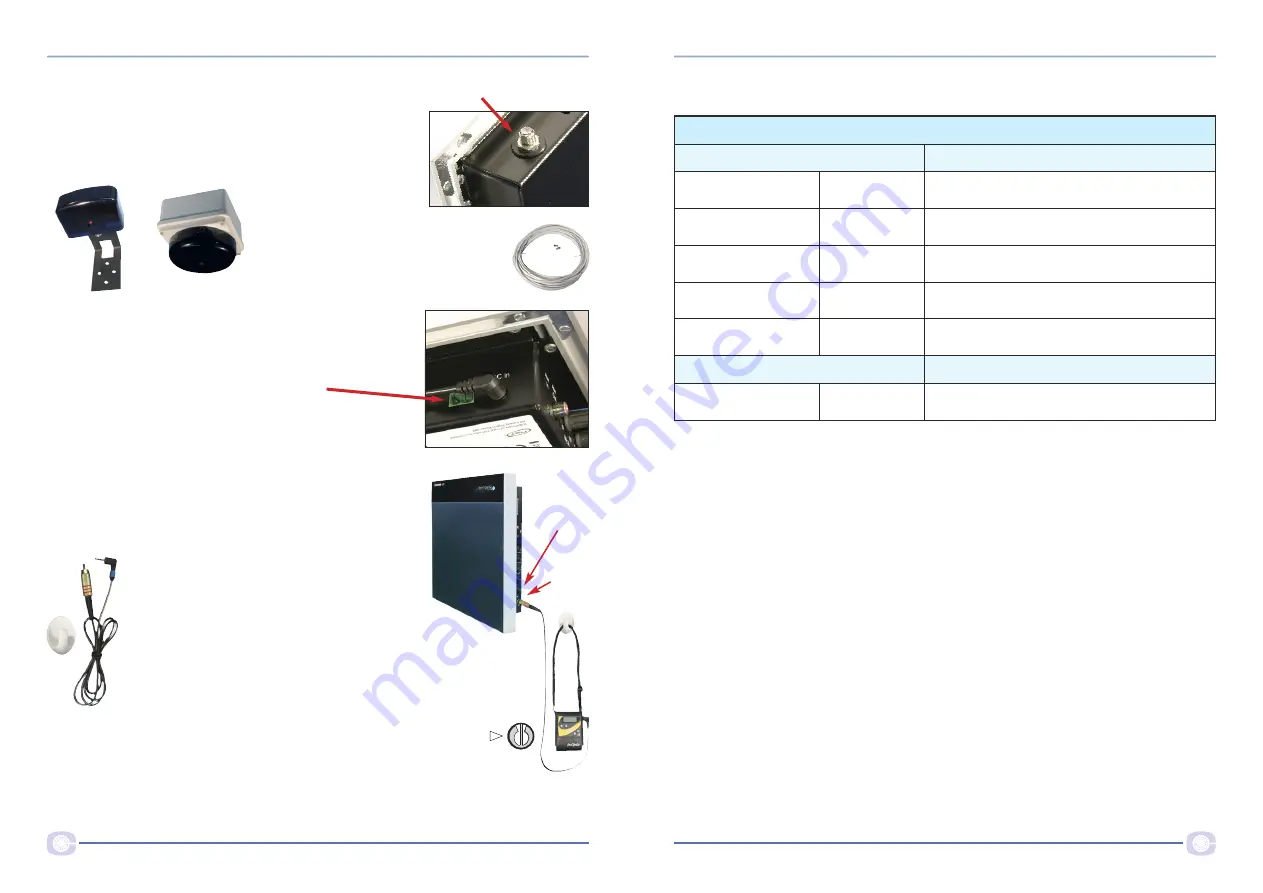
45IRSDZ
Optional external sensor
An external infra red pick up sensor to improve transmitter
reception can be fitted to your Swift Digital amplifier/speaker.
Two alternative sensor types are available, a wall or ceiling
sensor, as is an IR Swift sensor wiring pack.
Swift Digital sensor
wiring pack
c/w cable, 2 plugs &
2 plug cover boots
(XRG6IRC)
External sensor input
Aux Out
socket
‒ phono
Aux Out
adjust
Output to external equipment
eg. rebroadcasting via an fm radio aid for hearing aid users
45SIBKFMGB
Extension speaker
A compatible 8 ohm extension speaker or
ceiling speaker can be connected to the socket
which is on the bottom of the Swift Digital unit.
Aux Out
adjust
There is an aux out volume adjust ‒ set as shown
for any of the above leads.
This connection may also be used to record the
output of the Swift Digital.
45IRSW
SwiftConnect technical info
Appendix A
SwiftConnect LED modes
Central blue LED ring
Mode
O
Off
SwiftConnect unpowered
O O O
0.4 second flash
every 10 seconds
SwiftConnect active and
searching for Swift Digital unit
O
Solid blue
On and connected to Swift Digital unit
O O O O O O O
One short flash
every second
SwiftConnect on but "alone"
(Swift Digital unit not on or unpaired)
OO OO OO OO OO
Two short flashes
every second
Pairing mode
(max duration 60 seconds)
Green LED's
Mode
l
Responsive
Lights up when sound is detected on the
appropriate input
SwiftConnect on/off
When USB power is applied the SwiftConnect will turn on. Touching the centre button for
less than 0.5 seconds will switch between on and standby (off). However if the paired Swift
Digital is on, then the SwiftConnect will switch itself back on automatically within 10 secs.
The SwiftConnect wakes up briefly once every 10 seconds to check whether the paired Swift
Digital has been switched on.
The SwiftConnect automatically enters the low power standby mode 2 hours after last use.
SwiftConnect input and return volume control setting
This procedure assumes that the computer audio is sent to the interactive whiteboard audio
system from the 3.5mm stereo headphone socket.
If the computer audio is sent digitally to the interactive whiteboard (e.g. via USB) then see
‘interactive whiteboard’ digital audio’ below.
Initially, leave the computer connected to the interactive whiteboard audio system without
the SwiftConnect connected and set the computer volume at about half. Play the
audio/video material and adjust the interactive whiteboard speaker volume control to give
the required volume.
Remove the interactive whiteboard audio cable from the computer headphone socket and
replug into either of the SwiftConnect outputs. Then, connect a 3.5mm lead between the
computer headphones output and either of the SwiftConnect inputs.


