21
B45SWDUG5 V5.1 ‒ Swift Digital User & Installation Guide
Swift Digital
20
B45SWDUG5 V5.1 ‒ Swift Digital User & Installation Guide
Swift Digital
Micro USB
power
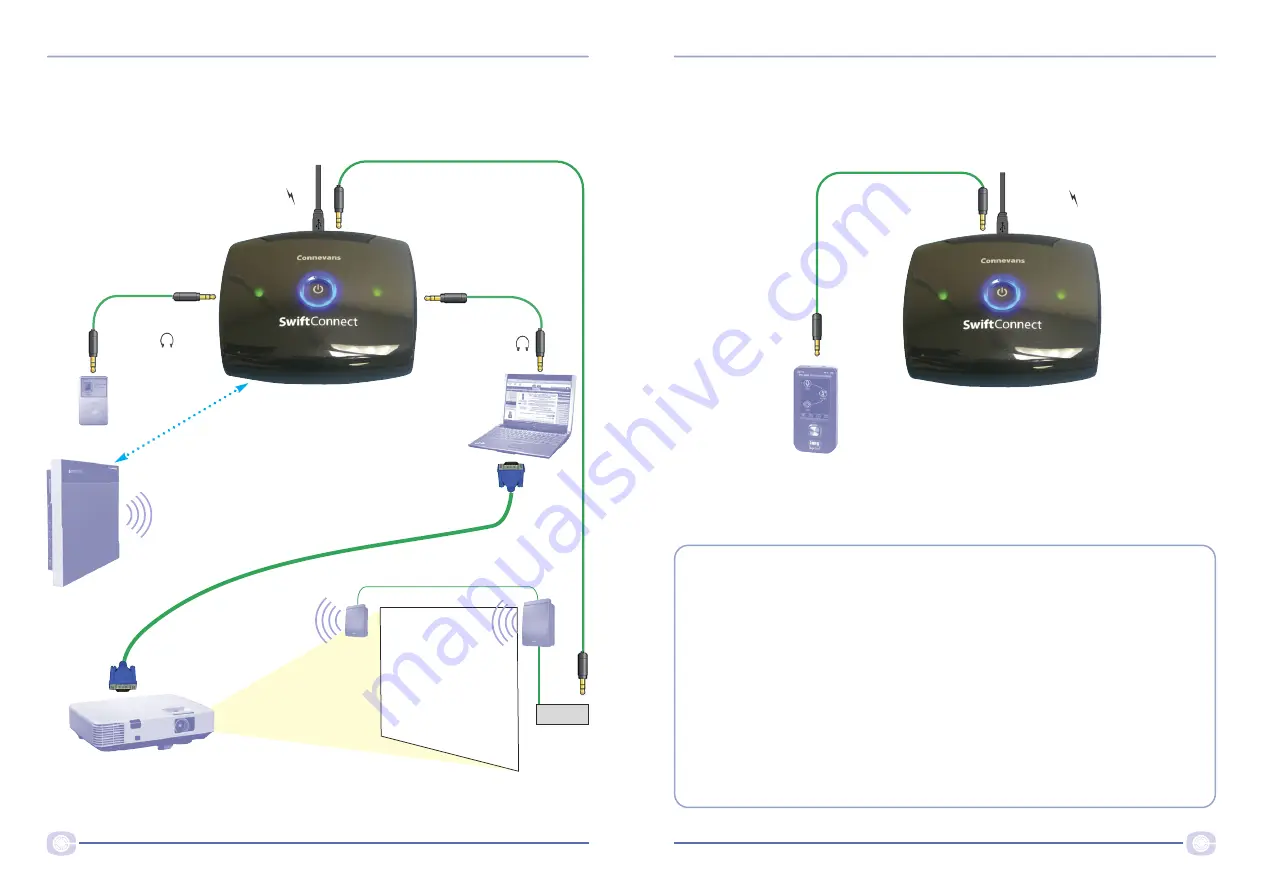
Scenario 4 ‒ recording your lesson on a voice recorder
The sound from the Swift Digital ‒ including all connected sound sources ‒ can be recorded
on a voice recorder with an AUX level input.
Out
Aux
FIRST USE
The first time you use a SwiftConnect with a Swift Digital it is necessary to pair them.
1 Connect the micro USB power lead to the rear of the SwiftConnect and turn on the
power ‒ the centre blue light will flash.
2 Power up the Swift Digital and turn on the Swift
TX
microphone ‒ the blue front
power light should be steady on showing that it is awake.
3 Press and immediately release the pairing button on the side of the Swift Digital
‒ the green light will flash (you now have 1 minute to complete the next step).
4 Touch and hold the centre button on the SwiftConnect until the blue light stops
flashing.
Once paired the two will remain paired ‒ being switched on/off does not affect the
paired status.
Scenario 3 ‒ playing sound from computer/ iPod etc from a Swift Digital and from
existing speakers beside a screen
The SwiftConnect is connected to
a laptop and iPod, as in scenario 1,
with the addition of a lead to show
how to connect into an
existing projector & screen
sound system, so that all
the soundfield sound is
heard from all the speakers.
If you have a hum or buzz when connecting your computer to your projector & screen sound system, you
need to use an isolating transformer (pt no 45GLTXPS) in line with the screen sound system audio input.
Micro USB
power
Audio out to
speaker amplifier
Amp
Speaker
Speaker
Digital radio
to Swift Digital
Video from laptop
Input
Input
From iPod
From laptop
Out


