7
B45SWDUG5 V5.1 ‒ Swift Digital User & Installation Guide
Swift Digital
6
B45SWDUG5 V5.1 ‒ Swift Digital User & Installation Guide
Swift Digital
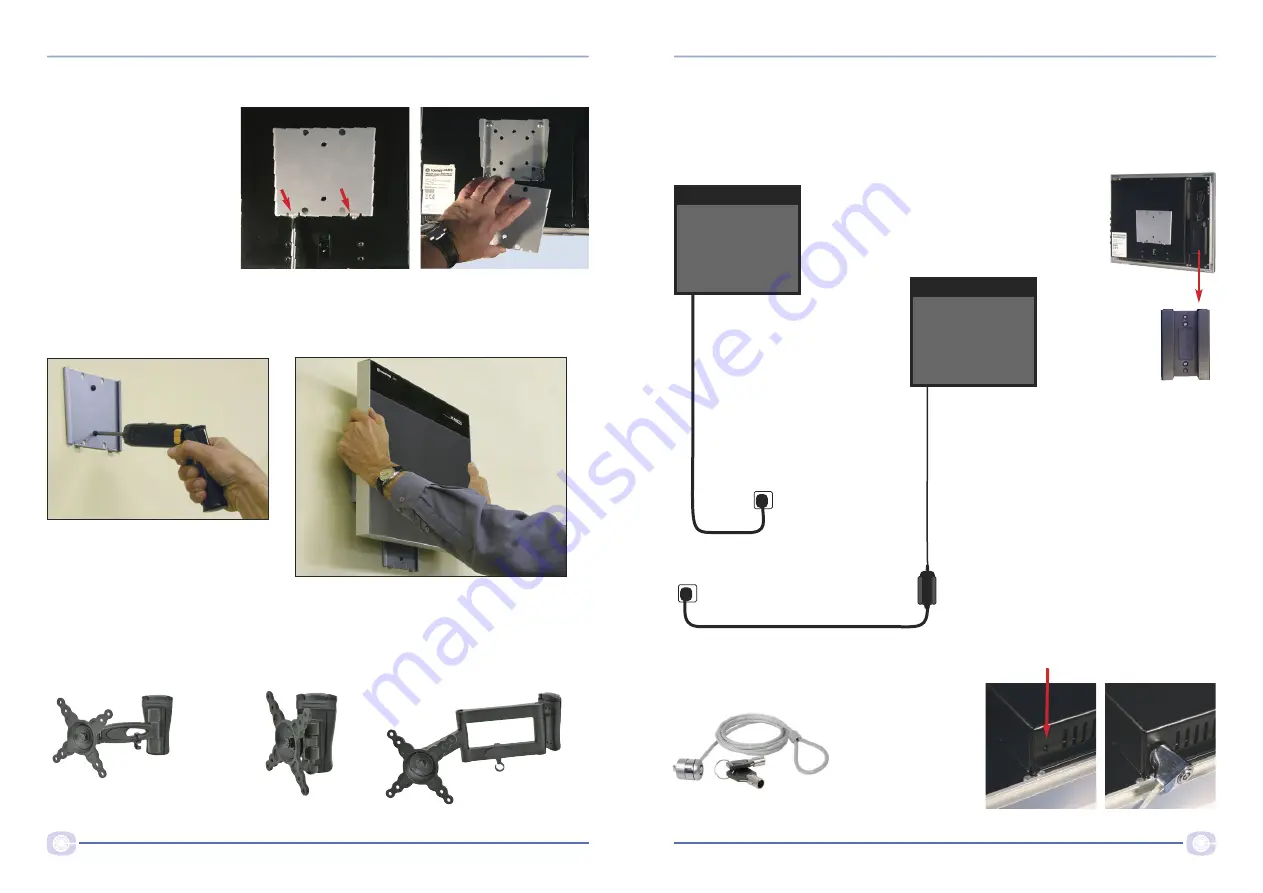
Mains connection and power supply
It is important that the Swift Digital is sited in a position for good sound rather than just
near to an existing mains power socket.
Ideally there should be a dedicated mains socket near to the Swift Digital amplifier/speaker
unit.
Alternatively, if a mains socket cannot be
fitted close by, the power supply holder may
be removed from the Swift Digital and fitted
directly to the wall.
The power supply holder
may be fitted to the wall either
vertically or horizontally, as
appropriate, and the wire should
be either clipped to the wall or
fitted in trunking.
It is important that both the low
voltage and mains voltage cabling
are safely and neatly secured. We
would advise against fitting the
mains power supply unit and
holder anywhere where it could be
accidentally kicked, or knocked by a
vacuum cleaner.
mains ‒1.8m
mains ‒ 1.8m
low voltage ‒
1.65m
Part no. MX501141
If security is an issue the Swift Digital has a standard kensington laptop security cable ‘locking
slot’ on the top left. Connevans can supply security cables with
key locking.
Extension cables are available for
the 1.65m low voltage dc power
cable running from the IR Swift:
Part no. XDCA05BK
5m
Part no. XDCA10BK
10m
The Swift Digital uses the standard 100mm VESA bracket system. A wide range of alternative
VESA fixings are available from Connevans and other suppliers.
Wall mounting the Swift Digital speaker amplifier
Swift Digital amplifier/speaker
units are supplied with a flush
mount wall bracket already
fitted.
1. Remove the bottom two
screws as shown to release
the wall mounting plate.
Jointed arm
Part no. MX129512
Non flush
mounting
Part no. MX129510
Alternative VESA mounting brackets
3. Slide the Swift Digital unit on to the wall bracket
and secure with screws removed at step 1.
A long philips screwdriver will be required.
(Connevans part no 45SWPHIL)
2. Fit the wall plate in chosen position
(see page 5) ‒ remember to plan
where your mains lead will run.
See opposite.
Single arm
Part no. MX129511


