19
B45SWDUG5 V5.1 ‒ Swift Digital User & Installation Guide
Swift Digital
18
B45SWDUG5 V5.1 ‒ Swift Digital User & Installation Guide
Swift Digital
The SwiftConnect can be used in several different ways ‒ the following pages
show you 4 typical scenarios
Power
The SwiftConnect can either be powered from the supplied USB mains power supply or from
a USB output on a computer.
Please note that non low earth leakage USB power supplies
may cause a hum.
When USB power is applied the SwiftConnect will turn itself on, alternatively when you start
using a paired Swift Digital the SwiftConnect will also turn on within 10 secs.
The SwiftConnect automatically enters a low power standby mode 2 hours after it was last
used but will turn itself on again when sound is detected.
Pairing
‒ if the SwiftConnect has not been used with the Swift Digital previously, please see
bottom of page 21.
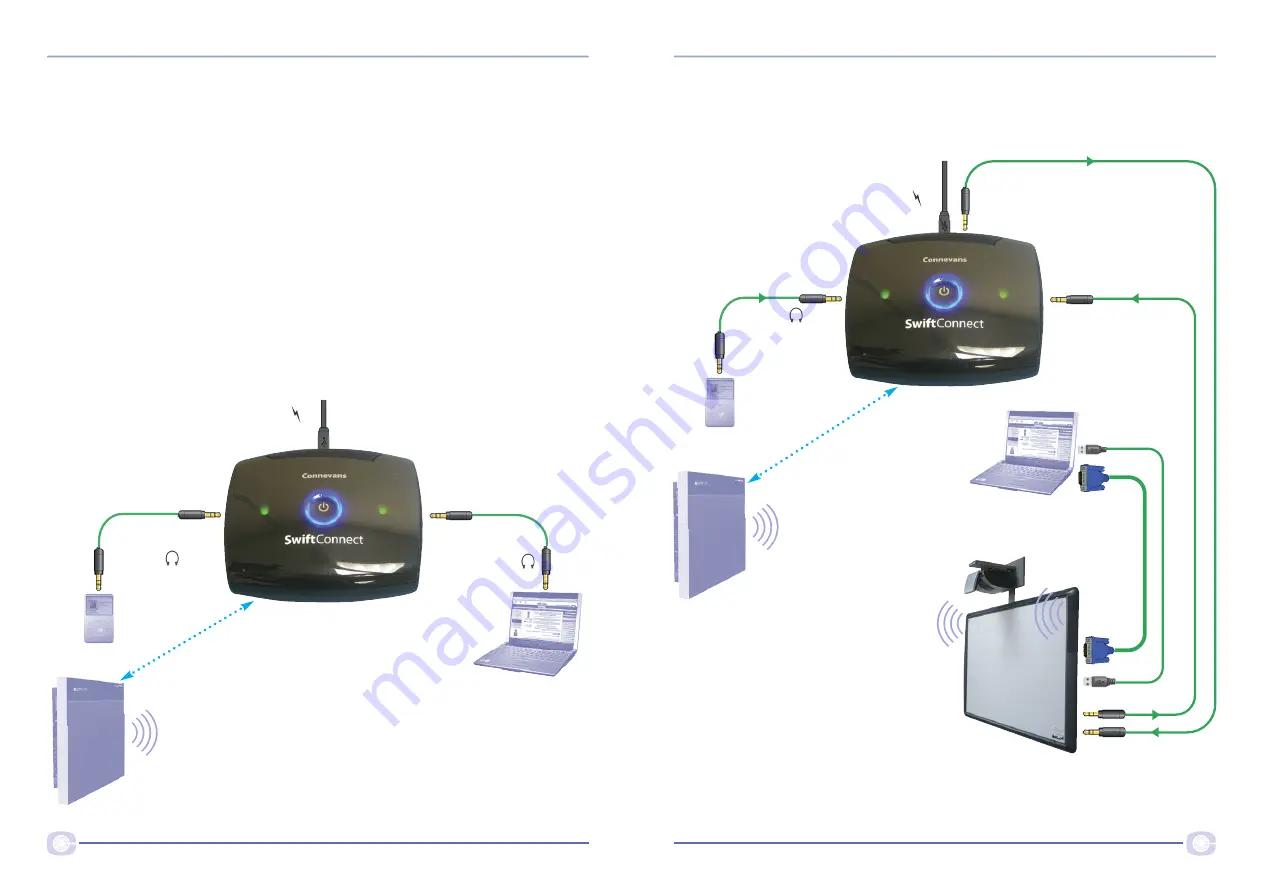
Scenario 1 ‒ playing sound from computer/ iPod etc from a Swift Digital
This scenario shows the SwiftConnect connected to a laptop and iPod to play their sound
from the Swift Digital at the back of the classroom.
Micro USB
power
Digital radio
to Swift Digital
Input
Input
From iPod
From laptop
Scenario 2 ‒ playing sound from computer/ iPod etc from a Swift Digital
and from interactive whiteboard and its speakers
Here the SwiftConnect is
connected to a laptop and iPod,
as in scenario 1,
plus we show
how to connect into an
interactive whiteboard
so that all the soundfield
sound is heard from all
the speakers.
In this scenario we are assuming that when the USB lead is connected to your computer to enable the
interactive features, the audio is also ‘hijacked’ and no longer is fed to the headphone socket ‒ hence the
need to use the PC audio out from the interactive whiteboard.
USB
interactive
connection
PC audio out
Micro USB
power
Input
Input
Out
From iPod
Digital radio
to Swift Digital
Video
from
laptop
Audio out to existing whiteboard speaker
system input
DVD/CD/AUX


