background image


10 

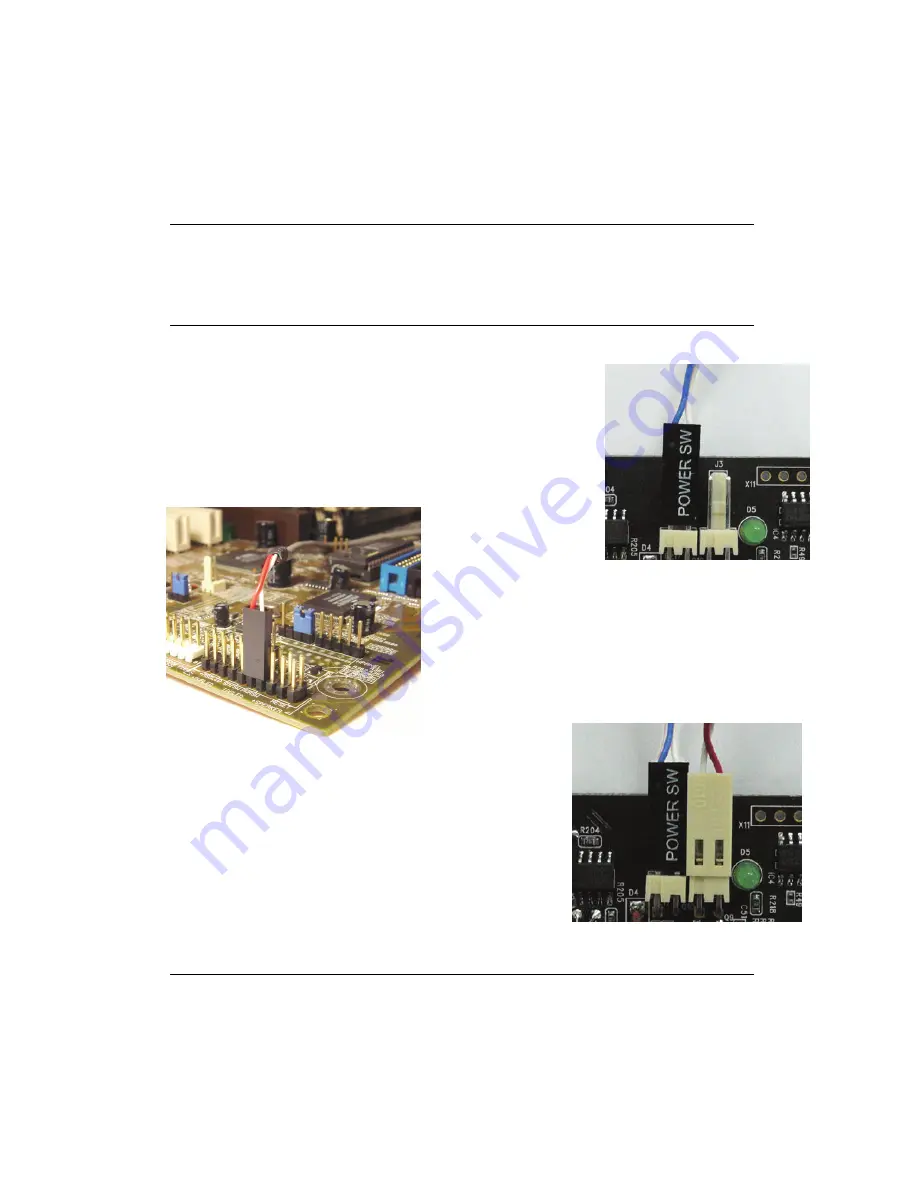
3.  Locate the ATX power switch pins on your computer case and trace the 

wires to the power switch connector on your mainboard. The ATX power 
switch cable is normally a twisted pair cable with a two-pin connector as 
shown above. 

Note 

On the mainboard, the ATX power switch pins are usually labeled “POWER 
SW” or similar. It is vital to remember the position of these pins for a later step 
in the installation process. 

4. Unplug the ATX power switch cable from the 

mainboard and connect it to the white connector 
named “JS1” on the VideoMate Vista E600F PCIe 
card, as shown on the right.     


5.  Connect the black socket of Power Up 

patch cable to the power switch 
connector on the mainboard. 


6. Connect the white socket of Power Up patch 

cable to the connector named “JS2” on the 
VideoMate Vista E600F PCIe Tuner card. 


Note 

Double check your work. If you plug the cables into the incorrect pins, your 
PC may not start or function improperly. 

Содержание E600F

Страница 1: ...VideoMate Vista E600F HW2 PCIe TV Tuner Card Start Up Guide Compro Technology Inc www comprousa com...

Страница 2: ...respective owners Compro makes no warranties with respect to this documentation and disclaims any implied warranties of merchantability quality or fitness for any particular purpose The information in...

Страница 3: ...F Connectors 6 MCE Remote for Vista E600F TV Card 7 Hardware Installation 9 Software Installation 12 Remote Power On Off 13 ComproDTV Vista Gadget Tool for Vista 15 ComproDTV MCE Add In 17 HID HumanIn...

Страница 4: ...B System Memory z Sound card z Open PCI Express x1 slot z CD ROM drive for software installation z Windows XP SP2 or Vista x86 x64 z 50 MB free disk space for basic software installation RECOMMENDED S...

Страница 5: ...kage Contents Vista E600F PCIe TV card IR Receiver Installation CD Start Up Guide MCE Remote I type to F type TV Converter FM Antenna 6 in 1 video audio input cable Power Up cable Ulead Software CD Ba...

Страница 6: ...e such as a VCR DVD or VCD Option for composite video patch cable not included in the package Component Video Input Green Connect to the video device with component video output Component video cable...

Страница 7: ...oMate Vista E600F bundles the easy to use Microsoft certified remote control to controls the Media Center and also ComproDTV ComproFM software Some keys are special designed for Windows Vista Premium...

Страница 8: ...o Stereo SAP Up arrow Up arrow 21 Replay or switch TV format Scan channel Down Left arrow 22 Down arrow or snapshot Down arrow Down arrow 23 Advance in Timeshifting Scan channel Up Right arrow 24 OK P...

Страница 9: ...ter and unplug main power cord 2 Remove the computer case cover Power Up Connections 39 Timeshift Play Pause Play Pause Play Pause 40 Change scale of screen Skip Forward 41 Enter frequency 42 Channel...

Страница 10: ...ese pins for a later step in the installation process 4 Unplug the ATX power switch cable from the mainboard and connect it to the white connector named JS1 on the VideoMate Vista E600F PCIe card as s...

Страница 11: ...inboard documentation to determine the position of the ATX power switch connector Power Up will start your computer 5 minutes in advance of the scheduled recording time for example if you have set Com...

Страница 12: ...l necessary software VideoMate Vista E600F drivers ComproDTV 4 and ComproFM 2 or choose Custom to install selected item by item We also provide the DiecrtX 9 and Acrobat Reader 6 0 software on the ins...

Страница 13: ...convenient home entertainment video appliance Using Remote Power On Off Make sure you follow the instructions of the installation guide You will be able to use Remote Power On Off immediately Remote...

Страница 14: ...me as pressing the Cancel button You may also use your mouse to press the cancel button Press OK to immediately shutdown the computer When watching TV i e ComproDTV 4 is running Just press the CLEAR b...

Страница 15: ...V mode Start Stop Live TV Play pause from playlist Channel Up in live TV mode Start stop record live TV Mute Playlist mode It just displays first eight files in the list you recorded if there are more...

Страница 16: ...V playback video mode and its size is bigger than docked one You can direct drag the gadget window to the other place out the sidebar and shows the bigger undock window to watch TV or playback recorde...

Страница 17: ...ust click the Media Center icon program library DTV Add In and you can enjoy Live TV at Windows Media Center While this environment provide you some useful function shown as below when the function is...

Страница 18: ...in your system bar You can choose the Option to enter the setup window Setup Step 1 Choose the type of your remote control There are many type of remote from Compro please select the remote picture as...

Страница 19: ...your PC such as Windows MCE Vista Premium Vista Ultimate this function can replace the windows remote control HID can also combine the Compro software control in the MCE interface to make you more con...

Страница 20: ...ge down Stop S Record R and Record Option Channel Up Page Up with Quick Channel list I Play P Pause U Volume Mute M Num Pad W Channel Surf F Timeshift T Snapshot Space Last Channel N Repeat Playback S...

Страница 21: ...or use default channel table to do the scanning Autoscan The first time you start ComproDTV 4 Autoscan will automatically scan for available TV channels for TV signals You can rescan the channels at...

Страница 22: ...rty by right click the mouse on the Description field of the channel you wish to edit Custom Settings for each channel You can customize each channel properties by click the icon in Custom Settings fi...

Страница 23: ...Slave window can be resized by mouse dragging lower left corner to any ratio Advanced Multiple Video Display Mode ComproDTV 4 also supports 2 or above Compro products connect and watch it at the same...

Страница 24: ...e to available programs of another frequency The slave window will show black if there is no additional program on this frequency Slave window has no full screen mode Please double click on slave wind...

Страница 25: ...capture dialog as below You can setup to save it as jpg or bmp format in the ComproDTV option interface And also setup the picture compress quality in jpg file Recording ComproDTV 4 is a digital vide...

Страница 26: ...t corner of the icon on the control panel and select Straight to Disc The E600F TV card supports DVD formats direct recording You can see the straight to disc dialog as above Format Display the record...

Страница 27: ...e check the help file of ComproFM or the manual in the installation CD Control Panel The following describe the ComproFM control panel functions and tips for using ComproFM The following figure gives...

Страница 28: ...problems watching recording or timeshifting live TV please check the status of the drivers with Device Manager You should see VideoMate CX2388x AVS Video Capture devices in the Sound video and game c...

Страница 29: ...time or clock Finally it is possible that your power supply doesn t provide the standard 3 3V standby power Therefore changing your power supply might help My PC cannot shut down In rare circumstance...

Страница 30: ...such as Nimo K Lite and Stormcodec This kind of software forces applications to use their CODEC for play back Therefore the recorded file cannot be played since an incompatible CODEC is being used for...

Страница 31: ...still have problems please install the latest ComproDTV 4 and driver from our website Contacting Compro Technical Support Before you submit an email for support please check support FAQs on our web s...

Отзывы: