COHU 7420HD series Скачать руководство пользователя страница 21

21

6X-1099Z1

5.3.1  Video Control Area 

Changing the Video Display

The video display can be expanded to the full screen by clicking the F11 key on the keyboard. To exit from 
full screen display, press F11 again.

To close the control area, move the mouse pointer over video viewing area and double click the right mouse 
button. To bring the control area back, double-click the right mouse button again.

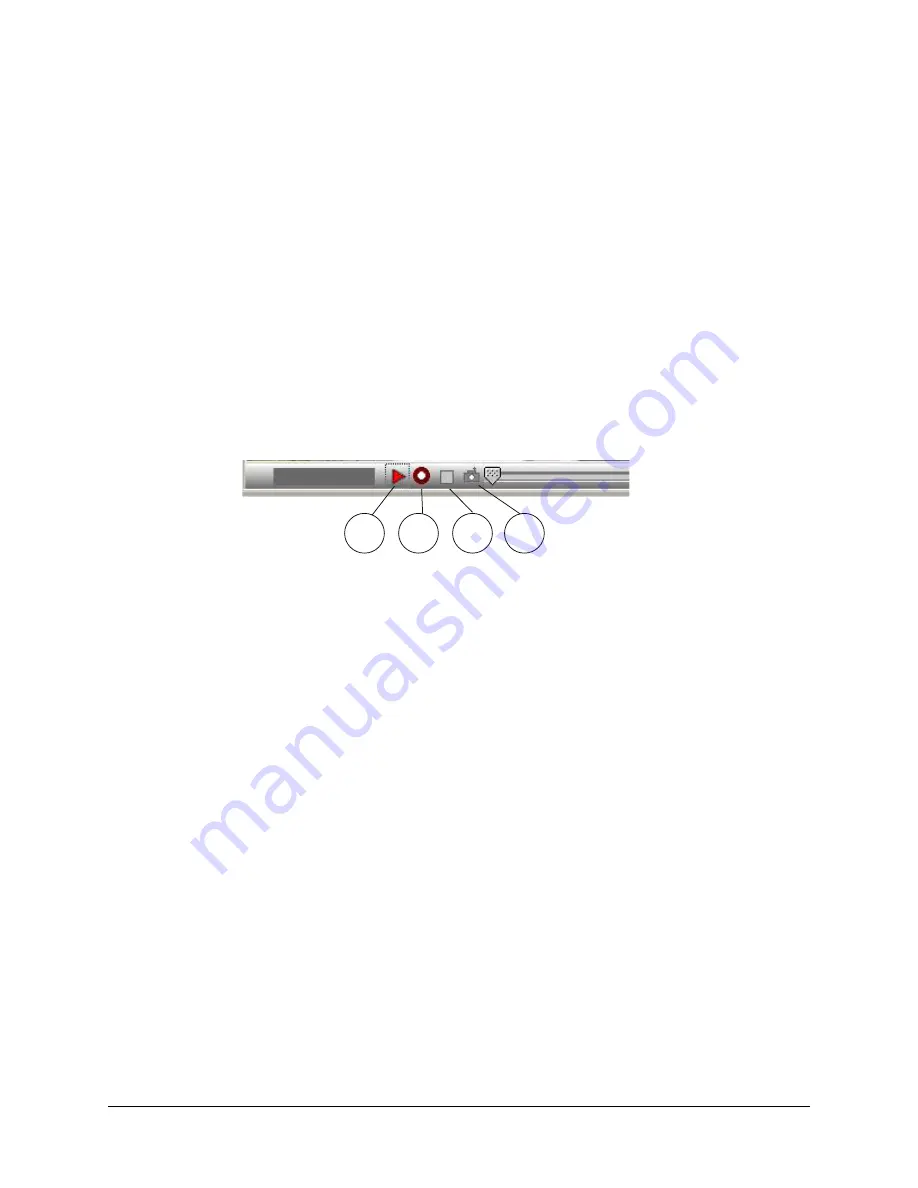
5.3.2  Live Video and Recording Controls 

1.  Start/Pause Live Video Button - Starts/Pauses Live Video stream.

2. 

Start Recording/Stop Recording Button - Starts/Stops recording. See section 5.7 on how to find and 

play back recorded video.

3.  Stop Video Display Button - Stops Live Video activity and returns to the Nothing Loaded screen.

4. 

Take Snapshot Button - Takes snapshots. See section 5.7.1 on how to find and display snapshots.

5.3.3  LED Indicators

Three LED indicators are located in the right top corner of the video area:

• 

Right LED glowing solid green indicates that a live video connection is established. 

•  Middle LED flashing green indicates that the recorded video is playing back.
•  Left LED flashing red indicates that recording is in process.

5.3.4 Text Overlay (On Screen Text Display)

On screen text display located in the top left corner of the monitor allows user  to see the Camera name and 
the existing status of pressure and temperature. For more information see the following sections:

• 

for changing Camera name see section 5.4.1.4.

1

2

3

4

Содержание 7420HD series

Страница 1: ...hwaite Circle Poway CA 92064 Factory default IP address is 192 168 2 150 Phone 858 277 6700 Fax 858 277 0221 www cohu cameras com info cohu com March 15 2012 Technical Manual 6X 1099Z1 Phone 858 277 6...

Страница 2: ...signing the new Camera IP Address 13 4 4 Using the Helios CohuONVIFDiscovery Software to Discover the Camera 14 4 5 Checkout Procedure 15 5 0 Operation 16 5 1 Assigning the Static IP Address 16 5 2 Ac...

Страница 3: ...intellectual property rights to technology em bodied in the product described in this manual FCC compliance This equipment has been tested and found to comply with the limits for a Class A digital dev...

Страница 4: ...t to the carrier for inspection immediately upon discovery of the concealed damage Keep all cartons and packing materials To return the product to the factory for service please contact the Customer S...

Страница 5: ...artment for technical assistance at cst cohu com Liability It is the sole responsibility of the installer to provide proper installation in compliance with all local codes and regulations Safety instr...

Страница 6: ...h as an Ethernet switch or from a midspan injector Please refer to section 2 1 for additional information Optional flash memory SDHC Class 6 cards with capacity of 8 16 and 32 GB are available for int...

Страница 7: ...power is supplied by an injector placed between an existing non PoE switch and the Camera The PoE injector is supplied with the Camera when the 7425 xxxx option is ordered Please refer to the Cohu web...

Страница 8: ...tor is supplied with the 7425 xxxx option Please refer to the Cohu web page www cohu cameras com products 7420hd html in the 7420HD series specifications section for ordering information Network Switc...

Страница 9: ...the side cable ac cess hole Use the provided template to drill the mounting holes for the mounting plate IMPORTANT The camera system is a fixed position camera system Therefore camera direction will b...

Страница 10: ...slide the electronics package to remove it from the dome base Disconnect the internal CAT5 pigtail cable 3 1 3 Mounting the Dome Base Connect the customer cable to the CAT5 pigtail end if the back ca...

Страница 11: ...n and rotate the camera to the desired position NOTE Do not over rotate Tighten the locking screws 3 1 5 Focus the Lens Apply power to the camera View the camera image using a Web browser Adjust focus...

Страница 12: ...6X 1099Z1 12 5 77 147 32 5 53 140 46 7420HD Overall Dimensions in mm with Mounting Plate 22 5 5 2 51 63 75 Camera direction 2 16 54 86 1 083 27 50 Mounting Plate Dimensions in mm 22 5 5...

Страница 13: ...osoft Internet Explorer version 8 4 2 IP Control and Viewing of Camera Installation and testing of the Camera can be performed with the built in Helios Web Interface application The Helios Web Interfa...

Страница 14: ...t with other devices Write down the new Camera address to make the camera easy to find later If the camera IP ad dress becomes lost use the CohuONVIFDiscovery software to find the camera on a network...

Страница 15: ...ored default parameters within the camera s non volatile memory The default IP address assigned to the Cameras at the factory is 192 168 2 150 For information on accessing the Camera using the Helios...

Страница 16: ...ator Please contact your local IT department if you do not have Admin privileges Set your computer IP address to the same subnet as the Camera IP address Go Start Control Panel Network connections Loc...

Страница 17: ...Click OK to close the the Local Area Connections Properties dialog box and click Close to close the Local Area Connection dialog box General Tab Use the following IP address button is selected Enter...

Страница 18: ...8 Log in as a local administrator on your computer NOTE You may need to set security level in IE and add the Camera as a trusted site in order to run a video See Appendix 1 Enter the Camera IP address...

Страница 19: ...llow different levels of access Those ac counts are Guest User Privileged User Priv Administrator Admin For more information see sections 5 4 1 6 and 5 4 2 IMPORTANT Upon delivery the first time you a...

Страница 20: ...rea 1 The current user level logged into the Camera See sections 5 4 1 6 and 5 4 2 2 The series number of the Camera 3 Camera configuration control panel menu See sections 5 4 5 7 4 Logout Video area...

Страница 21: ...d video 3 Stop Video Display Button Stops Live Video activity and returns to the Nothing Loaded screen 4 Take Snapshot Button Takes snapshots See section 5 7 1 on how to find and display snapshots 5 3...

Страница 22: ...ser you will be able to see two buttons Properties and Change Password If you are logged in as the Guest you will be able to see one button Password 5 4 1 Configuration This button is available for th...

Страница 23: ...nique Hostname should be assigned for both DHCP and static configurations Select Use the following IP Address to do static configuration This will allow the following values to be set manually IP Addr...

Страница 24: ...ulticast address to use In all cases the packet size to use can be specified as 550 1400 or 8192 bytes Transport Mode choose from the drop down menu Unicast RTP RTSP broadcasting for video on demand b...

Страница 25: ...to use In all cases the packet size to use can be specified as 550 1400 or 8192 bytes Transport Mode choose from the drop down menu Unicast RTP RTSP broadcasting for video on demand between a single s...

Страница 26: ...ging the Camera Name The user must be logged in as Admin in order to make changes Click the Camera Set Up button Click the Configuration button Click the OSD tab Type a new name of the Camera into the...

Страница 27: ...rmware upgrades Administrator Admin user has access to all Camera settings and functions can change network and user configuration and download firmware upgrades NOTE TheusernameisdisplayedaboveCohulo...

Страница 28: ...ser closes the browser or stops viewing the Camera NOTE Increasing this time will not allow a user to close the browser and then return to the Camera without authenticating again Max Login Time the am...

Страница 29: ...ord Help allows user to choose a topic from a drop down list Establishing the Password To set the user access level follow the next steps Click the Camera Setup button from the Home page Click the Cha...

Страница 30: ...o night or from night to day Manual Prevents the white balance compensation from compensating for changing lighting conditions and allows the operator to manually change the red and blue levels for a...

Страница 31: ...e the range of lighting conditions that can be accommodated by the automatic exposure control but may cause image artifacts with certain types of artificial lighting such as fluorescent lights AGC Aut...

Страница 32: ...and removes the IR cut filter to allow infrared illumination to reach the image sensor and contribute to the image Auto The camera will automatically switch to Day or Night mode depending on the amou...

Страница 33: ...The page provides information about the Camera current software ver sion and component versions Follow instructions on the page to upgrade your firmware and web interface versions Download the desire...

Страница 34: ...t Upgrade button CAUTION Make sure to install the correct file of the firmware dur ing the upgrade process CAUTION The upgrade process takes approximately 5 minutes Do not interrupt it A series of scr...

Страница 35: ...Web Update button CAUTION Make sure to install the correct file of the Web Inter face during the upgrade process CAUTION The upgrade process takes approximately 2 minutes Do not interrupt it A series...

Страница 36: ...ed for two streams in the video format tab in the con figuration window Select one of two streams to adjust the video stream 5 6 Zoom Magnification The Zoom Magnification control selection is availabl...

Страница 37: ...Folder your access has been restricted and you need to take ownership of the folder To take ownership of the folder follow these steps Right click on the folder that you want to take ownership and cli...

Страница 38: ...x labeled Add this website to the zone and click the Add button This will add the Camera to the list of trusted sites Repeat the step for each Camera you want to add NOTE Clear the check box labeled R...

Страница 39: ...39 6X 1099Z1 Figure 3 Custom Level Settings that are known to work with the Helios Web Interface table continues on the next page...

Страница 40: ...6X 1099Z1 40 Figure 3 Custom Level Settings that are known to work with the Helios Web Interface...

Страница 41: ...41 6X 1099Z1 Figure 4 Advanced Settings that are known to work with the Helios Web Interface...

Страница 42: ...arranty Please refer to the Cohu website for product warranty information http www cohu cameras com warranty WarrantyStatement pdf Revision History Revision Date Comments Rev Z1 3 15 2012 Preliminary...

Отзывы: