iGate2.0 User Manual
C r e a t e d : D e c e m b e r 3 , 2 0 2 1
c l i m a t e m a s t e r.c o m
19
This page intentionally left blank.
Страница 1: ...5 MODE Screen 5 SETPOINT Screen 6 FAN Screen 6 PROGRAM 7 VACATION 8 SETTINGS Screen 8 HOT WATER Screen 8 WEATHER Screen 8 HUMIDITY Screen 8 BANNER Screen 9 SOFTWARE Screen 9 BACKLIGHT Screen 10 ALERT...
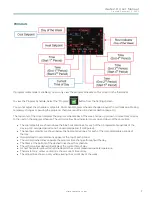
Страница 2: ...mbers only Default temperature units is Fahrenheit Navigate to the SETTINGS screen to change to Celsius Banner Press the center of the scrolling Banner to switch to the screen indicated by the display...
Страница 3: ...ing Range 32 to 104 F 0 to 40 C 10 to 95 relative humidity non condensing Mounting Standard 4x2 in electrical box using the 6 32 x 1 2 mounting screws provided Overall Dimensions Width Height Depth 3...
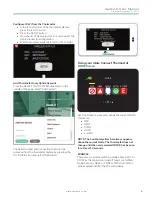
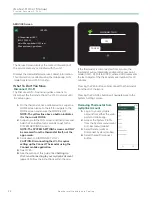
Страница 4: ...ss and password then press the Log In button to open your myUplink account Setting Up Wi Fi and Connecting to your myUplink account Supports 802 11 a b g n standards Configure Wi Fi from Your Mobile D...
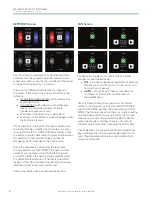
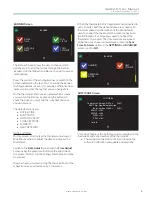
Страница 5: ...mber and Connection Token can be accessed from the thermostat display by pressing the Wi Fi Status icon top left of the banner Using your iGate Connect Thermostat MODE Screen E COOL OFF HEAT AUTO E HE...
Страница 6: ...xt above the Play button says OCCUPIED if the heat and cool setpoints are the same as the OCCUPIED setpoints or UNOCCUPIED if the heat and cool setpoints match the UNOCCUPIED setpoints If neither is t...
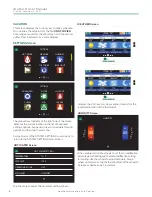
Страница 7: ...ellow Row Indicator moves up and down at the same time The cool setpoints are shown above the blue horizontal lines for each of the 4 programmable periods of the day up to 3 occupied periods and 1 uno...
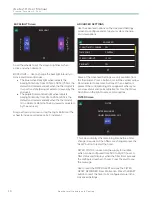
Страница 8: ...ons Swipe up or down to navigate through options and then tap to select one Swipe on any of the SYSTEM SETTINGS sub screens to return to the SYSTEM SETTINGS main screen HOT WATER Screen HOT WATER SETT...
Страница 9: ...itch to the Date Adjust screen and the Time Adjust screen using the green icon button at the right side of the screen Scroll or tap the Orange Month wheel or Blue Day wheel Drag a wheel up or down or...
Страница 10: ...to configure and setup your system change and view options ADVANCED SYNCH TIME TO SERVER TIME ZONE SCREEN TIMEOUT PROXIMITY YES CENTRAL 15 SEC YES Some of the Advanced Settings are only available fro...
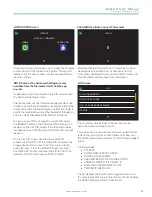
Страница 11: ...ET PIN screen use the 4 blue digit PIN wheels to set the PIN Set the 4 digit PIN and press the orange Save button to save the PIN and return to the Lockout Screen Press the DISABLE button to cancel th...
Страница 12: ...he SYSTEM SETTINGS screen NOTE The SYSTEM SETTINGS screen can ONLY be accessed from the thermostat itself not the app or web 3 Scroll down to DISCONNECT Wi Fi CAUTION Disconnecting the Wi Fi requires...
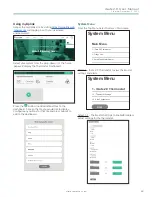
Страница 13: ...iles to the dashboard Click on the tile you would like to display Configure any options for that tile and press Submit to add to the dashboard System Menu From the Top Menu Select System Main menu Sys...
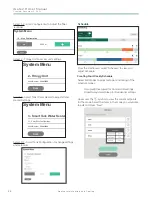
Страница 14: ...r Settings System Menu 3 Smart Tank Water Heater 3 1 SmartTank Configuration Back Serial Number 192411600 Select 3 1 SmartTank Configuration to change settings and setpoints Schedule From the Dashboar...
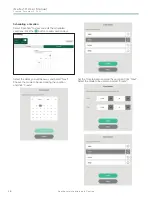
Страница 15: ...Adjust the settings as needed and Save Using the Weekly Schedule Editor To Add a schedule mode to a day Click Add Select the Mode and Start Time and Save To copy a day s program to a different day se...
Страница 16: ...lect Vacation to view and edit the scheduled vacations Click the button to add vacation days Select the dates you will be away and Select Next Choose the mode to be used during the vacation and click...
Страница 17: ...or temperature 122 F NOTE Displayed only if using humidity temperature as a backup source during a fault condition with the primary temperature sensor HUM TEMP SENSOR LOW Humidity sensor temperature 0...
Страница 18: ...S to restore all default settings to the original values Advanced Setting Option Default Screen Options Sync Time to Server Yes Time Zone 4 CENTRAL HAWAII ALASKA PACIFIC MOUNTAIN CENTRAL EASTERN ATLAN...
Страница 19: ...iGate2 0 User Manual Created December 3 2021 climatemaster com 19 This page intentionally left blank...
Страница 20: ...be as described herein Please contact ClimateMaster s Customer Service Department at 1 405 745 6000 for specific information on the current design and specifications Statements and other information...