background image

1

2

3

4

5

6

7

8

4 – 13

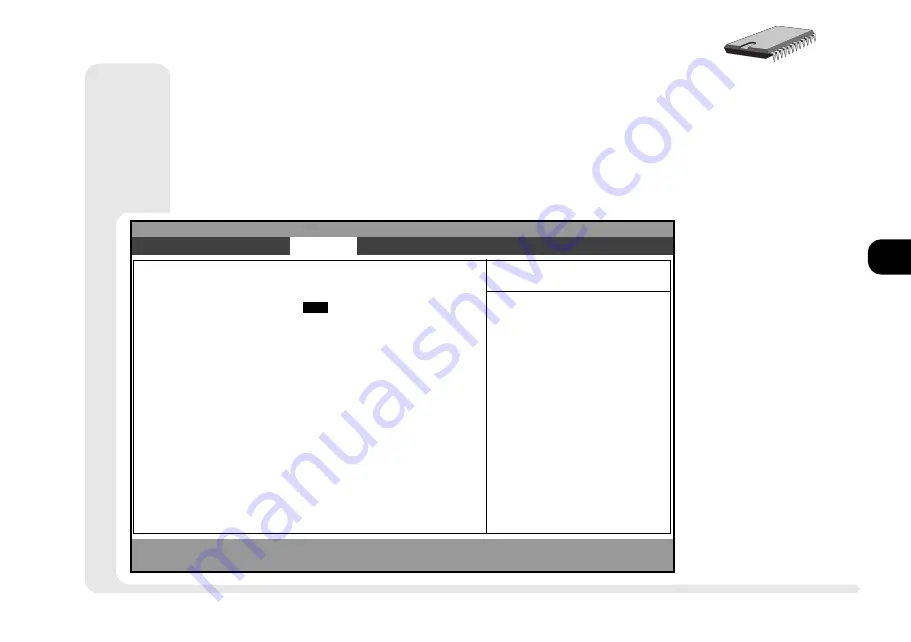
S

ECURITY


M

ENU

S

ECURITY

 M

ENU

F

IG

. 4 – 5

S

ET

 U

SER

 P

ASSWORD

 & S

ET

 S

UPERVISOR

 P

ASSWORD


(S

ECURITY

 M

ENU

)

These lines change to “Enabled” as their passwords are set. The

Supervisor’s password must be set before you can set the User’s.

PhoenixBIOS Setup Utility

Main

 Advanced

S e c u r i t y

Power

E x i t

Item Specific Help

F 1

Help

ñò

Select Item

- / +

Change Values

F 9

Setup Defaults

ESC

E x i t

ïð

Select Menu

E n t e r

Select 

u

 Sub-Menu

F1Ø

Previous Defaults

User Password controls
access to the system at
boot.

Set User Password

[

E n t e r

]

Set Supervisor Password

[ E n t e r ]

Password on boot

[ D i s a b l e d ]

Fixed disk boot sector

[Normal]

security menu

Содержание 9800

Страница 1: ...1 2 3 4 5 6 7 8 i MULTIMEDIA NOTEBOOK COMPUTER USER S MANUAL ...

Страница 2: ...tered trademarks of their respective compa nies They are mentioned for identification purposes only and are not intended as an endorsement of that product or its manufacturer 2nd Edition July 1998 notice Trademarks This product may incorporate copyright protection technology that is protected by method claims of certain U S patents and other intellectual property rights owned by Macrovision Corpor...

Страница 3: ...ar installation If this equipment does cause harmful interference to radio or television reception which can be determined by turning the equipment off and on the user is encouraged to try to correct the interference by one or more of the following measures Reorient or relocate the receiving antenna Increase the separation between the equipment and receiver Connect the equipment into an outlet on ...

Страница 4: ...and damage your data 4 Keep it dry This is an electrical appliance If water or any other liquid gets into it the computer could be badly damaged 5 Be careful with power The computer has specific power re quirements Only use a power adapter approved for use with this com puter Your AC adapter may be designed for international travel but it still requires a steady uninterrupted power supply If you a...

Страница 5: ...way from and promptly dispose of a damaged battery Always dispose of batteries carefully Batteries may explode or leak if exposed to fire or improperly handled or discarded M Warning The product that you have purchased con tains a rechargeable battery The battery is recyclable At the end of its useful life under various state and local laws it may be illegal to dispose of this battery into the mun...

Страница 6: ...nty and expose you and the computer to electric shock Refer all servicing to authorized service person nel Unplug the computer from the power supply Then refer ser vicing to qualified service personnel under any of the following conditions When the power cord or AC DC adapter is damaged or frayed If the computer has been exposed to rain or other liquids If the computer does not work normally when ...

Страница 7: ...programs operating systems italics Setup Windows 95 files all capitals AUTOEXEC BAT program groups bold Control Panel sequences arrows My Computer Control Panel icons user interface switches bold Continue Yes menu items initial capitals Boot High Speed variables quotes Enabled text the user must enter bold a setup keys to press while in DOS brackets bold Enter command switches bold format s space ...

Страница 8: ... vi Servicing vi Conventions vii Chapter 1 Introduction Using this Manual 1 2 Pages 1 2 Chapters 1 3 Not Here 1 4 System Map 1 5 Front View LCD Work Panel TouchPad 1 5 Left View CD ROM Bay and Power Bay 1 6 Right View Drives Audio PC Card 1 7 Rear View Ports 1 8 Bottom View Compartments 1 11 Hot Key Controls 1 12 Status Screen Indicators 1 13 Packing Contents 1 14 Quick Start 1 15 TOC ...

Страница 9: ...ce 2 6 TouchPad PS 2 Device 2 6 Video 2 7 Setup 2 8 LCD 2 8 External Monitor 2 9 TV Factory Installed Option 2 10 Switching 2 11 Audio 2 12 Additional Audio 2 13 PC Cards 2 14 Operating Systems 2 15 Windows 95 2 15 Windows NT 4 0 2 16 Inserting a PC Card 2 16 Removing a PC Card 2 16 Fax Modem optional module 2 17 Usage 2 18 TOC ...

Страница 10: ...e 3 6 Audio CD 3 6 The FDD 3 9 Inserting Removing Floppy Disks 3 9 FDD Care 3 9 Chapter 4 Firmware The Power On Self Test POST 4 2 Failing the POST 4 3 The Setup Program 4 4 Entering Setup 4 4 Setup Screens 4 4 More on Setup 4 6 IDE Adapter 0 Master Main Menu 4 6 IDE Adapter 1 Master Main Menu 4 8 Advanced Menu 4 12 Plug Play O S Advanced Menu 4 12 Security Menu 4 13 Fixed disk boot sector Securit...

Страница 11: ... Battery Pack 5 7 Power Management 5 8 Hardware Battery Status Warnings 5 8 Low Battery Save 5 9 Firmware Setup Controls 5 10 Save to Disk 5 10 Suspend 5 11 Software Utilities 5 12 APM 5 12 Chapter 6 Extras Other Extras 6 2 Memory 6 3 TouchPad 6 5 Gestures 6 5 Customizing Gestures 6 6 FIR for the IrDA 6 7 CardWizard 6 8 CardWizard Operating Systems 6 8 CardWizard Windows NT 4 0 6 9 TOC ...

Страница 12: ...t 6 12 Port Replicator 6 13 Docking Procedures 6 14 Undocking Procedure 6 14 Troubleshooting 6 15 Regulatory Information 6 15 Appendix A Specifications CPU Chipset A 2 Memory A 3 Video A 4 Audio A 4 Drives A 5 I O A 5 Power minimum Requirements A 6 Other Features A 7 Environment A 7 Dimensions A 7 Accessories Options A 8 Appendix B Troubleshooting Glossary Index TOC ...

Страница 13: ... Video Setup 2 7 Windows 95 2 7 Windows NT 4 0 2 9 Audio Setup 2 12 Windows 95 2 12 Windows NT 4 0 2 13 PC Card Setup for Windows 95 2 15 Setting up the Fax Modem 2 17 Windows 95 2 17 Windows NT 4 0 2 18 Replacing a HDD 3 4 Formatting the HDD 3 5 528MB or Larger HDDs LBA Mode 3 5 CD ROM Drivers 3 6 Windows 95 3 6 Windows NT 4 0 3 6 Windows NT 3 51 3 6 OS 2 Warp 3 6 Other Operating Systems 3 6 CD R...

Страница 14: ...Disk Setup cont 5 12 APM for Windows NT 4 0 Setup 5 12 Installing DIMMs 6 4 TouchPad Driver Installation 6 5 MouseWare Driver for Windows 95 NT 4 0 6 5 Installing CardWizard 6 8 Windows 95 6 8 Windows NT 4 0 6 9 Installing CardWizard cont 6 10 Formatting in Windows NT 4 0 6 10 More on CPUs A 2 Voltage Speed Power Savings A 2 Packaging A 2 MMX A 2 More on Video Standards A 4 Recharge timing A 6 Mor...

Страница 15: ...Panel 1 6 Fig 1 3 Right Panel 1 7 Fig 1 4 Rear Panel cover closed 1 8 Fig 1 5 Rear Panel cover open 1 9 Fig 1 6 Bottom Panel 1 11 Fig 2 1 Type Keys 2 3 Fig 2 2 Function Keys 2 3 Fig 2 3 PS 2 Keyboard Port 2 4 Fig 2 4 The TouchPad 2 5 Fig 2 5 The LCD Controls 2 7 Fig 2 6 Display Properties Control Panel 2 8 Fig 2 7 VGA Port 2 9 Fig 2 8 TV Port Factory Installed Option 2 10 Fig 2 9 Display Panel TV ...

Страница 16: ... Cartridge 3 4 Fig 3 5 Using a CD ROM 3 6 Fig 3 6 FDD 3 9 Fig 4 1 Startup Screen The POST 4 2 Fig 4 2 Setup Main Menu 4 5 Fig 4 3 Setup Main Menu Integrated Peripherals Sub menu 4 9 Fig 4 4 Advanced Menu 4 12 Fig 4 5 Security Menu 4 13 Fig 5 1 Connecting AC Adapter 5 3 Fig 5 2 Removing the Battery 5 6 Fig 6 1 Inserting the DIMM 6 4 Fig 6 2 Mouse Properties 6 6 Fig 6 3 Port Replicator Docking 6 14 ...

Страница 17: ...le 1 1 Hot Key Controls 1 12 Table 1 2 Status Screen Indicators 1 13 Table 1 2 cont Status Screen Indicators 1 14 Table 2 1 TV out Display Options 2 11 Table 5 1 Status Screen Indicators 5 2 Table 6 1Default TouchPad Gestures 6 5 TOC tables ...

Страница 18: ...1 2 3 4 5 6 7 8 xviii P r e f a c e NOTES Notes ...

Страница 19: ...1 Introduction This manual is an introduction to your notebook computer system its main features and how to get it working In this chapter we cover How to use this manual A system map A Quick Start Guide for advanced users ...

Страница 20: ...lanations procedures watch for a and software setup in structions watch for a Advanced Advice Advanced users should check the sidebars which look like this You ll find setup information about drivers tips and more detailed information about the notebook s various features Beginners are welcome too As you get used to your computer you may be surprised at how much of this stuff you can understand þ ...

Страница 21: ... power system both hardware and software including power management options Chapter 6 Extras Is about improving the system with additional RAM utilities some non essential or enhance ment software and the optional port replicator Appendicies A B These have information and explanations of the system s specifications and troubleshooting tips Glossary Index Have definitions for terminology that may b...

Страница 22: ...perating systems i e Windows 95 Windows NT 4 0 OS 2 Warp UNIX etc have their own manuals as do application software e g word processing and database programs If you have questions about those programs you should consult those manuals non manual ...

Страница 23: ... WORK PANEL TOUCHPAD Latch To open the notebook cover slide this latch to the right TouchPad Chapter 2 System covers basic functions Chapter 6 Enhancements has a supplemental driver LCD Video functions are covered in Chapter 2 System WORK PANEL VIEW FIG 1 1 1 microphone 2 speakers 3 close cover switch 4 power button 5 status screen 6 keyboard 7 TouchPad buttons front view 7 6 5 4 3 2 1 2 ...

Страница 24: ...OWER BAY CD ROM Chapter 2 System covers basic functions Chaprer 6 Enhancements has additional audio utilities Power Bay Refer to Chapter 5 Power and Appendix A Specifi cations for all aspects of the power system left view LEFT PANEL FIG 1 2 1 CD ROM Bay 2 Power Bay ...

Страница 25: ... Card Your computer uses newer technologies than the drivers included in Windows 95 Use the setup procedure detailed in Chapter 2 System Supplemen tal PC Card drivers are detailed in Chapter 6 Extras Card Wizard Audio Setup for these ports is covered in Chapter 2 System Kensington Lock This is a standard security port M Warning Don t block the fan Overheating may cause system instablility right vi...

Страница 26: ...overed in Chapter 6 Extras This port uses serial COM2 resources The infrared connection supports the SIR FIR and ASK standards Its most common use is for a printer modem or LAN Note Newer versions of Windows 95 have an IrDA driver built in For older versions support is available from Microsoft Corp For other operating systems and IrDA standards consult your system vendor Also consult the user s gu...

Страница 27: ...eral s manual be fore you make a connec tion PS 2 Note You can only use one type of PS 2 de vice per system session If you want to use a different device mouse or key board you must shut down and restart the system However you can detach and reconnect the same device during a system session USB Refer to Chapter 2 System on how to activate this port TV out Jack This is explained in Chapter 2 System...

Страница 28: ...ost printers use the Standard mode The Setup s Help bar re fer to Chapter 4 Firmware ex plains how to adjust this setting Your peripheral s manual explains how to configure the device This port also serves as the exter nal FDD connection Refer to Chapter 3 Modules for more on this feature Printer Note Your operating system may include driv ers for many printer models Consult your printer dealer fo...

Страница 29: ... Drive bay is covered in Chapter 3 Modules M Warning Don t block the cooling vents Overheating may cause system instablility M Warning Follow the safety in structions for using bat teries BOTTOM PANEL FIG 1 6 1 system cooling vents 2 RAM compartment 3 Battery compartment ...

Страница 30: ...t affect phones Fn volume up increases audio volume Fn volume down reduces audio volume Fn brightness up increases LCD brightness Fn brightness down reduces LCD brightness Fn contrast up increases LCD image contrast DSTN display only Fn contrast down reduces LCD image contrast DSTN display only any key resume ends power saving modes including Suspend to RAM but not Save to Disk hot keys HOT KEY CO...

Страница 31: ...tic keys produces capitalized characters other keys are unaffected Scroll Lock Scroll Lock is on HDD bay HDD is being accessed Floppy Floppy is being accessed PC Card PC Card socket s are in use Drive bay CD ROM is being accessed STATUS SCREEN INDICATORS Your notebook lets you know what it s doing with the following status screen indicators icons Table 1 2 STATUS SCREEN INDICATORS ...

Страница 32: ...nd ports are in power saving mode Battery 80 Battery has more than 80 considered Full Battery 80 to 20 Battery 20 Low battery range recharge with the adapter Battery empty Charging steady lines correspond to charge level lines frame blink cycling lines indicate dumb battery charging system problem re insert or replace the battery if the problem all lines frame blink continues consult your service ...

Страница 33: ...ly attach any peripherals you want to use with the notebook i e mouse or keyboard to their ports Ch 1 5 Attach the AC adapter to the port on the side of the computer Ch 5 6 Plug the AC power cord into an outlet 7 Connect the AC power cord to the AC adapter 8 Raise the lid LCD to a 90o angle 9 Push in the button power switch to turn on þ Battery Charges When you get your system the battery ies may ...

Страница 34: ...1 2 3 4 5 6 7 8 1 16 Introduction NOTES notes ...

Страница 35: ... 4 5 6 7 8 2 1 2 System This chapter is about how to use and setup the most visible parts of the system input the keyboard the TouchPad Output Video subsystem Audio subsystem Communications PC Card Fax modem ...

Страница 36: ... by a If you re using another system i e OS 2 Warp Windows 3 1 Win dows NT 3 51 or DOS check the appropriate README files on the accompanying CD ROM For additional nonessential utilities check out Chapter 6 Extras procedures þ Other Systems Some operating systems lack supporting software for some components If the software you need is not included on our CD ROM contact your dealer or service repre...

Страница 37: ...unction keys F1 F12 so you should consult those manuals keyboards TYPE KEYS FIG 2 1 The embedded numeric key pad outlined is activated by pressing NumLock its LCD will appear Special Characters Some software applications allow the number keys to be used in conjunction with Alt to produce spe cial characters These special characters can only be produced by using number keys on the em bedded numeric...

Страница 38: ...you have a Y connector you can attach both a keyboard and PS 2 mouse However whatever the arrangement the port can only accept one type of device configuration per system session For example if you connect a PS 2 mouse to this port you cannot connect a keyboard to the port during the same system session Doing so will cause a system conflict If you already have a mouse attached and want to use a ke...

Страница 39: ...ry enabled It can use the Microsoft or IBM PS 2 mouse driver available with most operating sys tems Optimized TouchPad software for various operating systems is on the Software Utilites CD ROM which came with the system and is covered in Chapter 6 Extras Using TouchPad Serial Device WINDOWS 95 1 Attach the serial device when the system is off 2 Turn on the system and allow Windows 95 to detect and...

Страница 40: ...ype of device per system session If you want to switch to another device you must shut down and restart the system However you can detach and reconnect the same device dur ing a system session TouchPad Using TouchPad Serial Device cont WINDOWS NT 4 0 To use a serial device and the TouchPad at the same time in the Windows NT 4 0 environment you must configure the operating system as you install it ...

Страница 41: ...ver interface shows the available options More on Video Displays Appendix A Specifications has a chart of the system s display capabilities Video Setup WINDOWS 95 To setup the Windows 95 video driver and utilities 1 Open Control Panel Display 2 Click on Settings Change Display Type or Settings Advanced Properties Adapter 3 Click on the Change button next to the Adapter Type field 4 Insert the Soft...

Страница 42: ...em isn t included or you suspect it s outdated consult your dealer These drivers are re quired if you want to use a TV display or want enhanced performance on an exter nal monitor as well as the LCD The instructions in the side bars tell you how to install the drivers However your operating system s documentation may have additional tips Note For most operating systems video driver installation is...

Страница 43: ...tory Click on OK and then on OK again 6 Select S3 Incorporated Display Driver and click on OK or Yes to start the installa tion 7 After the installation finishes Windows NT 4 0 will tell you to close the various screens and reboot When you restart and return to the Display page you can change the settings This driver doesn t support different image out put EXTERNAL MONITOR If you prefer to use an ...

Страница 44: ...ver is configured for your TV s standard NTSC or PAL use the video driver control panel video TV PORT FACTORY INSTALLED OPTION FIG 2 8 Both the TV notebook should be OFF before you connect them DISPLAY PANEL TV SETTINGS FIG 2 9 Be sure the NTSC PAL setting on the Device page is correct M Warning The NTSC and PAL set tings can only be used with the appropriate televisions ...

Страница 45: ... x 0 0 8 C S T N n a h t r e g r a l s n o i t u l o s e r l l A g n i n n a p e h t h t i w d e w e i v e r a V T n o t c e f f e L A P 0 8 4 x 0 4 6 0 0 6 x 0 0 8 A G V h t o b s t r o p p u s L A P s n o i t u l o s e r A G V S d n a s y a l p s i d l l a n o e g a m i t n e r e f f i d r o e m a s l o r t n o C l a u D C S T N 0 0 4 x 0 4 6 r o t i n o m r o t i n o m D C L D C L V T D C L V T...

Страница 46: ...Device Driver Wizard ap pears click on Yes Next Browse 4 Navigate to Drivers Win95 Audio driver on the Software Utilities CD ROM Click on OK OK Finish Note During this procedure you may have to repeat this step 5 When the system asks for the Win 95 CD ROM insert it and click OK Close OK 6 When the additional files are installed return to the Device Manager page and click on Refresh Windows will co...

Страница 47: ...nd click on OK In addition to the default settings which appear click on Use Dual DMA and Enable MPU401 Again you should use the default settings When you re finished choose Continue or OK to confirm the resource settings Then restart the system to activate the driver 5 Once the system has restarted double click on the speaker icon of the tray on the lower right to open the sound control panel If ...

Страница 48: ...IA rev 2 and CardBus PCI bus to PCMCIA socket Both sockets are Zoomed Video ZV The ZV Port is a direct con nection between the PC Card and the notebook s video and audio subsystems As such it works directly with the CD ROM module to support multimedia features Refer to the documentation which comes with your ZV card for more information about its capabilities and how to use its features PC CARD SO...

Страница 49: ... for Windows 95 The PC Card components are newer than the driv ers supplied by Windows 95 so before you can use this device you must make some changes to your system 1 Open Control Panel System Device Man ager tab Other devices Remove the CardBus Bridge listings there are 2 2 Under PCMCIA socket remove PCIC or com patible PCMCIA controller 3 Using Window s Explorer to navigate to D drivers win95 u...

Страница 50: ...a PC Card Windows 95 and NT 4 0 prompt you for that card s driver If your operating system supports Plug n Play e g Windows 95 PC Cards can be inserted and removed while the system is on When the card is in correctly the system beeps once If the PC Card is not detected check if the correct drivers are loaded M Warning Do not add remove or change cards while the system is in a power sav ing mode Th...

Страница 51: ...me folder so just redirect it as necessary 3 When the installation is complete Windows 95 returns to its standard view 4 Shut down the system and restart When Win dows 95 resumes run Modem Driver Setup Pro gram Open the Start menu Run Browse 5 Navigate to D Drivers Win95 Modem setup exe this assumes you re installing from the Software Utilities CD ROM 6 Click OK then Next Follow the directions we ...

Страница 52: ...es as it reboots Click the Modem icon in the Control Panel to continue the setup the modem should be assigned to COM3 Note For Dial up Internet access you must be sure to have all the proper protocols installed e g TCP IP Refer to your operating system manual for this and or your Internet Service Provider s docu mentation USAGE Once your fax modem is setup you still have to configure the software ...

Страница 53: ...7 8 3 1 3 Media This chapter is about the system s data storage devices or drives HDD How to configure the system to use it how to replace it CD ROM How to access it FDD Floppy How to use it and care for the media ...

Страница 54: ...e is in use the corresponding indicator appears accessing the main HDD accessing the FDD accessing a CD ROM The icon does not appear if you are playing an audio CD 1 icons DRIVES FIG 3 1 1 CD ROM 2 HDD 3 FDD STATUS SCREEN DRIVE INDICATORS FIG 3 2 4 CD ROM 5 FDD 6 HDD ...

Страница 55: ...rtridge out HDD M Warning Don t try to remove the hard disk HDD while the system is on or a floppy disk while the system is accessing it These actions may cause the system to crash result in data loss or damage INSTALLING THE HDD CARTRIDGE To install the new or upgraded HDD cartridge carefully slide it back into the HDD bay Be sure that the bay door handle is se curely locked in position REMOVING ...

Страница 56: ...1 at an angle plug its pins into the connector 5 Make sure all the pins are inserted fully 3 Cover the HDD s electronic component side with the shield 4 4 Insert the HDD and shield combination into the frame 1 As you do so carefully fit the edges of the shield around the screw holes of the frame 5 Secure the HDD shield and frame with the four mounting screws 6 M Warning Some usually older HDDs hav...

Страница 57: ...information on its parti tioning and formatting utilities Note If you want to use the Save to Disk fea ture refer to Chapter 5 Power before you par tition the HDD After you replace or upgrade the HDD turn the system on and configure it for the newly installed HDD using Setup Refer to Chapter 4 Firmware 528MB OR LARGER HDDS LBA MODE The notebook automatically reads any HDD 528MB or larger as using ...

Страница 58: ...come with them should also be able to configure the CD ROM If they can t install a version of DOS and the CD ROM driver as described below Then follow the installation utilities for the operating system you plan to use As the installation progresses the op erating system will replace or modify our CD ROM driver OTHER OPERATING SYSTEMS These instructions assume you ve already installed some version...

Страница 59: ...the notebook is turned off you can open the tray by inserting a probe e g a straightened paperclip into the small hole next to the button CD ROM Drivers cont 3 As each page appears press Y or Enter to con firm the settings If you don t want to install the driver in the default directory C CDROM when the Specify the directory dialog box appears use Backspace to delete the current name then type in ...

Страница 60: ...h the CD ROM and video subsystems to produce better quality images However to use it you must install these drivers The CD ROM driver covered in this chapter The audio and video drivers covered in Chapter 2 System VPM driver built into the video driver for Windows 3 1x Windows 95 and Windows NT 4 0 ZV Card driver supplied by the ZV Card s manufacturer As of this publication this feature is pending...

Страница 61: ...ckup copies of software and data If a disk label is already on the disk use a soft tipped pen to write on the label This prevents damage to the disk Don t use a pencil its carbon particles can rub off inside the drive Do not remove any disk from the drive when the LCD is flashing in use Do not try to clean bend or throw disks Do not touch or scratch any exposed portion of the disk medium Don t pul...

Страница 62: ...1 2 3 4 5 6 7 8 3 10 M e d i a notes NOTES ...

Страница 63: ...ew this chapter first and note the original settings found in Setup Even if you are a beginner keep a record of the settings you find and any changes you make This information could be useful if your system ever needs servicing There is one general rule Don t make any changes unless you are sure of what you are doing Many of the settings are required by the system and changing them could cause it ...

Страница 64: ...you can no longer get into Setup POST STARTUP SCREEN THE POST FIG 4 1 1 BIOS information 2 CPU type 3 memory status 4 HDD identification notice 5 error notice example 6 Enter Setup cue appears if there is an error 7 Enter Setup cue appearsonlyduringPOST 6 is not present Phoenix BIOS 4 Ø Release 6 Ø Copyright 1985 1997 Phoenix Technologies Ltd All Rights Reserved PP 1 01 24b 03 23 98 98L 01 07 CPU ...

Страница 65: ...s you to boot You will get a message identifying the problem make a note of this message followed by the cue Press F1 to resume F2 to enter Setup Press F1 to resume F2 to enter Setup Press F1 to resume F2 to enter Setup Press F1 to resume F2 to enter Setup Press F1 to resume F2 to enter Setup Press F1 to see if the boot process can continue It may work without the correct configuration Press F2 to...

Страница 66: ...o quickly just press F2 again If the computer is already on reboot using the Ctrl Alt Delete combination and then hold down F2 Setup s main menu will appear SETUP SCREENS The Setup interface looks like a windows screen Along the top of the screen is a menu bar with five 5 menu headings When you select a heading a new screen appears Scroll through the features listed on each screen to make changes ...

Страница 67: ...ge Values F9 Setup Defaults ESC E x i t ïð Select Menu Enter Select uSub Menu F1Ø Previous Defaults System Time 13 43 12 System Date 1Ø 31 1996 Diskette A 1 44 u IDE Adapter 0 Master 3253MB u IDE Adapter 0 Slave None u IDE Adapter 1 Master CD ROM u IDE Adapter 1 Slave none u Integrated Peripherals u MemoryCache u Boot option Language English US System Memory 640 KB Extended Memory 31744 KB The Ite...

Страница 68: ...will also change these settings Some applications may also alter data files to reflect these changes DISKETTE A MAIN MENU Operating systems which use 3 mode formatting used mainly in Japan instruct the BIOS to change Floppy modes as necessary IDE ADAPTER 0 MASTER MAIN MENU Pressing Enter opens the sub menu to configure the main IDE HDD which fits into the notebook s HDD bay Refer to Chapter 3 Modu...

Страница 69: ...in the Cylinders Heads and Sectors Track fields The size MB field is automatically calculated based on this information The information for all these fields should be printed on the hard disk itself or in its accompa nying documentation CD ROM The system expects a CD ROM or DVD CD ROM ATAPI The system expects a removable disk drive this feature is not available with this notebook computer model þ ...

Страница 70: ...me hard disk If you don t you may encounter read write errors IDE ADAPTER 1 MASTER MAIN MENU Pressing Enter opens the sub menu to configure the drive on the secondary bus For this system this setting should be CD ROM Refer to Chapter 3 Modules for more on these modules The fields on this screen are the same as those for Primary Master þ When to Use LBA The standard or ATA mode of seeing HDDs is in...

Страница 71: ... Main Advanced Advanced Advanced Advanced Advanced Security Security Security Security Security Power Power Power Power Power E x i t E x i t E x i t E x i t E x i t Integrated Peripherals Item Specific Help F1 Help ñò Select Item Change Values F9 Setup Defaults ESC E x i t ïð Select Menu Enter Select u Sub Menu F1Ø Previous Defaults COM1 Port Enabled Base I O address 3F8 Interrupt IRQ 4 COM2 Port...

Страница 72: ...onal port replicator If you don t plan to use this port you can set this line to Disabled to con serve power Serial Resources If you are not planning to use these serial ports you can disable them by choosing Disabled This way you can assign resources to another de vice e g a PC Card device MODE IR MAIN MENU INTEGRATED PERIPHERALS SERIAL PORT B Make sure the mode you choose is sup ported by the de...

Страница 73: ...ilable Output only Standard Bi directional EPP version 1 9 ECP Extended You should check your parallel device s documentation to see which one it can use If you don t plan to use this port you can set it to Disabled to conserve power Parallel Modes Most devices on the market use Standard mode peripherals ...

Страница 74: ...re using a Plug Play capable operating system Select No if you need the BIOS to configure non boot devices PhoenixBIOS Setup Utility Main Main Main Main Main Advanced Advanced Advanced Advanced Advanced Security Security Security Security Security Power Power Power Power Power E x i t E x i t E x i t E x i t E x i t Setup Warning Setup Warning Setup Warning Setup Warning Setup Warning Item Specifi...

Страница 75: ...ore you can set the User s PhoenixBIOS Setup Utility Main Advanced Security Power E x i t Item Specific Help F1 Help ñò Select Item Change Values F9 Setup Defaults ESC E x i t ïð Select Menu Enter Select u Sub Menu F1Ø Previous Defaults User Password controls access to the system at boot Set User Password Enter Set Supervisor Password Enter Password on boot Disabled Fixed disk boot sector Normal s...

Страница 76: ...d Only a Supervisor can change a Supervisor password Opening the Supervisor Password field erases any older password If you leave the field empty both the Supervisor and User passwords are disabled and erased SET USER PASSWORD SECURITY MENU To use this feature a Supervisor password must already be en abled Changing the User password field or leaving it blank only affects this field Users are canno...

Страница 77: ... can be changed PASSWORD ON BOOT SECURITY MENU When this is Enabled the system will ask for a password each time you turn on the system or reboot Type either password and then press Enter The system allows three attempts If the wrong password is entered again the system locks and must be restarted security menu ...

Страница 78: ...ning or reformatting the hard disk You must turn off the Write Protect feature to preform those functions or install a different hard disk If boot sector protection is not enabled make sure that the new hard disk is not infected with viruses POWER MENU Before you adjust the settings in this menu we suggest a review of the power management system in Chapter 5 Power Note The Fn combination activates...

Страница 79: ...ter is about the power system both hardware and software Hardware AC adapter also see page 1 7 battery pack also see page 1 11 Software Setup utility parameters also see page 4 16 power battery management controls also see pages 1 12 1 14 ...

Страница 80: ...urned OFF RAM is refreshed slowly system fan is OFF peripheral de vices and ports are in power saving mode Battery 80 Battery has more than 80 considered Full Battery 80 to 20 Battery 20 Low battery range recharge with the adapter Battery empty Charging steady lines correspond to charge level lines frame blink cycling lines indicate dumb battery charging system problem re insert or replace the bat...

Страница 81: ...nected to a power source and then to the computer the icon on the status screen appears to indicate the system is receiving AC power To use the AC adapter 1 Plug the power cord to the power adapter 2 Plug the power adapter to the adapter port on the computer s right panel 3 Plug the power cord into a wall outlet 4 Press the switch for one second to turn the system on adapter freeze activates Save ...

Страница 82: ...his computer or if you have not used the battery pack for a long time 1 Install the battery pack in its comaprtment if it s not already there 2 Make sure the AC adapter isn t plugged in when you boot up your system 3 When Windows 95 is up and running insert the Software Utilities CD ROM and go to the Start menu choose Programs MS DOS Prompt For Windows NT 4 0 go to the Start Menu and choose Comman...

Страница 83: ...is plugged in Refer to the AC Power section for details Turn on the system and press F2 to enter Setup If you are not sure how to do this refer to Chapter 4 Firmware B Open the Power menu and set Power Savings to Disabled This pre vents automatic Suspend when the battery is low C Exit using the Save Value Exit option D Make sure that your operating system does not activate Advanced Power Managemen...

Страница 84: ...tall a battery pack 1 Turn the computer upside down and open the battery compartment by releasing the latch and sliding the cover to the right 2 Remove the used battery if present by pulling on its tab 3 Remove the battery from its packaging 4 Slide the battery into the compartment You should feel a slight click as the connectors in the notebook slide into the battery pack s slots 5 Replace the co...

Страница 85: ...dix A Specifications for a guide to battery life and figuring recharge times SMART DUMB BATTERIES The status screen icons appear the same for both battery types However the val ues for dumb batteries are much less accurate Though not shown the system detects Low battery status about 10 for both M Warning If your system does not have a smart battery i e a Sony LIP9020 Windows APM will register powe...

Страница 86: ...cial file or partition on the HDD This is created and managed by the PHDisk utility found on the same floppy as the CD ROM driver Another copy is on the Software Utilities CD ROM DOS Windows 3 1x and Windows 95 can use both file and partition methods Windows NT and OS 2 only use the partition method The Save to Disk partition must be setup before you install the operating system Setup the Save to ...

Страница 87: ...rtition isn t large enough the sys tem will default to the Save to Disk file if present and large enough or to Suspend mode If the system uses Suspend mode your unsaved data will be lost when power is turned off Save to Disk Setup cont THE PARTITION METHOD The Save to Disk partition must be setup on an unpartitioned unformatted hard disk If your hard disk already has information you want to keep m...

Страница 88: ... amount of memory you expect to have 4 When the utility has finished creating the par tition run your operating system s partition utility e g MS DOS s fdisk It will tell you that it has found a non DOS or unknown partition Do not do anything to this partition just partition and setup the rest of the hard disk with your operating system Be careful not to format the non DOS or unknown partition Oth...

Страница 89: ...he computer comes back on Save to Disk Setup cont a PHDISK CREATE size PARTITION ENTER or a PHDISK C size P ENTER If you don t want to change the size of the partition but still want to have a larger Save to Disk area create a Save to Disk file Then delete the partition as described above This will prevent the system from getting confused and make sure the informa tion is now written in the file T...

Страница 90: ...the full range of options available in Phoenix s Setup based power manage ment system Use the battery icon on the Windows control panel to access APM in Windows 95 or PowerProfiler in Windows NT 4 0 For best results use Advanced settings For more information about APM refer to your operating system documentation Installing SystemSoft PowerProfiler To install PowerProfiler for Windows NT 4 0 1 Inse...

Страница 91: ...ved TouchPad drivers also see page 2 5 2 6 FIR driver for IrDA PC Card If you plan on increasing your system memory be sure to read the Memory section before you make any purchases If you use the TouchPad frequently the enhanced driver allows you to make it even more user friendly However it doesn t have any effect if you re using an external pointing device ...

Страница 92: ...eview any accompanying README files Windows 3 1x PC Card driver Audio driver Video driver including VPM for multimedia CD ROM driver duplicated on Floppy Windows NT 3 5x PC Card driver Audio driver TouchPad driver by Logitech OS 2 Warp 3 0 Audio driver Video driver OS 2 Warp 4 0 Audio driver If you need aditional utilities or drivers consult your system dealer and or ask your operating system vend...

Страница 93: ...mbination Socket requirements up to 128MB maximum using one or both sockets Socket 1 Socket 2 requirements 8MB 16MB 32MB or 64MB modules 144 pin SO DIMMs 3 3 volt TSOP package SDRAM DIMMs rated at 10ns or faster Make sure you put the correct type in each socket memory M Warning Check with your dealer to make sure installing RAM yourself doesn t violate your warranty M Warning Make sure each module...

Страница 94: ... you to insert it only one way Make sure it is seated as far into the slot as it will go 5 Gently push down on the module 4 until its lock catches snap into place DO NOT FORCE IT The module should fit in without much pressure If there is a lot of resistance check to make sure the DIMM is properly seated 6 Install the second module in the same way 7 Replace the memory bay cover 5 8 After changing t...

Страница 95: ...gestures TABLE 6 1 DEFAULT TOUCHPAD GESTURES The MouseWare driver sup ports both Logitech and Stan dard gestures LOGITECH GESTURE STANDARD GESTURE DESCRIPTION E QUIVALENCE e d i l S e d i l S d a p e h t s s o r c a r o s r u c e h t e v o M 2 p a T d n r e g n i F 1 g n i d l o h e l i h w t s n w o d r e g n i f r e g n i F 1 p a T e s u o m t f e l e h t k c i l c e l g n i S n o t t u b r o e ...

Страница 96: ...dow 95 use the Buttons tab in Mouse Properties of Control Panel 1 From the Start menu select Settings Control Panel 2 Double click on the Mouse icon When the Mouse Properties page appears use the on line help to get information about each feature To configure other common features click on other tabs MOUSE PROPERTIES FIG 6 2 ...

Страница 97: ... works with Windows 95 so its included in that operating system s driver folder Before installing it please be sure to read the RELNOTES DOC file included in the FIR folder This file has important instructions about the installation procedure and system settings You can open the file with the Wordpad utility included with Windows 95 ...

Страница 98: ...r all types of cards this will use more system resources Choose Custom Installation if you know that you won t need some features 6 Allow the modifications to the various files 7 When complete reboot the system Note If you allow SRAM ATA drive support it will add removable drive resources before your CD ROM This will affect programs which de pend on CD ROM based files If you don t want to use SRAM...

Страница 99: ...ctories for itself in the Program Files directory on your C drive unless you choose otherwise 5 When the installation is complete allow the system to reboot to complete the setup CARDWIZARD WINDOWS NT 4 0 On its own Windows NT 4 0 won t al low hot insertion or removal of PC Cards CardWizard overcomes this de ficiency However before removing a card you should click on Stop in the CardWizard control...

Страница 100: ...tems To use it copy the CS_APM EXE file from the Drivers Utili ties CD ROM to the CardWizard direc tory on your HDD Then using an editor program modify the CONFIG SYS file install drive path cs_apm exe e g Install c cardwiz cs_apm exe USING REMOVABLE STORAGE CARDS If you are using removable storage cards i e ATA Hard Disk ATA Flash Disk cards and SRAM cards be sure to read the readme files which c...

Страница 101: ...r PC Card socket 2 Switch to the CARDWIZ directory or the directory where you installed the CardWizard software 3 Type atainit drive letter and press Enter e g atainit e Enter Follow the prompts on the screen as the utility partitions the PC Card Note Before you substitute the drive letter check the system booting message to see which logical drive names are reserved for ATA cards MCFORMAT EXE Thi...

Страница 102: ...with all legacy cards It also extends ZV card support to Windows 3 1x and Windows 95 We recommend you read the readme file on the CardWizard disk to find out if any special conditions apply to a card you are considering buying If you are interested in a card model and have compatibility questions call the card manufacturer to check on its compatibility with SystemSoft s CardWorks and CardWizard ut...

Страница 103: ...s on your notebook computer USB Port 2 ports Serial Port COM1 TV out Port S type VGA Port Parallel Port PS 2 Port for a compatible pointing device PS 2 Port for a PS 2 compatible keyboard Power Socket Depending on your notebook model this serves as a pass through connector to the notebook s own DC in port If your computer doesn t support this feature its function is null you must use the notebook ...

Страница 104: ...ure the expansion door on the rear of the note book is open 3 Position the notebook be tween the slide connection and ejector guides 4 Pull the docking lever for ward to securely fasten the Port Replicator 5 Turn on the computer pc card DOCKING LEVER OPEN CLOSE PORT REPLICATOR DOCKING FIG 6 3 UNDOCKING PROCEDURE 1 Shut down your system or put it into Suspend mode 2 Push the docking lever all the w...

Страница 105: ...e sure the cable connections between the Port Replicator and the device s in question are undamaged and secured Make sure the peripherals work when connected directly to the notebook computer Confirm the Setup settings for the ports Shut down the entire system Disconnect all peripherals from the note book Disconnect all devices from their power supplies Reestablish all connections Turn on any peri...

Страница 106: ...1 2 3 4 5 6 7 8 6 16 E x t r a s NOTES notes ...

Страница 107: ...ns The information listed in this section is for reference only It is subject to change at the manufacturer s discretion and without notice Unless otherwise indicated none of the components and or subsystems can be modified or upgraded ...

Страница 108: ...r So of these options a 166MHz Tillamook Pentium running at 1 8V is the most energy effi cient though among the slowest However ac tual power consumption also depends on the amount of work the CPU must perform PACKAGING The PPGA format features a removable CPU The accompanying chipset is hard wired onto the mainboard MMX As of press time all CPU options include MMX technology M Warning The CPU is ...

Страница 109: ... K6 32KB code 32KB data L2 cache PPGA configuration 256KB or 512KB Pipeline Burst SRAM RAM up to 128MB maximum using one or both sockets Socket 1 Socket 2 requirements 8MB 16MB 32MB or 64MB modules 144 pin SO DIMMs 3 3 volt TSOP package SDRAM DIMMs rated at 10ns or faster User upgradable ...

Страница 110: ...bility SoundBlasterPro3 01 MS Windows Sound System zoom video Built in 2 speakers mic 0 8watt max output Ports Line in Mic in phone speakers out including NTSC Maximum colors available for Dual Control in Windows NT 4 0 as of this publucation ü resolutions available with 2MB of video RAM v resolutions available with 4MB of video RAM n o i t u l o s e R s r o l o C A G V A G V S A G X A G X S y a l...

Страница 111: ...itchable with DVD I O USB 1channel on board 1 channel extended through port replicator max output channel 500mA complies with PC98 spec rev 1 sec 7 2 Parallel Printer 25 pin bi directional SPP EPP v1 7 1 9 ECP v1 7 Serial 1 9 pin RS232C NS16C550A compatible Serial 2 IrDA v1 1 FIR ASK TV out mini din PS 2 mouse or keyboard PC Card 2x Type II or 1x Type III PC Card with ZV support Expansion propriet...

Страница 112: ...timated Battery Life max battery life 3h 30m NiMH 4h 10m Li Ion disabled 2h 28m NiMH 2h 43m Li Ion These numbers are very rough guides for two Setup default configurations See the sidebar for an explanation of limitations More on Charging Your system doesn t require a proprietary battery so to accomodate the widest range of batteries on the market and still be safe we ve taken a lot of factors int...

Страница 113: ... battery FDD HDD CD ROM More on Battery Life We can t be more specific because performance varies depending on many factors including bat tery condition capacity environmental conditions system usage habits software requirements and not least system configuration Our extremely artificial examples are based on the following configuration Battery NiMH SMP 36S 3600mA Li Ion SMP 202P 4200mA CPU Tillam...

Страница 114: ... FDD or LS 120 drive Drivers for hardware system software bundled applications User s manual Expansion DRAM module s 8MB 16MB 32MB or 64MB TV terminal cable AC adapter with power cord Port replicator Battery pack 36 Ni MH 202 Li Ion Car adapter 19VDC 2 4A output Carrying Bag Options may not be immediately available and or may be standard accesories depending on your package Optional Factory Instal...

Страница 115: ...the safety precautions in the preface If all else fails talk to your dealer You should also make a record of what happened and what remedies you tried Of course if something goes wrong it will happen at the most inconvenient time possible so you should preview this section just in case If after you ve tried everything and the system still won t cooperate try turning it off for a few minutes and th...

Страница 116: ...stalled solution Check the power bay make sure the battery is present and seated properly the design of the battery only al lows it to go in one way Make sure there s nothing interfering with the battery contacts possible cause Low battery indicator The battery status icon is flashing solution Plug in the AC power source If the computer doesn t start up immediately turn it off then on again possib...

Страница 117: ...ystem has a power management scheme i e APM check its settings You may also be using a PC Card device which is drawing a lot of power e g a Type III storage device possible cause The battery does not fully charge due to prolonged inac tivity indicator The battery life per charge is too short solution Refer to Chapter 5 Power Use Charge possible cause The battery is too hot indicator The battery is...

Страница 118: ...ty precautions in the Preface The notebook feels too hot possible cause The system is using too much power indicator The computer feels uncomfortably warm solution Reduce the computer s power consumption refer to Chapter 4 Firmware and Chapter 5 Power Make sure the notebook is properly ventilated and the fan port is not blocked If this doesn t cool it down put the system into Suspend mode or turn ...

Страница 119: ...o Setup s Main menu Boot Options sub menu and change the Display set ting see Chapter 4 Firmware If an external monitor is connected turn it on The screen is flickering possible cause The vertical refresh rate is insufficient solution 1 Avoid using the Simultaneous display mode Use LCD only or CRT only 2 Switch to a lower resolution and or fewer colors 3 Adjust the refresh frequency in the display...

Страница 120: ...an the screen using a soft clean dry cloth Many cleaning solutions can damage the LCD surface so you should follow the precautions outlined in the Preface Try to avoid touching the screen itself Even the cleanest hands can leave oils which attract contaminants possible cause The screen is suffering from burn in indicator The screen has ghost images even when it s off solution Thisproblemisusuallya...

Страница 121: ...parameters if they are not the same as the original settings solution The Setup s Autotype Fixed Disk assumes that any hard disk 528 MB or larger is formatted using LBA mode Some older systems don t use LBA mode If your hard disk wasn t formatted using LBA mode you must enter Setup s Fixed Disk Type section and manually adjust the LBAModeControl switch to Disabled SinceLBAmode is the preferred sta...

Страница 122: ...ing occurs and you activate the Save to Disk process 1 the hard disk has been changed or 2 therehasbeenaCMOS failure or a Checksum failure and the problem has not been corrected If one of these occurs you must run the PhDisk utility as soon as possible Refer to Setting up for Save to Disk in Chapter 5 Power The Save to Disk function does not work possible cause The system cannot access the Save to...

Страница 123: ...ings menu and enable the features you prefer Refer to the Power Management sec tion of Chapter 5 Power The system does not go into Suspend or Save to Disk when the battery is low possible cause Suspend Timeout is disabled solution Use one of the Power Management presets or manually set the Suspend Timeout in the Power Savings menu in Setup RefertoChapter4 FirmwareandChapter5 Power The PC Card does...

Страница 124: ...tte drive A error description The floppy drive is present but fails the BIOS POST solution 1 Make sure the FDD is fully inserted into the Floppy bay or attached to its external adapter and then to the parallel port refer to Chapter 3 Media 2 Check that the FDD is correctly defined in Setup refer to Chapter 4 Firmware message Extended RAM failed at offset nnn description The extended memory is not ...

Страница 125: ...t your service center If the problem disappears replace the DIMMs one at a time to identify the defective module Replace any defective DIMMs message Fixed Disk x Failure or Fixed Disk Controller Failure description The hard disk is not working or is not properly configured solution 1 Check that the HDD is properly attached refer to Chapter 3 Media 2 Run Setup to make sure the HDD is correctly conf...

Страница 126: ...ce center message Keyboard error description The POST doesn t see the keyboard solution 1 Try restarting the system 2 If you are using an external keyboard remove it and make sure the onboard keyboard works correctly If it does you may have to replace the external keyboard 3 If you changed the video output make sure you didn t dislodge the keyboard ribbon connectors refer to Chapter 2 System 4 If ...

Страница 127: ...ur HDD was set up with multiple partitions make sure drive C is active boot up from drive A and use FDISK EXE message Parity check 1 nnnn or Parity check 2 nnnn description The BIOS found a parity error in the system bus solution 1 Reboot 2 If the problem persists contact your service representative message Press F1 to resume F2 to Setup description The POST discovered a recoverable error solution...

Страница 128: ... CMOS clock battery indicator shows the battery is dead solution Contact your service representative to replace the onboard bat tery Then run Setup to reestablish the correct settings message System cache error Cache disabled description The RAM cache failed the BIOS test and was disabled solution 1 Reboot 2 Continue without the cache though system performance will be degraded 3 Contact your servi...

Страница 129: ...lution Contact your service representative OTHER MESSAGES If your hard disk is disconnected after the POST but before the operat ing system starts to initialize you may get the following message Hard disk failed Press H to retry Hard Disk any other key for floppy You can press H to try again or press any other key to boot from a floppy If you feel that the hard disk is improperly connected turn of...

Страница 130: ...1 2 3 4 5 6 A B B 16 T r o u b l e notes NOTES ...

Страница 131: ...board that connects a system board to a peripheral I O device de vices or adds specialized functions to the system Address An identification such as a label number or name that designates a particular location in storage or any other data destination or source Application A program such as a word processor image editor or database ...

Страница 132: ... from bootstrap To start or restart a computer sys tem by reading instructions from a storage device into the computer s memory If the computer is already turned on it s a warm boot if not it s a cold boot C D Cache memory A small high speed memory for the temporary storage of informa tion usually used between a slower large memory and a fast central processing unit CD ROM Compact Disk Read Only M...

Страница 133: ...are pro grammed to operate as a system The layout or design of ele ments in a hardware or information processing system CPU Central Processing Unit The component of a computer sys tem with the circuitry to control the interpretation and execu tion of instructions This computer has a Pentium Crash The system suddenly stops working This usually requires a system reboot Disk drive A device that reads...

Страница 134: ...nd from a particular peripheral device The electrical and mechanical requirements are different from one kind of device to another so software drivers are used to standardize the format of data between them and the central processor E F External option An device attached to the outside of the system unit which extends and enhances its operation i e printer or mouse G H Hot i e a socket port is hot...

Страница 135: ...pe of internally mounted hard disk con troller External devices usually use SCSI controllers Internal option A part installed inside the system unit cover which enhances operation of the system such as an adapter and a memory chip Interrupt A signal that when activated causes the hardware to transfer the program control to some specific location in main storage thus breaking the normal flow of the...

Страница 136: ...visibility in high illumination levels but no visibility in low illumination levels Load In programming enter data into storage or working registers M N MB Megabyte 1 048 576 bytes 1024KB Memory The storage facilities of the computer capable of storing vast amounts of data Microprocessor The basic arithmetic logic and control elements required for processing generally contained on one integrated c...

Страница 137: ...p A video and audio compres sion standard which allows decompression at 1 2 MB to 1 5 MB second so CD players can replay color movies at a realis tic 30 frames second NTSC National Television Standards Committee A video broadcast standard of 525 scan lines every 1 30 second This is accom plished in 2 passes of 1 60 second each 60 Hz This system is used mostly in North America and East Asia Nonvola...

Страница 138: ...ight wires Additional wires are needed to exchange control signals Parameter An arbitrary constant A variable in an algebraic expression that temporarily assumes the properties of a constant PC Card This term has largely replaced the term PCMCIA See PCMCIA PCI Peripheral Component Interface A 32 64 bit local bus archi tecture widely used in Pentium based PCs Developed by DEC IBM Intel and others a...

Страница 139: ...chitecture provides PCMCIA support which automatically recognizes when PCMCIA devices are inserted and removed The simpler term PC Card has largely replaced this acronym to refer to these cards PnP Plug and Play The technology that makes Windows 95 auto matically detect and configure most of the adapters and pe ripherals connected to a PC A fully PnP enabled PC requires three PnP components a PnP ...

Страница 140: ...ly considered to be superior to SLIP because it features error detection data compression and other elements of mod ern communications protocols that SLIP lacks Q R RAM Random Access Memory Memory into which the user can enter information and instructions write and from which the user can call up data read RAM is the working memory of the computer into which application programs can be loaded from...

Страница 141: ...s components 3 The preparation of a computing system to perform a job or job step Setup is usually performed by an operator and often involves performing routine functions 4 The preparation of the system for normal operation Stop clock A mode in which the CPU effectively shuts down Stop grant A mode in which the CPU stops processing instructions TCP IP Transmission Control Protocol Internet Protoc...

Страница 142: ...s display of 256 colors at 640 x 480 graphics resolution and 720 x 400 text resolution This standard has been superceded by SVGA 256 colors at 800 x 600 resolution XVGA 256 colors at 1024 x 768 resolu tion and SXVGA 256 colors at 1280 x 1024 resolution Volatile memory The contents of the memory storage unit are lost when the machine is turned off e g cache or RAM W Z Zoomed Video ZV Port The ZV Po...

Страница 143: ...ex The items in this section are for reference only Appendicies are not listed here Technical terms are defined in the Glossary 3 Mode See FDD A AC adapter See Power APM See Power Audio 1 7 2 12 2 14 4 12 audio CD 3 2 3 6 3 7 3 8 ...

Страница 144: ...loppy 1 7 See also FDD Power HDD 1 7 1 11 3 3 4 6 See also HDD power 1 6 See also Power Beep 2 16 5 10 6 9 6 10 Bidirectional mode See Peripherals printers BIOS See Firmware BIOS Setup utility See also Chipset BIOS Boot boot up 1 12 4 3 4 7 5 4 5 5 See also Starting Brightness See Keyboard See also Display C Cache See Options cache See also Chipset cache Case rear panel 2 9 CD ROM 2 14 6 8 Chipset...

Страница 145: ... Data loss 3 3 Database Programs See Software applications DIMM RAM See Options memory RAM Display 1 5 2 14 4 4 See also Chipset VGA display external monitor 2 7 2 8 2 9 refresh rate 2 9 LCD 1 12 1 15 2 7 2 8 See also Ports TFT 2 7 resolution 2 7 TV 2 7 2 8 See also Ports TV NTSC 2 10 PAL SECAM 2 10 Docking station See Ports DOS See Operating System DOS Doze mode See Power management Driver setup ...

Страница 146: ...e also Ports parallel Error 4 2 F Fan 1 7 1 11 Fax Modem 2 17 5 10 5 11 FDD 1 6 1 15 3 9 4 7 3 mode 4 6 formatting 4 6 5 9 module 1 10 Firmware 5 10 BIOS Setup utility 1 12 3 5 4 1 4 2 4 3 4 4 4 5 4 6 4 7 5 1 5 5 5 12 6 1 6 4 Autotype 4 7 4 8 Item Specific Help 4 5 4 6 5 10 POST 4 1 4 2 4 3 4 4 5 8 Flash ROM See Chipset Flash ROM Flickering monitor 2 9 Fn Key Combination See Keyboard ...

Страница 147: ... HDD 3 5 5 8 5 9 formatting 3 5 5 10 LBA mode 3 5 Save to HDD 1 15 3 5 module 3 3 4 7 shield 3 4 Headphones See Ports See also Audio Hot sockets 2 15 swap 2 15 I I O iii IBM See Operating System OS 2 Warp Intel See Options CPU See also Chipset Internet 2 18 IrDA port See Ports Item Specific Help See Firmware ...

Страница 148: ... Display Setup utility 1 12 See also Firmware suspend 5 10 5 11 See also Power management numeric keypad 2 3 type keys 2 3 special characters 2 3 L LED 1 13 1 14 AC in 1 14 5 2 5 3 See also Power battery 1 14 5 2 5 8 See also Power CapsLock 1 13 See also Keyboard charging See also Power drive bay 1 13 See also Bays drive floppy bay 1 13 3 2 See also Bays floppy HDD bay 1 13 3 2 See also Bays HDD N...

Страница 149: ...7 See Options memory RAM MIDI game port See Ports Module 1 6 adapter See Power adapter battery See Power CD ROM 2 12 3 2 3 6 3 7 3 8 See CD ROM Fax Modem See Fax Modem FDD 3 2 See FDD HDD 3 2 3 3 See also HDD replacing upgrading 3 4 3 5 MO See also MO magneto optical drive Mouse 1 9 1 15 2 4 mouse 2 4 Microsoft or IBM PS 2 2 5 Multimedia 2 12 2 14 3 8 MPEG 3 8 ...

Страница 150: ...2 5 8 CD ROM setup driver 3 6 Japanese 4 6 OS 2 Warp 1 4 2 5 5 8 5 12 CD ROM setup driver 3 6 Plug n Play 2 16 4 12 UNIX 1 4 Windows 3 1x 4 12 5 8 5 12 Windows 95 1 4 2 5 5 4 5 8 5 12 audio setup driver 2 12 CD ROM setup driver 3 6 PC Card setup driver 2 15 2 16 6 8 TouchPad setup driver 2 5 2 6 6 5 video setup driver 2 7 2 9 Windows NT 3 51 5 8 CD ROM setup driver 3 6 Windows NT 4 0 1 4 5 8 audio...

Страница 151: ...ons CPU factory installed 5 8 memory RAM 4 2 5 9 6 3 DIMM 6 3 6 4 EDO video 5 8 OS 2 Warp See Operating System OS 2 Warp P Packing See Storage PAL 2 10 Parallel See Ports PC Card 1 7 1 15 2 14 2 16 3 8 5 11 3rd See also Options factory installed CardBus 2 14 2 15 2 16 CardWizard 6 8 6 9 flash cards 6 11 I O 2 16 4 10 LAN 2 16 SCSI 2 16 removing 2 16 SRAM ATA drives 6 8 6 10 6 11 ...

Страница 152: ...so Peripherals expansion docking station 1 8 4 10 headphones speakers 1 7 2 12 See also Audio IrDA 1 8 4 10 keyboard 2 4 line in 1 7 2 12 See also Audio mic in 1 7 2 12 See also Audio monitor VGA 1 9 1 10 2 9 See also Display parallel 1 9 4 11 PS 2 1 9 2 4 2 5 2 6 serial 1 9 2 5 2 6 5 11 2nd 1 8 4 10 See also Firmware BIOS Setup utility TV 2 10 Power iv 1 5 adapter iv 1 15 5 1 5 3 5 4 5 8 6 1 batt...

Страница 153: ...rive formatting Save to HDD suspend 2 16 4 16 5 5 5 9 5 11 Programs See Software applications PS 2 See Ports Q Quick Start 1 15 R RAM See Options memory RAM Restarting the system 1 9 2 5 2 6 3 7 6 8 S S DSTN See Display S TFT See Display LCD Safety 1 15 5 4 Security 4 13 5 11 access restrictions 4 14 4 15 hardware Kensington Lock 1 7 ...

Страница 154: ...1 power management 5 1 6 1 utility audio 2 8 3 6 utility video 2 7 SoundBlaster See Audio Speakers See Ports See also Audio SPP mode See Firmware See also Peripherals Standby mode See Power management Starting 1 15 4 15 5 9 5 10 5 11 See also Quick Start Status panel 1 5 Storage 1 14 1 15 System Memory See Options memory RAM SystemSoft 6 8 T TCP IP See Fax Modem TFT See Display LCD Time 4 6 TouchP...

Страница 155: ... 2 1 3 1 11 2 8 2 10 2 12 2 16 3 3 3 4 3 5 3 9 4 8 5 3 5 9 5 11 6 3 6 4 symbol 1 2 1 3 Warnings iii v Warranty 6 3 Wavetable See Audio Windows 3 1x See Operating System Windows 3 1x Windows 95 See Operating System Windows 95 Windows NT 3 51 See Operating System Windows NT 3 51 Windows NT 4 0 See Operating System Windows NT 4 0 Word Processing See Software applications ...

Страница 156: ...I 2 3 4 5 6 A B I 14 C I n d e x X X TFT See Display Z ZV type PC Card See PC Card 3 Mode See FDD ...

Отзывы: