1
2
3
4
5
6
7
8
3 4
M e d i a
ï
5
3
6
4
6
2
1
R
EPLACING
/U
PGRADING
THE
C
ARTRIDGE
If youre too harried or a bit of a techno-
phobe, contact your dealer to purchase or
replace your current HDD with an upgrade.
HDD
¯
Replacing a HDD
You can replace your HDD with another 2.5,
12mm high IDE hard disk drive.
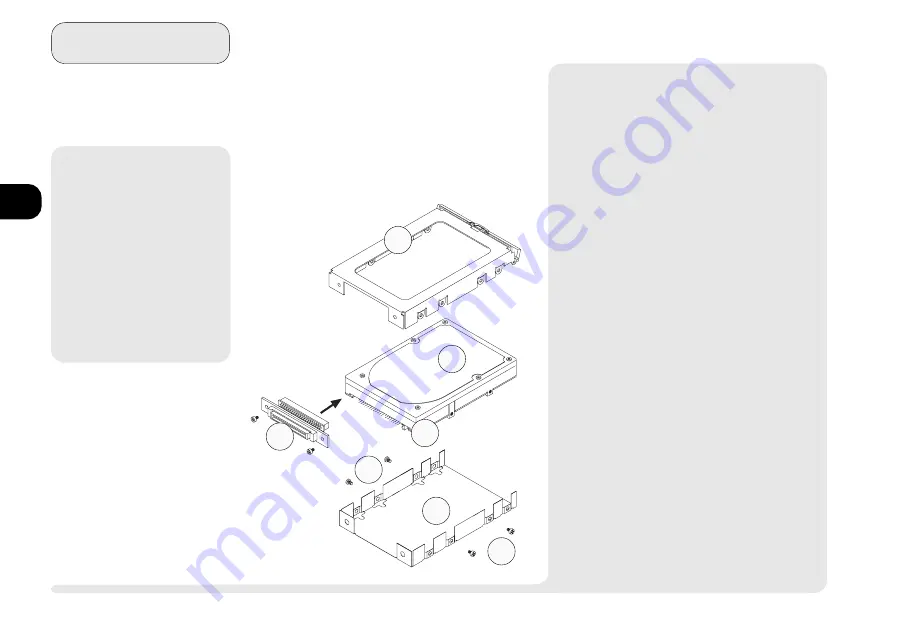
To assemble the cartridge,
1.
Make sure the HDDs jumper pins are set to
master (3). - Most HDDs dont require any
settings, but check your HDDs documenta-
tion to be sure.
2.
Holding the HDD (1) at an angle, plug its pins
into the connector (5). Make sure all the pins
are inserted fully.
3.
Cover the HDDs electronic component side
with the shield (4).
4.
Insert the HDD and shield combination into
the frame (1). As you do so, carefully fit the
edges of the shield around the screw holes of
the frame.
5.
Secure the HDD, shield and frame with the
four mounting screws (6).
M
Warning
Some (usually older)
HDDs have a small
jumper switch. It must
be set to master or the
system may not cor-
rectly recognize the
drive. Check your
drives documentation.
A
SSEMBLING
THE
HDD
C
ARTRIDGE
F
IG
. 3 4
1. cartridge frame
2. HDD
(electronics face-down)
3. master/slave jumper
4. mylar shield
5. connector
6. screws
Содержание 9800
Страница 1: ...1 2 3 4 5 6 7 8 i MULTIMEDIA NOTEBOOK COMPUTER USER S MANUAL ...
Страница 18: ...1 2 3 4 5 6 7 8 xviii P r e f a c e NOTES Notes ...
Страница 34: ...1 2 3 4 5 6 7 8 1 16 Introduction NOTES notes ...
Страница 62: ...1 2 3 4 5 6 7 8 3 10 M e d i a notes NOTES ...
Страница 106: ...1 2 3 4 5 6 7 8 6 16 E x t r a s NOTES notes ...
Страница 130: ...1 2 3 4 5 6 A B B 16 T r o u b l e notes NOTES ...
Страница 156: ...I 2 3 4 5 6 A B I 14 C I n d e x X X TFT See Display Z ZV type PC Card See PC Card 3 Mode See FDD ...


