background image

63

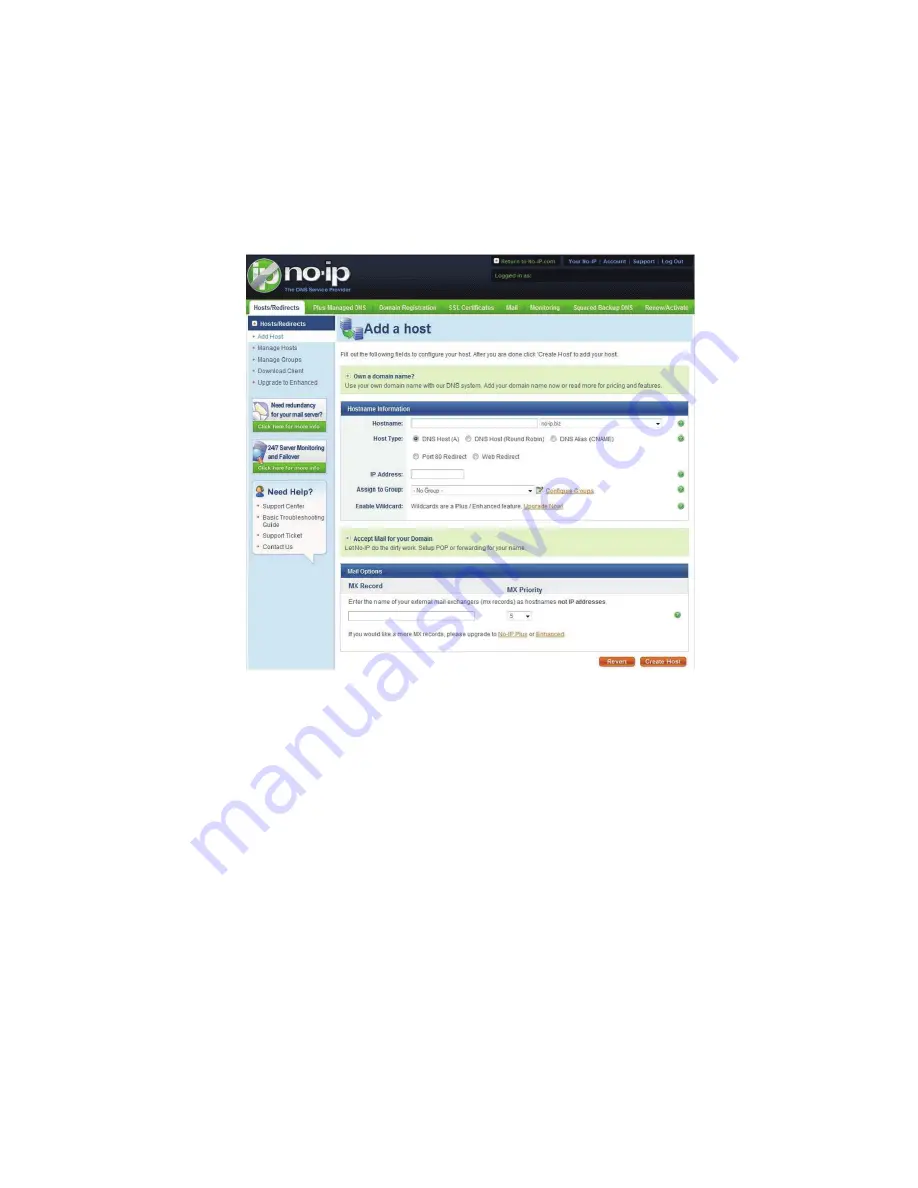
Figure 8-7 

8.

In Figure 8-8, input corresponding host name in the filed. You can use this name to access device from an external 

network. In the field to the right of the name, select the desired area. This is your domain name for access to the 

device. Click “Create Host” button at the bottom of the page. 

Figure 8-8 

9.

 Now you can see an interface is shown as in Figure 8-9. Here you can view domain name and the computer's 

current IP setup. If you already have a domain name equal to gurado trusted, you must define another name for the 

host.

Содержание PTZ Series

Страница 1: ......

Страница 2: ......

Страница 3: ......

Страница 4: ......

Страница 5: ......

Страница 6: ......

Страница 7: ......

Страница 8: ......

Страница 9: ......

Страница 10: ......

Страница 11: ......

Страница 12: ......

Страница 13: ......

Страница 14: ......

Страница 15: ......

Страница 16: ......

Страница 17: ......

Страница 18: ......

Страница 19: ...Home Use IP Camera PTZ Series Quick Start Guide Version 1 2 ...

Страница 20: ... 0 DWD RQYHUWHU DEOH 3 LPHQVLRQ 4 QVWDOODWLRQ 3URFHGXUH 6 UDFNHW QVWDOODWLRQ 6 DUG QVWDOODWLRQ 6 5HPRYH DUG 7 4XLFN RQILJXUDWLRQ 7RRO 9 2YHUYLHZ 9 2SHUDWLRQ 9 HE 2SHUDWLRQ 12 1HWZRUN RQQHFWLRQ 12 RJLQ DQG 0DLQ QWHUIDFH 12 SSHQGL 7R LF RU D DUGRXV 0DWHULDOV RU OHPHQWV 15 ...

Страница 21: ...smoke z Installation Environment All installation and operation here should conform to your local electrical safety codes The device working environment shall conform to the specified temperature and humidity Please make sure the device is away from the direct sunlight or other heating sources Please keep the sound ventilation z Please refer to the packing list in the box Name Amount IPC 1 5V powe...

Страница 22: ...iii We are not liable for any problems caused by unauthorized modifications or attempted repair ...

Страница 23: ...ng The red light becomes on when system boots up When system is running properly the green light becomes on When system is upgrading the red light flashes The interval is 0 5s Port 2 PIR receiver enclosure Passive IR motion detect port It can detect the object of the IR radiant such as the human body or other heating object Port 3 LDR light dependent resistor It is to sense the environment illumin...

Страница 24: ...s shown as in Figure 1 2 Figure 1 2 Please refer to the following sheet for detailed information Port Name Function I O Connect to MD9M data converter cable or wireless alarm box Antenna Connect to the wireless antenna to receive the WIFI 3G and etc wireless signal RESET When the device is running properly The power indication light is green press REEST button for at least 5 seconds and then relea...

Страница 25: ... SD card please make sure current card is not in write mode Otherwise it may result in data loss or card damage Before hot swap please stop record download operation LAN Ethernet port You can connect to the standard Ethernet port USB port USB Port You can connect to the USB device 3G port 3G card port You can insert 3G UIM card 0 0 DWD RQYHUWHU DEOH The MD9M data converter cable is shown as below ...

Страница 26: ... alarm output end Port 6 Yellow NO Normal open alarm output end Port 7 Blue RX Transparent debug COM RS232_RX ˈ RS232 COM receive end Port 8 Purple TX Transparent debug COM RS232_TX ˈ RS232 COM send end Port 9 Grey GND Ground end Port 10 Bare wire Ground end LPHQVLRQ The device front dimension interface is shown as below The unit is mm See Figure 1 4 Figure 1 4 The side panel dimension interface i...

Страница 27: ...5 Figure 1 5 The device pedestal dimension is shown as in Figure 1 6 The unit is mm Figure 1 6 ...

Страница 28: ...wo screws to the wall mount bracket to fasten the bracket z Put installation slot of the bottom of the device to the wall mount bracket Put wall mount bracket to the device pedestal and then secure firmly Finally you can turn the device clockwise to fix the device on the bracket Figure 2 1 DUG QVWDOODWLRQ Please follow the steps listed below to install the 3G card See Figure 2 2 and Figure 2 3 z U...

Страница 29: ...rd See Figure 2 4 z Use the screwdriver to loosen the screw of 3G card protection cap in the rear panel Remove the cap from the camera z Follow the 3G card direction to remove the 3G UIM card z Insert the 3G card protection cap z Use the screwdriver to fix the screw to secure the protection cap ...

Страница 30: ...8 Figure 2 4 ...

Страница 31: ...applies to the IP addresses in the same segment 2SHUDWLRQ Double click the ĀConfigTools exeāicon you can see an interface is shown as in Figure 3 1 In the device list interface you can view device IP address port number subnet mask default gateway MAC address and etc Figure 3 1 Select one IP address and then right click mouse you can see an interface is shown as in Figure 3 2 Figure 3 2 ...

Страница 32: ...nterface Or you can select an IP address and then click the Login button to go to the login interface See Figure 3 4 In Figure 3 4 you can view device IP address user name password and port Please modify the corresponding information to login Please note the port information here shall be identical with the port value you set in TCP port in Web Network interface Otherwise you can not login the dev...

Страница 33: ...11 Figure 3 5 ...

Страница 34: ...r please set the corresponding gateway and subnet mask z Use order ping IP camera address to check connection is OK or not RJLQ DQG 0DLQ QWHUIDFH Open IE and input IP camera address in the address bar For example if your camera IP is 192 168 1 108 then please input http 192 168 1 108 in IE address bar See Figure 4 1 Figure 4 1 System pops up warning information to ask you whether install control w...

Страница 35: ...elow See Figure 4 3 Please input your user name and password Default factory name is admin and password is admin Note For security reasons please modify your password after you first login Figure 4 3 After you logged in you can see the main window See Figure 4 4 ...

Страница 36: ...14 Figure 4 4 Please refer to the Web Operation Manual included in the resource CD for detailed operation instruction ...

Страница 37: ...rd During the environmental friendly use period EFUP period the toxic or hazardous substance or elements contained in products will not leak or mutate so that the use of these substances or elements will not result in any severe environmental pollution any bodily injury or damage to any assets The consumer is not authorized to process such kind of substances or elements please return to the corres...

Страница 38: ...Home Use IP Camera PTZ Series User s Manual Version 1 2 ...

Страница 39: ...9 URQW 3DQHO 9 5HDU 3DQHO 10 0 0 DWD RQYHUWHU DEOH 11 LPHQVLRQ 12 LGLUHFWLRQDO WDON 13 2 5 1 Device end to PC end 13 2 5 2 PC end to the device end 14 RFDO ODUP 6HWXS 14 LUHOHVV ODUP 6HWXS 15 2 7 1 Version 15 2 7 2 RS232 16 2 7 3 Alarm Setup 16 2 7 4 Motion Detect 19 2 7 5 Alarm Output 19 QVWDOODWLRQ 3URFHGXUH 21 UDFNHW QVWDOODWLRQ 21 DUG QVWDOODWLRQ 21 5HPRYH DUG 22 ...

Страница 40: ...UDWLRQ 7RRO 24 2YHUYLHZ 24 2SHUDWLRQ 24 HE 2SHUDWLRQ 27 1HWZRUN RQQHFWLRQ 27 RJLQ DQG 0DLQ QWHUIDFH 27 1HWZRUN RQQHFWLRQ 30 RQQHFWLRQ 30 L L DQG RPPRQ RQQHFWLRQ 30 4 31 SSHQGL 7R LF RU D DUGRXV 0DWHULDOV RU OHPHQWV 32 ...

Страница 41: ...g our IP camera This user s manual is designed to be a reference tool for your system Please read the following safeguard and warnings carefully before you use this series product Please keep this user s manual well for future reference ...

Страница 42: ... 3 Environment This series IP camera should be installed in a cool dry place away from direct sunlight or strong light inflammable explosive substances and etc 4 Daily Maintenance Please shut down the device and then unplug the power cable before you begin daily maintenance work Use the dry soft cloth to clean the device If there is too much dust please use the water to dilute the mild detergent f...

Страница 43: ...We assume no liability or responsibility for all the fires or electrical shock caused by improper handling or installation We are not liable for any problems caused by unauthorized modifications or attempted repair ...

Страница 44: ...A2000 1X WCDMA module support mobile data transmission z Embedded WIFI module to support WIFI wireless data transmission z Support cable network data transmission via Ethernet Storage Function z Support central server backup function in accordance with your configuration and setup in alarm or schedule setting z Support record via Web and the recorded files are storage in the client end PC z Suppor...

Страница 45: ...etect function z Built in auto Pan Tilt support the pan and tilt movement z Support watermark technology to avoid vicious video modification z Support scene mode function use can select various modes to monitor 6SHFLILFDWLRQ 1 3 1 Performance Please refer to the following sheet for IPC performance specification Name Specification Sensor Mode 1 4 inch CMOS Video Mode PAL NTSC Resolution 300 000 pix...

Страница 46: ...ne mode setup Resolution VGAǃQVGAǃCIFǃQCIFǃQQVGA Video Compression Standard H 264 compression format Motion Detection Take 18 22 pix as a macro unit Support 396 detection zones Sensitivity level ranges from 1 to 6 Video Dual stream 2 ch real time VGA Bidirectional Talk Bidirectional talk function Delay within 200ms Audio Audio Listening Audio listening 1 ch MIC input WEB access via IE browser PPPo...

Страница 47: ...grade Support upgrade tool Device Upgrade COM upgrade TFTP upgrade from network via COM command COM control platform View IPC running status or IPC parameter via COM port Device Management Network client end Log in the client end software in the PC to monitor IPC IPC provides user interface device information video information COM setup record setup motion detection setup alarm setup OSD informati...

Страница 48: ...sable by default Date separator _ Time format 24H Language Simplified Chinese When HDD is full Overwrite Record duration 60M Device No 8 General Setup Video type PAL Channel Channel01 Encode mode H 264 Audio Video enable Enable audio and video General bit stream General bit stream Resolution VGA Frame rate 25 Bit stream control VBR Quality Good Bit stream value 2048 Main Stream I frame interval co...

Страница 49: ... 01 DHCP Disable IP address 192 168 1 108 Subnet mask 255 255 0 0 Gateway 192 168 0 1 Device name Device factory default name TCP port 37777 HTTP port 80 UDP port 37776 Network user connection amount 10 Network transmission QoS Disable Remote host Multiple broadcast group Enable Disable IP address 239 255 42 42 Port 36666 Email setup Enable Multiple DDNs Disable NAS setup Disable NTP setup Disable...

Страница 50: ...pe Never Address 0 Disable Video Detection Snapshot Disable Channel Ch01 Protocol DH SD1 Address 1 Baud rate 9600 Data bit 8 Stop bit 1 PTZ Setup Parity None All Disable General Disable Encode Disable Record Disable COM Disable Network Disable Alarm Disable Video detection Disable Display output Disable Default and Backup Channel No Disable Even Type No HDD Disable General Output Disable Alarm Lat...

Страница 51: ...hite Balance N A Signal Type Internal input Mirror Disable N A N A Camera Property Flip Disable N A N A Channel 1 Exposure Auto Day Night N A BLC N A Scene Mode Disable Signal Mode Internal Input Mirror Disable Camera Property Flip Disable Enable Disable SN 1 IP 0 0 0 0 Port 7000 Auto Registration Device ID none DNS 202 101 172 35 DNS Setup Alternative DNS 202 101 172 35 Enable Disable White list ...

Страница 52: ...e red light becomes on when system boots up When system is running properly the green light becomes on When system is upgrading the red light flashes The interval is 0 5s Port 2 PIR receiver enclosure Passive IR motion detect port It can detect the object of the IR radiant such as the human body or other heating object Port 3 LDR light dependent resistor It is to sense the environment illumination...

Страница 53: ...s shown as in Figure 2 2 Figure 2 2 Please refer to the following sheet for detailed information Port Name Function I O Connect to MD9M data converter cable or wireless alarm box Antenna Connect to the wireless antenna to receive the WIFI 3G and etc wireless signal RESET When the device is running properly The power indication light is green press REEST button for at least 5 seconds and then relea...

Страница 54: ... SD card please make sure current card is not in write mode Otherwise it may result in data loss or card damage Before hot swap please stop record download operation LAN Ethernet port You can connect to the standard Ethernet port USB port USB Port You can connect to the USB device 3G port 3G card port You can insert 3G UIM card 0 0 DWD RQYHUWHU DEOH The MD9M data converter cable is shown as below ...

Страница 55: ... alarm output end Port 6 Yellow NO Normal open alarm output end Port 7 Blue RX Transparent debug COM RS232_RX ˈ RS232 COM receive end Port 8 Purple TX Transparent debug COM RS232_TX ˈ RS232 COM send end Port 9 Grey GND Ground end Port 10 Bare wire Ground end LPHQVLRQ The device front dimension interface is shown as below The unit is mm See Figure 2 4 Figure 2 4 The side panel dimension interface i...

Страница 56: ...13 Figure 2 5 The device pedestal dimension is shown as in Figure 2 6 The unit is mm Figure 2 6 LGLUHFWLRQDO WDON 2 5 1 Device end to PC end Device Connection ...

Страница 57: ...to the above interface Figure 2 7 to enable bidirectional talk Listening Operation At the PC end speak via the speaker or the pickup and then you can get the audio from the earphone or sound box at the device end RFDO ODUP 6HWXS The alarm interface is shown as in Figure 2 8 Please follow the steps listed below for local alarm input and output connection 1 Connect the alarm input device to the red ...

Страница 58: ...P 6HWXS 2 7 1 Version After you connected the wireless alarm box you can view the wireless port information 2 4 means there are two wireless alarm input channels and four wireless alarm output channels See Figure 2 9 Figure 2 9 ...

Страница 59: ... rate 9600 z Data bit 8 z Stop bit 1 z Parity None Figure 2 10 2 7 3 Alarm Setup Important Before you enable the wireless alarm function please implement the successful coding of the wireless alarm input device Otherwise you can not see the wireless output item Please select the event type as IR input and then select alarm input port Check the box to enable wireless function ...

Страница 60: ...e coding the yellow coding status indication light can prompt the corresponding dialogue box 3 Clear the address Please click the coding button of the warless alarm box you can see the yellow coding status indication light becomes flash Then please press the coding button for 5 seconds to clear all the wireless alarm device addresses 4 Alarm output Please select the corresponding alarm output port...

Страница 61: ...current setup to more channel s See Figure 2 13 Figure 2 13 Period In Figure 2 11 click period set button and then click set button You can select the corresponding period s in the following interface The front end device can respond the wireless alarm in the specified period you set below See Figure 2 14 ...

Страница 62: ...ireless port for the motion detect operation There are four options wireless output 1 to output 4 Then you can check the box to enable wireless output function Now you have enabled the wireless alarm output function See Figure 2 15 Figure 2 15 2 7 5 Alarm Output ...

Страница 63: ...er you selected the wireless alarm and emergency alarm type you can see the wireless alarm information in the following interface once the device activated the corresponding alarm See Figure 2 16 Figure 2 16 ...

Страница 64: ...two screws to the wall mount bracket to fasten the bracket z Put installation slot of the bottom of the device to the wall mount bracket Put wall mount bracket to the device pedestal and then secure firmly Finally you can turn the device clockwise to fix the device on the bracket Figure 3 1 DUG QVWDOODWLRQ Please follow the steps listed below to install the 3G card See Figure 3 2 and Figure 3 3 z ...

Страница 65: ...rd See Figure 3 4 z Use the screwdriver to loosen the screw of 3G card protection cap in the rear panel Remove the cap from the camera z Follow the 3G card direction to remove the 3G UIM card z Insert the 3G card protection cap z Use the screwdriver to fix the screw to secure the protection cap ...

Страница 66: ...23 Figure 3 4 ...

Страница 67: ... only applies to the IP addresses in the same segment 2SHUDWLRQ Double click the ĀConfigTools exeāicon you can see an interface is shown as in Figure 4 1 In the device list interface you can view device IP address port number subnet mask default gateway MAC address and etc Figure 4 1 Select one IP address and then right click mouse you can see an interface is shown as in Figure 4 2 ...

Страница 68: ...gin interface Or you can select an IP address and then click the Login button to go to the login interface See Figure 4 4 In Figure 4 4 you can view device IP address user name password and port Please modify the corresponding information to login Please note the port information here shall be identical with the port value you set in TCP port in Web Network interface Otherwise you can not login th...

Страница 69: ...26 Figure 4 5 ...

Страница 70: ...here is router please set the corresponding gateway and subnet mask z Use order ping IP camera address to check connection is OK or not RJLQ DQG 0DLQ QWHUIDFH Open IE and input IP camera address in the address bar For example if your camera IP is 192 168 1 108 then please input http 192 168 1 108 in IE address bar See Figure 5 1 Figure 5 1 System pops up warning information to ask you whether inst...

Страница 71: ...elow See Figure 5 3 Please input your user name and password Default factory name is admin and password is admin Note For security reasons please modify your password after you first login Figure 5 3 After you logged in you can see the main window See Figure 5 4 ...

Страница 72: ...29 Figure 5 4 Please refer to the Web Operation Manual included in the resource CD for detailed operation instruction ...

Страница 73: ...LRQ RQQHFWLRQ Please refer to the following figure for 3G cable connection See Figure 6 1 Figure 6 1 L L DQG RPPRQ RQQHFWLRQ Please refer to the following figure for WiFi and common connection See Figure 6 2 Figure 6 2 ...

Страница 74: ...age media When disk information is shown as hibernation or capacity is 0 please format it first Via Web I can not upgrade the device via network The status indication light is shown as red when network upgrade operation failed You can use port 3800 to continue upgrade Recommended SD card brand Kingston 4GBǃKingston 1GBǃKingston 16GBǃTranscend 16GBǃSanDisk 1GǃSanDisk 4G Usually we recommend the 4GB...

Страница 75: ...zardous substance or elements contained in products will not leak or mutate so that the use of these substances or elements will not result in any severe environmental pollution any bodily injury or damage to any assets The consumer is not authorized to process such kind of substances or elements please return to the corresponding local authorities to process according to your local government sta...

Страница 76: ...Home Use IP Camera PTZ Series Web Operation Manual Version1 2 ...

Страница 77: ... 3UHYLHZ LQGRZ 6ZLWFK 7 37 RQWURO 8 RORU DQG 0RUH 6HWXS 10 RQILJXUH 12 6 VWHP QIRUPDWLRQ 12 3 1 1 Version Information 12 3 1 2 HDD information 12 3 1 3 Log 13 6 VWHP RQILJXUDWLRQ 14 3 2 1 General Setup 14 3 2 2 Encode 16 3 2 3 Schedule 19 3 2 4 RS232 21 3 2 5 Network 23 3 2 6 Alarm 29 3 2 7 Detect 33 3 2 8 PTZ 36 3 2 9 Default Backup 37 ...

Страница 78: ...ntenance 42 3 3 6 Snapshot 42 3 3 7 Abnormity 43 GGLWLRQDO XQFWLRQ 45 3 4 1 Configure 45 3 4 2 Auto Register 46 3 4 3 Talk Encode 47 3 4 4 Wireless Network 47 3 4 5 CDMA GPRS For T E C series only 49 3 4 6 Mobile Configuration For T E C series only 51 6HDUFK 54 ODUP 55 ERXW 57 RJ RXW 58 SSHQGL 1R 3 16 59 ...

Страница 79: ...factory default setup z IP address 192 168 1 108 z User name admin z Password admin Please follow the steps listed below for network connection z Make sure the IPC has connected to the network properly z IPC IP address and PC IP address shall be in the same network segment IPC default IP address is 192 168 1 108 If there is router please set the corresponding gateway and subnet mask z Use order pi...

Страница 80: ... 168 1 108 then please input http 192 168 1 108 in IE address column See Figure 2 1 Figure 2 1 System pops up warning information to ask you whether install webrec cab control or not Please click yes button If you can t download the ActiveX file please modify your settings as follows See Figure 2 2 Input your IP address here ...

Страница 81: ...ion the interface is shown as below See Figure 2 3 Please input your user name and password Default factory name is admin and password is admin Note For security reasons please modify your password after you first login Figure 2 3 ...

Страница 82: ...There are six sections z Section 1 Monitor channel menu tree z Section 2 System menu z Section 3 PTZ control z Section 4 Video setup and other setup z Section 5 Preview window z Section 6 Monitor window switch 0RQLWRU KDQQHO 0HQX 7UHH The monitor channel menu tree is shown as in Figure 2 5 ķ ĸ Ĺ ĺ ļ Ļ ...

Страница 83: ... Please note the extra stream resolution shall be less than main stream resolution Open all close all Click this button to open all video channels Once all video channels are open it becomes close all button Start dialogue You can click this button to enable audio talk Audio compression type G 711a default Local play Click local play button to select file to play in PC The playback bar is shown as...

Страница 84: ...meter information SN Parameter Function 1 4 Display device information z 1 IPC IP address z 2 Channel number z 3 Bit stream z 4 Stream decode type S1 Overlay S2 Off stream S3 GD1 H1 Overlay H2 off stream decoding from the display card 5 Digital zoom Click this button and then left drag the mouse in the zone to zoom in Right click mouse system restores original status 6 Change show mode Resize or s...

Страница 85: ...lease refer to chapter 3 Configuration chapter 4 Search chapter 5 Alarm chapter 6 About chapter 7 Log out for detailed information Figure 2 7 System Menu 0RQLWRU LQGRZ 6ZLWFK The monitor window switch interface is shown as in Figure 2 8 Figure 2 8 Monitor Window Switch System supports 1 4 6 8 9 13 16 20 25 36 window real time preview It is video quality adjustment button It has relationship with d...

Страница 86: ...irm cancel buttons are for speed dome only Current IPC series products do not support this function z PTZ direction PTZ supports eight directions left right up down upper left upper right bottom left bottom right z Speed The step 8 speed is faster than step 1 Figure 2 10 PTZ Interface Click PTZ set button the interface is shown as in Figure 2 11 You can click this icon to display or hide the PTZ c...

Страница 87: ...nput auto tour value and preset value Click add button you have added one preset in the tour z Repeat the above procedures you can add more presets in one tour z Or you can click delete button to remove one preset from the tour Pattern You can input pattern value and then click start record button to begin PTZ movement Please go back to Figure 2 10 to implement camera operation Then you can click ...

Страница 88: ...hown as in Figure 2 12 Figure 2 12 Color Please refer to the following sheet for detailed information Parameter Function It is to adjust monitor video brightness It is to adjust monitor video contrast ness It is to adjust monitor video saturation Video setup It is to adjust monitor video hue Note z All the operations here apply to WEB end only z Please go to chapter 3 3 2 System configuration Enco...

Страница 89: ...path button system pops up an interface for you to modify path Record Path Click record path button system pops up an interface for you to modify path More Reboot Click this button system pops up a dialogue box please click OK button to reboot device ...

Страница 90: ...vice hardware feature and software version information See Figure 3 1 Figure 3 1 Version Information 3 1 2 HDD information The device supports the SD card storage Here you can view local storage status and network status including free capacity and total capacity See Figure 3 2 ...

Страница 91: ...13 Figure 3 2 HDD Information 3 1 3 Log Here you can view system log See Figure 3 3 Figure 3 3 Log Click backup button the interface is shown as in Figure 3 4 ...

Страница 92: ...tion Search You can select log type from the drop down list and then click search button to view the list Clear You can click this button to delete all displayed log files Please note system does not support clear by type Backup You can click this button to backup log files to current PC 6 VWHP RQILJXUDWLRQ Please click save button to save your current setup 3 2 1 General Setup Here you can set sy...

Страница 93: ...15 Figure 3 5 General Setup Figure 3 6 DST Figure 3 7 DST Please refer to the following sheet for detailed information ...

Страница 94: ... Figure 3 6 and Figure 3 7 Language Display device language HDD Full There are two options stop recording or overwrite the previous files when HDD is full Please note current series IPC does not support this function Pack Duration Here you can select file size Default setup is 60 minutes Please note current series IPC does not support this function Device No When you are using one remote control t...

Страница 95: ...17 Figure 3 8 Encode Figure 3 9 Color Setting Click watermark button you can see an interface is shown as below ...

Страница 96: ... can use high frame rate to record important events record scheduled event in lower frame rate and it allows you to set different frame rates for motion detection record and alarm record Extra Stream Select extra stream if you enabled the extension stream to monitor Audio Video Recorded file only contains video by default You need to draw a circle here to enable audio function Resolution The optio...

Страница 97: ...CTV See Figure 3 10 Please note current series IPC does not support this function Cover area privacy mask z Here you can privacy mask the specified video in the monitor video z System max supports 4 privacy mask zones Time Title z You can enable this function so that system overlays time information in video window z OSD transparent value ranges from 0 to 255 0 means complete transparent z You can...

Страница 98: ...20 Figure 3 11 Schedule Figure 3 12 Storage Set ...

Страница 99: ...nding setup interface z Please set schedule period and then select corresponding record or snapshot type motion detection snapshot and alarm snapshot Right now system does not support schedule snapshot function z Please select date Current setup applies to current day by default You can draw a circle before the week to apply the setup to the whole week z After complete setup please go back to Figu...

Страница 100: ...ch between RS232 and control keyboard Network keyboard COM control protocol You can use network keyboard to control IPC via COM Transparent COM Network user can communicate with RS232 COM device Alarm box Wireless alarm box protocol System can use COM to communicate with the wireless alarm box Function COM_GPS GPS module protocol You can connect to it to realize GPS function Data Bit The value ran...

Страница 101: ... Figure 3 15 Figure 3 15 Network Please refer to the following sheet for detailed information Parameter Function Ethernet Please select the network card first DHCP Dynamically get IP address You can get the device IP from the DHCP server if you enabled this function Device Name The device ID in the network TCP Port Default value is 37777 HTTP Port Default value is 80 UDP Port Default value is 3777...

Страница 102: ...e 3 16 Advanced Set Please refer to the following sheet for detailed information Parameter Function Multiple cast group z Set MULCAST address and port z Enable MULCAST function z Current series IPC does not support this function right now Remote Host PPPOE z Input the PPPoE user name and password you get from the IPS internet service provider and enable PPPoE function Please save current setup and...

Страница 103: ...Input server address and then enable this function Port Default value is 25 You can modify it if necessary User Name The sender email account user name Password The sender email account password Sender Sender email address Subject Input email subject here Address Input receiver email address here Max three addresses DDNS The DDNS interface is shown as in Figure 3 18 ...

Страница 104: ...te DDNS protocol means you use your self defined private protocol to realize DDNS function CN99 DDNS protocol server address is http www 3322 org NO IP DDNS protocol server address is http www no ip com Dyndns DDNS protocol server address is http www dyndns com Server IP DDNS server IP address Server Port DDNS server port Domain Name Your self defined domain name User The user name you input to lo...

Страница 105: ...ed information Parameter Function NAS enable Please select network storage protocol FTP and then enable NAS function Server IP Input remote storage server IP address Port Input Remote storage server port number User Name Log in user account Password The password you need to log in the server Remote Path Remote storage file path Save You can click save button after you complete setup for one channe...

Страница 106: ...network time synchronization Please enable current function and then input server IP port number time zone and time Figure 3 20 NTP Please refer to the following sheet for detail information Parameter Function Enable Enable NTP function or not Server IP Server IP address Port Server port Time Zone Device current time zone Update Interval Time update interval value ...

Страница 107: ...ase note you can not set white list and black list function at the same time Figure 3 21 IP Filter 3 2 6 Alarm Alarm setup interface is shown as in Figure 3 22 and Figure 3 23 The Figure 3 22 is the general alarm setup interface and the Figure 3 23 is the wireless alarm setup interface Figure 3 22 General Alarm Setup ...

Страница 108: ...30 Figure 3 23 General Alarm Setup Figure 3 24 Wireless setup ...

Страница 109: ...etwork alarm there are two options alarm input 01 02 For the wireless alarm there is max 8 channel alarm input Enable You need to draw a circle here so that system can detect the alarm signal Type There are two options normal open and normal close NO becomes activated in low voltage NC becomes activated in high voltage Period z Alarm record function becomes activated in the specified periods z The...

Страница 110: ...ord for specified time after alarm ended The value ranges from 10s to 300s Email Please draw a circle to enable email function System can se out email to alert you when alarm occurs and ends Tour z Display the selected video in local monitor window z This function is not available in current device PTZ activation z Here you can set PTZ movement when alarm occurs Such as go to preset x when there i...

Страница 111: ...d then click save button Refresh Click this button to get device latest configuration information 3 2 7 Detect Analysis the video system enable motion detection alarm when it detects the motion signal reached the specified sensitivity The detection interface is shown as in Figure 3 26 and Figure 3 27 Figure 3 26 Detect General setup ...

Страница 112: ...igure 3 28 Motion Detection Zone Setup Please refer to the following sheet for detailed information Parameter Function Event Type There are three types Motion detection video loss Camera Masking Channel Select channel name from the dropdown list ...

Страница 113: ...uring the anti dither period The value ranges from 0s to 15s Alarm output There is one channel local alarm output Please select the corresponding local alarm output port of the motion detect It is local alarm activation output port It can activate the local alarm output device when an alarm occurs Wireless output z There are four wireless alarm outputs You can see this item after you successfully ...

Страница 114: ... PTZ interface is shown as in Figure 3 29 Please note before operation please make sure you have set speed dome address and the IPC and speed dome connection is OK Figure 3 29 PTZ Please refer to the following sheet for detailed information Parameter Function Channel You can select monitor channel from the dropdown list Protocol Select the corresponding dome protocol such as PELCOD Address Set cor...

Страница 115: ...ter you complete setup for one channel or you can complete the whole setups and then click save button Refresh Click this button to get device latest configuration information 3 2 9 Default Backup Default Restore factory default setup You can select corresponding items Backup Export current configuration to local PC or import configuration from current PC Please refer to Figure 3 30 Please note sy...

Страница 116: ...nt HDD management includes net storage management and local storage management Please note if you want to use local storage function your storage device need to support current function Please select the storage device first and then you can see the items on your right become valid You can check the corresponding item here See Figure 3 31 Figure 3 31 HDD Management Please refer to the following sh...

Страница 117: ...sert the new disk when system is running Now the system software and hardware will maintain proper operation and there is no devastating disaster Execute Click this button to save disk current status 3 3 2 Alarm I O Here you can search alarm output status See Figure 3 32 and Figure 3 33 Figure 3 32 Local Alarm I O Configuration ...

Страница 118: ...utput channel See Figure 3 32 Please click the button 1 You can see the wireless output channel if you have connected to the wireless alarm box and have enabled the wireless alarm function There are total 4 wireless alarm channels See Figure 3 33 Trigger Enable disable alarm output device Refresh Search alarm output status 3 3 3 Record Record control interface is shown as in Figure 3 34 ...

Страница 119: ...bles auto record function as you set in record schedule setup Manual Enable corresponding channel to record no matter what period applied in the record setup Stop Stop current channel record no matter what period applied in the record setup 3 3 4 Account Here you can add remove user or modify password See Figure 3 35 ...

Страница 120: ...nt 3 3 5 Auto Maintenance Here you can select auto reboot and auto delete old files interval from the dropdown list See Figure 3 36 Figure 3 36 Auto Maintenance 3 3 6 Snapshot Snapshot interface is shown as in Figure 3 37 ...

Страница 121: ... modes Timing and activation Frame rate You can select from the dropdown list The value ranges from 1f s to 8f s Resolution You can select from the dropdown list The resolution may vary due to different series Quality You can select from the dropdown list Here is for you to set video quality 3 3 7 Abnormity The abnormity interface is shown as below See Figure 3 38 ...

Страница 122: ...alarm output channel when alarm occurs You need to check the box to enable this function Please connect the device to the wireless alarm box to enable the alarm activation output Record channel System auto activates channel to record once alarm occurs For offline type only See Figure 3 36 Please note you need to go to chapter 3 3 3 record to set current period as auto record Record latch System ca...

Страница 123: ...amera property parameter See Figure 3 39 The following interface may vary due to different IPC series Figure 3 39 Configure Please refer to the following sheet for detail information Parameter Function Channel Monitor channel 1 Exposure Mode Please select auto exposure AE Day Night Mode IPC day night mode switch There are three options color off color on auto BLC Backlight compensation level There...

Страница 124: ... and right limit Flip It is to switch video up and bottom limit 3 4 2 Auto Register Auto register interface is shown as below See Figure 3 40 You can use this function to work with the corresponding proxy server based on SDK Figure 3 40 Auto Register Please refer to the following sheet for detailed information Parameter Function Enable Enable auto register function No Device management server numb...

Страница 125: ...ID search button to search wireless router available See Figure 3 42 z Click enable button z Double click the wireless router ID available to implement setup Wireless network modes WEP encryption type are automatically set in accordance with the wireless router z If the wireless router adopts WEP encryption you need to set encryption information manually See Figure 3 43 Please input encryption mod...

Страница 126: ...3 42 Search wireless router Figure 3 43 wireless router setup Please refer to the following sheet for detailed information Parameter Function SSID search Click this button to search the wireless router available ...

Страница 127: ...lowing items WEP Key Type and ID WEP Select WEP encryption mode It includes WEP64 bit and WEP128bit Key Type Select password mode It includes two options ASCII and hex ID The password to log in the wireless router Max supports 4 groups Save Click this button to save current setup Refresh Click this button to get device latest configuration 3 4 5 CDMA GPRS For T E C series only The CDMA GPRS interf...

Страница 128: ...p and sms Dial up number Please input 3G network dialup number here Username The user name for you to login the 3G network Password The password for you to login the 3G network Keep alive time You can set dialup duration Default value is 30s Period Click set button the interface is shown as in Figure 3 45 You can set the period to connect to the 3G network System only enables wireless network dial...

Страница 129: ...n view CDMA_1x network signal z After the device connected to the W CDMA or TD moduleˈyou can view the EDGE network signal Wireless signal EVDO signal You can view current 3G network signal z After the device connected to the EVDO moduleˈyou can view EVDO signal z After the device connected to the W CDMA moduleˈyou can view W_CDMA network signal here z After the device connected to TD moduleˈyou c...

Страница 130: ...e message SMS activate The mobile user can send out message to activate the device to connect to the 3G network You need to check the box to enable current function Sender You can input several senders mobile number here Dial activate The mobile user can give a call to activate the device to connect to the 3G network You need to check the box to enable current function Caller You can input several...

Страница 131: ...e number sends out the message on to the device the device begins 3G dial up and then connect to the 3G network When the specified mobile number sends out the message off to the device the device disconnects the network and then becomes offline Dial save System can save the mobile phone number which can dial the device to enable it to connect to the 3G network Before the operation please make sure...

Страница 132: ...button to view it in the web monitor window If your current selected window is in real time monitor mode system automatically switches to play the selected file For detail playback information please refer to chapter 2 2 monitor channel menu tree local play Figure 4 1 Search Main Interface During the playback process you can see there are control buttons such as play pause stop slow play and fast ...

Страница 133: ...alarms when motion detection alarm occurs Disk full System alarms when disk is full Current series IPC does not support this function right now Disk error System alarms when disk error occurs Current series IPC does not support this function right now Camera masking System alarms when camera is viciously masking Alarm Type Encode alarm System alarms when encode module alarm occurs Operation Listen...

Страница 134: ...pplies to video detection alarm motion detection video loss and camera masking This function is not valid in external alarm mode Prompt Automatically pops up alarm dialogue box Sound pop up System sends out alarm sound when alarm occurs You can specify as you wish Path Here you can specify alarm sound file ...

Страница 135: ...57 ERXW Click about button you can view current web client information See Figure 6 1 Figure 6 1 ...

Страница 136: ...58 RJ RXW Click log out button system goes back to login interface See Figure 7 1 Figure 7 1 ...

Страница 137: ...re are five options No IP DynDNS CN99 Private and Oray y Server IP You can use ping command to get server s IP y Port input server port here y Domain Name Get the domain name you get from your DDNS service provider y User Get the user name you get from your DDNS service provider y Password Enter corresponding password Highlight the icon in front of Enable to enable the DDNS server configuration ...

Страница 138: ...rom the server Then we have a constant domain name in the Web browser along with the HTTP port send a request to identify the car IP of the domain name typed The server will direct the domain name to the IP connection thus allowing access to the device which does not have a fixed IP in the network Note It is important to note that to gain access to the device in a local network it is necessary to ...

Страница 139: ... email containing username and password You can use this account to access the service 4 Open the e mail sent by trusted rmação No IP and double click the link that is below the phrase To activate your account please click the following URL in the body of the email See Figure 8 4 Figure 8 4 ...

Страница 140: ...ign and enter the email address and password you get earlier Click login to sign up you can see the welcome interface and configuration option of account See Figure 8 6 You can highlight manage host item Figure 8 6 7 The Manage Hosts interface is shown as in Figure 8 7 Click the Add Host button you can access the creation of a domain name ...

Страница 141: ...the name select the desired area This is your domain name for access to the device Click Create Host button at the bottom of the page Figure 8 8 9 Now you can see an interface is shown as in Figure 8 9 Here you can view domain name and the computer s current IP setup If you already have a domain name equal to gurado trusted you must define another name for the host ...

Страница 142: ...ompt Windows The server s IP will be displayed on the screen See Figure 8 10 Your device can use this IP to find the No IP server Figure 8 10 11 Please go to the device and access the MAIN MENU SETTING NETWORK DDNS Input server IP you get in the above step Select the DDNS Type as No IP DDNS and highlight the icon in front of Enable to enable the DDNS function Now fill the fields as described below...

Страница 143: ...vd16s480st no ip biz 2 If the device HTTP port is 80 just type the domain name Otherwise enter in the browser address as http nome the field created in Step 8 port number of HTTP For example http vd16s480st no ip biz 9090 3 Press Enter The system will ask install application webrec cab control or not Please click Yes to perform a successful connection 4 If the page does not appear on the computer ...

Страница 144: ...he user interface x All the designs and software here are subject to change without prior written notice x If there is any uncertainty or controversy please refer to the final explanation of us x Please visit our website or contact your local service engineer for more information ...

Страница 145: ......

Страница 146: ...6 In no event will ClearView CCTV Inc be liable for any special incidental or consequential damages including loss of use loss of profit and claims of third parties however caused whether by the negligence of ClearView CCTV Inc or otherwise 7 For warranty repaired or replaced products ClearView CCTV Inc will warrant all replacement parts and repairs for the remainder of the original warranty or 90...

Отзывы: