21
,QVWDOODWLRQ3URFHGXUH
This series IP camera can be placed on the table directly, or use the wall mount bracket to install
in the wall or ceiling. You can refer to the steps listed below:
%UDFNHW,QVWDOODWLRQ
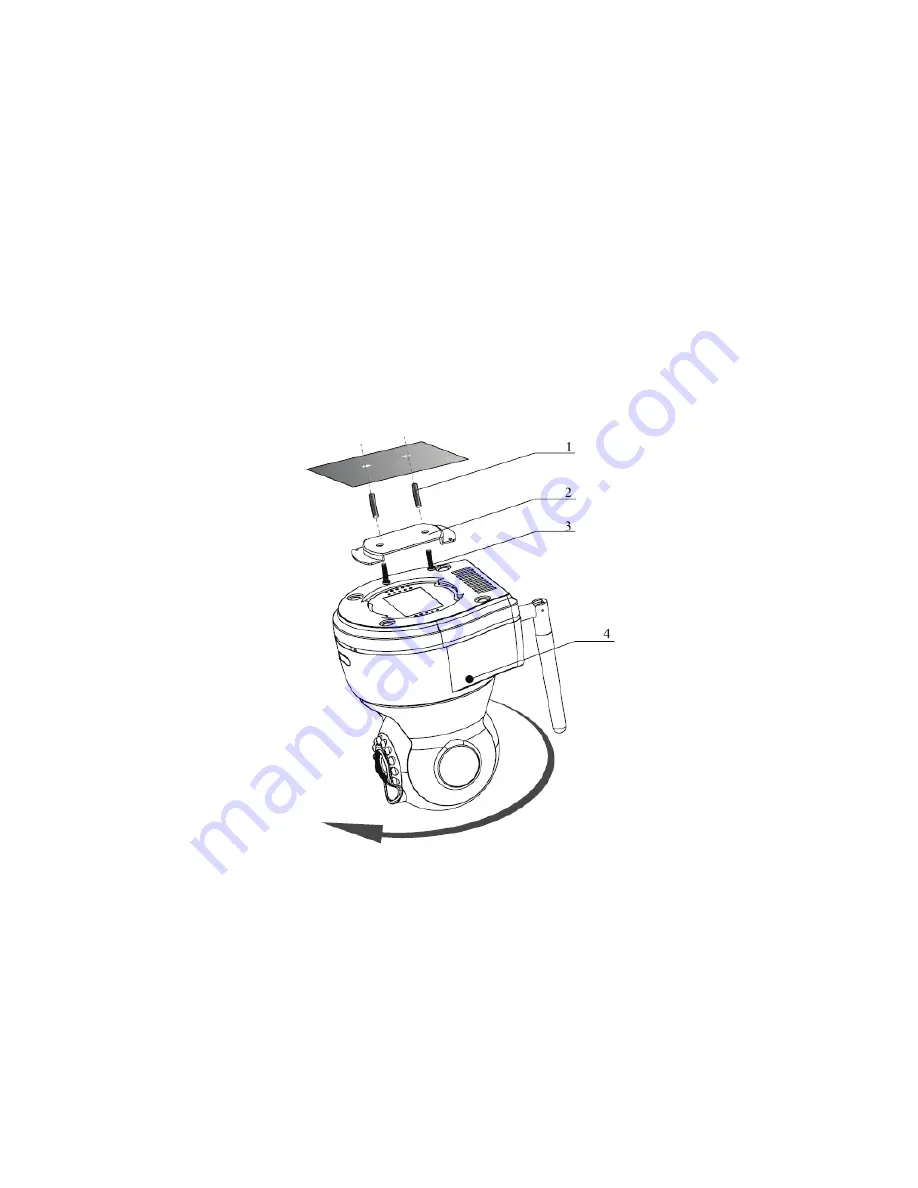
Bracket installation interface is shown as below. See Figure 3-1.
z
Dig two holes in the wall or the surface, and then input the plastic bolt to the hole and
secure.
z
Please put the installation holes of the bottom of the wall mount bracket to the two holes
in the wall or surface (Please follow the direction shown in the Figure 3-1) and then
secure firmly. Insert the two screws to the wall mount bracket to fasten the bracket.
z
Put installation slot of the bottom of the device to the wall mount bracket. Put wall mount
bracket to the device pedestal and then secure firmly. Finally you can turn the device
clockwise to fix the device on the bracket.
Figure 3-1
*&DUG,QVWDOODWLRQ
Please follow the steps listed below to install the 3G card. See Figure 3-2 and Figure 3-3.
z
Use the screwdriver to loosen the 3G card protection screw in the rear panel, and then
remove the 3G card protection cap from the camera.
z
Install the 3G card to the camera according to the proper installation position.
z
Put the 3G card protection cap back.
z
Use the screwdriver to fix the 3G card protection cap screw firmly to secure the card
protection cap in the camera.
Содержание PTZ Series
Страница 1: ......
Страница 2: ......
Страница 3: ......
Страница 4: ......
Страница 5: ......
Страница 6: ......
Страница 7: ......
Страница 8: ......
Страница 9: ......
Страница 10: ......
Страница 11: ......
Страница 12: ......
Страница 13: ......
Страница 14: ......
Страница 15: ......
Страница 16: ......
Страница 17: ......
Страница 18: ......
Страница 19: ...Home Use IP Camera PTZ Series Quick Start Guide Version 1 2 ...
Страница 22: ...iii We are not liable for any problems caused by unauthorized modifications or attempted repair ...
Страница 27: ...5 Figure 1 5 The device pedestal dimension is shown as in Figure 1 6 The unit is mm Figure 1 6 ...
Страница 30: ...8 Figure 2 4 ...
Страница 33: ...11 Figure 3 5 ...
Страница 38: ...Home Use IP Camera PTZ Series User s Manual Version 1 2 ...
Страница 66: ...23 Figure 3 4 ...
Страница 69: ...26 Figure 4 5 ...
Страница 76: ...Home Use IP Camera PTZ Series Web Operation Manual Version1 2 ...
Страница 98: ...20 Figure 3 11 Schedule Figure 3 12 Storage Set ...
Страница 108: ...30 Figure 3 23 General Alarm Setup Figure 3 24 Wireless setup ...
Страница 135: ...57 ERXW Click about button you can view current web client information See Figure 6 1 Figure 6 1 ...
Страница 136: ...58 RJ RXW Click log out button system goes back to login interface See Figure 7 1 Figure 7 1 ...
Страница 145: ......


