background image

60

VZ509A

English

INSTAL

LATIO

MAN

UAL

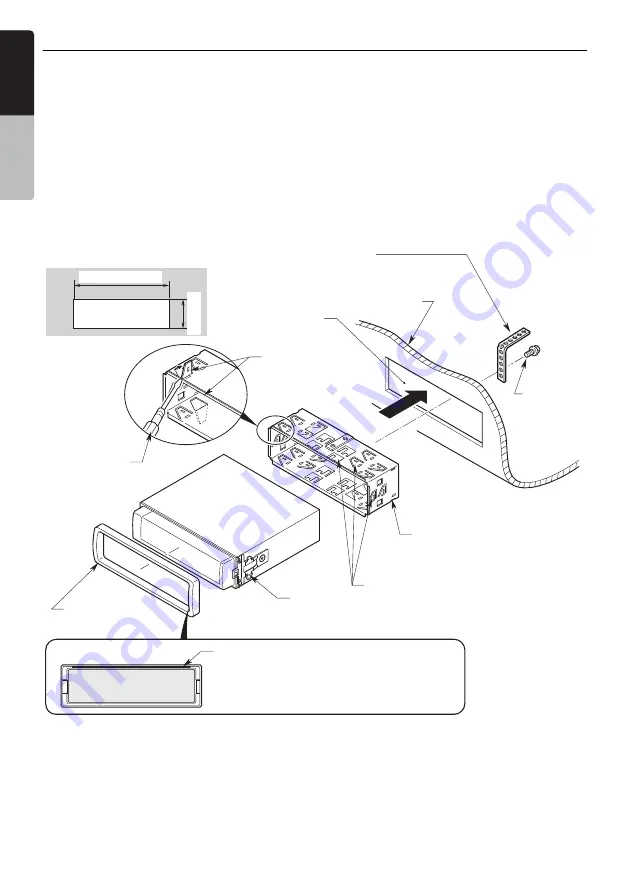
5. INSTALLING THE MAIN UNIT

Universal Mount

1. Place the universal mounting bracket into the 

instrument panel, use a screwdriver to bend 
each stopper of the universal mounting 
bracket inward, then secure the stopper as 
shown in Figure 6.

2. Wire as shown in Section 8 (see page 63).
3. Insert the main unit into the universal 

mounting bracket until it locks.

4. Mount the outer escutcheon so that all the 

hooks are locked.

Note:

Some car models require special mounting kits for 
proper installation. Consult your Clarion dealer for 
details.

Fasten the front stopper securely to prevent the 
main unit from coming loose.

Console opening dimensions

Hole

182 mm

Hole

Strap

*

This part is not provided.

Hexagonal 
bolt

Instrument panel

Stoppers

Screwdriver

Universal mounting bracket

Stoppers

2-Spring

Main Unit

Outer escutcheon

Note:

Set the outer escutcheon so that its metallic part 
on the back side fits the upper edge of the main 
unit.

Figure 6

53 mm

Содержание VZ509

Страница 1: ...DVD MULTIMEDIA STATION WITH 7 inch TOUCH PANEL CONTROL Owner s manual Installation manual VZ509A ...

Страница 2: ...3 Adjusting the Volume 14 Opening the Liquid Crystal Panel and Adjusting the Angle 14 Turning the Audio OFF 15 Turning the Monitor OFF 16 Displaying the Clock Screen 16 Setting Ejecting a Disc 16 Connecting Disconnecting an USB Media Device 17 Selecting a Media Source 18 2 Zone Function 19 5 SOURCE OPERATIONS 20 Radio Operations 20 DVD Video Operations 22 Video CD Operations 29 Audio CD Operations...

Страница 3: ...DVD Video CD MP3 WMA AAC Player Expanding Systems 1 FEATURES Expanding audio features 4 Channel Amplifier Rear Vision Camera CC2011E CAA185 Rear Monitor Expanding navigation features iPod USB Memory VTR etc Note The items listed outside of the frames are the commercial products generally sold Expanding visual features Bluetooth cellular phone BLT370 NP509A ...

Страница 4: ...hat cannot be played back This player cannot play DVD Audio DVD RAM Photo CDs etc Note It may not be possible to play back discs recorded on some CD DVD drive units Cause disc characteristics cracks dust dirt dust dirt on player s lens etc If a CD R RW DVD R RW or DVD R RW disc that has not been finalized is played it will take a long time to start playing Also it may not be possible to play depen...

Страница 5: ...up during DVD video playback to perform menu setting Example showing DVD menu 1 When the inside of the car is very cold and the player is used soon after switching on the heater moisture may form on the disc DVD CD or the optical parts of the player and proper playback may not be possible If moisture forms on the disc DVD CD wipe it off with a soft cloth If moisture forms on the optical parts of t...

Страница 6: ...l sensor is exposed to direct sunlight In extremely cold weather the display movement may slow down and the display may darken but this is not a malfunction The display will work normally when the temperature increases Small black and shiny spots inside the liquid crystal panel are normal for LCD products The liquid crystal panel may stop temporarily when it opens or closes when the engine stops o...

Страница 7: ...g and enhancing the harmonics lost through compression BBE MP works by regenerating harmonics from the source material effectively recovering warmth details and nuance Manufactured under license from BBE Sound Inc Licensed by BBE Sound Inc under one or more of the following US patents 5510752 5736897 BBE and BBE symbol are registered trademarks of BBE Sound Inc Functions of Buttons Note Be sure to...

Страница 8: ...rned off Once turn off the engine switch then restart the engine again When power is first turned on after initial installation When an external device is connected or disconnected When Reset button is pressed In addition to the above conditions the system check function can be performed from the System tab menu on the General screen Note 1 These images indicate the buttons to press or keys to tou...

Страница 9: ...8 VZ509A English Owner s manual Tuner mode operation Source screen Switches the radio band Seek tuning Manual tuning Selects Home Travel modes Select desired station after selecting radio band ...

Страница 10: ...creen DVD Video mode screen 2 Options screen Setup screen Screen during DVD Video mode when automobile moving Note 2 If you do not touch the screen for about 7 seconds all the keys on the screen will disappear Touch the screen surface to redisplay them DVD top menu 2 ...

Страница 11: ...10 VZ509A English Owner s manual Adjusting the General settings Settings screen General screen System tab screen Display tab screen Source or Mode screen Clock tab screen ...

Страница 12: ...11 VZ509A English Owner s manual Adjusting the Audio settings Settings screen Audio screen Others tab screen Beat EQ tab screen BAL FAD tab screen Source or Mode screen ...

Страница 13: ... function is ON AUDIO button Press to set the Audio language in DVD Video and DivX modes Press to change the Audio Channel mode in Video CD mode SUBTITLE button Press to display subtitles in DVD Video and DivX modes ANGLE button Press to switch among the angles when DVD video discs recorded in multiple angles are played back TOP MENU button Press to display the DVD top menu stored on the DVD video...

Страница 14: ...playback in DVD Video mode R F buttons Press to select the next lower or higher preset station in Tuner mode disabled when 2 Zone ON Press to select the next lower or higher chapter number in DVD Video mode Press to select the next lower or higher track in Video CD CDDA MP3 WMA AAC DivX and USB modes Keep pressing to perform fast backward or fast forward playback in DVD and USB modes Note Be sure ...

Страница 15: ...nel s maximum angle of inclination can be adjusted to match the installation configuration within the vehicle Perform this with the panel in its housed position 1 Keep pressing the OPEN CLOSE button more than 5 seconds The electronic beep will be heard After the beep sounds twice the panel will come out and stand up to the maximum angle After completion of the calibration the panel will be housed ...

Страница 16: ...s unit unused for a long period of time or leaving your car be sure to house the liquid crystal panel Turning the liquid crystal panel horizontal Air conditioner operation mode When the way the liquid crystal panel is mounted hinders the operation of the air conditioner the position of the panel can be turned horizontal temporarily 1 Keep pressing the OPEN CLOSE button more than 2 seconds when the...

Страница 17: ...isc you may not be able to get it back out of the DVD player or it may damage the DVD player Do not use discs that have large scratches are misshapen cracked etc Use of such discs may cause misoperation or damage To remove a disc from its storage case press down on the center of the case and lift the disc out holding it carefully by the edges Do not use commercially available disc protection sheet...

Страница 18: ...a disc is left in the ejected position for 15 seconds the disc is automatically reloaded Auto reload 3 Remove the disc carefully 4 Touch the Back key Note If you force a disc into the insertion slot before auto reloading this can damage the disc Connecting Disconnecting an USB Media Device This unit has one USB Universal Serial Bus connector which is compatible with USB 1 1 and USB 2 0 Playable US...

Страница 19: ...foreign objects into the USB connector Always insert the USB media device fully into the connector Incomplete connections may cause the device not to be recognized Disconnecting an USB media device 1 Confirm that data transfer is not performed on the USB media device For the method to confirm it see the operation manual of your USB media device 2 Remove the USB media device from the USB connector ...

Страница 20: ...tal panel of this unit The source sounds of the Main zone are output from the speakers of the vehicle side and those of the Sub zone are from the optional headphone systems Controlling a source assigned to the Sub zone can be made by using the optional remote control unit To control it from this unit once assign the same source to the Main zone then control it When a media without video images is ...

Страница 21: ...from this unit once select the same source mode as assigned to the Sub zone for the Main zone and then control it Turning off the 2 Zone function 1 Press the SRC button to display the Source screen 2 Touch the 2 Zone tab to display the 2 Zone tab screen 3 Touch and hold the 2 Zone Off key for more than 1 second Radio Operations Listening to the radio 1 Press the SRC button and touch the Tuner key ...

Страница 22: ...me or Travel mode 2 Touch the Band key to select the band 3 Touch the corresponding Preset key to recall the stored station Touching and holding the desired Preset key for more than 2 seconds will store the current station to the preset memory Manual memory 1 Touch the Home Travel key to select the Home or Travel mode 2 Touch the Band key to select the band you wish to store 3 Tune in the station ...

Страница 23: ...ormed in the middle of DVD video play the disc will restart from beginning Displaying the DVD Setup screen 1 Touch the screen to display the DVD Video mode screen 2 Touch the Options key to display the Options menu 3 Touch the Setup key to display the Setup screen Touch the key to display the next page Touch the key to return to the previous page 4 Perform setting for the desired setting items See...

Страница 24: ... Setting up the subtitle language The factory default setting is English Setting up the password for setting up of the parental level The factory default setting is 0000 Note When a disc with view restrictions is inserted you will be prompted to input a password The disc will not be viewable until the correct password is entered 4 1 Touch the On or Off key of the Angle item to turn the Angle funct...

Страница 25: ...CA 6782 CUBA 6785 DOMINICA 6877 DOMINICAN REPUBLIC 6879 ECUADOR 6967 EL SALVADOR 8386 FIJI 7074 GRENADA 7168 GUATEMALA 7184 GUYANA 7189 HAITI 7284 HONDURAS 7278 JAMAICA 7477 KIRIBATI 7573 MARSHALL ISLANDS 7772 MEXICO 7788 MICRONESIA FEDERATED STATES OF 7077 NAURU 7882 NEW ZEALAND 7890 NICARAGUA 7873 PALAU 8087 PANAMA 8065 PAPUA NEW GUINEA 8071 PARAGUAY 8089 PERU 8069 SAINT KITTS AND NEVIS 7578 SAI...

Страница 26: ... volume setting in the other modes does not affect the DVD playback When the DVD menu is displayed For general DVD Video discs the DVD menu may appear After the DVD menu is displayed select an item in the operations described as follows COOK ISLANDS 6775 FALKLAND ISLANDS MALVINAS 7075 FRENCH GUIANA 7170 FRENCH POLYNESIA 8070 GUADELOUPE 7180 GUAM 7185 MARTINIQUE 7781 MONTSERRAT 7783 NETHERLANDS ANT...

Страница 27: ... is expanded so that the top and bottom edges of the image fit to the screen and that the aspect ratio of the image becomes 4 3 The aspect ratio of the image may be changed Wide The image is expanded so that the left and right edges of the image fit to the screen The top and bottom areas of the image may be cut off 3 Touch the Hide key to return to the playback screen DVD menu operations Showing t...

Страница 28: ...e reproduced during slow playback Fast forward and fast backward 1 Showing the DVD Video mode screen touch and hold the Chapter or Chapter key during playback Chapter key Fast forward Chapter key Fast backward The playback speed becomes 4 time faster at first and then 16 time faster 3 seconds later Releasing the key resumes the normal speed playback No audio is reproduced during fast forward and f...

Страница 29: ...ong the audio languages during playback 1 Showing the DVD Video mode screen touch the Options key 2 Touch the Audio key during playback Each time you touch the key you can switch among audio languages Depending on the disc up to 8 audios may be recorded For details see the mark of the disc Indicates that 8 audios have been recorded Depending on the disc switching may be completely impossible or im...

Страница 30: ...ed to control playback Using pre recorded menu screens in the Video CD with PBC you can enjoy playback of software with a simplified dialog function Selecting the Video CD mode 1 Set a Video CD disc to the DVD player The system will automatically read the disc data change to the DVD mode Video CD mode and start playback after a while See also Setting Ejecting a Disc page 16 Note For your safety th...

Страница 31: ...ckward direction In addition audio cannot be reproduced during slow playback Skipping a track searching 1 Touch the Track or Track key during playback The track is skipped and playback starts Touching the Track key starts playback from the beginning of the next track Touching the Track key starts playback from the beginning of the current track When this button is pressed again within about 2 seco...

Страница 32: ...atio of the image may be changed Wide The image is expanded in the same way as the Full Wide setting but the width will become narrower Depending on the image data black areas may be displayed at the both sides of the screen 3 Touch the Hide key to return to the playback screen Audio CD Operations This system is a CD TEXT compatible model and supports the display of the DISC TITLE TRACK TITLE and ...

Страница 33: ...ation plays back all tracks on the disc in no particular order T RDM is displayed on the screen You can also specify this function by touching the Random key on the CDDA mode screen 3 To cancel the play touch the Track key of the function to cancel 4 Touch the Back key to return to the previous screen Scrolling track titles When a title or name displayed on the screen is longer than the text area ...

Страница 34: ...1 kHz Set the Bit Rate to 48 64 80 96 128 160 or 192 kbps Add a file extension WMA or wma using single byte characters For AAC files This system supports only the MPEG4 Audio files encoded by the iTunes Set the Sampling Frequency to 44 1 or 48 kHz Set the Bit Rate to within ranges from 16 to 320 kbps VBR Add a file extension M4A or m4a using single byte characters Precautions when preparing a disc...

Страница 35: ...ed and playback starts Touching the Track key starts playback from the beginning of the next track Touching the Track key starts playback from the beginning of the current track When this key is touched again within about 2 seconds playback starts from the beginning of the previous track These functions perform in the current folder only Fast forward and fast backward 1 Touch and hold the Track or...

Страница 36: ...ether with DivX files in a disc or folder You can select whether such discs are regarded as MP3 WMA AAC discs or as DivX discs 1 Touch the Options key 2 Touch the Audio or Video key of the Playform item to specify the setting Audio Discs are regarded as MP3 WMA AAC discs Video Discs are regarded as DivX discs 3 Touch the Back key if required Note This setting is disabled when a Mixed Mode CD which...

Страница 37: ... and then engage the parking brake again You can store DivX files and the MP3 WMA AAC files together in a disc or folder In such a case you can select whether the disc is regarded as a DivX disc or as an MP3 WMA AAC disc See Setting the Playform of discs recorded with audio files page 38 When a disc is already set 1 Press the SRC button to display the Source screen 2 Touch the DVD key to select th...

Страница 38: ...ect ratio of the image may be changed Wide The image is expanded so that the left and right edges of the image fit to the screen The top and bottom areas of the image may be cut off 3 Touch the Hide key to return to the playback screen Searching with a folder track number You can specify a file to play using the folder number or track number 1 Showing the DivX mode screen touch the Options key 2 T...

Страница 39: ...ideo displaying them on this unit it is required to use the special connector cable CCA 723 separately sold Note This system will not operate or may operate improperly with unsupported versions For detailed information on the playable iPod models see our home page www clarion com Notes on using Apple iPod Do not connect an iPod to this unit with a headphone connected to the iPod When in the iPod m...

Страница 40: ...g the Track key starts playback from the beginning of the next track Touching the Track key starts playback from the beginning of the current track When this key is kept touching playback starts from the beginning of the previous track Fast forward and fast backward 1 Touch and hold the Track or Track key during playback The playback speed becomes faster Releasing the key resumes the normal speed ...

Страница 41: ...ing these categories The category keys displayed may differ depending on the connected iPod Playlists The list of all the Video Playlists stored in the iPod is displayed Movies The list of all the Movies stored in the iPod is displayed Music Videos You can narrow the Albums to be listed by specifying the Artist name Rental The list of all the Rental Movies stored in the iPod which are downloaded w...

Страница 42: ...connect an iPod with video by using the optional connector cable you can enjoy the video data stored in the iPod showing them on the liquid crystal panel of this unit and the rear monitor if connected 1 Play back your desired video tracks The system will automatically enter into the Video mode and the playback starts The specified video image is also displayed on the rear monitor if connected When...

Страница 43: ...upports only the MPEG4 Audio files encoded by the iTunes Set the Sampling Frequency to For MP3 files MPEG1 Layer3 32 44 1 or 48 kHz MPEG2 Layer3 16 22 05 or 24 kHz MPEG2 5 Layer3 8 11 025 or 12 kHz For WMA files 32 44 1 or 48 kHz For AAC files 44 1 or 48 kHz Set the Bit Rate to For MP3 files MPEG1 Layer3 32 to 320 kbps VBR MPEG2 Layer3 16 to 160 kbps VBR MPEG2 5 Layer3 16 to 160 kbps VBR For WMA f...

Страница 44: ...re available only when the Clarion NAVI Clarion Navi NP509A is connected When in the AV mode Touch the Navi or Map key on the Source screen to switch to the Navi mode When the image interruption from the Navi arises the screen will be changed to the Navi display When the interruption is finished the screen will return to the previous AV display Note Depending on the distance to the next guidance p...

Страница 45: ...image may be changed Cinema The image is expanded so that the top and bottom edges of the image fit to the screen Normal The image is expanded so that the top and bottom edges of the image fit to the screen and that the aspect ratio of the image becomes 4 3 The aspect ratio of the image may be changed Wide The image is expanded so that the left and right edges of the image fit to the screen The to...

Страница 46: ... adjust the effect level by touching the or key Setting range 3 to 3 The factory default setting is 0 3 1 Touch the Beat EQ key to display the Beat EQ tab screen 3 2 Touch the Custom key 3 3 Perform the following settings to adjust the sound tone 3 4 Touch the Bass key 3 5 Touch the or key of the desired item to adjust the effect level Gain 7 to 7 The factory default setting is 0 Frequency 50Hz 10...

Страница 47: ...r item to adjust the fader level Emphasizes the sound from the front speakers Emphasizes the sound from the rear speakers Adjustment range front 12 to rear 12 The factory default setting is 0 3 1 Touch the Others key to display the Others tab screen 3 2 Touch the or key of the Sub Woofer Ctrl item to adjust the output level Setting range 6 to 6 3 1 Touch the Others key to display the Others tab sc...

Страница 48: ...ring use of the Rear Vision Camera Make sure of safety around your vehicle The factory default setting is On Note This setting is disabled when the Camera Interrupt feature is set to Off Setting the AUX input NTSC PAL The factory default setting is PAL Note This setting is applied only to the AUX video input If nonstandard video signals are input the video image may be disturbed When you set to Au...

Страница 49: ...sc is set in the DVD player Setting the TEL Switch When a telephone is connected to this unit using the optional adapter box you can listen to your telephone calls on your car speakers The factory default setting is Off 3 1 Touch the Display key to display the Display tab screen 3 2 Touch the 5S 10S or 30S key of the HVAC item to set the time to 5 seconds 10 seconds or 30 seconds 3 1 Touch the Sys...

Страница 50: ...een is displayed 3 4 Touch the Start system check key to perform the system check manually The system will be restarted after performing the system check 3 1 Touch the System key to display the System tab screen 3 2 Touch the key to display the next screen 3 3 Touch the key of the System Check item 3 4 Touch the Reset NAVI module key to reset the navigation system 3 1 Touch the System key to displ...

Страница 51: ...o antenna function is turned on Down The antenna is collapsed Adjusting the Clock The time is displayed in 12 hour format Note This setting is disabled when the Navigation system is connected The clock is automatically adjusted using the CT clock time data in the GPS data Adjusting the Monitor You can customize the various monitor settings by the following operations Setting the Screen mode The sy...

Страница 52: ...key to display the Settings screen 2 Touch the Monitor ADJ key to display the Monitor screen 3 Touch the Dimmer Bright Color Contrast or Hue key you wish to adjust then touch the or key to adjust the level Dimmer Adjusts the panel brightness when the car lights are ON or OFF Press to make image brighter Press to make image dimmer Bright Adjusts the brightness of the display Press to make image bri...

Страница 53: ...n fall on the light receptive part of the remote control unit When direct rays of the sun fall on the light receptive part of the remote control unit it may not work The battery of the remote control unit is dead or there is no battery in the remote control unit Check the battery of the remote control unit The display is dark The Dimmer control is too low Adjust the Dimmer properly The operating c...

Страница 54: ...ets may form on the internal lens when the car is parked in a humid place Let dry for about 1 hour with the power on The image is not displayed The parking brake is not engaged Check that the parking brake is engaged Disc cannot be played with the display Parental Violation shown The view is limited Release the view limitation or change the parental level See the subsection Setting up the parental...

Страница 55: ...MP3 WMA AAC files encoded properly The iPod s video image is disturbed The TV Signal setting of the iPod is not set correctly Set the TV Signal setting NTSC PAL of the iPod correctly 9 ERROR DISPLAYS Display Cause Measure Error 2 A disc is caught inside the DVD player and is not ejected This is a failure of DVD player s mechanism Consult your store of purchase Error 3 A disc cannot be played due t...

Страница 56: ...eared disconnect the iPod and reconnect it again The iPod is frozen Disconnect the iPod reset it and reconnect it again Error 5 iPod The connected iPod is not recognized Disconnect the iPod and reconnect it again If the iPod is still not recognized try replacing with a different iPod If the iPod is frozen disconnect it reset it and reconnect it again Bus Error Over current or data error is detecte...

Страница 57: ...mplifier Maximum power output 200 W 50 W u 4 Speaker impedance 4 4 to 8 allowable Input Audio input sensitivity High 0 65 V at 2 V output Mid 1 3 V at 2 V output Low 2 0 V at 2 V output input impedance 10 k or greater Video input 1 0 r0 2 Vp p input impedance 75 Video Output Video output 1 0 r0 2 Vp p output impedance 75 LCD Monitor Screen Size 7 inch wide type 152 mm Width u 85 mm Height Display ...

Страница 58: ...in a place where the elements of the antenna do not protrude beyond the edge of the front back left and right of the vehicle If it comes in contact with pedestrians it may cause an accident INSTALLATION AND WIRE CONNECTION MANUAL WARNING This symbol is intended to alert the user to the presence of important operating instructions Failure to heed the instructions may result in severe injury or deat...

Страница 59: ...ure to switch off the vehicle when connecting or disconnecting cords to from the unit otherwise an electric shock injury or accident may occur 2 PACKAGE CONTENTS 1 Main unit 2 Manuals 3 Power supply cord 4 Rca pin cord 5 Bag for accessories No 1 Flat head screw M5 u 8 mm 4 Hexagonal bolt M5 u 8 mm 5 Machine screw M4 u 3 mm 4 Electro tap 6 Bag for accessories No 2 Hook plate 2 7 Bag for accessories...

Страница 60: ...hat the unit will not hamper operation of the gearshift lever or obstruct your view before selecting the installation location Figure 2 Install the unit within 30q of the horizontal plane Figure 3 If you have to do any modification on the car body such as drilling holes consult your car dealer beforehand Use the included screws for installation Using other screws can cause damage Figure 4 Note Use...

Страница 61: ...cks 4 Mount the outer escutcheon so that all the hooks are locked Note Some car models require special mounting kits for proper installation Consult your Clarion dealer for details Fasten the front stopper securely to prevent the main unit from coming loose Console opening dimensions Hole 182 mm Hole Strap This part is not provided Hexagonal bolt Instrument panel Stoppers Screwdriver Universal mou...

Страница 62: ...e mounting brackets to the chassis as shown in Figure 8 Holes are pre tapped for TOYOTA and NISSAN vehicles modification such as drilling new holes of the mounting brackets may be required for other models 3 Wire as shown in Section 8 see page 63 4 Secure the unit in the dashboard and then reassemble the dashboard and the center panel Note 1 The parts and screws with this mark are used to install ...

Страница 63: ... sure to turn the power off before wiring Be particularly careful where you route the wires Keep them well away from the engine and exhaust pipe etc Heat may damage the wires If the fuse should blow check to see if the wiring is correct If a fuse is blown replace it with a new one of the same amperage rating as the original 15A FUSE To replace the fuse remove the old fuse of the power supply cord ...

Страница 64: ...erminal Right Left Front audio output terminal Rear audio output terminal Subwoofer output terminal MONO 2ch Video output terminal 2 Zone audio output terminal AUX1 audio input terminal Rear Vision Camera terminal 4 Channel Amplifier Rear Monitor Wireless Headphone VTR etc USB terminal Red White Red Steering wheel remote control terminal AUX2 audio input terminal Use the AUX1 audio input when you ...

Страница 65: ...Rear right 12V accessory Front right Front right Front left Front left Rear left Rear left Amplifier turn on cord Illumination Auto antenna Parking brake cord Reverse gear cord Purple Purple Black Red Gray Gray Black White White Black Green Green Black Blue White Orange White Blue Grass green Purple white Brown Phone mute Yellow No connection ...

Страница 66: ...inal Connect the Rear Vision Camera to the RCA pin cord if not the screen turns black while the gearshift lever is in the reverse gear position The power supply box CAA185 sold separately is required for connection of the main unit and the Rear Vision Camera Navigation System NP509A When the Navigation System is to be connected connect the 13 pin cable included in NP509A For detailed information r...

Страница 67: ...2009 5 280 8818 00 QC 6830K Clarion Co Ltd All Rights Reserved Copyright 2009 Clarion Co Ltd A ...

Отзывы: