


170
11
P R A C T I C A L I N F O R M A T I O N
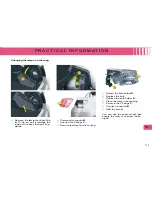
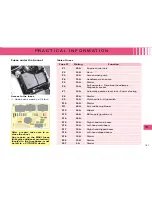
Changing dipped beams
Lift up the pegs
A
to remove the
cover on the headlamp.
Remove the protective cap
C
.
Disconnect the connector by
pressing it between the thumb
and index fi nger.
Free the bulb from its two metal
clamps.
Take out the bulb.
Replace the bulb, exerting a
slight axial force.
Reconnect the connector, until it
is all the way in.
Replace the protective cap
C
.
Replace the cover and fi x it in
place using the pegs
A
.
Changing the directional lighting
Lift up the pegs
A
to remove the
cover on the headlamp.
Remove the protective cap
D
.
Disconnect the connector by
pressing it between the thumb
and index fi nger.
Free the bulb from its two metal
clamps.
Take out the bulb.
Replace the bulb, exerting a
slight axial force.
Reconnect the connector, until it
is all the way in.
Replace the protective cap
D
.
Replace the cover and fi x it in
place using the pegs
A
.
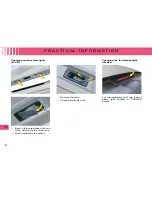
Changing direction indicators
Remove the fi xing screw of cover
A
using a torx tool, tip the cover
over and remove.
Remove the fi xing screw of lamp
B
using a torx tool and pull the
headlamp unit to remove it from
the bumper.
Detach the bulb
C
by pressing
on bars
1
and
2
.
Disconnect the connector (pull
whilst pressing on the grey
tongue using a fl at screwdriver).
Replace the bulb.
Connect the connector (push the
grey tongue in well).
Replace the headlamp unit in the
bumper.
Screw the headlamp unit in.
Position the cover using its
guides and screw in.
Bulbs:
HP24 W
Содержание C5 2013
Страница 1: ......
Страница 232: ...203 12 T E C H N I C A L D A T A Interior Saloon A 1 030 B 1 115 C 566 D 504 E 1 040 F 1 705...
Страница 234: ...205 12 T E C H N I C A L D A T A Interior Tourer A 1 060 B 1 115 C 510 D 851 E 1 058 F 1 723...
Страница 288: ...2 01 FIRST STEPS MY WAY CONTROL PANEL...


