background image

172 

P R A C T I C A L   I N F O R M A T I O N
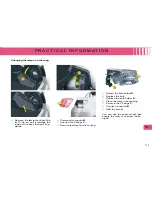
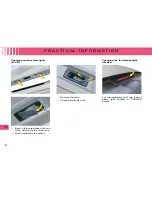
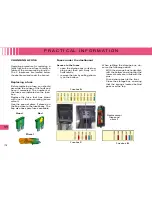
  Rear lamps (Saloon) 

 Identify the failed bulb. 


1.


Stop-lamps and sidelamps:


P21 W/5 W 


2.


Sidelamps:

  R 5 W 


3.


Reversing lamp:

  H21 W 


4.


Foglamps:

  H21 W 


5.


Direction indicators:

  P21 W  


   Open the boot. 


   Using a fl at screwdriver, remove 

the  3  clips  which  fi x  the  trim  in 

the lamp area. 


   Partially remove the trim  

F

 . 


   Disconnect the connector  

G

 . 

  Changing the lamps on the boot 


   Detach the bulb holder  

H

 . 


   Replace the bulb. 


   Replace the bulb holder  

H

 . 


   Connect the connector  

G

 . 


   Replace and fi x the trim  

F

  with its 

clips.   

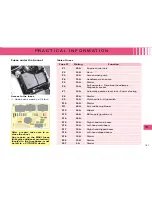
  In some climatic conditions, 

mist  may  appear  on  the 

headlamp/indicator lenses.

This  is  normal  and  will  disappear 

(e.g. after the lamps have been on 

for a few minutes). 

 If it does not, contact a CITROËN 

dealer. 


Содержание C5 2013

Страница 1: ......

Страница 2: ...driving assistance device warns you when you unwittingly cross a lane marking Parking assistance visual sound This function warns you if an obstacle is detected in front of or behind the vehicle Tyre...

Страница 3: ...on the lever E Opening the boot 76 77 81 O P E N I N G Remote control key Fuel tank 64 Locking filler cap Turn the key a quarter turn to lock and unlock the ller cap When refuelling place the cap on...

Страница 4: ...found in a protective holder inside the spare wheel 165 Access to the spare wheel To access the spare wheel Lift up the boot oor using the strap Saloon or the retractable hook Tourer Fold back the bo...

Страница 5: ...default Manual locking unlocking is possible Parking space sensor The Parking space sensor func tion assists you in nding a parking space Dual zone automatic air conditioning This air conditioning sys...

Страница 6: ...ation controls for the audio telematics and trip computer systems 9 Driver s air vent 10 Instrument panel 11 Driver s air vent 12 Windscreen wiper screen wash controls 13 Ignition switch 14 ESP parkin...

Страница 7: ...amps button 8 Glovebox Vehicle document storage Audio video sockets 9 Doors and boot locking unlocking control Programmable heating indicator 10 Automatic gearbox SPORT SNOW mode controls 11 Electroni...

Страница 8: ...creen menu Telephone Cruise control and speed limiter The SET PAUSE VOL MUTE buttons have touch sensitive identi ca tion to make them easier to use Activation of voice recognition or reminder of navig...

Страница 9: ...C Heated seat control D Longitudinal adjustment of seat E Adjustment of the backrest lumbar support Memorisation The Memorisation function allows you to programme the driver s seat rear view mirrors...

Страница 10: ...ards Steering column adjustment Electric exterior rear view mirrors 1 Selection of rear view mirror A Left hand side B Right hand side C Foldback Deployment 2 Directional control for mirror se lected...

Страница 11: ...eam and main beam Front foglamps and rear foglamps on Front foglamps on Automatic lighting of headlamps Rear wipers Tourer Rotate control C to the desired posi tion Off Intermittent wipe Screen wash R...

Страница 12: ...driver s side Adjustment of air distribution on passenger s side Rear and external rear view mirrors demisting deicing Air recirculation entry of air from outside Front demisting deicing Driver s side...

Страница 13: ...emperature D Speed indicator E Instrument panel F Mileage recorder G Trip mileage recorder reset button H Rev counter I Engine oil temperature J Display of automatic gearbox information When the ignit...

Страница 14: ...dio wipers electric windows opening roof electric seats telephone video interior lighting motorised tailgate etc are supplied electrically for a maximum of no more than around one hour so as to avoid...

Страница 15: ...deactivation warning lamp H Front passenger s airbag activation warning lamp 31 In order to be able to use a rearwards facing child seat in the front passenger s seat position it is imperative to dea...

Страница 16: ...on hill start assist phase To aid starting on a gradient your vehicle is equipped with a system which keeps it immobilised for a short time about 1 second the approximate time it takes to move your fo...

Страница 17: ...ument panel display The speed limiter or cruise control mode is displayed on the instrument panel when selected Cruise control Speed limiter Selection of LIMIT Activation of speed limiter mode SET Inc...

Страница 18: ...he road pro le Position D Operation in sequential mode with manual gear changing Position M Operation in automatic SPORT mode Position D and press but ton A Operation in automatic SNOW mode Position D...

Страница 19: ...ed with a speed lower than 6 mph 10 km h and at a distance of less than 1 5 m from the space The xed lighting of the warning lamp indicates that this function is selected D R I V I N G 143 145 This de...

Страница 20: ...unter E Indicator Engine oil temperature Gear selector position and gear engaged Automatic gearbox F Controls Lighting rheostat Resetting to zero of trip mileage computer and maintenance indicator G I...

Страница 21: ...Main menu The instrument panel A is located in the centre of the dashboard With the vehicle stationary you can access the main menu of the instrument panel by quickly pressing on the left hand rotati...

Страница 22: ...ctivate the guide me home lighting and adjust its duration Activate deactivate the dual function Xenon directional head lamps Comfort menu Once you have selected this menu you can Activate deactivate...

Страница 23: ...in strument panel with the range the current consumption the route 1 tab is displayed in zone C of the instrument panel with the distance travelled the average consumption the average speed for the rs...

Страница 24: ...ni cant change in the current consump tion When the range falls below 20 miles 30 km dashes are displayed After lling with at least 5 litres of fuel the range is recalculated and is dis played when it...

Страница 25: ...splay ing only the total mileage and the trip mileage bottom of screen Display of navigation information on instrument panel screen You can display navigation informa tion on the instrument panel scre...

Страница 26: ...splay ing only the total mileage and the trip mileage bottom of screen Display of navigation information on instrument panel screen You can display navigation informa tion on the instrument panel scre...

Страница 27: ...the engine is started these warning lights should switch off Operation indicator lights Visual indicators informing the driver that a system is in operation opera tion or deactivation indicator light...

Страница 28: ...re operating the starter When the engine is running or the vehicle is moving the lighting of one of the following warning lights indicates the occurrence of a fault requiring intervention on the part...

Страница 29: ...re operating the starter When the engine is running or the vehicle is moving the lighting of one of the following warning lights indicates the occurrence of a fault requiring intervention on the part...

Страница 30: ...re operating the starter When the engine is running or the vehicle is moving the lighting of one of the following warning lights indicates the occurrence of a fault requiring intervention on the part...

Страница 31: ...amp ashes it indicates a fault with its application or release Consult a CITRO N dealer With the engine running and when displayed at the same time as the STOP warning lamp it indicates that the brake...

Страница 32: ...ccording to country This warning lamp lights up on the instrument panel to remind the driver and all passengers that they must fasten their seat belt It is linked to the seat belt informa tion given b...

Страница 33: ...f the distance recorder resumes its normal operation The display then indicates the total and trip distances Less than 620 miles 1 000 km remain before the next service is due Example 500 miles remain...

Страница 34: ...lock the vehicle and wait at least ve minutes for the zero reset to be taken into ac count Engine oil level indicator System which informs the driver of the validity or invalidity of the engine oil l...

Страница 35: ...lock the vehicle and wait at least ve minutes for the zero reset to be taken into ac count Engine oil level indicator System which informs the driver of the validity or invalidity of the engine oil l...

Страница 36: ...s the bars should be within section 1 In severe operating conditions the bars may extend into section 2 the engine coolant temperature warn ing lamp A and the STOP warning lamp will light up stop imme...

Страница 37: ...s the bars should be within section 1 In severe operating conditions the bars may extend into section 2 the engine coolant temperature warn ing lamp A and the STOP warning lamp will light up stop imme...

Страница 38: ...distance travelled during a day or other period until it is reset to zero by the driver With the ignition on press the button until zeros appear Lighting rheostat System for manual adjustment of the...

Страница 39: ...distance travelled during a day or other period until it is reset to zero by the driver With the ignition on press the button until zeros appear Lighting rheostat System for manual adjustment of the...

Страница 40: ...distance travelled during a day or other period until it is reset to zero by the driver With the ignition on press the button until zeros appear Lighting rheostat System for manual adjustment of the...

Страница 41: ...ashes ice risk The outside temperature displayed may be greater than the actual tem perature if the vehicle is parked in bright sunlight It is recommended that the driver should not manipulate the co...

Страница 42: ...e steering wheel or D on the audio equipment Select the screen con guration using C Con rm with a press on C on the steering wheel or D on the audio equipment Select the adjustment for the date and th...

Страница 43: ...ond ing menu turn the navigator to move the selection press the navigator to con rm the selection or press the ESC button to aban don the current operation and re turn to the previous display Accordin...

Страница 44: ...te and time This menu allows you to set the date and time the format of the date and the format of the time To set the date and time Press the SETUP control Turn the dial to select DATE AND TIME Press...

Страница 45: ...llite navigation system information Controls From the NaviDrive 3D control pan el to select one of the applications press the dedicated RADIO MEDIA NAV TRAFFIC ADDR BOOK or SETUP button to gain access...

Страница 46: ...e on use personal voice programming etc set the volume of the voice syn thesiser Date and time This menu allows you to set the date and time the format of the date and the format of the time refer to...

Страница 47: ...stem eliminates unpleas ant air currents while maintain ing an optimum temperature in the passenger compartment To open the air diffusion grille turn the dial upwards To close the air diffusion grille...

Страница 48: ...good working order it is essential that it is operated at least once a month The air conditioning uses the en gine power during its operation As a result the fuel consumption of the vehicle increases...

Страница 49: ...r Fahrenheit depending on the choice of con guration validated on the display A setting around the value 21 usually makes it possible to obtain optimum comfort However depending on your requirements a...

Страница 50: ...ontrol 6 to clear the win dows quickly The indicator light comes on The OFF symbol is displayed on the multifunction display This action switches off the display and the indicator lights It deactivate...

Страница 51: ...y to pre vent an excessive distribution of cold air When entering the vehicle af ter it has been parked for a fairly long period if the inte rior temperature is very diffe rent from your comfort setti...

Страница 52: ...ns Air ow Temperature in the passenger compartment Air distribution Air conditioning Automatic air recirculation It is advisable to leave all of the vents open Simply pressing one of the controls with...

Страница 53: ...ature difference as quickly as possible 2a 2b Temperature adjustment Control via the manual controls Press one of the controls with the exception of those which regulate the temperature 2a and 2b The...

Страница 54: ...s and odours Intake of air in automatic anti pollution mode This is activated by de fault in automatic comfort regulation mode The automatic mode has an air qual ity sensor It analyses the air and iso...

Страница 55: ...suf cient to demist or de ice the windows hu midity several passen gers ice Press control 9 to clear the win dows quickly The indicator light comes on This system controls the tempera ture air ow and...

Страница 56: ...is located on the left hand side of the dashboard 1 Time or remaining functioning time 2 Increase time 3 Select programme 4 Programme number selected 5 Immediate start up of heating 6 Time adjustment...

Страница 57: ...n of the system s operation disap pears after 10 seconds Start up of the heating system can be programmed between 1 minute and 24 hours in advance Adjusting the remaining operating duration When the h...

Страница 58: ...ress button 5 The warning lamp 8 and the screen go out When a programme is operating pressing button 2 or 7 displays the heating start up time A second press on these buttons displays the time When a...

Страница 59: ...To avoid any risk of intoxication or asphyxiation the additional heat ing must not be used even for short periods in an enclosed area such as a garage or workshop not equipped with a system for the ex...

Страница 60: ...backrest angle Operate the control and adjust the position of the backrest to the front or to the rear 3 Adjustment of the seat height Raise or lower the control the number of times required to ob tai...

Страница 61: ...ngitudinal adjustment Raise or lower the front of the control to adjust the seat cush ion angle Raise or lower the rear of the control to raise or lower the seat Simultaneously raise or lower the fron...

Страница 62: ...t entry to the vehicle When switching on the ignition the seat moves forward to the memo rised driving position When moving the seat take care that no person or object hinders the automatic movement o...

Страница 63: ...to re call the corresponding position An audible signal is heard indicating the end of the adjustment When the ignition is on after a few consecutive position recalls the function will be deactivated...

Страница 64: ...to re call the corresponding position An audible signal is heard indicating the end of the adjustment When the ignition is on after a few consecutive position recalls the function will be deactivated...

Страница 65: ...t seat forwards if necessary raise the front of the seat cushion 1 tilt the seat cushion 1 fully against the front seat check that the seat belt is posi tioned correctly on the side of the seat back l...

Страница 66: ...y a long press on control A re engag es the mirror The folding and unfolding of the exte rior mirrors using the remote control can be deactivated by a CITRO N dealer The objects observed are in real i...

Страница 67: ...comes on and the mirror operates automatically Switching off Press switch 1 The indicator light 2 switches off and the mirror remains in its lightest state In order to guarantee optimum vis ibility du...

Страница 68: ...he steer ing wheel can be adjusted to adapt the driving position to the size of the driver Adjustment First adjust the driver s seat to the most suitable position When stationary pull the con trol A t...

Страница 69: ...ds and lighting of the courtesy light if the function is activated According to version the exterior mirrors unfold at the same time Selective unlocking using the remote control Press the open padlock...

Страница 70: ...locking Press the closed padlock again within ve seconds to deadlock the vehicle Locking the vehicle Normal locking using the remote control Press the closed pad lock to lock the vehicle completely P...

Страница 71: ...lectronic engine immobiliser locks the engine management sys tem a few minutes after the ignition is switched off and prevents starting of the engine by anyone who does not have the key In the event o...

Страница 72: ...witched on the steering is unlocked by turning the key to position M move the steering wheel gently if necessary 3 D Starter position Never turn the key to this position when the engine is running Key...

Страница 73: ...tion Press the closed padlock imme diately for a few seconds until the operation requested is trig gered Switch off the ignition and remove the key from the ignition switch The remote control is fully...

Страница 74: ...d The remote control does not operate when the key is in the ignition even when the ignition is switched off ex cept for reprogramming Locking the vehicle Driving with the doors locked may make access...

Страница 75: ...lectronic engine immobiliser locks the engine management sys tem a few minutes after the ignition is switched off and prevents starting of the engine by anyone who does not have the key In the event o...

Страница 76: ...d The remote control does not operate when the key is in the ignition even when the ignition is switched off ex cept for reprogramming Locking the vehicle Driving with the doors locked may make access...

Страница 77: ...witched on the steering is unlocked by turning the key to position M move the steering wheel gently if necessary 3 D Starter position Never turn the key to this position when the engine is running Key...

Страница 78: ...full alarm Activation Switch off the ignition and get out of the vehicle Lock or deadlock the vehicle using the locking button on the remote control The alarm is activated the indicator light on butt...

Страница 79: ...the remote control Unlock the vehicle using the key in the driver s door lock Open the door the alarm is trig gered Switch on the ignition the alarm stops Locking the vehicle without alarm Lock or dea...

Страница 80: ...trol again stops the movement of the window The electric window controls re main operational for approximately 45 seconds after the ignition is switched off or until the vehicle is locked after a door...

Страница 81: ...the rear controls are deactivated Indicator light off the rear controls are activated Always remove the key from the ignition when leaving the vehicle even for a short time If an obstacle is encounte...

Страница 82: ...river s door only the other door controls unlock the other doors and the boot The interior door controls do not operate when the vehicle is dead locked Manual centralised control System which provides...

Страница 83: ...Unlocking Above 6 mph 10 km h press button A to unlock the doors and the boot temporarily Activation Press button A for more than two seconds A con rmation message appears on the instrument panel dis...

Страница 84: ...c central locking is deactivated It is unlocked when a door is opened or when the central locking button is pressed speed lower than 6 mph 10 km h Opening Locking unlocking Tailgate release System for...

Страница 85: ...central locking unlocking control Interrupting the opening closing of the boot When the tailgate is being opened or closed electrically you can inter rupt its movement at any point by pressing push bu...

Страница 86: ...verheat and then cut out preventing opening and closing of the tailgate Allow the motor to cool down for ten minutes without opening or closing the tailgate Closing in manual back up mode remains poss...

Страница 87: ...inch function press control B to the 2nd notch fully closed wait until the blind is fully closed press control B for at least 3 seconds If the blind opens randomly during a closing operation and strai...

Страница 88: ...inch function press control B to the 2nd notch fully closed wait until the blind is fully closed press control B for at least 3 seconds If the blind opens randomly during a closing operation and strai...

Страница 89: ...0 km Press at the top left corner then pull open from the left turn the key a quarter turn to lock and unlock the ller cap when refuelling place the cap on hook A ll the tank but do not persist after...

Страница 90: ...ngine A Bio ex vehicle is one that has been designed to operate equally on unleaded petrol 95 or 98 RON or on bioethanol in Europe this is a mixture of 85 ethanol and 15 unleaded petrol known as E85 A...

Страница 91: ...mps for even better visibility daytime lights to be seen during the day Programming Various automatic lighting control modes are also available according to the following options guide me home lightin...

Страница 92: ...ituations the power of their beams may dazzle other driv ers They should only be used in fog or snow In these weather conditions it is your responsibility to switch on the fog lamps and dipped headlam...

Страница 93: ...poor Switching on With the ignition off ash the headlamps using the lever B A second headlamp ash switches the function off again Switching off The manual guide me home lighting switches off automati...

Страница 94: ...poor Switching on With the ignition off ash the headlamps using the lever B A second headlamp ash switches the function off again Switching off The manual guide me home lighting switches off automati...

Страница 95: ...located in the centre of the wind screen behind the interior mirror the associated functions would no longer be controlled MANUAL ADJUSTMENT OF THE HEADLAMPS To avoid dazzling other road users the he...

Страница 96: ...located in the centre of the wind screen behind the interior mirror the associated functions would no longer be controlled MANUAL ADJUSTMENT OF THE HEADLAMPS To avoid dazzling other road users the he...

Страница 97: ...ting is most useful when travelling at low and medium speed urban driving winding road inter sections parking manoeuvres Activation This function is activated when the direction indicator is activated...

Страница 98: ...When stationary or moving at very low speed or when reverse gear is engaged the function is inactive The status of the function remains in the memory when the ignition is switched off Directional head...

Страница 99: ...ers rear wiping on engaging reverse gear Manual controls The wiper commands are issued directly by the driver by means of the lever A and the ring B Rear wiper Tourer B rear wiper selection ring park...

Страница 100: ...rainfall Activation This is controlled manually by the driver by pushing lever A to the AUTO position It is accompanied by a message on the instrument panel display Switching off This is controlled ma...

Страница 101: ...rainfall Activation This is controlled manually by the driver by pushing lever A to the AUTO position It is accompanied by a message on the instrument panel display Switching off This is controlled ma...

Страница 102: ...oapy water change them approximately every 6 months avoid using them to retain card board on the windscreen COURTESY LIGHTS Selection and control of the various passenger compartment lights 1 Front co...

Страница 103: ...oapy water change them approximately every 6 months avoid using them to retain card board on the windscreen COURTESY LIGHTS Selection and control of the various passenger compartment lights 1 Front co...

Страница 104: ...ing lights With the ignition on press the corresponding switch Panoramic glass roof rear reading lights Tourer With the key in position or with the ignition on Press the corresponding switch The readi...

Страница 105: ...up the central console DOOR LIGHTING Door opening controls lighting Dashboard Operation These lights are activated with the automatic switching on of the lights when the exterior light is poor They ar...

Страница 106: ...up the central console DOOR LIGHTING Door opening controls lighting Dashboard Operation These lights are activated with the automatic switching on of the lights when the exterior light is poor They ar...

Страница 107: ...the storage pocket It goes out a few seconds after you remove your hand WELCOME LIGHTING With the door open this lights up the ground next to the vehicle Floor lighting In the front and the rear of th...

Страница 108: ...the storage pocket It goes out a few seconds after you remove your hand WELCOME LIGHTING With the door open this lights up the ground next to the vehicle Floor lighting In the front and the rear of th...

Страница 109: ...n be disengaged from its central xing and pivoted over to the side windows if required AIR CONDITIONED GLOVEBOX To open the glovebox pull on the handle and lower the lid The glovebox has a manually cl...

Страница 110: ...mat The use of a mat not approved by CITRO N may obstruct access to the pedals and hinder the cruise control speed limiter function Floor mats approved by CITRO N are tted with a 3rd xing located in t...

Страница 111: ...extract the cup holder Storage Lift up the upper part of the rear central armrest to access storage space B 12 V ACCESSORIES SOCKET SIDE BLINDS Pull on the tab A and position the blind on the hook B...

Страница 112: ...n be disengaged from its central xing and pivoted over to the side windows if required AIR CONDITIONED GLOVEBOX To open the glovebox pull on the handle and lower the lid The glovebox has a manually cl...

Страница 113: ...mat The use of a mat not approved by CITRO N may obstruct access to the pedals and hinder the cruise control speed limiter function Floor mats approved by CITRO N are tted with a 3rd xing located in t...

Страница 114: ...mat The use of a mat not approved by CITRO N may obstruct access to the pedals and hinder the cruise control speed limiter function Floor mats approved by CITRO N are tted with a 3rd xing located in t...

Страница 115: ...extract the cup holder Storage Lift up the upper part of the rear central armrest to access storage space B 12 V ACCESSORIES SOCKET SIDE BLINDS Pull on the tab A and position the blind on the hook B...

Страница 116: ...extract the cup holder Storage Lift up the upper part of the rear central armrest to access storage space B 12 V ACCESSORIES SOCKET SIDE BLINDS Pull on the tab A and position the blind on the hook B...

Страница 117: ...Pull strap spare wheel storage 3 Boot lamp 4 6 CD changer Luggage securing rings Use the 4 securing rings on the boot oor to secure your luggage For safety reasons in case of the need for sharp brakin...

Страница 118: ...or to secure your loads For safety reasons in the event of sharp braking you are ad vised to place heavy objects as far forwards as possible 3 Hooks These allow a cargo net to be tted see details on f...

Страница 119: ...ation B behind the rear bench seat Compress the roller control 1 and put the roller in place in its location C on the right Release the control to secure the luggage cover Unroll it to its fastening o...

Страница 120: ...l the high load retaining net and position one of the ends of the net s metal bar in the cor responding xing cover Check that the hook is secured in the rail located inside the cover 3 pull the high l...

Страница 121: ...en are the rear seats a child weighing less than 9 kg must travel in the rearwards facing position both in the front and in the rear CITRO N recommends that chil dren should travel in the rear seats o...

Страница 122: ...birth to 10 kg Group 0 from birth to 13 kg Groups 1 2 and 3 from 9 to 36 kg L1 R MER Baby Safe Plus Installed in the rearwards facing position L2 KIDDY Life The use of the restraining cushion is comp...

Страница 123: ...for your country before driving with your child in this seat c Group 0 from birth to 10 kg Shells and car cots cannot be installed on the front passenger seat U seat position suitable for installatio...

Страница 124: ...ring B xed at the bottom of the rear of the seat back used to secure the upper strap of the child seat These are three rings for each rear side seat two lower rings C located be tween the vehicle sea...

Страница 125: ...f a booster seat which has a back tted with a seat belt guide at shoulder level As a safety precaution do not leave one or more children alone and unsupervised in a vehicle a child or an animal in a v...

Страница 126: ...ached to the vehicle seat using the three point seat belt Follow the instructions for tting the child seat given in the seat manufacturer s installation guide R MER Duo Plus ISOFIX size category B1 Gr...

Страница 127: ...ng tted with an upper strap or a support forwards facing tted with a support a shell tted with an upper strap or a support To attach the upper strap refer to the ISOFIX mountings paragraph X Seat not...

Страница 128: ...ht remains off until the child lock is activated This system is independent and in no circumstances does it take the place of the central locking control Check the status of the child lock each time y...

Страница 129: ...of hazard warning lights When braking in an emergency depending on the deceleration the hazard warning lights come on They will switch off automatically the rst time you accelerate If they do not pres...

Страница 130: ...of hazard warning lights When braking in an emergency depending on the deceleration the hazard warning lights come on They will switch off automatically the rst time you accelerate If they do not pres...

Страница 131: ...of hazard warning lights When braking in an emergency depending on the deceleration the hazard warning lights come on They will switch off automatically the rst time you accelerate If they do not pres...

Страница 132: ...k the tyre pressures at any given moment Press on button A CHECK the information will be displayed on the instrument panel screen Press on button A CHECK The system indicates to you that the tyres are...

Страница 133: ...beep Consult a CITRO N dealer If you have tted wheels that are not equipped with tyre de a tion detection wheels with snow tyres etc contact a CITRO N dealer The de ation detection system is a driving...

Страница 134: ...e on the instrument panel dis play it indicates a malfunction of the anti lock braking system which could result in loss of control of the vehicle when braking If this warning light comes on together...

Страница 135: ...button lo cated in the centre of the fascia If this warning light comes on on the instrument panel and the indicator light on the button comes on this indi cates that the ASR and ESP systems are disa...

Страница 136: ...o the girth of the seat occupant The pretensioning seat belts are active when the ignition is on The force limiter reduces the pres sure of the seat belt against the chest of the occupant so increasin...

Страница 137: ...o the girth of the seat occupant The pretensioning seat belts are active when the ignition is on The force limiter reduces the pres sure of the seat belt against the chest of the occupant so increasin...

Страница 138: ...stening To unfasten the belt press on the red button in the buckle The belt retracts automatically when not in use Rear seat belts Each rear seat is tted with a three point inertia reel seat belt with...

Страница 139: ...d in front of you with a smooth movement checking that it does not twist must not be transformed or mod i ed to avoid altering its perform ance Recommendations for children Use a suitable child seat i...

Страница 140: ...same or a subsequent acci dent the air bag will not operate Impact detection zones A Front impact zone B Side impact zone Triggering of the air bag s is ac companied by a slight emission of harmless s...

Страница 141: ...ety of your front passenger in the event of an impact Operating fault If this symbol appears on the instrument panel dis play accompanied by an audible warning and a mes sage contact a CITRO N dealer...

Страница 142: ...ime discharging the hot gas via openings provided for this pur pose Front air bags Do not drive holding the steering wheel by its spokes or resting your hands on the centre part of the wheel Passenger...

Страница 143: ...of a serious side impact in or der to limit the risk of head injuries Each curtain air bag is incorporated in the pillars and the upper part of the passenger compartment Activation It is triggered at...

Страница 144: ...ime discharging the hot gas via openings provided for this pur pose Front air bags Do not drive holding the steering wheel by its spokes or resting your hands on the centre part of the wheel Passenger...

Страница 145: ...uf cient level of brake uid or a malfunction of the braking distribution It is essential to stop the vehicle Consult a CITRO N dealer Application Pull the parking brake to immobi lise your vehicle To...

Страница 146: ...ly apply the parking brake by pulling on control A The application of the parking brake is con rmed by the lighting of the warning lamp on control A and on the instrument panel Before leaving the vehi...

Страница 147: ...tivation deactivation is performed using the con guration menu of the instrument panel display To do so select Personalisation Con guration De ne the Vehicle parameters Driving assistance Automatic ha...

Страница 148: ...tivation deactivation is performed using the con guration menu of the instrument panel display To do so select Personalisation Con guration De ne the Vehicle parameters Driving assistance Automatic ha...

Страница 149: ...ut you are applying the parking brake manually when the gradient you are parked on is variable in its effect e g on a ferry in a lorry during towing In the case of towing a loaded vehicle or parking o...

Страница 150: ...the ESP sys tem is signalled by the light ing of this warning lamp then braking stability is not guaranteed In this event stability must be assured by the driver by repeating alternate pull release ac...

Страница 151: ...g lamp is lit permanently The time required for the subse quent application may be longer than during normal operation It is essential that the ignition is not switched on until the parking brake has...

Страница 152: ...safe location on at ground with a gear engaged 2 Display of the messages Parking brake faulty and Anti roll back fault and of the following warning lamps The automatic functions are deactivated The h...

Страница 153: ...seconds 5 Display of message Parking brake control faulty automatic mode activated and the following warning lamps and or ashing Only the functions for automatic application on switching off the engin...

Страница 154: ...nding slope with the vehicle stationary the vehicle is held for a brief moment when you release the brake pedal provided you are in rst gear or neutral on a manual gearbox provided you are in D or M o...

Страница 155: ...D MANUAL GEARBOX Engaging reverse gear Raise the ring under the knob and push the gear lever to the left then forwards Only engage reverse gear when the vehicle is stationary with the engine at idle A...

Страница 156: ...D MANUAL GEARBOX Engaging reverse gear Raise the ring under the knob and push the gear lever to the left then forwards Only engage reverse gear when the vehicle is stationary with the engine at idle A...

Страница 157: ...D MANUAL GEARBOX Engaging reverse gear Raise the ring under the knob and push the gear lever to the left then forwards Only engage reverse gear when the vehicle is stationary with the engine at idle A...

Страница 158: ...splayed on the instrument panel dial C A position grille relating to the selec tor allows you to view the position that is selected For safety position P can be dis engaged only if you press the brake...

Страница 159: ...pedal Otherwise when the ignition is on or the engine is running reposition the selector in position P put your foot on the brake ped al and then select the gear you want Park This position of the se...

Страница 160: ...x may change down automatically in order to provide effective engine braking If you lift your foot off the accelera tor abruptly the gearbox will not en gage a higher gear Manual operation Position of...

Страница 161: ...tion in very particular conditions of use With the lever in position D and the engine run ning press button A SNOW programme With the lever in position D and the engine running press button B The gear...

Страница 162: ...e speed Maintained press Increasing of the speed in steps of 5 km h 5 mph 4 Short press Decreasing of the speed in steps of 1 km h 1 mph storing of the speed Maintained press Decreasing of the speed i...

Страница 163: ...press Maintained press Volume increase 16 Short press Maintained press Volume decrease 17 Short press First press mute Second press restoring of the sound 18 Short press Radio source Automatic search...

Страница 164: ...anel The speed limiter information is dis played in zone A of the instrument panel Programming Press on button 4 to select speed limiter mode LIMIT The selection is con rmed by the display of the func...

Страница 165: ...strument panel Overriding the programmed speed The accelerator pedal has an end of travel switch In order to exceed the memorised maximum speed at any time you can press the pedal all the way down Whi...

Страница 166: ...en the function is selected no cruising speed has yet been memorised Once the desired speed has been reached using the accelerator press button 1 or button 2 The cruising speed is then memorised and c...

Страница 167: ...cles with a manual gearbox cruise control is deactivated if the gear lever is in neutral Reactivation By recalling the memorised speed After deactivation press button 3 Your vehicle automatically retu...

Страница 168: ...ing on the ground has been crossed on the right on the left hand side if the mark ing on the ground has been crossed on the left No warning is transmitted while the direction indicator is active and f...

Страница 169: ...of the vehicle Displays on the instrument panel The parking space sensor function warning lamp can have three differ ent statuses off the function is not selected on xed the function is selected but...

Страница 170: ...noeuvre The function displays the following types of message Parking YES Parking dif cult Parking NO The function deselects itself auto matically when you engage reverse gear when you switch off the i...

Страница 171: ...ction display The proximity information is indicat ed by an audible signal which be comes more rapid as the vehicle approaches the obstacle a diagram on the multifunction display with blocks which mov...

Страница 172: ...teeing the highest level of safety It also automatically corrects road holding according to the vehicle load and driving conditions Also the Hydractive III suspen sion gives you the possibility of cho...

Страница 173: ...teeing the highest level of safety It also automatically corrects road holding according to the vehicle load and driving conditions Also the Hydractive III suspen sion gives you the possibility of cho...

Страница 174: ...ground clearance re sponds to all types of situation Apart from a few speci c situations driving in the normal road position is imperative Press once on one of the adjust ment controls The change in...

Страница 175: ...km h on a good road surface ground clearance is lowered The vehicle returns to its normal position if the road surface deteriorates or if your speed is lower than 55 mph ap prox 90 km h At low or med...

Страница 176: ...support notch Clip the strut in its housing Lower the bonnet then slam it rmly at the end of its travel Pull on the bonnet to check that it is secured correctly To avoid any risk of burns only handle...

Страница 177: ...Continue until all the water has owed out Then retighten the bleed screw or the water detection sensor HDi 110 HDi 173 and V6 HDi 208 engines Pull the protective cover upwards to remove it HDi 138 en...

Страница 178: ...engines are the result of advanced technology Any intervention requires special quali cations which only a CITRO N dealer can guarantee V6 HDi 208 engine with electric pump In the event of running ou...

Страница 179: ...headlamp wash reservoir 2 Power steering uid reservoir or power steering and suspension uid reservoir 3 Coolant reservoir 4 Dipstick 5 Engine oil ller cap 6 Brake uid reservoir 7 Battery 8 Air lter V...

Страница 180: ...V6 petrol engine 1 Screen wash and headlamp wash reservoir 2 Power steering and suspension uid reservoir 3 Engine coolant reservoir 4 Engine oil gauge 5 Engine oil topping up 6 Brake uid reservoir 7...

Страница 181: ...ring uid reservoir or power steering and suspension uid reservoir depending on equipment 3 Coolant reservoir 4 Dipstick 5 Engine oil ller cap 6 Air lter 7 Brake uid reservoir 8 Battery As the diesel c...

Страница 182: ...e oil gauge 5 Engine oil topping up 6 Air lter 7 Brake uid reservoir 8 Battery 9 and terminals for starting with an assisting battery The diesel fuel circuit being under high pressure Any intervention...

Страница 183: ...tions and ful l the DOT4 standards The reading will only be correct if the vehicle is on level ground and the engine has been off for more than 15 minutes The check is carried out either when the igni...

Страница 184: ...r this purpose in the CITRO N network In the case of vehicles tted with headlamp washers the minimum level of this uid is indicated by an audible signal and a message on the multifunction display Top...

Страница 185: ...ble odours Oil filter Replace the oil lter each time the engine oil is changed Particulate filter system Diesel Complementary to the catalytic converter this lter makes an ac tive contribution to the...

Страница 186: ...s contact a CITRO N dealer Handbrake If the handbrake travel is too long or if a loss of ef fectiveness of this system is noticed the handbrake must be adjusted even between two services This system m...

Страница 187: ...ottle 1 to the valve of the tyre to be re paired Connect the compressor s elec tric plug to the vehicle s 12 V socket Start the vehicle and leave the engine running Complete system consisting of a com...

Страница 188: ...speed between 15 and 35 mph 20 and 60 km h to ll the puncture Stop to check the repair and the pressure Connect the compressor pipe di rectly to the valve of the repaired wheel Switch on the compresso...

Страница 189: ...miles 200 km Visit a CITRO N dealer as soon as possible to have the tyre repaired or replaced by a technician Take care the bottle of puncture repair uid con tains ethylene glycol This product is har...

Страница 190: ...e tools The tools are to be found in a protec tive holder inside the spare wheel Pull back the retaining strap to have access List of tools 1 Handle 2 Jack 3 Tool for the removal re tting of bolt prot...

Страница 191: ...ot pillar Detach the strap then push the wheel forwards so as to be able to lift it To reposition the spare wheel Position the spare wheel at in the boot then pull it towards you Next place the toolbo...

Страница 192: ...on the subframe close to the wheels then use the handle to unwind the jack until it reaches the ground Remove the protector from each bolt using tool 3 Slacken the wheel bolts Before positioning the...

Страница 193: ...ce Re t the protectors on the bolts Return the ground clearance to the normal position Ensure the tyre pressure is cor rect and have the balancing checked Deflation detection Such wheels have tyre pre...

Страница 194: ...ce Re t the protectors on the bolts Return the ground clearance to the normal position Ensure the tyre pressure is cor rect and have the balancing checked Deflation detection Such wheels have tyre pre...

Страница 195: ...sidelamps Lift up the pegs A to remove the cover on the headlamp Remove the protective cap B Pull the bulb holder to remove it Replace the bulb and replace the bulb holder For the maintenance of the f...

Страница 196: ...ap B Pull the bulb holder to remove it Replace the bulb and replace the bulb holder Replace the protective cap B Replace the cover and x it in place using the pegs A Model with halogen headlamps 1 Mai...

Страница 197: ...between the thumb and index nger Free the bulb from its two metal clamps Take out the bulb Replace the bulb exerting a slight axial force Reconnect the connector until it is all the way in Replace th...

Страница 198: ...from the bumper The side repeater is sealed If the bulb is faulty replace the side repeater Consult a CITRO N dealer Changing side repeaters Disconnect the connector D Remove the bulb by performing a...

Страница 199: ...3 clips which x the trim in the lamp area Partially remove the trim F Disconnect the connector G Changing the lamps on the boot Detach the bulb holder H Replace the bulb Replace the bulb holder H Conn...

Страница 200: ...de of the boot then pull it up wards Disconnect connector B Unscrew the 2 xings C Remove the lamp from its housing Detach the bulb holder D Replace the bulb Replace the bulb holder D Place the lamp in...

Страница 201: ...ulb 1 Stop lamps and sidelamps P21 W 5 W 2 Sidelamps R 5 W 3 Reversing lamp H21 W 4 Foglamps H21 W 5 Direction indicators P21 W In some climatic conditions mist may appear on the headlamp in dicator l...

Страница 202: ...he boot Pull it upwards Disconnect the connector B Unscrew the xing screw C Remove the lamp from its housing Detach the bulb holder D Replace the faulty bulb Replace the bulb holder D Place the lamp i...

Страница 203: ...ate lights W 5 W Insert a thin screwdriver into one of the external holes of the lens Push it outwards to unclip it Changing the third brake light diodes For the replacement of this type of diode ligh...

Страница 204: ...ding lamps Tourer Detach the cover of the reading lamp to access the bulb Bulb W 5 W Spotlamp Detach the cover If necessary detach the partition of the affected spotlamp Boot lamp Detach the cover and...

Страница 205: ...ding lamps Tourer Detach the cover of the reading lamp to access the bulb Bulb W 5 W Spotlamp Detach the cover If necessary detach the partition of the affected spotlamp Boot lamp Detach the cover and...

Страница 206: ...ame rating same colour Use the special pliers 1 placed on the ap close to the fuseboxes The ap also has spare fuses available Good Bad Pliers 1 Fuses under the dashboard Access to the fuses open the s...

Страница 207: ...ame rating same colour Use the special pliers 1 placed on the ap close to the fuseboxes The ap also has spare fuses available Good Bad Pliers 1 Fuses under the dashboard Access to the fuses open the s...

Страница 208: ...of saloon G35 5 A Passenger door lighting passenger rear view mirror adjustment G36 30 A Electric tailgate Tourer G37 20 A Heated front seats G38 30 A Driver s electric seat G39 30 A Passenger s elect...

Страница 209: ...wheel Display De ation detection Electric boot ECU F9 30 A Cigar lighter front 12 V socket F10 15 A Alarm Controls on the steering wheel signalling and screen wipe controls F11 15 A Low current anti t...

Страница 210: ...e control unit F2 15 A Horn F3 10 A Screen wash pump F4 10 A Headlamp wash pump F5 15 A Starter F6 10 A Air ow meter Directional headlamps Diagnostic socket F7 10 A Automatic gearbox lever lock Power...

Страница 211: ...TRO N declines all responsibil ity for the consequences and costs that are caused by faults or repairs on your vehicle resulting from the in stallation of accessories that are not supplied and or not...

Страница 212: ...he battery is located in the boot un der the left hand wing trim To gain access to it open the boot open the ap and remove the battery Lift the pins to remove the front left headlamp cover V6 HDi en g...

Страница 213: ...un used for more than one month Do not disconnect the ter minals while the engine is running Do not charge the batteries without disconnecting the terminals rst Do not touch the clips during the opera...

Страница 214: ...are put on standby If the telephone is being used at this time it will be maintained for 5 minutes with radio CD hands free kit it will be interrupted after 10 minutes with the MyWay audio navigation...

Страница 215: ...e towed vehicle Place the gear lever in neutral position N on the automatic gearbox Towing another vehicle On the rear bumper unclip the cover by pressing on the right Saloon at the bottom Tourer Scre...

Страница 216: ...maximum permitted without ex ceeding it Air density decreases with altitude thus reducing engine performance Above 1 000 metres the maximum towing load must be reduced by 10 and so on for every 1 000...

Страница 217: ...close as possible to the roof Anchor the load securely and draw attention to it if any part of it is overhanging Drive gently as the vehicle will be more liable to the effects of side winds vehicle s...

Страница 218: ...rotate the knob 1 by 90 in the direction of the arrow in order to position the shutter 2 in a vertical position in the air duct 3 To return to the normal situation push the knob 1 then rotate in the o...

Страница 219: ...ns of the snow guard up to the upper and lower sections of the front bumper Press on the surround to clip in one by one the xing clips Remove Using a screwdriver lift it up to detach each xing clip on...

Страница 220: ...d around 5 categories Comfort and leisure mats boot tray boot carpet sun blinds mini bar fragrance cartridges roof bars bicycle carrier ski carrier roof box es towbars child seats and booster cushions...

Страница 221: ...88 85 x 88 87 x 82 6 EU standard maximum power kW 92 103 103 155 Maximum power engine speed rpm 6 000 6 000 6 000 6 000 EU standard maximum torque Nm 170 200 200 290 Maximum torque engine speed rpm 3...

Страница 222: ...EU standard maximum power kW 80 103 100 125 150 Maximum power engine speed rpm 4 000 4 000 4 000 4 000 EU standard maximum torque Nm 240 320 370 440 Maximum torque engine speed rpm 1 750 2 000 1 500...

Страница 223: ...cated at the time of printing These consumption values were established in accordance with Directive 80 1268 CEE They may vary depending on the style of driving traf c conditions weather conditions th...

Страница 224: ...RFJC 12 1 6 4 8 5 200 Auto RFJF 12 8 6 8 9 214 Bio ex 2 l 16V 143 bhp Manual RFJC FF 12 1 6 4 8 5 200 15 6 9 2 11 5 191 3 l V6 24V 215 bhp Auto XFVJ 15 7 7 6 10 6 250 The consumption gures shown here...

Страница 225: ...mmunicated at the time of printing These consumption values were established in accordance with Directive 80 1268 CEE They may vary depending on the style of driving traf c conditions weather conditio...

Страница 226: ...9HZC 7 4 4 8 5 7 150 2 l HDi 140 bhp Manual RHF8 7 6 4 9 5 9 155 2 l HDi 138 bhp Auto RHRJ 10 5 6 7 2 191 2 l HDi 173 bhp Manual 4HTH 8 9 5 3 6 6 175 V6 HDi 208 bhp Auto UHZJ 11 9 6 5 8 5 225 The cons...

Страница 227: ...ehicle weight GVW 2 015 2 063 2 090 2 063 2 230 Gross train weight GTW 3 315 3 563 3 590 3 563 3 630 Braked trailer within GTW limit on a 10 or 12 gradient 1 300 1 500 1 500 1 400 Braked trailer with...

Страница 228: ...90 1 600 Unbraked trailer 750 750 750 750 Recommended nose weight 64 72 72 68 The GTW and towed load values indicated apply up to a maximum altitude of 1 000 metres the towed load mentioned must be re...

Страница 229: ...weight GVW 2 040 2 155 2 190 2 216 2 310 Gross train weight GTW 3 140 3 755 3 490 3 816 3 710 Braked trailer within GTW limit on a 10 or 12 gradient 1 100 1 600 1 300 1 600 1 400 Braked trailer with l...

Страница 230: ...it the weight towed WEIGHTS AND TOWED LOADS TOURER in kg Diesel engines 1 6 l HDi 110 bhp 2 l HDi 140 bhp 2 l HDi 138 bhp 2 l HDi 173 bhp V6 HDi 208 bhp Gearboxes Manual Manual Auto Manual Auto Model...

Страница 231: ...202 12 T E C H N I C A L D A T A Without roof bars DIMENSIONS IN MM Exterior Saloon A 2 815 B 1 054 C 910 D 4 779 E 1 586 F 2 096 G 1 557 H 1 860 I 1 451...

Страница 232: ...203 12 T E C H N I C A L D A T A Interior Saloon A 1 030 B 1 115 C 566 D 504 E 1 040 F 1 705...

Страница 233: ...204 12 T E C H N I C A L D A T A Exterior Tourer A 2 815 B 1 054 C 959 D 4 829 E 1 586 F 2 096 G 1 557 H 1 860 I 1 479 Without roof bars...

Страница 234: ...205 12 T E C H N I C A L D A T A Interior Tourer A 1 060 B 1 115 C 510 D 851 E 1 058 F 1 723...

Страница 235: ...to use only CITRO N replacement parts A Chassis number plate On the left hand door centre pillar 1 EU type approval number 2 Vehicle identi cation no VIN 3 Gross vehicle weight 4 Gross train weight 5...

Страница 236: ...in another vehicle contact a CITRO N dealer for con guration of operate in your vehicle If it is to be installed in another vehicle contact a CITRO N dealer for con guration of operate in your vehicl...

Страница 237: ...ries 8 Abandon current operation 9 TA Traf c Announcement function on off Long press access to the PTY TYpes of radio Programme mode 10 Con rmation 11 Automatic search for a lower higher frequency Sel...

Страница 238: ...LEPHONE hands free kit matching management of a communication PERSONALISATION CONFIGURATION vehicle parameters display languages MONOCHROME DISPLAY C For a detailed global view of the menus available...

Страница 239: ...he display Select the FM WAVEBAND PREFERENCES function then press OK Select AUDIO FUNCTIONS then press OK Press the MENU button FM WAVEBAND PREFERENCES ACTIVATE FREQUENCY FOLLOWING RDS The external en...

Страница 240: ...player The audio equipment searches for all of the music tracks which may take anything between a few seconds and several tens of seconds before play begins On a single disc the CD player can read up...

Страница 241: ...r optimum sound quality In the particular case of a multi session CD the Joliet standard is recommended The audio equipment will only play les with the extension mp3 with a sampling rate of 22 05 KHz...

Страница 242: ...input permits the connection of portable equipment MP3 player It is activated by default Connect the portable equipment MP3 player to the audio sockets white and red RCA type located in the glove box...

Страница 243: ...n code 1234 Depending on the telephone you may be asked to enter this code before the superimposed con guration display appears YES YES The services offered by the hands free kit depend on the network...

Страница 244: ...ation Selection of the previous next stored RADIO station Selection of the previous next CD or MP3 directory Selection of the previous next CD in the CD changer 4 Abandon the current operation Refuse...

Страница 245: ...ws select the DISPLAY CONFIGURATION function Press to con rm the selection Press to con rm the selection Using the arrows select the ADJUST DATE AND TIME function Adjust the parameters one by one con...

Страница 246: ...PREFERENCES track random play RDM activate deactivate DEFINE THE VEHICLE PARAMETERS CHOICE OF LANGUAGE DISPLAY CONFIGURATION video brightness adjustment normal video inverse video brightness adjustme...

Страница 247: ...source radio CD changer The CD is ejected automatically or is not played by the player Check that the CD is inserted in the player the right way up Check the condition of the CD the CD cannot be playe...

Страница 248: ...o enable the system to check whether there is a more powerful transmitter in the geographical area This phenomenon is normal and does not indicate a failure of the audio equipment Have the aerial chec...

Страница 249: ...AUDIO EQUIPMENT BLUETOOTH TELEPHONE GPS EUROPE CONTENTS 01 First steps pg 2 02 General operation pg 4 03 Navigation Guidance pg 7 04 Traf c information pg 15 05 Radio pg 16 06 Music media players pg...

Страница 250: ...il in sections 02 and 10 Long press GPS coverage 3 Audio settings Balance Fader Bass Treble Musical Ambience 4 Volume adjustment Short press mute 5 Automatic search for a radio station on a lower freq...

Страница 251: ...f the map 4 direction navigator press up down When RADIO is displayed selection of the previous next radio station on the list When the MEDIA screen is displayed selection of the previous next MP3 dir...

Страница 252: ...th is recommended without any additional product RADIO MUSIC MEDIA VIDEO TELEPHONE If a conversation is in progress FULL SCREEN MAP NAVIGATION If navigation is in progress SETUP Access to the SETUP me...

Страница 253: ...T ADVICE BLOCK ROAD CANCEL LENGTHEN DIV SHORTEN DIV RECALCULATE ZOOM SCROLL TRAVEL ROUTE ROUTE INFO SHOW DEST TRIP INFO route type RADIO IN FM MODE TA RDS RADIOTEXT REGIONAL PROG REG AM IN AM MODE TA...

Страница 254: ...STAGE POIS NEARBY POSITION INFO OPTION guide to dial store position zoom scroll MAP SETTINGS 2D MAP PERSPECTIVE 3D MAP MAP ORIENT NORTH MAP ORIENT VEHICLE ZOOM SCROLL AUDIO DVD STOP GROUP group 1 2 n...

Страница 255: ...NATION INPUT A pre set list by entering the rst few letters of the towns in the A pre set list by entering the rst few letters of the towns in the country selected can be accessed via the LIST button...

Страница 256: ...enter the letters and digits Select the route type FAST ROUTE SHORT ROUTE or OPTIMISED ROUTE and press OK to con rm Then select START ROUTE GUIDANCE and the press OK to con rm It is also possible to s...

Страница 257: ...ed Press OK to con rm Press the NAV button Press the NAV button again or select the NAVIGATION MENU function and press OK to con rm Select the ROUTE TYPE function and press OK to con rm This function...

Страница 258: ...N MENU STOPOVERS ADD A STOPOVER NEW DESTINATION INPUT To change the stopovers repeat operations 1 to 3 and select To change the stopovers repeat operations 1 to 3 and select OPTIMISE ROUTE select a st...

Страница 259: ...untry then enter the name of the city using the virtual keypad Select the POI NEAR ROUTE function to search for POIs near the route Select the POI IN COUNTRY function to search for POIs in the country...

Страница 260: ...station Port Industrial estate Supermarket Bank Vending machine Tennis court Swimming pool Golf course Winter sports resort Theatre Cinema Camp site Theme parks Hospital Pharmacy Police station Schoo...

Страница 261: ...ually deployed to all of the other countries Insert the medium SD card or USB stick containing the POI database into the system s SD card reader or USB reader Successful downloading is con rmed by a m...

Страница 262: ...Press the NAV button again or select the NAVIGATION MENU function and press OK to con rm Select the SETTINGS function and press OK to con rm NAVIGATION MENU SETTINGS POI CATEGORIES ON MAP HAZARDOUS LO...

Страница 263: ...the lter of your choice MESSAGES ON ROUTE ALL WARNING MESSAGES ONLY WARNINGS ON ROUTE ALL MESSAGES The messages appear on the map and on the list TRAFFIC MENU The TMC icon at the bottom left of the sc...

Страница 264: ...tion during a journey The external environment hill building tunnel underground car park may interfere with the reception including in RDS following mode This phenomenon is a normal result of the way...

Страница 265: ...20 Kbps and the extension wma with a speed of between 5 Kbps and 384 Kbps extension wma with a speed of between 5 Kbps and 384 Kbps It also supports the VBR Variable Bit Rate mode No other type of le...

Страница 266: ...ton Select the SELECT MUSIC function and press OK to con rm Press this button Select the music source required Press OK to con rm Play begins SELECT MUSIC Press the MEDIA button again or select the ME...

Страница 267: ...ying and management of the controls are operated via the portable equipment USING THE EXTERNAL DEVICE AUX AUDIO VIDEO RCA CABLE NOT SUPPLIED MUSIC MEDIA PLAYERS If the external device is not activated...

Страница 268: ...ource is that of the medium used Check that the active MEDIA source is that of the medium used CD USB or SD card Select COPY FROM selected medium and press OK to validate Select the tracks required th...

Страница 269: ...ebox Management Create playlist Add the tracks required one by one then save the change The Playlist play mode must then be selected JUKEBOX LISTENING TO THE JUKEBOX JUKEBOX MANAGEMENT JUKEBOX Press t...

Страница 270: ...NE then choose between NONE BLUETOOTH TELEPHONE or INTERNAL TELEPHONE Press OK at each step to con rm The system can only be connected to one Bluetooth telephone and The system can only be connected t...

Страница 271: ...is connected the system prompts you to CONNECT PHONE Select YES and press OK to con rm Enter the authentication code on the telephone The code to be entered is displayed on the screen To change the t...

Страница 272: ...E FOR VOICE CALLS select YES if you wish to use your SIM card for your personal calls Otherwise only the emergency call and the services will use the SIM card PIN CODE When entering your PIN code tick...

Страница 273: ...in access to the address book It is also possible to select a number from the address book You can It is also possible to select a number from the address book You can select DIAL FROM ADDRESS BOOK Th...

Страница 274: ...t CITRO N ASSISTANCE to make a breakdown assistance call In an emergency press the SOS button until an audible signal is heard and a CONFIRMATION CANCELLATION screen is displayed if valid SIM card ins...

Страница 275: ...n Select the TIME FORMAT function and press OK to con rm Select the format required using the ring and press OK to con rm SET DATE AND TIME Select the DATE AND TIME function and press OK to con rm DES...

Страница 276: ...t an incoming telephone call Long press return to the initial display 5 Menu provides access to the main menu 6 VOL volume increase 7 VOL volume decrease 8 Successive presses mute restore sound 9 Shor...

Страница 277: ...lp Access to the radio help To cancel a voice command which is in progress Request to correct the last voice recognition carried out Clear RADIO Select station Station tts stationName Read out station...

Страница 278: ...number between 1 and 1 000 on the active MEDIUM Select a CD number between 1 and 6 in the CD changer to be activated Select a Folder number between 1 and 1 000 on the active MEDIUM TELEPHONE Phone men...

Страница 279: ...within a radius of 6 miles 10 km within a radius of 30 miles 50 km SELECT SOURCE audio CD MP3 CD audio DVD video DVD CD changer jukebox SD card USB external device audio video VIDEO SETTINGS display...

Страница 280: ...the AUDIO SETTINGS menu BALANCE FADER SEARCH FOR POINTS OF INTEREST nearby near destination in a town in a country along the route RADIO MENU AM FM WAVEBAND FM waveband AM waveband SELECT FREQUENCY NA...

Страница 281: ...GS automatic voice mail call signal select ring tone set ring volume enter message service number internal telephone settings PIN settings network selection SIM card memory status CREATE NEW FILE DISP...

Страница 282: ...s for use basic rules example of use tips perso voice programming new programming operation clear active programming voice synthesiser volume DATE AND TIME set date and time date format time format DI...

Страница 283: ...the condition of the CD the CD cannot be played if it is too damaged Check the content in the case of a recorded CD consult the advice in the Audio section The audio equipment s CD player does not pl...

Страница 284: ...ment Sound cut outs of 1 to 2 seconds in radio mode During this brief sound cut out the RDS searches for any frequency permitting better reception of the station Deactivate the RDS function by means o...

Страница 285: ...the copying before starting the guidance function Does the emergency call function work without a SIM card No European regulations impose the presence of a SIM card in order to make an emergency call...

Страница 286: ...o CD The CD is copy protected It is normal that a protected CD cannot be copied The system does not receive SMS The Bluetooth mode does not permit sending of the SMS to the system Use your SIM card an...

Страница 287: ...IMEDIA AUDIO EQUIPMENT BLUETOOTH TELEPHONE GPS EUROPE BY SD CARD CONTENTS 01 First steps pg 2 02 General operation pg 4 03 Navigation Guidance pg 6 04 Traf c information pg 13 05 Radio pg 14 06 Music...

Страница 288: ...2 01 FIRST STEPS MY WAY CONTROL PANEL...

Страница 289: ...on is in progress Trip Computer Long press displaying of a black screen DARK 8 Access to the NAVIGATION menu Displaying of the last destinations 9 Access to the TRAFFIC menu Displaying of the current...

Страница 290: ...of the display the use of a soft non abrasive cloth spectacles cloth is recommended without any additional product RADIO MUSIC MEDIA PLAYERS PHONE If a conversation is in progress TRIP COMPUTER FULL S...

Страница 291: ...rmal random track repeat folder track intro SELECT MUSIC NAV ABORT GUIDANCE REPEAT ADVICE BLOCK ROAD ROUTE INFO show dest trip info route type avoidance criteria satellites zoom scroll VOICE ADVICE RO...

Страница 292: ...front panel reader and leave it there to use the Navigation functions The navigation SD card data must not be changed The map data updates are available from CITRO N dealers A pre set list by entering...

Страница 293: ...ntered directly after selecting the POST CODE function Use the virtual keypad to enter the letters and digits Select the route type FAST ROUTE SHORT ROUTE or OPTIMISED ROUTE and press the dial to con...

Страница 294: ...oute options selected Press the dial to con rm Press the NAV button Press the NAV button again or select the NAVIGATION MENU function and press the dial to con rm Select the ROUTE TYPE function and pr...

Страница 295: ...ers maximum and press the dial to con rm Select the STOPOVERS function and press the dial to con rm NAVIGATION MENU STOPOVERS ADD A STOPOVER ENTER A NEW ADDRESS OK The stopover must be completed or de...

Страница 296: ...e country then enter the name of the city using the virtual keypad Select the POI NEAR ROUTE function to search for POIs near the route Select the POI IN COUNTRY function to search for POIs in the cou...

Страница 297: ...ion Bus station Port Industrial estate Supermarket Bank Vending machine Tennis court Swimming pool Golf course Winter sports resort Theatre Cinema Camp site Theme parks Hospital Pharmacy Police statio...

Страница 298: ...elect the POIs to be displayed on the map by default NAVI VOLUME Press the NAV button Press the NAV button again or select the NAVIGATION MENU function and press the dial to con rm Select the SETTINGS...

Страница 299: ...traf c 30 miles 50 km for long journeys motorway Select the GEOGRAPHICAL FILTER NONE function and press the dial to con rm The list of TMC messages appears under the TRAFFIC MENU The list of TMC messa...

Страница 300: ...tation during a journey explains the loss of reception of the station during a journey The external environment hill building tunnel underground car park may interfere with the reception including in...

Страница 301: ...ion mp3 with a speed of between 8 Kbps and 320 Kbps and the mp3 with a speed of between 8 Kbps and 320 Kbps and the extension wma with a speed of between 5 Kbps and 384 Kbps extension wma with a speed...

Страница 302: ...ress the MUSIC button Select the SELECT MUSIC function and press the dial to con rm Press the up or down button to select the next previous folder Select the music source required CD MP3 WMA CD MP3 WM...

Страница 303: ...s the dial to activate it EXTERNAL DEVICE Insert one or more CDs in the changer Press the MUSIC button Press one of the buttons on the numeric keypad to select the corresponding CD Select the CD CHANG...

Страница 304: ...nected is reconnected automatically Select the TELEPHONE MENU function and press the dial to con rm TELEPHONE MENU Enter the authentication code on the telephone The code to be entered is displayed on...

Страница 305: ...teering wheel control for more than two seconds to gain access to the address book It is also possible to select a number from the address book You can It is also possible to select a number from the...

Страница 306: ...ect the DATE FORMAT function and press the dial to con rm Select the SET DATE AND TIME function and press the dial to con rm Con rm the format required using the dial Pressing the SET UP button for mo...

Страница 307: ...the If whilst driving dashes are displayed continuously in place of the digits contact a CITRO N dealer If whilst driving dashes are displayed continuously in place of the digits contact a CITRO N de...

Страница 308: ...ding to the current display on the screen Successive presses provides access according to the current display on the screen Successive presses provides access according to the MAP NAV if navigation is...

Страница 309: ...main menu 4 Short press abandon the current operation Reject an incoming call Long press return to the initial display 5 Menu provides access to the main menu 6 VOL volume increase 7 VOL volume decrea...

Страница 310: ...OUTE ALL WARNING MESSAGES ALL MESSAGES GEOGRAPHICAL FILTER none within 2 miles 3 km within 3 miles 5 km within 6 miles 10 km within 30 miles 50 km SELECT MUSIC SOUND SETTINGS balance fader bass treble...

Страница 311: ...alculate fast route short route optimised route NAVIGATION MENU ABORT RESUME GUIDANCE DESTINATION INPUT address input country city street number start route guidance post code add to address book inte...

Страница 312: ...e volume enter mailbox number SYSTEM LANGUAGE deutsch english espanol fran ais italiano nederlands polski portuguese DATE AND TIME set date and time date format time format DISPLAY brightness colour p...

Страница 313: ...Check the condition of the CD the CD cannot be played if it is too damaged Check the content in the case of a recorded CD consult the advice in the Audio section The audio equipment s CD player does n...

Страница 314: ...whether there is a more powerful transmitter in the geographical area This phenomenon is normal and does not indicate a failure of the audio equipment Have the aerial checked by a CITRO N dealer Soun...

Страница 315: ...GPS may take up to 3 minutes to receive more than 4 satellites correctly Wait until the system has started up completely Check that there is a GPS coverage of at least 4 satellites long press on the M...

Отзывы: